
Gitlab添加K8S集群
介绍如何在Gitlab项目中添加K8S集群,以便使用K8S集群部署gitlab-runner帮我们运行gitlab的CI/CD。
参考官方文档:https://docs.gitlab.com/ee/user/project/clusters/add_remove_clusters.html#add-existing-cluster
1.登入gitlab后,进入自己的项目主页,菜单栏 Operations => Kubernetes => Add Kubernetes cluster,选择页签 Add existing cluster。
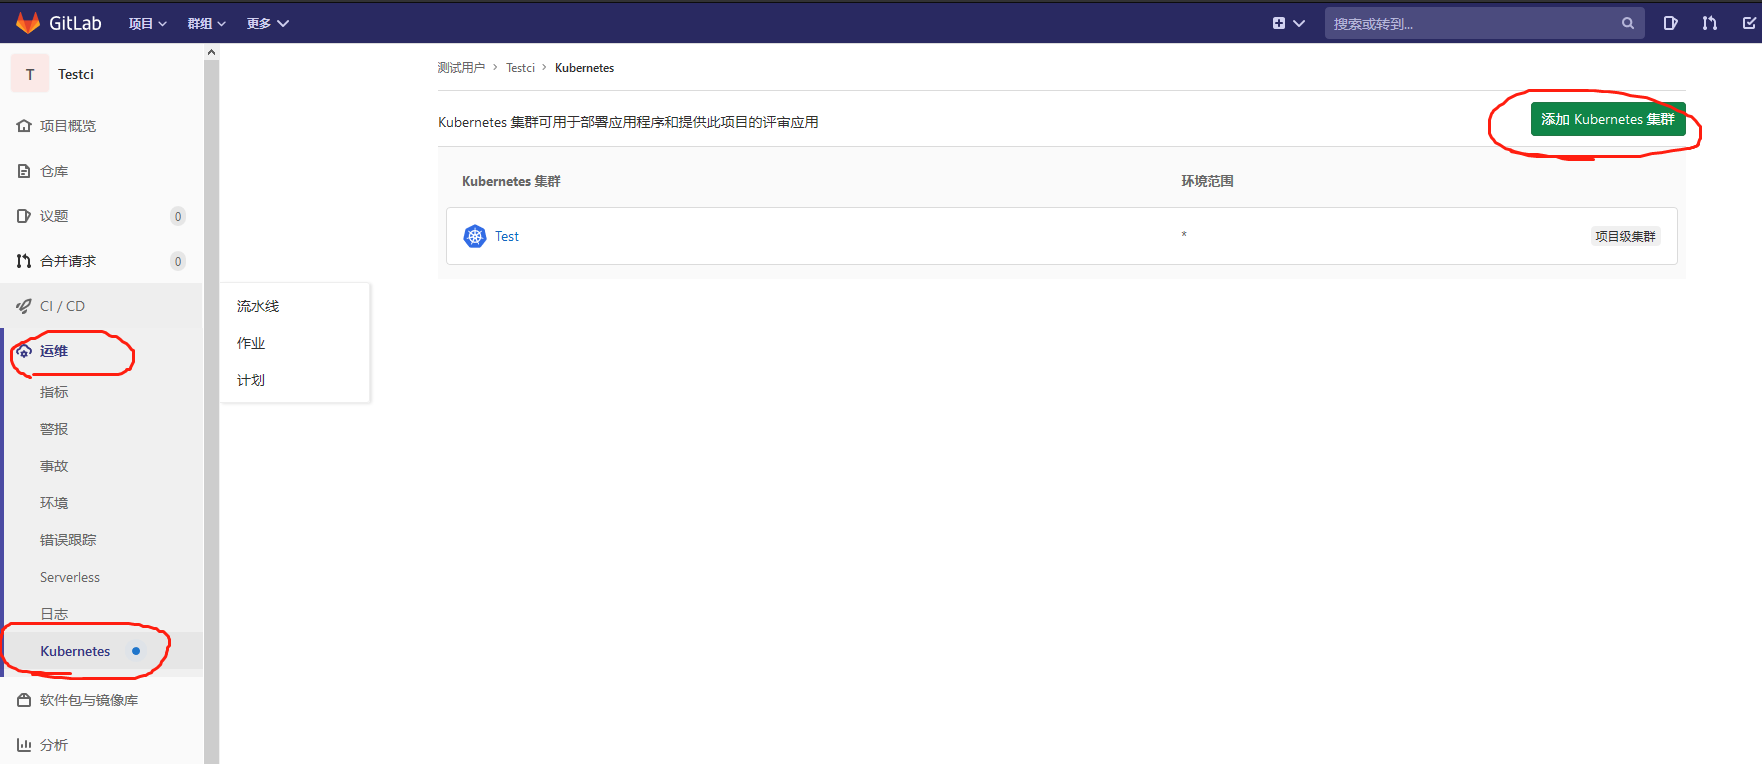

2.只需要获取响应的值填录到该表单即可。Kubernetes cluster name集群名称随意填,Project namespace可不填。

2.1 获取API URL
运行以下命令得到输出值:
kubectl cluster-info | grep 'Kubernetes master' | awk '/http/ {print $NF}'
2.2 获取CA Certificate
运行以下命令得到输出值:
kubectl get secrets # 获取一个类似default-token-xxxxx的名称,填写在下面这个命令<secret name>

kubectl get secret <secret name> -o jsonpath="{['data']['ca\.crt']}" | base64 --decode
2.3 获取Token
创建文件gitlab-admin-service-account.yaml:
vim gitlab-admin-service-account.yaml

apiVersion: v1

kind: ServiceAccount

metadata:

  name: gitlab

  namespace: kube-system

---

apiVersion: rbac.authorization.k8s.io/v1beta1

kind: ClusterRoleBinding

metadata:

  name: gitlab-admin

roleRef:

  apiGroup: rbac.authorization.k8s.io

  kind: ClusterRole

  name: cluster-admin

subjects:

  - kind: ServiceAccount

    name: gitlab

    namespace: kube-system

kubectl apply -f gitlab-admin-service-account.yaml

kubectl -n kube-system describe secret $(kubectl -n kube-system get secret | grep gitlab | awk '{print $1}')
添加完成之后,可以在集群中安装你想用的插件了,例如gitlab-runner。
官方操作步骤:
Add existing cluster
If you have an existing Kubernetes cluster, you can add it to a project, group, or instance.
NOTE: Note: Kubernetes integration is not supported for arm64 clusters. See the issue Helm Tiller fails to install on arm64 cluster for details.
Existing Kubernetes cluster
To add a Kubernetes cluster to your project, group, or instance:
Navigate to your:
- Project's {cloud-gear} Operations > Kubernetes page, for a project-level cluster.
- Group's {cloud-gear} Kubernetes page, for a group-level cluster.
- Admin Area > {cloud-gear} Kubernetes page, for an instance-level cluster.
Click Add Kubernetes cluster.
Click the Add existing cluster tab and fill in the details:
Kubernetes cluster name (required) - The name you wish to give the cluster.
Environment scope (required) - The associated environment to this cluster.
API URL (required) - It's the URL that GitLab uses to access the Kubernetes API. Kubernetes exposes several APIs, we want the "base" URL that is common to all of them. For example,
https://kubernetes.example.comrather thanhttps://kubernetes.example.com/api/v1.Get the API URL by running this command:
kubectl cluster-info | grep 'Kubernetes master' | awk '/http/ {print $NF}'
CA certificate (required) - A valid Kubernetes certificate is needed to authenticate to the cluster. We will use the certificate created by default.
List the secrets with
kubectl get secrets, and one should be named similar todefault-token-xxxxx. Copy that token name for use below.Get the certificate by running this command:
kubectl get secret <secret name> -o jsonpath="{['data']['ca\.crt']}" | base64 --decode
NOTE: Note: If the command returns the entire certificate chain, you need copy the root ca certificate at the bottom of the chain.
Token - GitLab authenticates against Kubernetes using service tokens, which are scoped to a particular
namespace. The token used should belong to a service account with cluster-admin privileges. To create this service account:Create a file called
gitlab-admin-service-account.yamlwith contents:apiVersion: v1
kind: ServiceAccount
metadata:
name: gitlab
namespace: kube-system
---
apiVersion: rbac.authorization.k8s.io/v1beta1
kind: ClusterRoleBinding
metadata:
name: gitlab-admin
roleRef:
apiGroup: rbac.authorization.k8s.io
kind: ClusterRole
name: cluster-admin
subjects:
- kind: ServiceAccount
name: gitlab
namespace: kube-system
Apply the service account and cluster role binding to your cluster:
kubectl apply -f gitlab-admin-service-account.yaml
You will need the
container.clusterRoleBindings.createpermission to create cluster-level roles. If you do not have this permission, you can alternatively enable Basic Authentication and then run thekubectl applycommand as an admin:kubectl apply -f gitlab-admin-service-account.yaml --username=admin --password=<password>
NOTE: Note: Basic Authentication can be turned on and the password credentials can be obtained using the Google Cloud Console.
Output:
serviceaccount "gitlab" created

clusterrolebinding "gitlab-admin" created
Retrieve the token for the
gitlabservice account:kubectl -n kube-system describe secret $(kubectl -n kube-system get secret | grep gitlab | awk '{print $1}')
Copy the
<authentication_token>value from the output:Name: gitlab-token-b5zv4
Namespace: kube-system
Labels: <none>
Annotations: kubernetes.io/service-account.name=gitlab
kubernetes.io/service-account.uid=bcfe66ac-39be-11e8-97e8-026dce96b6e8 Type: kubernetes.io/service-account-token Data
====
ca.crt: 1025 bytes
namespace: 11 bytes
token: <authentication_token>
NOTE: Note: For GKE clusters, you will need the
container.clusterRoleBindings.createpermission to create a cluster role binding. You can follow the Google Cloud documentation to grant access.GitLab-managed cluster - Leave this checked if you want GitLab to manage namespaces and service accounts for this cluster. See the Managed clusters section for more information.
Project namespace (optional) - You don't have to fill it in; by leaving it blank, GitLab will create one for you. Also:
- Each project should have a unique namespace.
- The project namespace is not necessarily the namespace of the secret, if you're using a secret with broader permissions, like the secret from
default. - You should not use
defaultas the project namespace. - If you or someone created a secret specifically for the project, usually with limited permissions, the secret's namespace and project namespace may be the same.
Finally, click the Create Kubernetes cluster button.
After a couple of minutes, your cluster will be ready to go. You can now proceed to install some pre-defined applications.
Gitlab添加K8S集群的更多相关文章
- 使用RKE快速部署k8s集群
一.环境准备 1.1环境信息 IP地址 角色 部署软件 10.10.100.5 K8s Master Etcd.Control 10.10.100.17 K8s Worker1 Worker 10.1 ...
- rancher导入k8s集群后添加监控无数据
1.日志报错 rancher导入k8s集群后添加监控无数据,rancher日志报错: k8s.io/kube-state-metrics/pkg/collectors/builder.go:: Fai ...
- k8s集群节点更换ip 或者 k8s集群添加新节点
1.需求情景:机房网络调整,突然要回收我k8s集群上一台node节点机器的ip,并调予新的ip到这台机器上,所以有了k8s集群节点更换ip一说:同时,k8s集群节点更换ip也相当于k8s集群添加新节点 ...
- kubernetes系列03—kubeadm安装部署K8S集群
本文收录在容器技术学习系列文章总目录 1.kubernetes安装介绍 1.1 K8S架构图 1.2 K8S搭建安装示意图 1.3 安装kubernetes方法 1.3.1 方法1:使用kubeadm ...
- rancher2.X搭建k8s集群平台
一, 新版特性 Rancher 1.6支持多种容器编排框架,包括Kubernetes.Mesos.Docker Swarm,默认的基础编排引擎是Cattle,Cattle极简的操作体验受到了大量开源社 ...
- 关于使用rancher部署k8s集群的一些小问题的解决
问题一: 在rancher的ui上,不能创建k8s的master节点的高可用集群.创建k8s集群,添加节点的时候,可以添加多个master,但是多个master又没有高可用,只要其中一个出问题了,那么 ...
- jenkins流水线部署springboot应用到k8s集群(k3s+jenkins+gitee+maven+docker)(2)
前言:上篇已介绍了jenkins在k3s环境部署,本篇继续上篇讲述流水线构建部署流程 1.从gitlab上拉取代码步骤 在jenkins中,新建一个凭证:Manage Jenkins -> Ma ...
- China Azure中部署Kubernetes(K8S)集群
目前China Azure还不支持容器服务(ACS),使用名称"az acs create --orchestrator-type Kubernetes -g zymtest -n kube ...
- k8s重要概念及部署k8s集群(一)--技术流ken
重要概念 1. cluster cluster是 计算.存储和网络资源的集合,k8s利用这些资源运行各种基于容器的应用. 2.master master是cluster的大脑,他的主要职责是调度,即决 ...
随机推荐
- LCA——树上倍增
首先,什么是LCA? LCA:最近公共祖先 祖先:从当前点到根节点所经过的点,包括他自己,都是这个点的祖先 A和B的公共祖先:同时是A,B两点的祖先的点 A和B的最近公共祖先:深度最大的A和B的公共祖 ...
- 零基础学Java(12)静态字段与静态方法
静态字段与静态方法 之前我们都定义的main方法都被标记了static修饰符,那到底是什么意思?下面我们来看看 静态字段 如果将一个字段定义为static,每个类只有一个这样的字段.而对于非静 ...
- 天人合一物我相融,站点升级渐进式Web应用PWA(Progressive Web Apps)实践
原文转载自「刘悦的技术博客」https://v3u.cn/a_id_216 PWA(Progressive web apps,渐进式 Web 应用)使用现代的 Web API 以及传统的渐进式增强策略 ...
- MySQL查询时间常用函数
查看本月数据 SELECT *FROMcontent_publishWHERE date_format(publish_time, '%Y %m') = date_format(DATE_SUB(cu ...
- Java学习 (四)基础篇 Java基础语法
注释&标识符&关键字 注释 注释并不会被执行,其主要目的用于解释当前代码 书写注释是一个非常好的习惯,大厂要求之一 public class hello { public static ...
- you need to load the kernel first
背景:在用第三方软件备份win10系统时,提示you need to load the kernel first 1.进BIOS把硬盘AHCI 模式调整成 SATA. 2.检查硬盘数据线是否插紧.主板 ...
- BS架构与CS架构
BS与CS的区别:1.BS是标准规范的,CS的协议自定义:2.BS核心运算都在服务器端,CS客户端和服务器端都可以运算:3.BS只需要部署服务器端,CS需要同时升级客户端和服务器端. CS(Clien ...
- 海豚调度直播来了 - 即将发版的1.3.0新特性及Roadmap路线
在过去的3个多月,Apache DolphinScheduler(incuating)和DolphinScheduler社区发生了很多变化,今晚19:30在线直播将为大家介绍最新1.3.0的新特性及R ...
- LuoguP2254 [NOI2005]瑰丽华尔兹 (单调队列优化DP)(用记忆化过了。。。)
记忆化 #include <cstdio> #include <iostream> #include <cstring> #include <algorith ...
- Java SE 14 新增特性
Java SE 14 新增特性 作者:Grey 原文地址:Java SE 14 新增特性 源码 源仓库: Github:java_new_features 镜像仓库: GitCode:java_new ...