
ShardingSphere-proxy-5.0.0企业级分库分表、读写分离、负载均衡、雪花算法、取模算法整合(八)
一、简要说明
以下配置实现了:
1、分库分表
2、每一个分库的读写分离
3、读库负载均衡算法
4、雪花算法,生成唯一id
5、字段取模
二、配置项
#

# Licensed to the Apache Software Foundation (ASF) under one or more

# contributor license agreements.  See the NOTICE file distributed with

# this work for additional information regarding copyright ownership.

# The ASF licenses this file to You under the Apache License, Version 2.0

# (the "License"); you may not use this file except in compliance with

# the License.  You may obtain a copy of the License at

#

#     http://www.apache.org/licenses/LICENSE-2.0

#

# Unless required by applicable law or agreed to in writing, software

# distributed under the License is distributed on an "AS IS" BASIS,

# WITHOUT WARRANTIES OR CONDITIONS OF ANY KIND, either express or implied.

# See the License for the specific language governing permissions and

# limitations under the License.

#

######################################################################################################

#

# Here you can configure the rules for the proxy.

# This example is configuration of sharding rule.

#

######################################################################################################

#

#schemaName: sharding_db

#

#dataSources:

#  ds_0:

#    url: jdbc:postgresql://127.0.0.1:5432/demo_ds_0

#    username: postgres

#    password: postgres

#    connectionTimeoutMilliseconds: 30000

#    idleTimeoutMilliseconds: 60000

#    maxLifetimeMilliseconds: 1800000

#    maxPoolSize: 50

#    minPoolSize: 1

#  ds_1:

#    url: jdbc:postgresql://127.0.0.1:5432/demo_ds_1

#    username: postgres

#    password: postgres

#    connectionTimeoutMilliseconds: 30000

#    idleTimeoutMilliseconds: 60000

#    maxLifetimeMilliseconds: 1800000

#    maxPoolSize: 50

#    minPoolSize: 1

#

#rules:

#- !SHARDING

#  tables:

#    t_order:

#      actualDataNodes: ds_${0..1}.t_order_${0..1}

#      tableStrategy:

#        standard:

#          shardingColumn: order_id

#          shardingAlgorithmName: t_order_inline

#      keyGenerateStrategy:

#          column: order_id

#          keyGeneratorName: snowflake

#    t_order_item:

#      actualDataNodes: ds_${0..1}.t_order_item_${0..1}

#      tableStrategy:

#        standard:

#          shardingColumn: order_id

#          shardingAlgorithmName: t_order_item_inline

#      keyGenerateStrategy:

#        column: order_item_id

#        keyGeneratorName: snowflake

#  bindingTables:

#    - t_order,t_order_item

#  defaultDatabaseStrategy:

#    standard:

#      shardingColumn: user_id

#      shardingAlgorithmName: database_inline

#  defaultTableStrategy:

#    none:

#

#  shardingAlgorithms:

#    database_inline:

#      type: INLINE

#      props:

#        algorithm-expression: ds_${user_id % 2}

#    t_order_inline:

#      type: INLINE

#      props:

#        algorithm-expression: t_order_${order_id % 2}

#    t_order_item_inline:

#      type: INLINE

#      props:

#        algorithm-expression: t_order_item_${order_id % 2}

#

#  keyGenerators:

#    snowflake:

#      type: SNOWFLAKE

#      props:

#        worker-id: 123

######################################################################################################

#

# If you want to connect to MySQL, you should manually copy MySQL driver to lib directory.

#

######################################################################################################

# 连接mysql所使用的数据库名

 schemaName: MyDb

 dataSources:

  dsdatasources_0:

    url: jdbc:mysql://127.0.0.1:3306/MyDb_0?serverTimezone=UTC&useSSL=false

    username: root # 数据库用户名

    password: mysql123  # 登录密码

    connectionTimeoutMilliseconds: 30000

    idleTimeoutMilliseconds: 60000

    maxLifetimeMilliseconds: 1800000

    maxPoolSize: 50

    minPoolSize: 1

  dsdatasources_0_read0:

    url: jdbc:mysql://192.168.140.132:3306/MyDb_0?serverTimezone=UTC&useSSL=false

    username: root # 数据库用户名

    password: Xiaohemiao_123  # 登录密码

    connectionTimeoutMilliseconds: 30000

    idleTimeoutMilliseconds: 60000

    maxLifetimeMilliseconds: 1800000

    maxPoolSize: 50

    minPoolSize: 1

  dsdatasources_1:

    url: jdbc:mysql://127.0.0.1:3306/MyDb_1?serverTimezone=UTC&useSSL=false

    username: root # 数据库用户名

    password: mysql123  # 登录密码

    connectionTimeoutMilliseconds: 30000

    idleTimeoutMilliseconds: 60000

    maxLifetimeMilliseconds: 1800000

    maxPoolSize: 50

    minPoolSize: 1

  dsdatasources_1_read1:

    url: jdbc:mysql://192.168.140.132:3306/MyDb_1?serverTimezone=UTC&useSSL=false

    username: root # 数据库用户名

    password: Xiaohemiao_123  # 登录密码

    connectionTimeoutMilliseconds: 30000

    idleTimeoutMilliseconds: 60000

    maxLifetimeMilliseconds: 1800000

    maxPoolSize: 50

    minPoolSize: 1

#  ds_1:

#    url: jdbc:mysql://127.0.0.1:3306/demo_ds_1?serverTimezone=UTC&useSSL=false

#    username: root

#    password:

#    connectionTimeoutMilliseconds: 30000

#    idleTimeoutMilliseconds: 60000

#    maxLifetimeMilliseconds: 1800000

#    maxPoolSize: 50

#    minPoolSize: 1

#

# 规则

 rules:

 - !READWRITE_SPLITTING

   dataSources:

     pr_ds1:

       writeDataSourceName: dsdatasources_0 #主库

       readDataSourceNames:

         - dsdatasources_0_read0 # 从库,如果有多个从库,就在下面写多个

       loadBalancerName: loadBalancer_ROUND_ROBIN

     pr_ds2:

       writeDataSourceName: dsdatasources_1 #主库

       readDataSourceNames:

         - dsdatasources_1_read1 # 从库,如果有多个从库,就在下面写多个

       loadBalancerName: loadBalancer_ROUND_ROBIN

   loadBalancers: # 负载均衡算法配置

     loadBalancer_ROUND_ROBIN: # 负载均衡算法名称,自定义

       type: ROUND_ROBIN   # 负载均衡算法,默认为轮询算法,还有加权算法和随机算法,可参考官网

 - !SHARDING

   tables:

     t_product: #需要进行分表的表名

       actualDataNodes: dsdatasources_${0..1}.t_product_${0..1} # 表达式,将表分为t_product_0 , t_product_1

       tableStrategy: #分表策略

        standard:

           shardingColumn: product_id # 字段名

           shardingAlgorithmName: t_product_MOD

       databaseStrategy: # 分库策略

           standard:

             shardingColumn: product_id

             shardingAlgorithmName: t_product_MOD

       keyGenerateStrategy:

         column: id

         keyGeneratorName: snowflake #雪花算法

#    t_order_item:

#      actualDataNodes: ds_${0..1}.t_order_item_${0..1}

#      tableStrategy:

#        standard:

#          shardingColumn: order_id

#          shardingAlgorithmName: t_order_item_inline

#      keyGenerateStrategy:

#        column: order_item_id

#        keyGeneratorName: snowflake

#  bindingTables:

#    - t_order,t_order_item

#  defaultDatabaseStrategy:

#    standard:

#      shardingColumn: user_id

#      shardingAlgorithmName: database_inline

#  defaultTableStrategy:

#    none:

#

   shardingAlgorithms:

     t_product_MOD: # 取模名称,可自定义

       type: MOD # 取模算法

       props:

         sharding-count: 2 #分片数量,因为分了两个表,所以这里是2

#    t_order_inline:

#      type: INLINE

#      props:

#        algorithm-expression: t_order_${order_id % 2}

#    t_order_item_inline:

#      type: INLINE

#      props:

#        algorithm-expression: t_order_item_${order_id % 2}

#

   keyGenerators:

     snowflake: # 雪花算法名称,自定义名称

       type: SNOWFLAKE

       props:

         worker-id: 123
三、数据准备
-- 创建表

SET NAMES utf8mb4;

SET FOREIGN_KEY_CHECKS = 0;

-- ----------------------------

-- Table structure for t_product

-- ----------------------------

DROP TABLE IF EXISTS `t_product`;

CREATE TABLE `t_product`  (

  `id` varchar(225) CHARACTER SET utf8mb4 COLLATE utf8mb4_general_ci NOT NULL,

  `product_id` int(11) NOT NULL,

  `product_name` varchar(255) CHARACTER SET utf8mb4 COLLATE utf8mb4_general_ci NOT NULL,

  PRIMARY KEY (`id`, `product_id`) USING BTREE

) ENGINE = InnoDB CHARACTER SET = utf8mb4 COLLATE = utf8mb4_general_ci ROW_FORMAT = Dynamic;

SET FOREIGN_KEY_CHECKS = 1;

-- 插入表数据

INSERT INTO t_product(product_id,product_name) VALUES(1,'one');

INSERT INTO t_product(product_id,product_name) VALUES(2,'two');

INSERT INTO t_product(product_id,product_name) VALUES(3,'three');

INSERT INTO t_product(product_id,product_name) VALUES(4,'four');

INSERT INTO t_product(product_id,product_name) VALUES(5,'five');

INSERT INTO t_product(product_id,product_name) VALUES(6,'six');

INSERT INTO t_product(product_id,product_name) VALUES(7,'seven');
四、查看数据
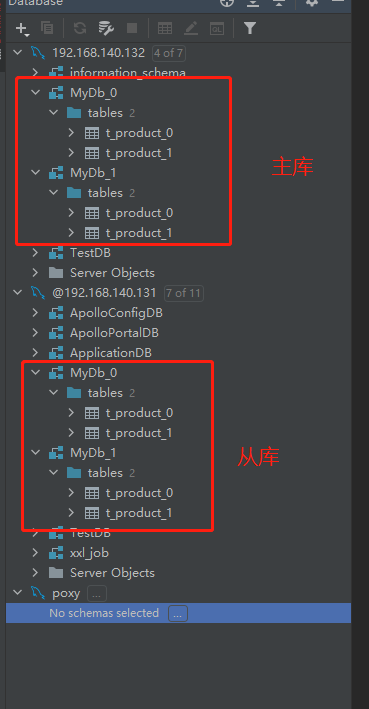
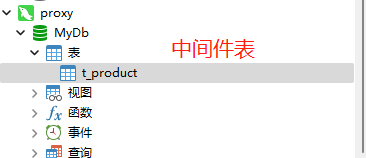
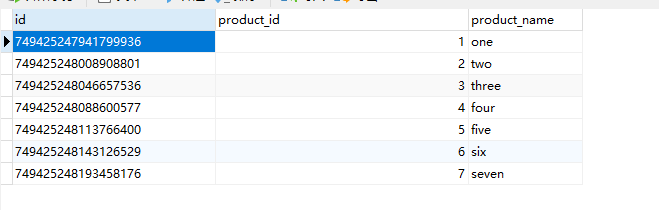
1、查看shardingsphere中间件t_product表数据
2、主库192.168.140.131数据

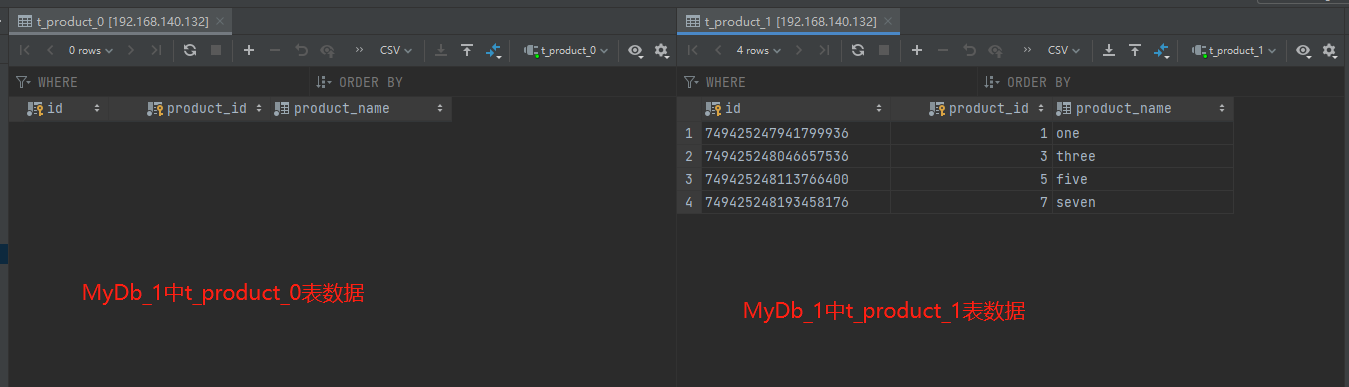
2、从库192.168.140.132数据
ShardingSphere-proxy-5.0.0企业级分库分表、读写分离、负载均衡、雪花算法、取模算法整合(八)的更多相关文章
- 分库分表(7)--- SpringBoot+ShardingSphere实现分库分表 + 读写分离
分库分表(7)--- ShardingSphere实现分库分表+读写分离 有关分库分表前面写了六篇博客: 1.分库分表(1) --- 理论 2.分库分表(2) --- ShardingSphere(理 ...
- DB层面上的设计 分库分表 读写分离 集群化 负载均衡
第1章 引言 随着互联网应用的广泛普及,海量数据的存储和访问成为了系统设计的瓶颈问题.对于一个大型的 互联网应用,每天几十亿的PV无疑对数据库造成了相当高的负载.对于系统的稳定性和扩展性造成了极大的 ...
- ShardingJdbc-分表;分库;分库分表;读写分离;一主多从+分表;一主多从+分库分表;公共表;数据脱敏;分布式事务
目录 创建项目 分表 导包 表结构 Yml 分库 Yml Java 分库分表 数据库 Yml 读写分离 数据库 Yml 其他 只请求主库 读写分离判断逻辑代码 一主多从+分表 Yml 一主多从+分库分 ...
- 一致性哈希算法(适用于分库分表、RPC负载均衡)转
在分布式应用中,应该来说使用到hash最多的地方就是rpc负载均衡和分库分表,通常对于正式意义上的分布式应用来说,扩容和收缩是一个半自动化的过程,在此期间,应用基本上是可用的,所以不能发生大规模动荡的 ...
- MySQL+MyCat分库分表 读写分离配置
一. MySQL+MyCat分库分表 1 MyCat简介 java编写的数据库中间件 Mycat运行环境需要JDK. Mycat是中间件.运行在代码应用和MySQL数据库之间的应用. 前身 : cor ...
- Windows环境下使用Mycat模拟分库分表-读写分离案例
一.基本环境 W7 64位.Mycat1.6.MySQL8.0 二.Mycat核心配置文件配置 解压Mycat1.6,并对server.xml.schema.xml.rule.xml三个核心配置文件做 ...
- 分库分表(6)--- SpringBoot+ShardingSphere实现分表+ 读写分离
分库分表(6)--- ShardingSphere实现分表+ 读写分离 有关分库分表前面写了五篇博客: 1.分库分表(1) --- 理论 2.分库分表(2) --- ShardingSphere(理论 ...
- dynamic + shardingsphere(4.1.1) 实现动态分库分表
1. 主要依赖: <dependency> <groupId>com.baomidou</groupId> <artifactId>dynamic-da ...
- go分库分表 主从分离例子
网上有很多介绍分库分表的文章,方法很多: 分区表切分 垂直切分 水平切分 区间切分 取模切分 这里不细说 分库分表简单,但后期会带来一系列的难题: 事务 Join 分页 数据库: master和sla ...
随机推荐
- HCIE笔记-第六节-CIDR与ICMP
项目部 58人 地址:194.2.3.128 /26 研发部 100人 地址: 194.2.3.0/25 市场部 27人 地址: 194.2.3.192/27 财务部 15人 地址:194.2.3.2 ...
- Amazing!巧用 CSS 视差实现酷炫交互动效
本文将介绍利用 CSS 实现滚动视差效果的一个小技巧,并且,利用这个技巧来制作一些有意思的交互特效. 关于使用 CSS 实现滚动视差效果,在之前有一篇文章详细描述过具体方案 - CSS 实现视差效果, ...
- 『现学现忘』Git对象 — 15、blob对象介绍
目录 (一)Git对象的存放目录 (二)Git中对象类型 (三)blob对象 1.blob对象说明 (1)blob对象定义 (2)blob对象说明 (3)blob对象存储的方式 (4)查看blob对象 ...
- HCNP Routing&Switching之MUX VLAN
前文我们了解了代理ARP相关话题,回顾请参考https://www.cnblogs.com/qiuhom-1874/p/16188230.html:今天我们再来聊一聊vlan隔离相关话题MUX VLA ...
- 研讨会回放视频:如何提升Jenkins能力,使其成为真正的DevOps平台
"如何实现集中管理.灵活高效的CI/CD"在线研讨会精彩分享 演讲嘉宾:杨海涛 在2022年3月29日举办的"如何实现集中管理.灵活高效的CI/CD"在线研讨会 ...
- Win10搭建Jenkins部署Java项目(本机和远程Win10部署)
目录 一.前言&背景 二.环境准备 三.插件安装 四.全局配置 Maven JDK Git Maven 五.新建项目并配置 新建项目 配置 1.Discard old builds 2.Thi ...
- c/c++递归打印文件夹
调用linux的系统函数,实现tree的功能,递归打印文件夹 使用到得函数: DIR *opendir(const char *name); // 打开文件夹 struct dirent *readd ...
- Android 4.4系统,User模式adb默认开启,取消授权,开启root调试记录
开启User模式adb,取消授权,修改如下: 1. /build/core/main.mk 修改以下内容 ifeq (true,$(strip $(enable_target_debugging)) ...
- ubuntu 获取 gateway 网关 ip
输入以下命令,第一行中 Gateway 列就是网关 IP netstat -rn
- OSError: no library called "cairo-2" was found
环境 Windows 11 python 3.8.13 (anaconda->envs) PyCharm 场景 我使用了GitHub上的第三方组件进行GUI开发,https://github.c ...