mina socket底层主流程源码实现
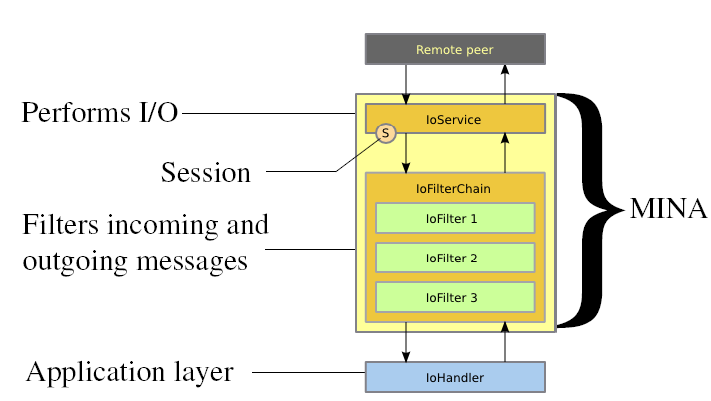
一,mina的架构
   public static void main(String[] args) throws Exception {

        NioSocketAcceptor acceptor = new NioSocketAcceptor();//创建接收器,用于接受socket连接。

        DefaultIoFilterChainBuilder chain = acceptor.getFilterChain();//获取filterChain

        MdcInjectionFilter mdcInjectionFilter = new MdcInjectionFilter();//获取mdc inject filter

        chain.addLast("mdc", mdcInjectionFilter);//设置filterChain 链中最好一个过滤器为mdcInjectionFilter

        // Add SSL filter if SSL is enabled.

        if (USE_SSL) {

            addSSLSupport(chain);

        }

        chain.addLast("codec", new ProtocolCodecFilter(

                new TextLineCodecFactory()));//字节组和字符串转换 filter

        addLogger(chain); //日志 filter

        // Bind

        acceptor.setHandler(new ChatProtocolHandler()); //设置接受的信息的业务处理类

        acceptor.bind(new InetSocketAddress(PORT));//绑定端口

        System.out.println("Listening on port " + PORT);

    }
然后看下ChatProtocolHandler ,该类是继承了IoHandlerAdapter类,看下具体实现逻辑的方法,简化了大部分代码。
 @Override

    public void messageReceived(IoSession session, Object message) {

        String theMessage = (String) message;//接受得来的字符串

        session.write("LOGIN OK");//返回登录成功,

    }
 NioSocketAcceptor acceptor = new NioSocketAcceptor();//创建接收器,用于接受socket连接。

 acceptor.bind(new InetSocketAddress(PORT));//绑定端口
NioSocketAcceptor acceptor = new NioSocketAcceptor();//创建接收器,用于接受socket连接。
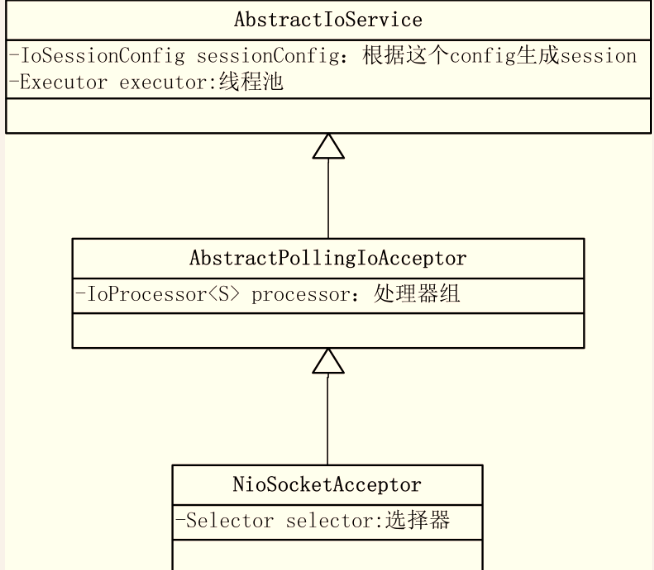
NioSocketAcceptor的继承图如下,属性只列出了相对重要的属性。
3.初始化processor,创建了下面这个对象。
protected ServerSocketChannel open(SocketAddress localAddress) throws Exception {

        // Creates the listening ServerSocket

        ServerSocketChannel channel = null;

        if (selectorProvider != null) {

            channel = selectorProvider.openServerSocketChannel();

        } else {

            channel = ServerSocketChannel.open();//创建一个ServerSocketChannel对象

        }

            // This is a non blocking socket channel

            channel.configureBlocking(false);//设定管道为非阻塞

            // Configure the server socket,

            ServerSocket socket = channel.socket();//获取管道中关联的ServerSocket

            // Set the reuseAddress flag accordingly with the setting

            socket.setReuseAddress(isReuseAddress());

            // and bind.

                socket.bind(localAddress, getBacklog());//绑定地址

         ...

            // Register the channel within the selector for ACCEPT event

            channel.register(selector, SelectionKey.OP_ACCEPT);//管道注册到选择器,监听socket的接受事件,该selector为NioSocketAcceptor的属性

       ....

        return channel;

    }
看下Acceptor的run方法,同样可以看到熟悉的selector代码:
 private class Acceptor implements Runnable {

        public void run() {

            assert (acceptorRef.get() == this);

            int nHandles = 0;

            // Release the lock

            lock.release();

            while (selectable) {

                try {

                    // Detect if we have some keys ready to be processed

                    // The select() will be woke up if some new connection

                    // have occurred, or if the selector has been explicitly

                    // woke up

                    int selected = select();//第一次访问到这个地方的时候,会在AbstractPollingIoAcceptor. bindInternal()中的wakeUp()方法中会被打断,直接执行下面registerHandles的初始化。

                    // this actually sets the selector to OP_ACCEPT,

                    // and binds to the port on which this class will

                    // listen on

                    nHandles += registerHandles();//主要是执行上面的open方法。

                    // Now, if the number of registred handles is 0, we can

                    // quit the loop: we don't have any socket listening

                    // for incoming connection.

                    if (nHandles == 0) {

                       .....

                    }

                    if (selected > 0) {//如果有新连接进来

                        // We have some connection request, let's process

                        // them here.

                        processHandles(selectedHandles());

                    }

                    // check to see if any cancellation request has been made.

                    nHandles -= unregisterHandles();

                } .....

            // Cleanup all the processors, and shutdown the acceptor.

            if (selectable && isDisposing()) {

                selectable = false;

               ......

        }}}
然后看下下面这段代码背后都做了哪些事情。
  if (selected > 0) {//如果有新连接进来

    // We have some connection request, let's process

    // them here.

    processHandles(selectedHandles());

                    }
selectedHandles()方法中主要是获取当前selector中已经就绪的selectedKey 的集合,具体的方法如下:
    @Override

    protected Iterator<ServerSocketChannel> selectedHandles() {

        return new ServerSocketChannelIterator(selector.selectedKeys());

    }
processHandles的的方法如下:
private void processHandles(Iterator<H> handles) throws Exception {
while (handles.hasNext()) {
H handle = handles.next();
handles.remove();
// Associates a new created connection to a processor,
// and get back a session
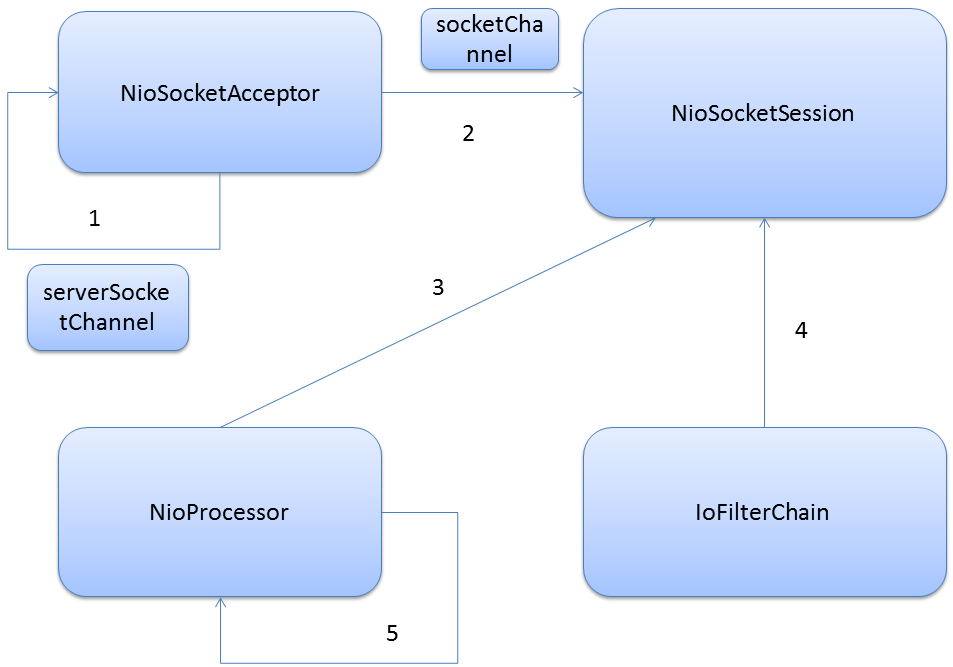
S session = accept(processor, handle);//生成一个NioSocketSession
if (session == null) {
continue;
}
initSession(session, null, null);//对session中的部分attribute和writeRequestQueue等进行默认的初始化。
// add the session to the SocketIoProcessor
session.getProcessor().add(session);
}
}
看一下accept方法
  @Override

    protected NioSession accept(IoProcessor<NioSession> processor, ServerSocketChannel handle) throws Exception {

        SelectionKey key = null;

        if (handle != null) {

            key = handle.keyFor(selector);//

        }

        if ((key == null) || (!key.isValid()) || (!key.isAcceptable())) {

            return null;

        }

        // accept the connection from the client

        SocketChannel ch = handle.accept();//接受一个新连接

        if (ch == null) {

            return null;

        }

        return new NioSocketSession(this, processor, ch);

    }
new NioSocketSession(this, processor, ch)中有几个主要的操作:
this.service = service;//设置当前当前session关联的IoService在这里是NioSocketAcceptor
this.handler = service.getHandler();//设置当前session关联的handler,在这里对应的是new ChatProtocolHandler()
sessionId = idGenerator.incrementAndGet();//获取唯一的sessionId
this.channel = channel;//设置当前的Channel,这里为新进来的socket连接对应的SocketChannel
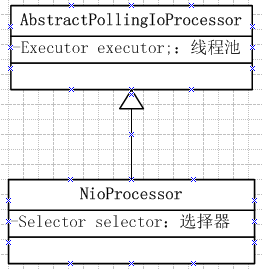
this.processor = processor;//设置当前IoProcessor<NioSession> processor ,这里设为AbstractPollingIoAcceptor.processor 也就是上面初始化的SimpleIoProcessorPool(..)
filterChain = new DefaultIoFilterChain(this);//初始化默认的filterChain
this.config.setAll(service.getSessionConfig());//设置SessionCofig 为NioSocketAcceptor.getSessionConfig();
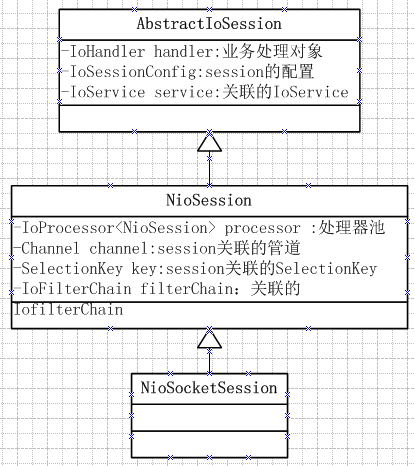
NioSocketSession的继承图如下:属性只列出了关键的属性。
 public final void add(S session) {

        getProcessor(session).add(session);//toread

    }
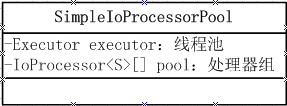
getProcessor(session) 中首先会在SimpleIoProcessorPool.pool中去取一个IoProcessor<S> 的实例,这里是NioProcessor实例,然后session和这个NioProcessor的实例关联起来。简化代码如下:
IoProcessor<S> processor  = pool[Math.abs((int) session.getId()) % pool.length];

 session.setAttributeIfAbsent(PROCESSOR, processor);
  private class Processor implements Runnable {

        public void run() {

      int selected = select(SELECT_TIMEOUT);//获取当前是否有新的请求进来。

      nSessions += handleNewSessions();

     if (selected > 0) {

                        //LOG.debug("Processing ..."); // This log hurts one of the MDCFilter test...

                        process();

                    }

      flush(currentTime);//如果有session有写请求在这里面处理

        }

}
   @Override

    protected void init(NioSession session) throws Exception {

        SelectableChannel ch = (SelectableChannel) session.getChannel();//获取session关联的SocketChannel

        ch.configureBlocking(false);//设置为非阻塞

        session.setSelectionKey(ch.register(selector, SelectionKey.OP_READ, session));//把socketChannel注册到NioProcessor的selector中,并且监听的时间为OP_READ,可读事件。

    }
              // Build the filter chain of this session.

IoFilterChainBuilder chainBuilder = session.getService().getFilterChainBuilder();

chainBuilder.buildFilterChain(session.getFilterChain());
四,处理请求
然后执行下面的代码,如果当前NioProcessor.selector有可读的channel的话,执行process()方法
     if (selected > 0) {

                        //LOG.debug("Processing ..."); // This log hurts one of the MDCFilter test...

                        process();

                    }
 private void read(S session) {

        IoSessionConfig config = session.getConfig();

        int bufferSize = config.getReadBufferSize();

        IoBuffer buf = IoBuffer.allocate(bufferSize);

        final boolean hasFragmentation = session.getTransportMetadata().hasFragmentation();

        try {

            int readBytes = 0;

            int ret;

            try {

                if (hasFragmentation) {

                    while ((ret = read(session, buf)) > 0) {//读取数据

                        readBytes += ret;

                        if (!buf.hasRemaining()) {

                            break;

                        }

                    }

                } else {

                    ret = read(session, buf);

                    if (ret > 0) {

                        readBytes = ret;

                    }

                }

            } finally {

                buf.flip();

            }

            if (readBytes > 0) {

                IoFilterChain filterChain = session.getFilterChain();//获取filterChain

                filterChain.fireMessageReceived(buf);//执行filterChain中的messageReceived事件。

                buf = null;

            IoFilterChain filterChain = session.getFilterChain();

            filterChain.fireExceptionCaught(e);

        }

    }
    @Override

    protected int write(NioSession session, IoBuffer buf, int length) throws Exception {

        if (buf.remaining() <= length) {

            return session.getChannel().write(buf.buf());

        }

        int oldLimit = buf.limit();

        buf.limit(buf.position() + length);

        try {

            return session.getChannel().write(buf.buf());

        } finally {

            buf.limit(oldLimit);

        }

    }
五,概括
最后来看下mina中IoService,IoSession,IoProcessor,IoFilterChain,Handler之间的关系。还是以上面聊天室的为例,从服务器开始监听端口,到有第一个请求进来,流程如下。
mina socket底层主流程源码实现的更多相关文章
- cglib源码主流程源码-我们到底能走多远系列48
扯淡 祝各位在园里的朋友新年快乐! 辛苦一年,为更好的自己也为更好的世界,很多人要感谢你们,你们也应该有很多人要感谢吧. 看了马斯克的采访视频,又想起兰迪·鲍许的最后一课,时光迁移,唯有梦想可坚持. ...
- JUC并发编程基石AQS之主流程源码解析
前言 由于AQS的源码太过凝练,而且有很多分支比如取消排队.等待条件等,如果把所有的分支在一篇文章的写完可能会看懵,所以这篇文章主要是从正常流程先走一遍,重点不在取消排队等分支,之后会专门写一篇取消排 ...
- linux内核中socket的创建过程源码分析(总结性质)
在漫长地分析完socket的创建源码后,发现一片浆糊,所以特此总结,我的博客中同时有另外一篇详细的源码分析,内核版本为3.9,建议在阅读本文后若还有兴趣再去看另外一篇博文.绝对不要单独看另外一篇. 一 ...
- Apache Mina 2.x 框架+源码分析
源码下载 http://www.apache.org/dyn/closer.cgi/mina/mina/2.0.9/apache-mina-2.0.9-src.tar.gz 整体架构 核心过程(IoA ...
- Dubbo消费方服务调用过程源码分析
参考:dubbo消费方服务调用过程源码分析dubbo基于spring的构建分析Dubbo概述--调用过程dubbo 请求调用过程分析dubbo集群容错机制代码分析1dubbo集群容错策略的代码分析2d ...
- Netty 学习(五):服务端启动核心流程源码说明
Netty 学习(五):服务端启动核心流程源码说明 作者: Grey 原文地址: 博客园:Netty 学习(五):服务端启动核心流程源码说明 CSDN:Netty 学习(五):服务端启动核心流程源码说 ...
- python_way day10 python和其他语言的作用域 、 python2.7多继承和3.5多继承的区别 、 socket 和 socketserver源码(支持并发处理socket,多进程,多线程)
python_way day10 1.python的作用域和其他语言的作用域 2.python2.7多继承和3.5多继承的区别 3.socket和socketserver源码(并发处理socket) ...
- 转:Spring与Mybatis整合的MapperScannerConfigurer处理过程源码分析
原文地址:Spring与Mybatis整合的MapperScannerConfigurer处理过程源码分析 前言 本文将分析mybatis与spring整合的MapperScannerConfigur ...
- Android Activity启动流程源码全解析(1)
前言 Activity是Android四大组件的老大,我们对它的生命周期方法调用顺序都烂熟于心了,可是这些生命周期方法到底是怎么调用的呢?在启动它的时候会用到startActivty这个方法,但是这个 ...
随机推荐
- java 简单矩阵乘法运算
1.计算的两个矩阵其中第一个矩阵的列数必须和第二个矩阵的行数一致(或者反过来): 2.第一个矩阵的行数决定了结果矩阵的行数,第二个矩阵的列数决定了结果矩阵的列数: package org.admln. ...
- C#基础--局部类型Partial
局部类型 原本来在同一个命名(namespace)空间下 是不允许相同的类(class)名存在的 但是partial关键字可以允许在同一个namespace下有想通过的类名存在 写法 下面的两个不 ...
- DIH处理包含回车符换行符html标签内容的文本
数据样例:2010-03-19 10:18:06130010543234203guqun09-12月-12liuyin18-6月 -14<P style="MARGIN-TOP: 0p ...
- #pragma weak
采用 #pragma weak name 形式时,指令使 name 成为弱符号.链接程序没有找到 name 的符号定义时,不会显示错误消息,也不会出现符号的多个弱定义的错误消息.链接程序仅执行第一个遇 ...
- [ASP.Net]TableLayoutPanel的使用
以前都是使用Panel.没有用过其他容器类.郁闷,要控制界面的自适应真是麻烦.平常用一用dock.anchor差不多了,但是,更复杂的情景下,就没法了.例如一行有多个控件,有的要求跟据窗口缩放,只缩放 ...
- Handsontable 学习笔记-Methods
Handson: 亲自实践 先给出数据源和基本配置: var data =[ ["A1","B1","C1","D1"] ...
- java中异步调用的解决方法
package demo.future; import java.util.ArrayList; import java.util.List; import java.util.concurrent. ...
- ajax 请求
案例: <html><head><script type="text/javascript">function loadXMLDoc(){var ...
- Linux+Apache+Php+Oracle 基础环境搭建
前言: 不能保证100%一次通过,每个系统都会或多或少有区别,如果缺少某些依赖包的话,还请见谅 1.安装Apache需要编译安装的包,各官方网站下载 ...
- codeforces Good Bye 2013 379D New Year Letter
题目链接:http://codeforces.com/problemset/problem/379/D [题目大意] 告诉你初始字符串S1.S2的长度和递推次数k, 使用类似斐波纳契数列的字符串合并的 ...