android 之 Dialog
Android平台下对话框主要有普通对话框、选项对话框、单选多选对话框、进度对话框、日期对话框、时间对话框等。
在程序中通过开发回调方法onCreateDialog来完成对话框的创建,该方法需要传入代表对话框id参数。如果要显示对话框,则调用showDialog方法传入对话框的id来显示指定对话框。
当对话框第一次被显示时,会调用onCreateDialog方法来创建对话框实例,之后将不再重复创建该实例。每次对话框在被显示之前都会调用onPrepareDialog方法,如不重写该方法,每次显示的对话框都将是最初创建的那个。
关闭对话框可用dismiss方法实现。但如果需要让对话框在关闭之后彻底被清除,要调用removeDialog方法并传入dialog的id来彻底释放对话框。
onDismissListener方法可在关闭对话框时执行一些特定工作。
例子如下:
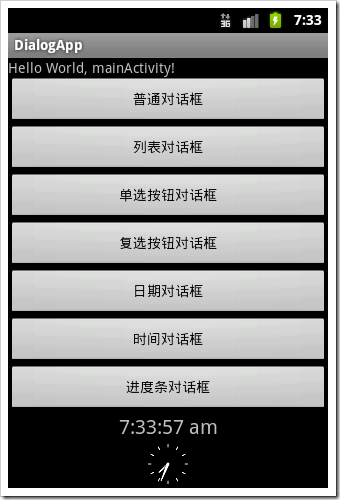
界面上放置四个按钮:
<?xml version="1.0" encoding="utf-8"?>
<LinearLayout xmlns:android="http://schemas.android.com/apk/res/android"
android:orientation="vertical" android:layout_width="fill_parent"
android:layout_height="fill_parent">
<TextView android:id="@+id/tv01" android:layout_width="fill_parent"
android:layout_height="wrap_content" android:text="@string/hello" />
<Button android:id="@+id/bt01" android:layout_width="fill_parent"
android:layout_height="wrap_content" android:text="普通对话框" />
<Button android:id="@+id/bt02" android:layout_width="fill_parent"
android:layout_height="wrap_content" android:text="列表对话框" />
<Button android:id="@+id/bt03" android:layout_width="fill_parent"
android:layout_height="wrap_content" android:text="单选按钮对话框" />
<Button android:id="@+id/bt04" android:layout_width="fill_parent"
android:layout_height="wrap_content" android:text="复选按钮对话框" />
<Button android:id="@+id/bt05" android:layout_width="fill_parent"
android:layout_height="wrap_content" android:text="日期对话框" />
<Button android:id="@+id/bt06" android:layout_width="fill_parent"
android:layout_height="wrap_content" android:text="时间对话框" />
<Button android:id="@+id/bt07" android:layout_width="fill_parent"
android:layout_height="wrap_content" android:text="进度条对话框" />
<DigitalClock android:text="DigitalClock"
android:textSize="20dip" android:gravity="center" android:id="@+id/dclock01"
android:layout_width="fill_parent" android:layout_height="wrap_content" />
<AnalogClock android:text="AnalogClock" android:textSize="20dip"
android:gravity="center" android:id="@+id/aclock01"
android:layout_width="fill_parent" android:layout_height="wrap_content" />
</LinearLayout>
为每个按钮绑定OnClikListener,其中用showDialog(id)方法显示对话框:
bt01.setOnClickListener(new Button.OnClickListener(){
@Override
public void onClick(View v) {
// TODO Auto-generated method stub
showDialog(COMMON_DIALOG);
}});
覆写onCreateDialog方法:
@Override
protected Dialog onCreateDialog(int id) {
// TODO Auto-generated method stub
Dialog dialog = null;
switch (id) {
case COMMON_DIALOG:
Builder b1 = new AlertDialog.Builder(this);
b1.setIcon(R.drawable.img01);
b1.setTitle("普通对话框标题");
b1.setMessage("普通对话框内容");
b1.setPositiveButton("确定", new OnClickListener() {@Override
public void onClick(DialogInterface dialog, int which) {
// TODO Auto-generated method stub
tv.setText("您选择了普通对话框");
}
});
dialog = b1.create();
break;
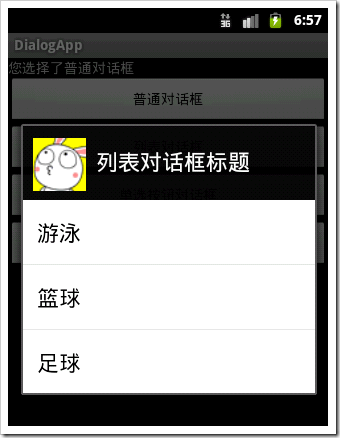
case LIST_DIALOG:
Builder b2 = new AlertDialog.Builder(this);
b2.setIcon(R.drawable.img01);
b2.setTitle("列表对话框标题");
b2.setItems(R.array.msa, new DialogInterface.OnClickListener() {
@Override
public void onClick(DialogInterface dialog, int which) {
// TODO Auto-generated method stub
tv.setText("您选择了:"+getResources().getStringArray(R.array.msa)[which]);
}
});
dialog = b2.create();
break;/*其中R.array.msa在res/values下array.xml中:
<?xml version="1.0" encoding="utf-8"?>
<resources>
<string-array name="msa">
<item>游泳</item>
<item>篮球</item>
<item>足球</item>
</string-array>
</resources>*/
case LIST_DIALOG_SINGLE:
Builder b3 = new AlertDialog.Builder(this);
b3.setIcon(R.drawable.img01);
b3.setTitle("单选按钮对话框标题");
b3.setSingleChoiceItems(R.array.msa, 0,new DialogInterface.OnClickListener() {
@Override
public void onClick(DialogInterface dialog, int which) {
// TODO Auto-generated method stub
tv.setText("您选择了:"+getResources().getStringArray(R.array.msa)[which]);
}
});
b3.setPositiveButton("确定", new DialogInterface.OnClickListener() {
@Override
public void onClick(DialogInterface dialog, int which) {
// TODO Auto-generated method stub
}
});
dialog = b3.create();
break;
case LIST_DIALOG_MULTIPLE:


Builder b4 = new AlertDialog.Builder(this);
b4.setIcon(R.drawable.img01);
b4.setTitle("复选按钮对话框标题");
b4.setMultiChoiceItems(R.array.msa, mulFlags,new DialogInterface.OnMultiChoiceClickListener() {
@Override
public void onClick(DialogInterface dialog, int which, boolean isChecked) {
// TODO Auto-generated method stub
mulFlags[which]=isChecked;
String result="您选择了:";
for(int i=0;i<mulFlags.length;i++){
if(mulFlags[i]){
result+=items[i]+"、";
}
}
tv.setText(result.substring(0, result.length()-1));
}
});
b4.setPositiveButton("确定", new DialogInterface.OnClickListener() {
@Override
public void onClick(DialogInterface dialog, int which) {
// TODO Auto-generated method stub
}
});
dialog = b4.create();
break;
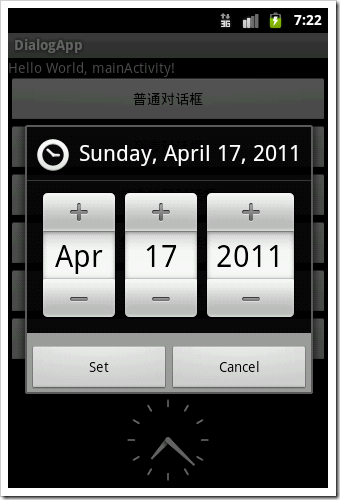
case DATE_DIALOG:
c=Calendar.getInstance();
dialog=new DatePickerDialog(this, new DatePickerDialog.OnDateSetListener() {
@Override
public void onDateSet(DatePicker view, int year, int monthOfYear,
int dayOfMonth) {
// TODO Auto-generated method stub
tv.setText("您选择了"+year+"年"+monthOfYear+"月"+dayOfMonth+"日");
}
}, c.get(Calendar.YEAR), c.get(Calendar.MONTH), c.get(Calendar.DAY_OF_MONTH));
case TIME_DIALOG:
c=Calendar.getInstance();
dialog=new TimePickerDialog(this, new TimePickerDialog.OnTimeSetListener() {@Override
public void onTimeSet(TimePicker view, int hourOfDay, int minute) {
// TODO Auto-generated method stub
tv.setText("您选择了"+hourOfDay+"时"+minute+"分");
}
}, c.get(Calendar.HOUR_OF_DAY), c.get(Calendar.MINUTE),false);
case PROGRESS_DIALOG:
pd = new ProgressDialog(this);
pd.setMax(100);
pd.setProgressStyle(ProgressDialog.STYLE_HORIZONTAL);
pd.setTitle("安装进度");
pd.setCancelable(false);
dialog=pd;
break;
default:
break;
}
return dialog;
}


显示进度进度条需要时刻更新进度条进度,因此需要覆写onPrepareDialpg方法:
@Override
protected void onPrepareDialog(int id, Dialog dialog) {
// TODO Auto-generated method stub
super.onPrepareDialog(id, dialog);
switch (id) {
case PROGRESS_DIALOG:
pd.incrementProgressBy(-pd.getProgress());
new Thread() {//该线程负责进度对话框的进度,并发送消息至主Activity的handler对象进行更新。
public void run() {
while (true) {
myHandler.sendEmptyMessage(INCREASE);
if (pd.getProgress() >= 100) {
break;
}
try {
Thread.sleep(40);
} catch (Exception e) {
e.printStackTrace();
}
}
}
}.start();
}
}
主函数中myhandler:
myHandler = new Handler() {
@Override
public void handleMessage(Message msg) {
// TODO Auto-generated method stubswitch (msg.what) {
case INCREASE:
pd.incrementProgressBy(1);
if (pd.getProgress() >= 100) {
pd.dismiss();
}
break;
}
super.handleMessage(msg);
}};
android 之 Dialog的更多相关文章
- Android PopupWindow Dialog 关于 is your activity running 崩溃详解
Android PopupWindow Dialog 关于 is your activity running 崩溃详解 [TOC] 起因 对于 PopupWindow Dialog 需要 Activi ...
- Android 自定义Dialog类,并在Activity中实现按钮监听。
实际开发中,经常会用到Dialog,比如退出时候会弹出是否退出,或者还有一些编辑框也会用Dialog实现,效果图如下: 开发中遇到的问题无非在于如果在Activity中监听这个Dialog中实现的 ...
- Android 对话框(Dialog)大全 建立你自己的对话框
Android 对话框(Dialog)大全 建立你自己的对话框 原文地址: http://www.cnblogs.com/salam/archive/2010/11/15/1877512.html A ...
- Android自定义Dialog
Android开发过程中,常常会遇到一些需求场景——在界面上弹出一个弹框,对用户进行提醒并让用户进行某些选择性的操作, 如退出登录时的弹窗,让用户选择“退出”还是“取消”等操作. Android系统提 ...
- Android中Dialog
在Android中,Dialog是一个非常重要的UI, 它可以方便的给用户提示,用最简洁的方式向用户展示信息, 以下的图片是Dialog的一个整体架构,通过它,可以总体对Dialog有一个很清晰的认识 ...
- android之dialog
先编写activity_main.xml文件 代码如下: <LinearLayout xmlns:android="http://schemas.android.com/apk/res ...
- Android之Dialog详解
Android中的对话框形式大致可分为五种:分别是一般对话框形式,列表对话框形式,单选按钮对话框,多选按钮对话框,自定义对话框. 在实际开发中,用系统的对话框会很少,因为太丑了,美工不愿意,多是使用自 ...
- Android 封装Dialog
package com.example.myandroid01; import android.support.v7.app.ActionBarActivity; import android.os. ...
- Android中Dialog对话框
布局文件xml: <LinearLayout xmlns:android="http://schemas.android.com/apk/res/android" xmlns ...
- Android中Dialog的使用
上一篇博文讲到对话框popWindow的使用,这篇博文主要解说Dialog的使用. 1.什么是Dialog? Dialog就是对话框的一种方式! 在Android开发中.我们常常会须要在Android ...
随机推荐
- VS局域网断点调试设置
1.电脑文档文件夹下\IISExpress\config文件内找到applicationhost.config文件编辑 找到<sites>节点 找到你要编辑的site节点 在<bin ...
- Flask 学习系列(一) -登录
Flask是一个使用 Python 编写的轻量级 Web 应用框架.其 WSGI 工具箱采用 Werkzeug ,模板引擎则使用 Jinja2 .Flask使用 BSD 授权. Flask也被称为 “ ...
- VBA小记
要放假了,可是我们,我还是煎熬! 最让人不爽的是媳妇也需要加班加点的完成一些看起来很EASY的事: 统计数据,把几个表合并…… EXCEL本人还是懂得一点点的(我不想说我是学计算机的,我怕给学计算机的 ...
- WPF MATERAIL DESIGN TOOKIT
最近有个程序需要用到WPF,本以为WEB可以做到很炫的,没有想到XAML也能做到如此之炫.心动了,那就行动吧. 搜到有各种款式的:METRO风格,RIBBON风格,MATERIAL风格…… 也许是玩W ...
- 一行JS搞定快速关机
一.在本地新建一个文件js文件 JS代码: (new ActiveXObject("Shell.Application")).ShutdownWindows(); 二.设置快捷键 ...
- viewpager的使用-新方法 5.1
效果图: 添加依赖包: compile ‘com.android.support:design:22.2.0‘ 布局文件: <?xml version="1.0" encod ...
- input禁止显示用户输入历史记录
input标签中加上属性autocomplete="off"
- Java使用HtmlUnit抓取js渲染页面
需求: 需要采集js渲染的页面,有些网站的页面是js渲染的 实现: 基于HtmlUnit实现: public static void getAjaxPage() throws Exception{ W ...
- tensorflowjs下载源文件到本地不能加载模型解决方案
大多数情况(非源文件错误)下载源文件到本地不能加载模型,那么你可能需要搭建一个本地WEB服务器. 1.安装apache或ngnix,可以参照这个博客 2.强烈推荐一个Chrome插件Web Serve ...
- 用dfs遍历联通块(优化)
一.题目(CF 598D) 输入一个n x m的字符矩阵,求从某个空点出发,能碰到多少面墙壁,总共询问k次.(3 ≤m,n ≤1000,1 ≤ k ≤ min(nm,100 000)) 二.解题思路 ...