Spring Boot中使用Swagger2生成RESTful API文档(转)
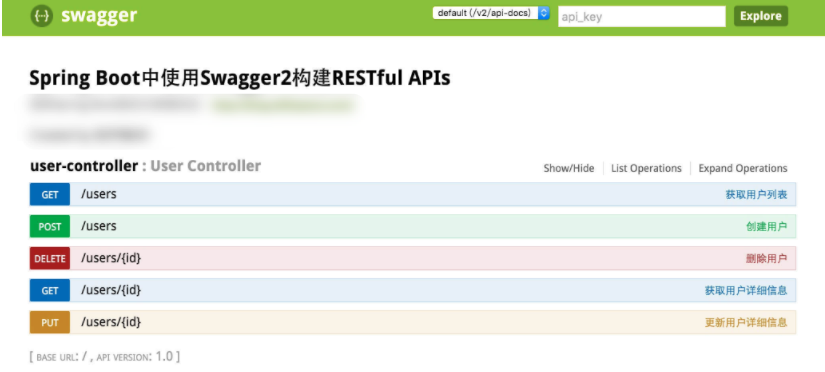
效果如下图所示:
添加Swagger2依赖
在pom.xml中加入Swagger2的依赖
        <!-- https://mvnrepository.com/artifact/io.springfox/springfox-swagger2 -->

        <dependency>

            <groupId>io.springfox</groupId>

            <artifactId>springfox-swagger2</artifactId>

            <version>2.7.0</version>

        </dependency>

        <!-- https://mvnrepository.com/artifact/io.springfox/springfox-swagger-ui -->

        <dependency>

            <groupId>io.springfox</groupId>

            <artifactId>springfox-swagger-ui</artifactId>

            <version>2.7.0</version>

        </dependency>
注意:如果是2.2版本的,有可能在右下角会出现错误,那么请升级为2.7版本的即可解决这个问题。
创建Swagger2配置类
在Application.java同级创建Swagger2的配置类Swagger2。
@Configuration

@EnableSwagger2

public class Swagger2 {

    @Bean

    public Docket createRestApi() {

        return new Docket(DocumentationType.SWAGGER_2)

                .apiInfo(apiInfo())

                .select()

                .apis(RequestHandlerSelectors.basePackage("com.jsoft.testspringboot.controller"))

                .paths(PathSelectors.any())

                .build();

    }

    private ApiInfo apiInfo() {

        return new ApiInfoBuilder()

                .title("Spring Boot中使用Swagger2构建RESTful APIs")

                .description("更多Spring Boot相关文章请关注:http://easonjim.com/")

                .termsOfServiceUrl("http://easonjim.com/")

                .contact("EasonJim")

                .version("1.0")

                .build();

    }

}
如上代码所示,通过@Configuration注解,让Spring来加载该类配置。再通过@EnableSwagger2注解来启用Swagger2。
再通过createRestApi函数创建Docket的Bean之后,apiInfo()用来创建该Api的基本信息(这些基本信息会展现在文档页面中)。select()函数返回一个ApiSelectorBuilder实例用来控制哪些接口暴露给Swagger来展现,本例采用指定扫描的包路径来定义,Swagger会扫描该包下所有Controller定义的API,并产生文档内容(除了被@ApiIgnore指定的请求)。
添加文档内容
在完成了上述配置后,其实已经可以生产文档内容,但是这样的文档主要针对请求本身,而描述主要来源于函数等命名产生,对用户并不友好,我们通常需要自己增加一些说明来丰富文档内容。如下所示,我们通过@ApiOperation注解来给API增加说明、通过@ApiImplicitParams、@ApiImplicitParam注解来给参数增加说明。
@RestController

@RequestMapping(value="/users")     // 通过这里配置使下面的映射都在/users下,可去除

public class UserController {

    static Map<Long, User> users = Collections.synchronizedMap(new HashMap<Long, User>());

    @ApiOperation(value="获取用户列表", notes="")

    @RequestMapping(value={""}, method=RequestMethod.GET)

    public List<User> getUserList() {

        List<User> r = new ArrayList<User>(users.values());

        return r;

    }

    @ApiOperation(value="创建用户", notes="根据User对象创建用户")

    @ApiImplicitParam(name = "user", value = "用户详细实体user", required = true, dataType = "User")

    @RequestMapping(value="", method=RequestMethod.POST)

    public String postUser(@RequestBody User user) {

        users.put(user.getId(), user);

        return "success";

    }

    @ApiOperation(value="获取用户详细信息", notes="根据url的id来获取用户详细信息")

    @ApiImplicitParam(name = "id", value = "用户ID", required = true, dataType = "Long")

    @RequestMapping(value="/{id}", method=RequestMethod.GET)

    public User getUser(@PathVariable Long id) {

        return users.get(id);

    }

    @ApiOperation(value="更新用户详细信息", notes="根据url的id来指定更新对象,并根据传过来的user信息来更新用户详细信息")

    @ApiImplicitParams({

            @ApiImplicitParam(name = "id", value = "用户ID", required = true, dataType = "Long"),

            @ApiImplicitParam(name = "user", value = "用户详细实体user", required = true, dataType = "User")

    })

    @RequestMapping(value="/{id}", method=RequestMethod.PUT)

    public String putUser(@PathVariable Long id, @RequestBody User user) {

        User u = users.get(id);

        u.setName(user.getName());

        u.setAge(user.getAge());

        users.put(id, u);

        return "success";

    }

    @ApiOperation(value="删除用户", notes="根据url的id来指定删除对象")

    @ApiImplicitParam(name = "id", value = "用户ID", required = true, dataType = "Long")

    @RequestMapping(value="/{id}", method=RequestMethod.DELETE)

    public String deleteUser(@PathVariable Long id) {

        users.remove(id);

        return "success";

    }

}
完成上述代码添加上,启动Spring Boot程序,访问:http://localhost:8080/swagger-ui.html
。就能看到前文所展示的RESTful API的页面。我们可以再点开具体的API请求,以POST类型的/users请求为例,可找到上述代码中我们配置的Notes信息以及参数user的描述信息,如下图所示。
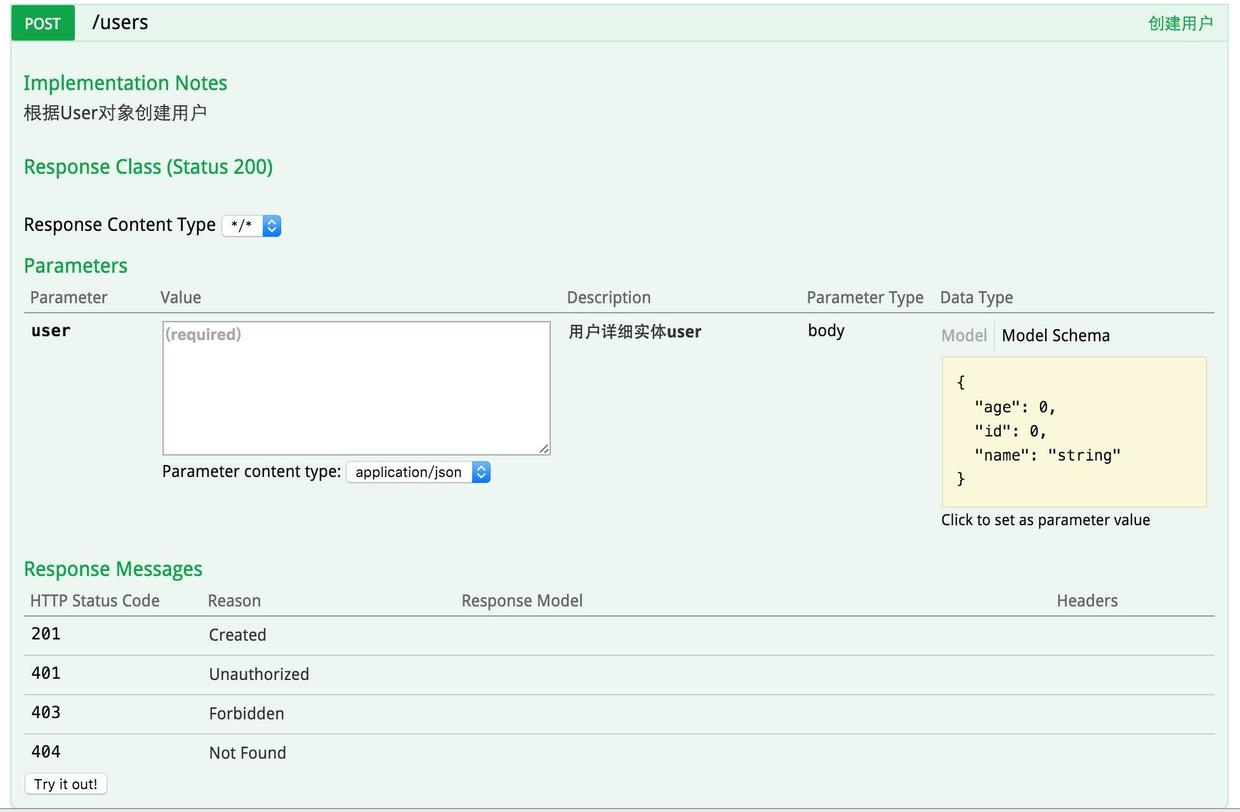
在上图请求的页面中,我们看到user的Value是个输入框?是的,Swagger除了查看接口功能外,还提供了调试测试功能,我们可以点击上图中右侧的Model Schema(黄色区域:它指明了User的数据结构),此时Value中就有了user对象的模板,我们只需要稍适修改,点击下方“Try it out!”按钮,即可完成了一次请求调用!
说明:
Swagger2不仅可以用于Spring Boot项目,还可以用于Spring MVC。配置基本一致。
Maven示例:
https://github.com/easonjim/5_java_example/tree/master/springboottest/springboottest2
参考:
http://www.jianshu.com/p/8033ef83a8ed(以上内容转自此篇文章)
http://www.keep3yue.com/461.html
https://springframework.guru/spring-boot-restful-api-documentation-with-swagger-2/
https://dzone.com/articles/spring-boot-restful-api-documentation-with-swagger
https://my.oschina.net/zhaky/blog/864562(Spring MVC)
http://blog.csdn.net/u014231523/article/details/54411026
http://blog.csdn.net/u014231523/article/details/54562695
Spring Boot中使用Swagger2生成RESTful API文档(转)的更多相关文章
- Spring Boot中使用Swagger2构建RESTful API文档
在开发rest api的时候,为了减少与其他团队平时开发期间的频繁沟通成本,传统做法我们会创建一份RESTful API文档来记录所有接口细节,然而这样的做法有以下几个问题: 1.由于接口众多,并且细 ...
- Spring Boot中使用Swagger2自动构建API文档
由于Spring Boot能够快速开发.便捷部署等特性,相信有很大一部分Spring Boot的用户会用来构建RESTful API.而我们构建RESTful API的目的通常都是由于多终端的原因,这 ...
- Spring Boot 集成Swagger2生成RESTful API文档
Swagger2可以在写代码的同时生成对应的RESTful API文档,方便开发人员参考,另外Swagger2也提供了强大的页面测试功能来调试每个RESTful API. 使用Spring Boot可 ...
- Spring Boot学习笔记 - 整合Swagger2自动生成RESTful API文档
1.添加Swagger2依赖 在pom.xml中加入Swagger2的依赖 <!--swagger2--> <dependency> <groupId>io.spr ...
- Spring Boot中使用Swagger2构建RESTful APIs
关于 Swagger Swagger能成为最受欢迎的REST APIs文档生成工具之一,有以下几个原因: Swagger 可以生成一个具有互动性的API控制台,开发者可以用来快速学习和尝试API. S ...
- Spring Boot 集成 Swagger 生成 RESTful API 文档
原文链接: Spring Boot 集成 Swagger 生成 RESTful API 文档 简介 Swagger 官网是这么描述它的:The Best APIs are Built with Swa ...
- Spring Boot 入门系列(二十二)使用Swagger2构建 RESTful API文档
前面介绍了如何Spring Boot 快速打造Restful API 接口,也介绍了如何优雅的实现 Api 版本控制,不清楚的可以看我之前的文章:https://www.cnblogs.com/zha ...
- Spring Boot中使用Swagger2构建RESTful APIs介绍
1.添加相关依赖 <!-- https://mvnrepository.com/artifact/io.springfox/springfox-swagger2 --> <depen ...
- springboot集成swagger2构建RESTful API文档
在开发过程中,有时候我们需要不停的测试接口,自测,或者交由测试测试接口,我们需要构建一个文档,都是单独写,太麻烦了,现在使用springboot集成swagger2来构建RESTful API文档,可 ...
随机推荐
- 思维题 URAL 1409 Two Gangsters
题目传送门 /* 思维题:注意题目一句话:At some moment it happened so that they shot one and the same can. 如果两个人都有射中的话, ...
- Using 10053 Trace Events and get outline
When it comes to performance tuning, we can spend time on one or both ends of the problem. On the &q ...
- Win7上安装Oracle数据库
由于ORACLE并没有FOR WIN7的版本,必须下载for vista_w2k8这个版本,将oralce 10G的安装镜像解压到硬盘,然后修改安装目录下的rehost.xml和oraparam.in ...
- P1044 栈
题目背景 栈是计算机中经典的数据结构,简单的说,栈就是限制在一端进行插入删除操作的线性表. 栈有两种最重要的操作,即pop(从栈顶弹出一个元素)和push(将一个元素进栈). 栈的重要性不言自明,任何 ...
- redis学习-字典
1.字典作用 实现数据库键空间(key space): 用作 Hash 类型键的底层实现之一: 2.字典实现的数据结构 typedef struct dict { // 特定于类型的处理函数 dict ...
- [Windows Server 2012] 初识Windows Server 2012
★ 欢迎来到[护卫神·V课堂],网站地址:http://v.huweishen.com★ 护卫神·V课堂 是护卫神旗下专业提供服务器教学视频的网站,每周更新视频.★ 本节我们将带领大家:初次见识Win ...
- python学习笔记(7)——集合(set)
关键词#1.定义:无序不重复元素集, 基本功能包括关系测试和消除重复元素. 2.关键词:类似dict.只有key无value.常用于集合类数学运算. 3.创建 s=set() #入参可以是list.t ...
- dapper未将对象引用设置到对象的实例
现象是这样的dapper在reader.Read<T>()方法时报:未将对象引用设置到对象的实例 解决:实体类里属性类型与数据库表字段类型不匹配 我用的mysql varchar(50)保 ...
- 在eclipse里如何快速定位到某一行?
使用快捷键ctrl+L讲每一行的行号显示出来:在eclipse的某一行的最左边,右键——show Line Numbers就可以将行数都显示出来.
- thupc & cts & apio & thusc 游记 (北京17日游记)
thupc & cts & apio & thusc 游记 (北京17日游记) Day 0 和隔壁校两人py了一下,六个人组了两队,(左哼哼)与(右哼哼),我和Camoufla ...