Android布局之相对布局——RelativeLayout
此博文主要是相对布局xml属性的解析及实例。
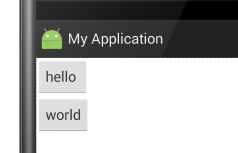
android:layout_above:此控件底部的边缘位于设定ID控件的上方
    <Button

        android:id="@+id/btn1"

        android:layout_width="wrap_content"

        android:layout_height="wrap_content"

        android:text="hello "

        android:layout_above="@+id/btn2" />    //<<<<------

    <Button

        android:id="@+id/btn2"

        android:layout_width="wrap_content"

        android:layout_height="wrap_content"

        android:text="world"

        android:layout_centerVertical="true"

        android:layout_alignParentLeft="true"

        android:layout_alignParentStart="true" />
显示结果:

android:layout_below:此控件顶部的边缘位于设定ID控件的下方
    <Button

        android:id="@+id/btn1"

        android:layout_width="wrap_content"

        android:layout_height="wrap_content"

        android:text="hello " />

    <Button

        android:id="@+id/btn2"

        android:layout_width="wrap_content"

        android:layout_height="wrap_content"

        android:text="world"

        android:layout_below="@+id/btn1"    //<<<<<<-------

        android:layout_alignParentLeft="true"

        android:layout_alignParentStart="true" />
显示结果:
android:layout_alignBaseline:将此控件内容的基线与给定ID控件内容的基线对齐。
    <Button

        android:id="@+id/btn1"

        android:layout_width="wrap_content"

        android:layout_height="wrap_content"

        android:text="hello "

        />

    <Button

        android:id="@+id/btn2"

        android:layout_width="wrap_content"

        android:layout_height="wrap_content"

        android:text="world"

        android:layout_alignBaseline="@+id/btn1"  //<<<<<------

        android:textSize="56sp"

        android:layout_toRightOf="@+id/btn1"
此属性没加时显示效果:
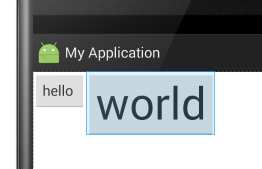
此属性加了之后的显示效果(此示例会超出布局,具体情况请自己多加练习):

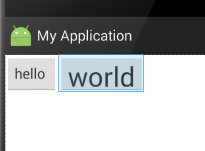
android:layout_alignBottom:将此控件的底部边缘与给定ID的控件底部边缘对齐。
    <Button

        android:id="@+id/btn1"

        android:layout_width="wrap_content"

        android:layout_height="wrap_content"

        android:text="hello "

        />

    <Button

        android:id="@+id/btn2"

        android:layout_width="wrap_content"

        android:layout_height="wrap_content"

        android:text="world"

        android:textSize="34sp"
     android:layout_alignBottom="@+id/btn1"    //<<<<----
     android:layout_toRightOf="@+id/btn1" />
此属性没加时显示效果:
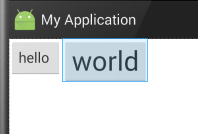
添加后显示的效果:
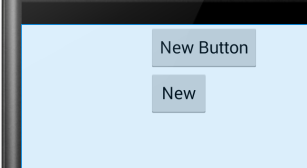
android:layout_alignEnd:将此控件与给定ID控件的末端对齐。以下的例子,很容易懂
    <Button

        android:layout_width="wrap_content"

        android:layout_height="wrap_content"

        android:text="New Button"

        android:id="@+id/button"

        android:layout_alignParentTop="true"

        android:layout_alignParentStart="true" />

    <Button

        android:layout_width="wrap_content"

        android:layout_height="wrap_content"

        android:text="New"

        android:id="@+id/button2"

        android:layout_alignEnd="@+id/button"    //<<<<<--------

        android:layout_below="@+id/button" />
此属性未添加时的显示结果:
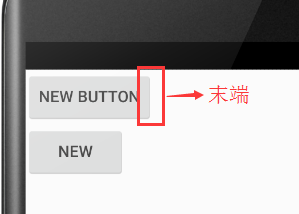
当添加此属性时的显示结果:

android:layout_alignLeft:将此控件的左边缘与给定ID控件的左边缘对齐
    <Button

        android:layout_width="wrap_content"

        android:layout_height="wrap_content"

        android:text="New Button"

        android:id="@+id/button"

        android:layout_alignParentTop="true"

        android:layout_centerHorizontal="true" />

    <Button

        android:layout_width="wrap_content"

        android:layout_height="wrap_content"

        android:text="New"

        android:id="@+id/button2"

        android:layout_alignLeft="@+id/button"    //<<<<<------

        android:layout_below="@+id/button" />
未添加此属性时显示效果:

添加此属性之后显示效果:
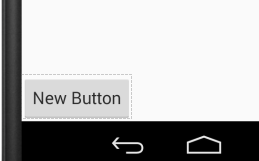
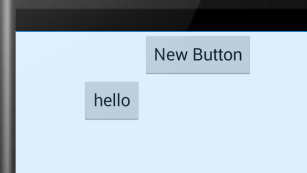
android:layout_alignParentBottom:如果设置为true,那么就将此控件的底部边缘与父容器的底部边缘匹配。
    <Button

        android:layout_width="wrap_content"

        android:layout_height="wrap_content"

        android:text="New Button"

        android:id="@+id/button"

        android:layout_alignParentBottom="true" />    //<<<<<------
未添加此属性显示效果:

添加后:
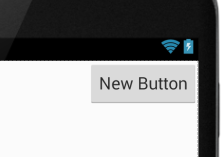
android:layout_alignParentEnd:如果设置为true,那么此控件的末边缘与父容器匹配
    <Button

        android:layout_width="wrap_content"

        android:layout_height="wrap_content"

        android:text="New Button"

        android:id="@+id/button"

        android:layout_alignParentEnd="true" />    //<<<<<<-------
未加此属性之前:
加了之后:
android:layout_alignParentLeft:如果设置为true,那么此控件的左边缘与父容器的左边缘匹配。这个属性可以用到的时候再用,这里可以参考layout_alignParentBottom属性,只是这个在左部而已。
android:layout_alignParentRight:如果设置为true,那么此控件的右边缘与父容器的右边缘匹配。此属性效果和 android:layout_alignParentEnd 属性效果差不多,显示效果参照 android:layout_alignParentEnd 的图
android:layout_alignParentStart:如果设置为true,那么此控件的开始边缘与父容器的开始边缘匹配。这个属性和android:layout_alignParentEnd 属性应该有别的用法,虽然在此例子中与left和right那两个属性显示效果差不多一样......
android:layout_alignParentTop:如果设置为true,那么此控件的顶部边缘与父容器的顶部边缘匹配。与layout_alignParentBottom相对。
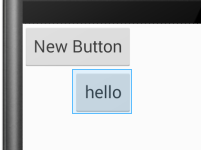
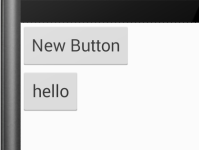
android:layout_alignRight:将此控件的右边缘与给定ID控件的右边缘对齐。
    <Button

        android:layout_width="wrap_content"

        android:layout_height="wrap_content"

        android:text="New Button"

        android:id="@+id/button"

        android:layout_alignParentStart="true" />

    <Button

        android:layout_width="wrap_content"

        android:layout_height="wrap_content"

        android:text="hello"

        android:layout_below="@+id/button"

        android:layout_alignRight="@+id/button"/>    //<<<<<------
未添加此属性时显示的效果:

添加后:
android:layout_alignStart:将此控件的开始边缘与给定ID控件的开始边缘对齐。和android:layout_alignLeft作用差不多感觉。
android:layout_alignTop:将此控件的顶部边缘与给定ID控件的顶部边缘对齐。
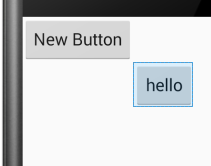
android:layout_toEndof:将此控件的开始边缘与给定ID控件的结束边缘对齐。
    <Button

        android:layout_width="wrap_content"

        android:layout_height="wrap_content"

        android:text="New Button"

        android:id="@+id/button"

        android:layout_alignParentStart="true" />

    <Button

        android:layout_width="wrap_content"

        android:layout_height="wrap_content"

        android:text="hello"

        android:layout_below="@+id/button"

        android:layout_toEndOf="@+id/button" />    //<<<<<<-----
未添加此属性时显示效果:
添加后显示效果:
android:layout_toLeftof:将此控件的右边缘与给定ID控件的左边缘对齐。
    <Button

        android:layout_width="wrap_content"

        android:layout_height="wrap_content"

        android:text="New Button"

        android:id="@+id/button"

        android:layout_alignParentTop="true"

        android:layout_centerHorizontal="true" />

    <Button

        android:layout_width="wrap_content"

        android:layout_height="wrap_content"

        android:text="hello"

        android:layout_below="@+id/button"

        android:layout_toLeftOf="@+id/button"/>    //<<<<<<------
未添加此属性时显示结果:

添加后显示结果:
android:layout_toRightof:将此控件的左边缘与给定ID控件的右边缘对齐。
    <Button

        android:layout_width="wrap_content"

        android:layout_height="wrap_content"

        android:text="New Button"

        android:id="@+id/button"

        android:layout_alignParentTop="true"

        android:layout_centerHorizontal="true" />

    <Button

        android:layout_width="wrap_content"

        android:layout_height="wrap_content"

        android:text="hello"

        android:layout_below="@+id/button"

        android:layout_toRightOf="@+id/button" />    //<<<<<<<-------
未添加显示效果:
添加后显示效果:

android:layout_toStartof:将此控件的末边缘与给定ID控件的开始边缘对齐。和android:layout_toLeftof属性的显示效果一样。
android:layout_centerHorizontal:如果设置为true,此控件将设置为水平居中
在这一条绿线上都是范围
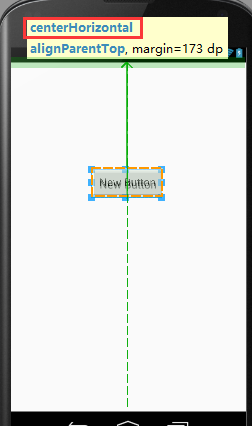
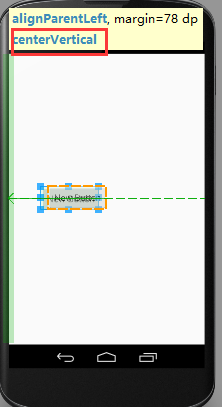
android:layout_centerVertical:如果设置为true,此控件将设置为垂直居中
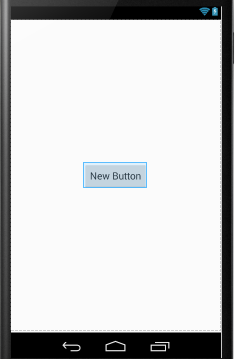
android:layout_centerInParent:如果设置为true,则此控件在他的父容器的中心位置。
android:layout_alignWithParentIfMissing:如果设置为true,当控件的 layout_toLeftOf、layout_toRightOf、等等 属性找不到时,就以父元素作为参考。
------------------------------------------------------------------------
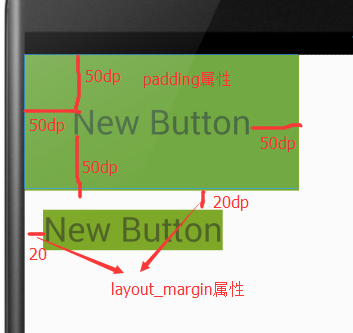
android:padding:指定控件中的内容与到此控件的四边缘的距离
android:layout_margin:设置此控件的四边缘与其他控件的距离
    <TextView

        android:layout_width="wrap_content"

        android:layout_height="wrap_content"

        android:text="New Button"

        android:textSize="36sp"

        android:id="@+id/button"

        android:background="@android:color/holo_green_dark"

        android:layout_alignParentTop="true"

        android:padding="50dp"                //<<<<<<-------

        android:layout_alignParentStart="true" />

    <TextView

        android:layout_width="wrap_content"

        android:layout_height="wrap_content"

        android:text="New Button"

        android:id="@+id/button2"

        android:textSize="36sp"

        android:background="@android:color/holo_green_dark"

        android:layout_margin="20dip"            //<<<<<<--------

        android:layout_below="@+id/button" />
显示效果:
android:paddingBottom:设置控件内容与控件下边缘的距离
android:paddingTop:设置控件内容与控件上边缘的距离
android:paddingLeft:设置控件内容与控件左边缘的距离
android:paddingRight:设置控件内容与控件右边缘的距离
android:layout_marginBottom:设置此控件的下边缘与其他控件的距离
android:layout_marginTop:设置此控件的上边缘与其他控件的距离
android:layout_marginLeft:设置此控件的左边缘与其他控件的距离
android:layout_marginRight:设置此控件的右边缘与其他控件的距离
Android布局之相对布局——RelativeLayout的更多相关文章
- Android UI -- 布局介绍(布局包括FrameLayout, LinearLayout, RelativeLayout, GridLayout)
首先介绍常用布局类 FrameLayout 最简单的布局管理器. 这个布局管理类有几个特性: 添加组件默认在左上角的. 如果添加多个组件会叠加到一起,并且都在左上角.(可以通过一gravity属性改变 ...
- Android 自学之相对布局 RelativeLayout
相对布局(RelativeLayout),相对布局容器内子组件的位置总是相对兄弟组件.父容器来决定的. RelativeLayout的XML属性及相关方法说明 XML属性 相关方法 说明 androi ...
- .Net程序猿玩转Android开发---(7)相对布局RelativeLayout
相对布局RelativeLayout是Android布局中一个比較经常使用的控件,使用该控件能够布局出适合各种屏幕分辨率的布局,RelativeLayout採用相对位置进行 ...
- Android精通:TableLayout布局,GridLayout网格布局,FrameLayout帧布局,AbsoluteLayout绝对布局,RelativeLayout相对布局
在Android中提供了几个常用布局: LinearLayout线性布局 RelativeLayout相对布局 FrameLayout帧布局 AbsoluteLayout绝对布局 TableLayou ...
- [转]浅谈Android五大布局(二)——RelativeLayout和TableLayout
在浅谈Android五大布局(一)中已经描述了LinearLayout(线性布局).FrameLayout(单帧布局)和AbsoulteLayout(绝对布局)三种布局结构,剩下的两种布局Relati ...
- 浅谈Android样式开发之布局优化
引言 今天我们来谈一下Android中布局优化常用的一些手段.官方给出了3种优化方案,分别是</include>.</viewstub>.</merge>标签,下面 ...
- Android开发-之五大布局
在html中大家都知道布局是什么意思了,简单来说就是将页面划分模块,比如html中的div.table等.那么Android中也是这样的.Android五大布局让界面更加美化,开发起来也更加方便.当然 ...
- Android开发自学笔记(Android Studio)—4.1布局组件
一.引言 Android的界面是有布局和组件协同完成的,布局好比是建筑里的框架,而组件则相当于建筑里的砖瓦.组件按照布局的要求依次排列,就组成了用户所看见的界面.在Android4.0之前,我们通常说 ...
- Android成长日记-五大布局
1. 五布局之线性布局LinearLayout 特点:它包含的子控件将以横向或竖向的方式排列 ps:android:gravity=”center|bottom”(gravity允许多级联用) Tip ...
- Android性能优化之布局优化
最新最准确内容建议直接访问原文:Android性能优化之布局优化 本文为Android性能优化的第二篇——布局优化,主要介绍使用抽象布局标签(include, viewstub, merge).去除不 ...
随机推荐
- AForge.net简介和认识
AForge.NET是一个专门为开发者和研究者基于C#框架设计的,他包括计算机视觉与人工智能,图像处理,神经网络,遗传算法,机器学习,模糊系统,机器人控制等领域.这个框架由一系列的类库组成.主要包括有 ...
- Centos 6.x 搭建 Zabbix Server
zabbix(音同 zæbix)是一个基于WEB界面的提供分布式系统监视以及网络监视功能的企业级的开源解决方案. zabbix能监视各种网络参数,保证服务器系统的安全运营:并提供灵活的通知机制以让 ...
- mysql文件系统
1 磁盘划分 在一台mysql服务器上,一般是sda做系统,sdb做数据,sdc做日志. 2 磁盘调度策略 linux默认调度策略是cfq,mysql上一般改为deadline echo 'deadl ...
- ssh密钥的分发之一:ssh-copy-id
ssh密钥的分发 我们在使用客户端账号对主机记性管理的时候,可以分为以下两种情况: .第一种情况,直接使用root账号: 优点:使用root账号密钥分发简单,指令执行简单 缺点:不安全 .第二种情况, ...
- DNS练习之反向解析
环境同正向解析一样. 切换到/var/named/chroot/etc目录下: 编辑named.rfc1912.zones文件,在末尾添加如下内容: [root@sishen63 etc]# vim ...
- 动手实现 React-redux(六):React-redux 总结
到这里大家已经掌握了 React-redux 的基本用法和概念,并且自己动手实现了一个 React-redux,我们回顾一下这几节都干了什么事情. React.js 除了状态提升以外并没有更好的办法帮 ...
- 洛谷P2742 【模板】二维凸包
题意 求凸包 Sol Andrew算法: 首先按照$x$为第一关键字,$y$为第二关键字从小到大排序,并删除重复的点 用栈维护凸包内的点 1.把$p_1, p_2$放入栈中 2.若$p_{i{(i & ...
- 人物丨让小三吐血,让原配泣血——24K渣男郎咸平
http://url.cn/5swgmythttps://www.toutiao.com/i6650650793743483395人物丨让小三吐血,让原配泣血——24K渣男郎咸平 人物丨让小三吐血,让 ...
- Oracle EXPDP and IMPDP
一.特点 • 可通过 DBMS_DATAPUMP 调用 • 可提供以下工具: – expdp – impdp – 基于 Web 的界面 • 提供四种数据移动方法: – 数据文件复制 – 直接路径 – ...
- github 下载全部项目
从github下载资料过程中,有些项目含有子模块,有时通过git clone 或者下载zip方式项目可能会缺少文件,因此需要执行 git submodule update --init --recur ...