java核心技术-IO
1.1 流的简单介绍和分类
Java流操作的相关的类和接口:
- File: 文件类
- RandomAccessFile: 随机存取文件类
- InputStream: 字节输出流
- OutputStream: 字符输出流
- Reader: 字符输入流
- Writer: 字符输出流
四个抽象基类分别为:InputStream 、OutputStream 、Reader 、Writer;
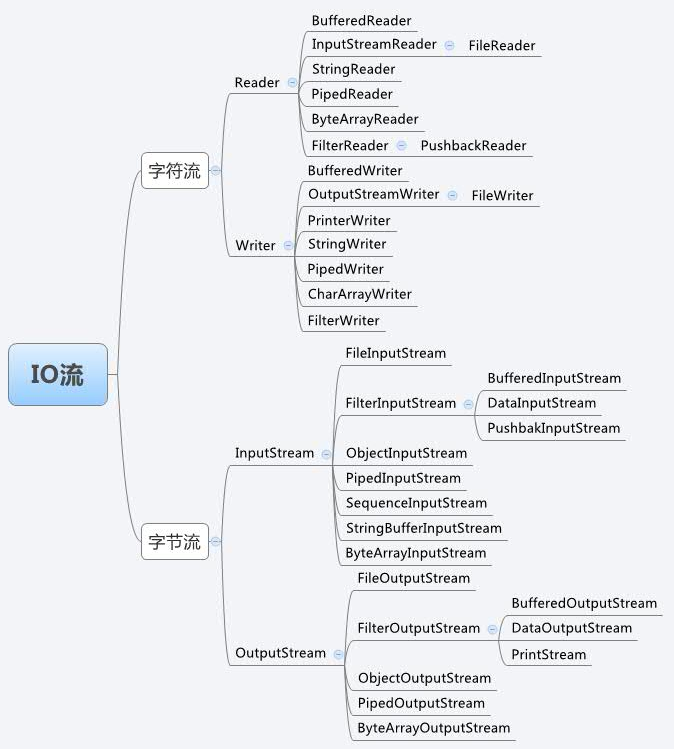
Java流类图结构:
注:若用字节流操作文本文件,会引起乱码和效率低的问题。若用字符流去操作非文本文件,不会报错,但什么也获取不了。
1.2 常见节点流和处理流的使用方法
1.2.1 只使用节点流的复制粘贴
非文本文件
		FileInputStream fis = null;

		FileOutputStream fos = null;

		try {

			//1.创建 FileInputStream 的实例,同时打开指定文件

			fis = new FileInputStream("1.jpg");

			fos = new FileOutputStream("2.jpg");

			byte[] b = new byte[1024];

			int len = 0;

			while((len = fis.read(b)) != -1){

				fos.write(b,0,len);

			}

		} catch (Exception e) {

			e.printStackTrace();

		} finally {

			if(fis != null){

				try {

					fis.close();

				} catch (IOException e) {

					e.printStackTrace();

				}

			}

			if(fos != null){

				try {

					fos.close();

				} catch (IOException e) {

					e.printStackTrace();

				}

			}

		}
文本文件
	    FileReader fr = null;

		FileWriter fw = null;

		try {

			fr = new FileReader("1.txt");

			fw = new FileWriter("2.txt");

			char[] c = new char[100];

			int len = 0;

			while((len = fr.read(c)) != -1){

				fw.write(c, 0, len);

			}

		} catch (Exception e) {

			e.printStackTrace();

		} finally {

			if(fw != null){

				try {

					fw.close();

				} catch (IOException e) {

					e.printStackTrace();

				}

			}

			if(fr != null){

				try {

					fr.close();

				} catch (IOException e) {

					e.printStackTrace();

				}

			}

		}
1.2.2 带上缓冲流的复制粘贴
非文本文件
		BufferedOutputStream bos = null;

		BufferedInputStream  bis = null;

		try {

			FileInputStream fis  = new FileInputStream("1.jpg");

			FileOutputStream fos = new FileOutputStream("2.jpg");

			bis = new BufferedInputStream(fis);

			bos = new BufferedOutputStream(fos);

			byte[] b = new byte[1024];

			int len = 0;

			while((len = bis.read(b)) != -1){

				bos.write(b, 0, len);

			}

		} catch (Exception e) {

			e.printStackTrace();

		} finally{

			if(bos != null){

				bos.close();

			}

			if(bis != null){

				bis.close();

			}

		}
文本文件
		BufferedReader br = null;

		BufferedWriter bw = null;

		try {

			FileReader fr = new FileReader("newFile.txt");

			FileWriter fw = new FileWriter("newFile2.txt");

			br = new BufferedReader(fr);

			bw = new BufferedWriter(fw);

			String str = null;

			while( (str = br.readLine()) != null){

				bw.write(str);

				bw.newLine();

			}

		} catch (Exception e) {

			e.printStackTrace();

		} finally {

			if(bw != null){

				bw.close();

			}

			if(br != null){

				br.close();

			}

		}
1.3 序列化与反序列化
主要使用对象流进行操作: ObjectInputStream 、ObjectOutputStream
序列化:将内存中的对象以二进制的形式保存在磁盘中
反序列化:将磁盘的对象读取
准备工作: 需要提供一个序列化接口。序列号如果不显示给出, 则会默认根据类信息自动生成一个序列号,一旦类信息发送变动与序列化前不同,对象的反序列化将会抛出异常,所以还是建议 显示给出一个序列号。
关键字: transient 和 static修饰的属性不会被序列化
1.3.1 序列化反序列化多个值
序列化
	    //3. 创建对象流,包装缓冲流,用于完成序列化

		ObjectOutputStream oos = null;

		try {

			int num = 10;

			boolean flag = false;

			String str = "abcde";

			//1.创建节点流,同时打开指定文件

			FileOutputStream fos = new FileOutputStream("./data.dat");

			//2.(可选)使用缓冲流包装节点流,用于提高传输效率。

			BufferedOutputStream bos = new BufferedOutputStream(fos);

			oos = new ObjectOutputStream(bos);

			oos.writeInt(num);

			oos.writeBoolean(flag);

			oos.writeUTF(str);

		} catch (IOException e) {

			e.printStackTrace();

		} finally {

			if(oos != null){

				//5.关闭流

				try {

					oos.close();

				} catch (IOException e) {

					e.printStackTrace();

				}

			}

		}
反序列化
		ObjectInputStream ois = null;

		try {

			FileInputStream fis = new FileInputStream("./data.dat");

			ois = new ObjectInputStream(fis);

			//反序列化的顺序务 必和 序列化的顺序保持一致

			int num = ois.readInt();

			boolean flag = ois.readBoolean();

			String str = ois.readUTF();

			System.out.println(num);

			System.out.println(flag);

			System.out.println(str);

		} catch (Exception e) {

			e.printStackTrace();

		} finally {

			if(ois != null){

				try {

					ois.close();

				} catch (IOException e) {

					e.printStackTrace();

				}

			}

		}
1.3.2 序列化和反序列化多个对象
准备工作
public class Person implements Serializable{

	private static final long serialVersionUID = 134628734823487283L;

	private String name;

	private int age;

	public Person(String name, int age) {

		super();

		this.name = name;

		this.age = age;

	}

	public Person() {}

	public int getAge(){

		return age;

	}

	public String getName(){

		return name;

	}

	public void setAge(int age) {

		this.age = age;

	}

	public void setName(String name) {

		this.name = name;

	}

	@Override

	public String toString() {

		return "Person [name=" + name + ", age=" + age + "]";

	}

}
序列化
	    //Person 务必要实现序列化接口

		Person p1 = new Person("张三",19);

		Person p2 = new Person("李四",20);

		Person p3 = new Person("王五",16);

		ObjectOutputStream oos = null;

		try {

			FileOutputStream fos = new FileOutputStream("person.dat");

			BufferedOutputStream bos = new BufferedOutputStream(fos);

			oos = new ObjectOutputStream(bos);

			oos.writeObject(p1);

			oos.writeObject(p2);

			oos.writeObject(p3);

		} catch (Exception e) {

			e.printStackTrace();

		} finally {

			if(oos != null){

				try {

					oos.close();

				} catch (IOException e) {

					e.printStackTrace();

				}

			}

		}
反序列化
                        ObjectInputStream ois = null;

		try {

			FileInputStream fis = new FileInputStream("person.dat");

			BufferedInputStream bis = new BufferedInputStream(fis);

			ois = new ObjectInputStream(bis);

			Person p1 = (Person)ois.readObject();

			Person p2 = (Person)ois.readObject();

			Person p3 = (Person)ois.readObject();

			System.out.println(p1);

			System.out.println(p2);

			System.out.println(p3);

		}  catch (Exception e) {

			e.printStackTrace();

		}  finally {

			if(ois != null){

				try {

					ois.close();

				} catch (IOException e) {

					e.printStackTrace();

				}

			}

		}
1.4 转换流
转换流:InputStreamReader & OutStreamWriter
编码:字符串 -> 字节数组
解码:字节数组 -> 字符串
		BufferedReader br = null;

		BufferedWriter bw = null;

		try {

			FileInputStream fis = new FileInputStream("hello.txt");

			InputStreamReader isr = new InputStreamReader(fis);

			br = new BufferedReader(isr);

			FileWriter fileWriter = new FileWriter("hello1.txt");

			bw = new BufferedWriter(fileWriter);

			String str = null;

			while((str = br.readLine()) != null){

				bw.write(str);

				bw.newLine();

			}

		} catch (Exception e) {

			e.printStackTrace();

		} finally {

			if(bw != null){

				try {

					bw.close();

				} catch (IOException e) {

					e.printStackTrace();

				}

			}

			if(br != null){

				try {

					br.close();

				} catch (IOException e) {

					e.printStackTrace();

				}

			}

		}
1.5 随机存取文件类
RandomAccessFile 类支持"随机访问"的方式,程序可以跳到文件的任意地方来读写文件
支持只访问文件的部分内容
可以向已存在的文件后追加内容
RandomAccessFile 对象包含一个记录指针,用以标示当前读写处的位置。
RandomAccessFile 类对象可以自由移动记录指针:
long getFilePointer():获取文件记录指针的位置
void seek(long pos):将文件记录指针定位到pos位置
- 构造器
public RandomAccessFile(File file,String mode)
public RandomAccessFile(String name,String mode)
- 创建RandomAccessFile 类实例需要制定一个mode 参数, 该参数指定 RandomAccessFile的访问模式:
r:以只读方式打开
rw:打开以便读取和写入
rwd:打开以便读取和写入;同步文件内容的更新
rws:打开以便读取和写入;同步文件内容和元数据的更新
	/**

	 * 在abcdef写入文件 再向abc中间 插入hello

	 */

	@Test

	public void test4() throws IOException{

		RandomAccessFile randomAccessFile = new RandomAccessFile("hell.txt", "rw");

		String str = "abcdef";

		randomAccessFile.write(str.getBytes());

		randomAccessFile.seek(3);

		String line = randomAccessFile.readLine();

		randomAccessFile.seek(3);

		randomAccessFile.write("hello".getBytes());

		randomAccessFile.write(line.getBytes());

		randomAccessFile.close();

	}
java核心技术-IO的更多相关文章
- java核心技术之流与文件
InputStream和OutputStream构成了输入/输出类层次结构的基础.用于按字节进行读写.而与之处在同一等级的Reader/Writer同样作为抽象类定义了用于对字符进行读取的类层次结构, ...
- java核心技术-(总结自杨晓峰-java核心技术36讲)
1. 谈谈你对java平台的理解 首先是java最显著的两个特性,一次写入处处运行:还有垃圾收集器gc,gc能够对java内存进行管理回收,程序员不需要关心内存的分配和回收问题 然后谈谈jre和jdk ...
- Java核心技术中的程序片段
import java.io.*; import java.nio.charset.Charset; import java.nio.charset.StandardCharsets; import ...
- 一文看懂java的IO流
废话不多说,直接上代码 import com.fasterxml.jackson.databind.ObjectMapper; import java.io.*; import java.nio.ch ...
- Java核心技术
[Java核心技术36讲]1.谈谈你对Java平台的理解 2.Exception和Error有什么区别 3.谈谈final.finally.finalize有什么不同?4.强引用.软引用.弱引用.虚引 ...
- 2019 最新 Java 核心技术教程,都在这了!
Java技术栈 www.javastack.cn 优秀的Java技术公众号 以下是Java技术栈微信公众号发布的所有关于 Java 的技术干货,会从以下几个方面汇总,本文会长期更新. Java 基础篇 ...
- 面试必备!Java核心技术100+面试题
一线互联网公司工作了几年,我作为求职者参加了不少面试,也作为面试官面试了很多同学,整理这份面试指南,一方面是帮助大家更好的准备面试,有的放矢,另一方面也是对自己知识框架做一个体系化的梳理. 这篇文章梳 ...
- Java核心技术点之泛型
1. Why ——引入泛型机制的原因 假如我们想要实现一个String数组,并且要求它可以动态改变大小,这时我们都会想到用ArrayList来聚合String对象.然而,过了一阵,我们想要实现一个大小 ...
- Java核心技术点之集合框架
1. 概述 Java集合框架由Java类库的一系列接口.抽象类以及具体实现类组成.我们这里所说的集合就是把一组对象组织到一起,然后再根据不同的需求操纵这些数据.集合类型就是容纳这些对象的一个容 ...
随机推荐
- Hibernate 干货
一 .hibernate概念: hibernate应用在javaee 三层框架中的dao层(web 层 --service层--dao层),在dao层实现对数据库的CRUD操作.hibernate是对 ...
- Windows Python Extension Packages
备注: 1.先要安装wheel库:pip install wheel 2.下载wheel,切换至下载路径,然后安装:pip install wheel库名.whl Windows Python Ext ...
- var在PHP和JS中的使用
一,var在PHP中的使用 var在PHP中使用很少,只在类中声明成员变量时候,可以使用var,其相当于public,而且以后逐渐用public替代var,所以在PHP中尽量不使用var声明变量. 二 ...
- Asp.net的生命周期应用之IHttpHandler
摘自:http://www.cnblogs.com/JimmyZhang/archive/2007/09/15/894124.html Framework提供了一系列的接口和类,允许你对于Http请求 ...
- appium获取toast方法
配置toast请注意: 1.指定desired_caps["automationName"] = "UiAutomator2" 2.要求安装jdk1.8 64位 ...
- 洛谷 P3757 [CQOI2017]老C的键盘
题面 luogu 题解 其实就是一颗二叉树 我们假设左儿子小于根,右儿子大于根 考虑树形\(dp\) \(f[u][i]\)表示以\(u\)为根的子树,\(u\)为第\(i\)小 那么考虑子树合并 其 ...
- Q312 戳气球
有 n 个气球,编号为0 到 n-1,每个气球上都标有一个数字,这些数字存在数组 nums 中. 现在要求你戳破所有的气球.每当你戳破一个气球 i 时,你可以获得 nums[left] * nums[ ...
- ator自动生成mybatis配置和类信息
generator自动生成mybatis的xml配置.model.map等信息: 1.下载mybatis-generator-core-1.3.2.jar包. 网址:http://cod ...
- Mac下Homebrew的图形化界面工具Cakebrew
安装: brew cask install cakebrew 如果不能下载直接上官网下载dmg包进行安装. 参考: https://www.cakebrew.com/ https://github.c ...
- (转)我是如何在SQLServer中处理每天四亿三千万记录的
首先声明,我只是个程序员,不是专业的DBA,以下这篇文章是从一个问题的解决过程去写的,而不是一开始就给大家一个正确的结果,如果文中有不对的地方,请各位数据库大牛给予指正,以便我能够更好的处理此次业务. ...