
Spring day01
1 实例化Spring容器
新建springday01项目
1.F盘jar/Spring/first/五个jar包拷贝到lib下,复制xml文件到项目first包下
2.First.java测试如何启动容器
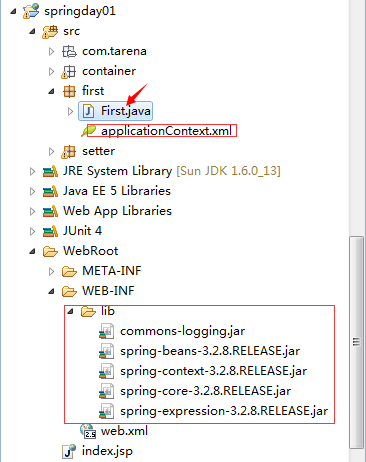
First.java:
public static void main(String[] args) {
//因为配置文件放在src下的first包下(文件路径可以随便,但是代码中也要改变)
String cfg = "first/applicationContext.xml";
ApplicationContext ctx = new ClassPathXmlApplicationContext(cfg);
System.out.println(ctx);
}
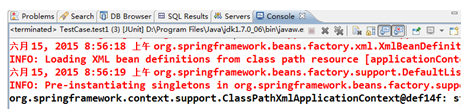
注:参考jar文件和xml文件在F:\Code\jar\Spring\first文件夹下。
2 使用Spring容器创建bean
1.复制xml文件到container/instance下,分别使用构造器(重点掌握)、静态工厂(了解)、实例工厂(了解)实例化bean
2.ExampleBean必须实现序列化接口,以及无参构造器
3.分别进行测试
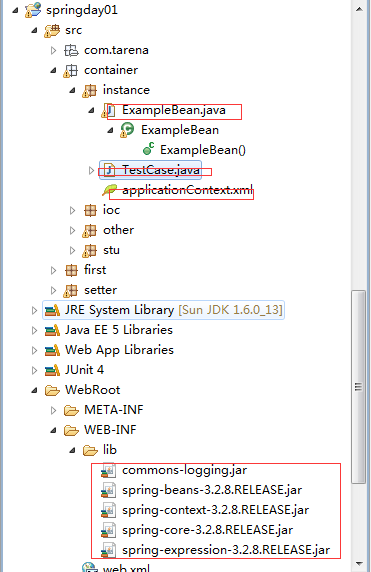
代码如下:
xml代码:
<?xml version="1.0" encoding="UTF-8"?>
<beans xmlns="http://www.springframework.org/schema/beans"
xmlns:xsi="http://www.w3.org/2001/XMLSchema-instance"
xmlns:context="http://www.springframework.org/schema/context"
xmlns:jdbc="http://www.springframework.org/schema/jdbc"
xmlns:jee="http://www.springframework.org/schema/jee"
xmlns:tx="http://www.springframework.org/schema/tx"
xmlns:aop="http://www.springframework.org/schema/aop"
xmlns:mvc="http://www.springframework.org/schema/mvc"
xmlns:util="http://www.springframework.org/schema/util"
xmlns:jpa="http://www.springframework.org/schema/data/jpa"
xsi:schemaLocation="
http://www.springframework.org/schema/beans http://www.springframework.org/schema/beans/spring-beans-3.2.xsd
http://www.springframework.org/schema/context http://www.springframework.org/schema/context/spring-context-3.2.xsd
http://www.springframework.org/schema/jdbc http://www.springframework.org/schema/jdbc/spring-jdbc-3.2.xsd
http://www.springframework.org/schema/jee http://www.springframework.org/schema/jee/spring-jee-3.2.xsd
http://www.springframework.org/schema/tx http://www.springframework.org/schema/tx/spring-tx-3.2.xsd
http://www.springframework.org/schema/data/jpa http://www.springframework.org/schema/data/jpa/spring-jpa-1.3.xsd
http://www.springframework.org/schema/aop http://www.springframework.org/schema/aop/spring-aop-3.2.xsd
http://www.springframework.org/schema/mvc http://www.springframework.org/schema/mvc/spring-mvc-3.2.xsd
http://www.springframework.org/schema/util http://www.springframework.org/schema/util/spring-util-3.2.xsd">
<!-- id要唯一,类名要写完整 -->
<bean id="eb1" class="container.instance.ExampleBean"/>
<!-- 虽然这个类我们自己没写,但是它一定有一个无参构造器 -->
<bean id="cal1" class="java.util.GregorianCalendar"/>
<!-- 此方法做了解,Calendar是一个抽象类,它没有无参构造器,第三句代表调用容器的静态方法 -->
<!-- 静态工厂方式创建一个对象,其中,factory-method属性用来指定静态方法名 -->
<bean id="cal2" class="java.util.Calendar"
factory-method="getInstance"/>
<!-- 使用实例工厂方式创建一个对象,第二个参数为别的bean的id,第三个参数表示
调用第二个bean的getTime方法 -->
<bean id="date1" factory-bean="cal1"
factory-method="getTime"/>
</beans>
ExampleBean.class:
//演示容器如何创建序列化对象
public class ExampleBean implements Serializable {
public ExampleBean(){
System.out.println("ExampleBean的无参构造器");
}
}
TestCase.class:
package container.instance;
import java.util.Calendar;
import java.util.Date;
import org.junit.Test;
import org.springframework.context.ApplicationContext;
import org.springframework.context.support.ClassPathXmlApplicationContext;
/*测试类*/
public class TestCase {
@Test
public void test1(){
//启动容器
String cfg = "container/instance/applicationContext.xml";
ApplicationContext ac = new ClassPathXmlApplicationContext(cfg);
//让容器创建一个对象,如果不写第二个参数,则返回Object,所以,我们加上第二个参数,即这个
//Bean所属的类
ExampleBean eb = ac.getBean("eb1",ExampleBean.class);
System.out.println(eb);
Calendar cal1 = ac.getBean("cal1", Calendar.class);
System.out.println(cal1);
Calendar cal2 = ac.getBean("cal2",Calendar.class);
System.out.println(cal2);
Date date1 = ac.getBean("date1",Date.class);
System.out.println(date1);
}
}
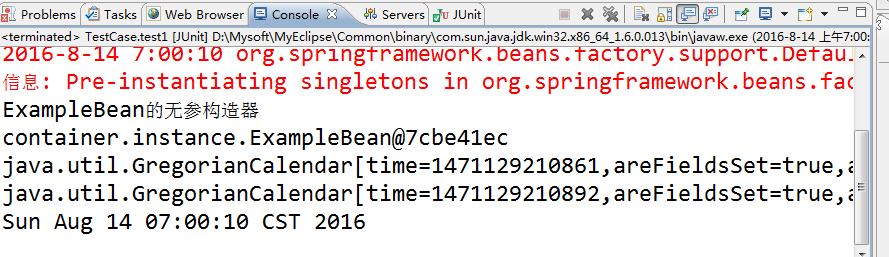
运行结果:
3 bean的作用域
1.复制xml文件到container/other下,使用构造器实例化bean
2.MessageBean实现序列化接口,无参构造器,初始化函数,销毁函数,调用函数
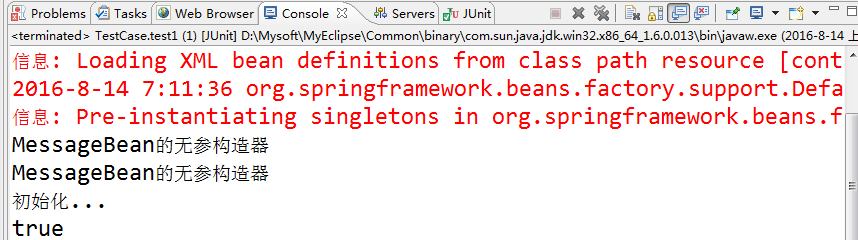
3.test1:
测试验证容器创建的bean默认是单例,即不管实例化多少次,都是同一个,但若xml中scope为prototype,则为多例
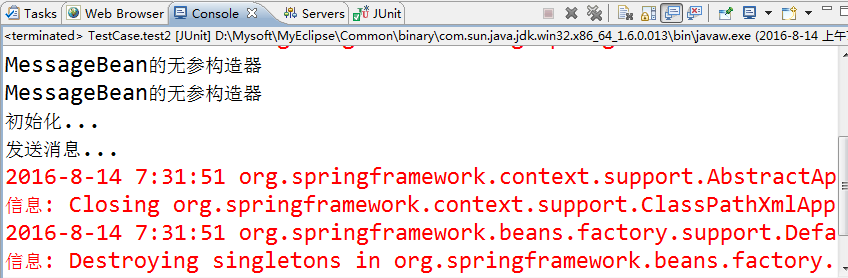
test2:
xml中配置init-method,创建对象时,会调用构造函数以及初始化函数
配置destroy-method,close容器时,会调用销毁函数,容器关闭只在单例singleton模式下进行
test3:
测试即使不创建bean,容器也会实现预创建好,如果想不提前创建bean对象,则lazy-init=“true”延迟实例化
4.stu包为类似的作业,练习bean生命周期
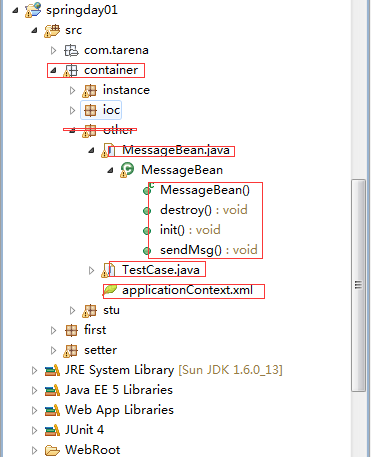
xml文件代码:
<?xml version="1.0" encoding="UTF-8"?>
<beans xmlns="http://www.springframework.org/schema/beans"
xmlns:xsi="http://www.w3.org/2001/XMLSchema-instance"
xmlns:context="http://www.springframework.org/schema/context"
xmlns:jdbc="http://www.springframework.org/schema/jdbc"
xmlns:jee="http://www.springframework.org/schema/jee"
xmlns:tx="http://www.springframework.org/schema/tx"
xmlns:aop="http://www.springframework.org/schema/aop"
xmlns:mvc="http://www.springframework.org/schema/mvc"
xmlns:util="http://www.springframework.org/schema/util"
xmlns:jpa="http://www.springframework.org/schema/data/jpa"
xsi:schemaLocation="
http://www.springframework.org/schema/beans http://www.springframework.org/schema/beans/spring-beans-3.2.xsd
http://www.springframework.org/schema/context http://www.springframework.org/schema/context/spring-context-3.2.xsd
http://www.springframework.org/schema/jdbc http://www.springframework.org/schema/jdbc/spring-jdbc-3.2.xsd
http://www.springframework.org/schema/jee http://www.springframework.org/schema/jee/spring-jee-3.2.xsd
http://www.springframework.org/schema/tx http://www.springframework.org/schema/tx/spring-tx-3.2.xsd
http://www.springframework.org/schema/data/jpa http://www.springframework.org/schema/data/jpa/spring-jpa-1.3.xsd
http://www.springframework.org/schema/aop http://www.springframework.org/schema/aop/spring-aop-3.2.xsd
http://www.springframework.org/schema/mvc http://www.springframework.org/schema/mvc/spring-mvc-3.2.xsd
http://www.springframework.org/schema/util http://www.springframework.org/schema/util/spring-util-3.2.xsd">
<!-- prototype:原型,其作用是让容器创建多个实例,
而singleton只创建一个实例 scope="prototype"-->
<bean id="mb1" class="container.other.MessageBean"
/>
<!-- init-method属性:指定初始化方法,注意,销毁方法只针对单例,此处若
scope为原型,则销毁方法不执行 -->
<bean id="mb2"
class="container.other.MessageBean"
init-method="init"
destroy-method="destroy"
/>
<!--lazy-init属性如果为true,表示延迟实例化 lazy-init="true"-->
<bean id="mb3"
class="container.other.MessageBean"
init-method="init"
destroy-method="destroy"
/>
</beans>
MessageBean.class代码:
package container.other;
import java.io.Serializable;
public class MessageBean implements Serializable{
public MessageBean(){
System.out.println("MessageBean的无参构造器");
}
//初始化方法
public void init(){
System.out.println("初始化...");
}
public void sendMsg(){
System.out.println("发送消息...");
}
//销毁方法
public void destroy(){
System.out.println("销毁资源");
}
}
TestCase代码:
package container.other;
import org.junit.Test;
import org.springframework.context.ApplicationContext;
import org.springframework.context.support.AbstractApplicationContext;
import org.springframework.context.support.ClassPathXmlApplicationContext;
public class TestCase {
@Test
public void test1(){
String cfg = "container/other/applicationContext.xml";
ApplicationContext ac =
new ClassPathXmlApplicationContext(cfg);
MessageBean mb1 = ac.getBean("mb1",MessageBean.class);
MessageBean mb2 = ac.getBean("mb1",MessageBean.class);
System.out.println(mb1==mb2);
//true 说明多次实例化,但实际值实例话一次,修改scope为prototype,则
//每getBean一次,则实例化一次,所以为false
}
@Test
public void test2(){
String cfg = "container/other/applicationContext.xml";
//ApplicationContext ac =
//关闭容易应该使用AbstractApplicationContext
AbstractApplicationContext ac =
new ClassPathXmlApplicationContext(cfg);
MessageBean mb2 = ac.getBean("mb2",MessageBean.class);
mb2.sendMsg();
//关闭容器
ac.close();
}
@Test
public void test3(){
String cfg = "container/other/applicationContext.xml";
ApplicationContext ac =
new ClassPathXmlApplicationContext(cfg);
//此处即使没有getBean,也会实例化,因此使用lazy-init会延迟实例化。
MessageBean mb3 = ac.getBean("mb3",MessageBean.class);
}
}
测试结果:
test1:
test2:

test3:
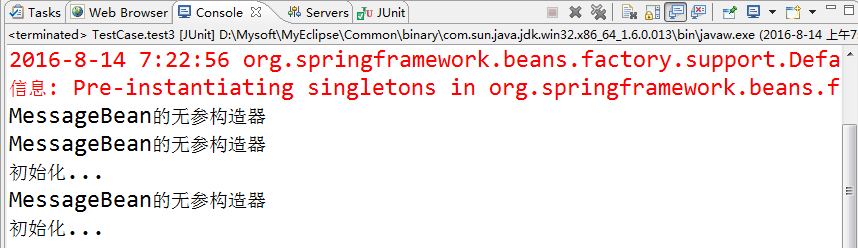
对于init-lazy此处显示结果不是很正确,具体参考tmooc文档说明。
5 Setter注入
1.复制xml文件到包setter下
2.Computer实现序列化接口,构造函数以及set/get方法
3.xml中使用setter注入声明bean
4.测试,输出bean属性
注意,此处只涉及了一个bean,下面的一个例子涉及到三个bean
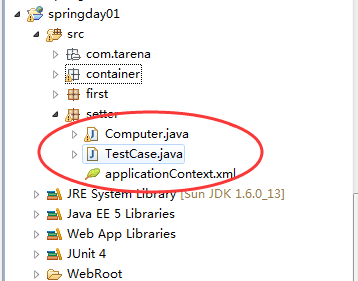
Computer.class:
package setter;
import java.io.Serializable;
public class Computer implements Serializable {
private String mainboard;
private String hdd;
private String ram;
public Computer() {
System.out.println("Computer()........");
}
public String getMainboard() {
return mainboard;
}
public void setMainboard(String mainboard) {
this.mainboard = mainboard;
}
public String getHdd() {
return hdd;
}
public void setHdd(String hdd) {
this.hdd = hdd;
}
public String getRam() {
return ram;
}
public void setRam(String ram) {
this.ram = ram;
}
}
在applicationContext.xml中声明这个bean,追加代码如下:
<bean id="computer" class="setter.Computer">
<property name="mainboard" value="技嘉"></property>
<property name="hdd" value="希捷"></property>
<property name="ram" value="金士顿"></property>
</bean>
TestCase 测试代码:
package setter;
import org.junit.Test;
import org.springframework.context.ApplicationContext;
import org.springframework.context.support.ClassPathXmlApplicationContext;
public class TestCase {
@Test
public void test1(){
String cfg = "setter/applicationContext.xml";
ApplicationContext ac =
new ClassPathXmlApplicationContext(cfg);
Computer computer = ac.getBean("computer",Computer.class);
System.out.println(computer.getMainboard());
System.out.println(computer.getHdd());
System.out.println(computer.getRam());
}
}
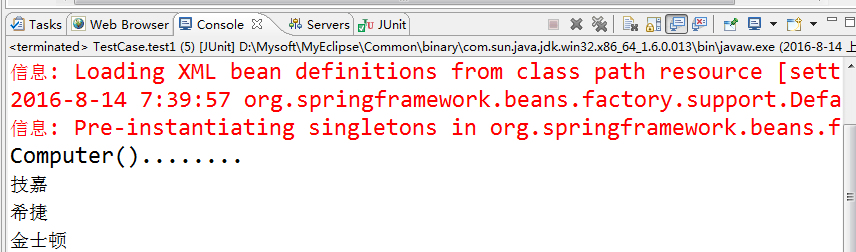
运行结果:
6 构造器注入
步骤一:创建bean
创建一个手机类MobilePhone,代码如下:
- package com.tarena.bean;
- import java.io.Serializable;
- public class MobilePhone implements Serializable {
- private String cpu;
- private String ram;
- public MobilePhone(String cpu, String ram) {
- this.cpu = cpu;
- this.ram = ram;
- }
- public String getCpu() {
- return cpu;
- }
- public void setCpu(String cpu) {
- this.cpu = cpu;
- }
- public String getRam() {
- return ram;
- }
- public void setRam(String ram) {
- this.ram = ram;
- }
- }
步骤二:声明bean
在applicationContext.xml中声明这个bean,追加代码如下:
- <!--构造器注入 -->
- <bean id="phone" class="com.tarena.bean.MobilePhone">
- <constructor-arg index="0" value="ARM"/>
- <constructor-arg index="1" value="2G"/>
- </bean>
步骤三:写测试代码
在TestCase中增加测试方法test6,追加代码如下:
- /**
- * 构造器注入
- */
- @Test
- public void test6() throws SQLException {
- String cfg = "applicationContext.xml";
- AbstractApplicationContext ctx =
- new ClassPathXmlApplicationContext(cfg);
- MobilePhone phone =
- ctx.getBean("phone", MobilePhone.class);
- System.out.println(phone.getCpu());
- System.out.println(phone.getRam());
- }
步骤四:执行测试
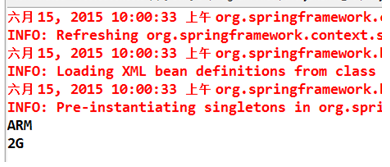
执行测试方法test6,效果如下图:
Spring day01的更多相关文章
- Spring day01笔记
struts:web层,比较简单(ValueStack值栈,拦截器) hibernate:dao层,知识点杂 spring:service层,重要,讲多少用多少 --> [了解] sprin ...
- 开放源代码的设计层面框架Spring——day01
spring第一天 一.Spring概述 1.1spring概述 1.1.1spring介绍 Spring是分层的Jav ...
- spring框架入门day01
struts:web层,比较简单(ValueStack值栈,拦截器) hibernate:dao层,知识点杂 spring:service层,重要,讲多少用多少 --> [了解] spring ...
- Spring day02笔记
spring day01回顾 编写流程(基于xml) 1.导入jar包:4+1 --> beans/core/context/expression | commons-logging 2.编写目 ...
- 05_ssm基础(三)之Spring基础
11.spring入门引导 12.spring_HelloWord程序 实现步骤: 0.找到spring压缩包,并解压 1.拷贝jar包 2.添加主配置文件(官方文档约28页) 3.在测试中使用 13 ...
- spring框架入门day02
0. 绪论 在第二天的学习中的学习JdbcTemplate之前,想要下载最新版本的mysql server8.0.11 结果在将所有的东西配置好后,发现报错, · Establishing SSL c ...
- 05_ssm基础(六)之SpringMVC
36.springMVC之入门 1.springMVC简介 Spring MVC是基于MVC模式的一个Web框架,它解决WEB开发中常见的问题(参数接收.文件上传.表单验证.国际化.等等),而且使用简 ...
- [刘阳Java]_Spring相关配置介绍_第5讲
这一节我们介绍一下Spring框架的相关常用配置 Spring依赖注入的两种方式(构造方法注入和setter方式注入) p-namespace方式配置 properties属性文件配置方式 集合对象配 ...
- [刘阳Java]_Spring IOC程序代码如何编写_第3讲
第2讲我们介绍了Spring IOC的基本原理,这篇文章告诉大家Spring IOC程序代码是如何编写的,从而可以更好的理解IOC和DI的概念(所有的Java类的初始化工作扔给Spring框架,一个J ...
随机推荐
- BLE-NRF51822-实现简单扫描器
在sdk目录 XXX:\Keil_v5\ARM\Pack\NordicSemiconductor\nRF_Examples\9.0.0\ble_central 下有官方提供的主从连接的demo. 官 ...
- eclipse Maven -->web project
http://blog.chinaunix.net/uid-26959955-id-3248053.html http://blog.csdn.net/wilsonke/article/details ...
- wget ftp
今天操作远端机器的时候发现少一个安装包, 需要传到对方的机器上,还能使用通过的老办法,直接SSH连上去了,发现传的很慢, 只有40K的样子, 看时间还需要二个多小时就有点受不了了.想想有一台FTP服务 ...
- discuz函数解析--写日志
public static function writelog($file, $log) { global $_G; $yearmonth = dgmdate(TIMESTAMP, 'Ym', $_G ...
- Dom方式解析XML
public class TestXML { public static void main(String[] args) throws SAXException, IOException { //D ...
- .Net程序员安卓学习之路5:使用xutils注入View和事件以及图片的显示
xUtils注入和图片显示 一.xUtils注入 引用官方介绍: ViewUtils模块: •android中的ioc框架,完全注解方式就可以进行UI,资源和事件绑定: •新的事件绑定方式,使用混淆工 ...
- Top 10 Free Wireless Network hacking/monitoring tools for ethical hackers and businesses
There are lots of free tools available online to get easy access to the WiFi networks intended to he ...
- github上所有大于800 star OC框架
https://github.com/XCGit/awesome-objc-frameworks#awesome-objc-frameworks awesome-objc-frameworks ID ...
- ASIHTTPRequest 记录过去5秒的平均流量字节/秒
//记录过去5秒的平均流量字节/秒 NSLog(@"%llu",[ASIHTTPRequest averageBandwidthUsedPerSecond]);
- ucenter 整合同步登录的内部实现原理及thinkphp整合ucenter
1.用户登录discuz,通过logging.php文件中的函数uc_user_login对post过来的数据进行验证,也就是对username和password进行验证.2.如果验证成功,将调用位于 ...