Linux驱动小技巧 | 利用DRIVER_ATTR实现调用内核函数
1. 前言
很多朋友在调试驱动的时候,都会遇到这样一个场景:
修改一个参数,然后调用某个内核中的函数。
比如将某个gpio的值拉高/拉低,修改某个寄存器的值等等。
如果每一个参数都通过字符设备的ioctl接口,增加对应的cmd,会比较麻烦,
研究内核的计算机大牛门怎么会容忍这种事发生,
于是设计出了DRIVER_ATTR这个宏,完美解决这个需求。
下面一口君通过一个简单的实例,给大家讲解如何使用DRIVER_ATTR。
2. DRIVER_ATTR定义
该宏定义的文件如下:
include/linux/device.h
struct driver_attribute {

	struct attribute attr;

	ssize_t (*show)(struct device_driver *driver, char *buf);

	ssize_t (*store)(struct device_driver *driver, const char *buf,

			 size_t count);

};

#define DRIVER_ATTR(_name, _mode, _show, _store) \

	struct driver_attribute driver_attr_##_name = __ATTR(_name, _mode, _show, _store)
__ATTR定义于文件
include/linux/sysfs.h
#define __ATTR(_name, _mode, _show, _store) {				\

	.attr = {.name = __stringify(_name), .mode = _mode },		\

	.show	= _show,						\

	.store	= _store,						\

}
说明
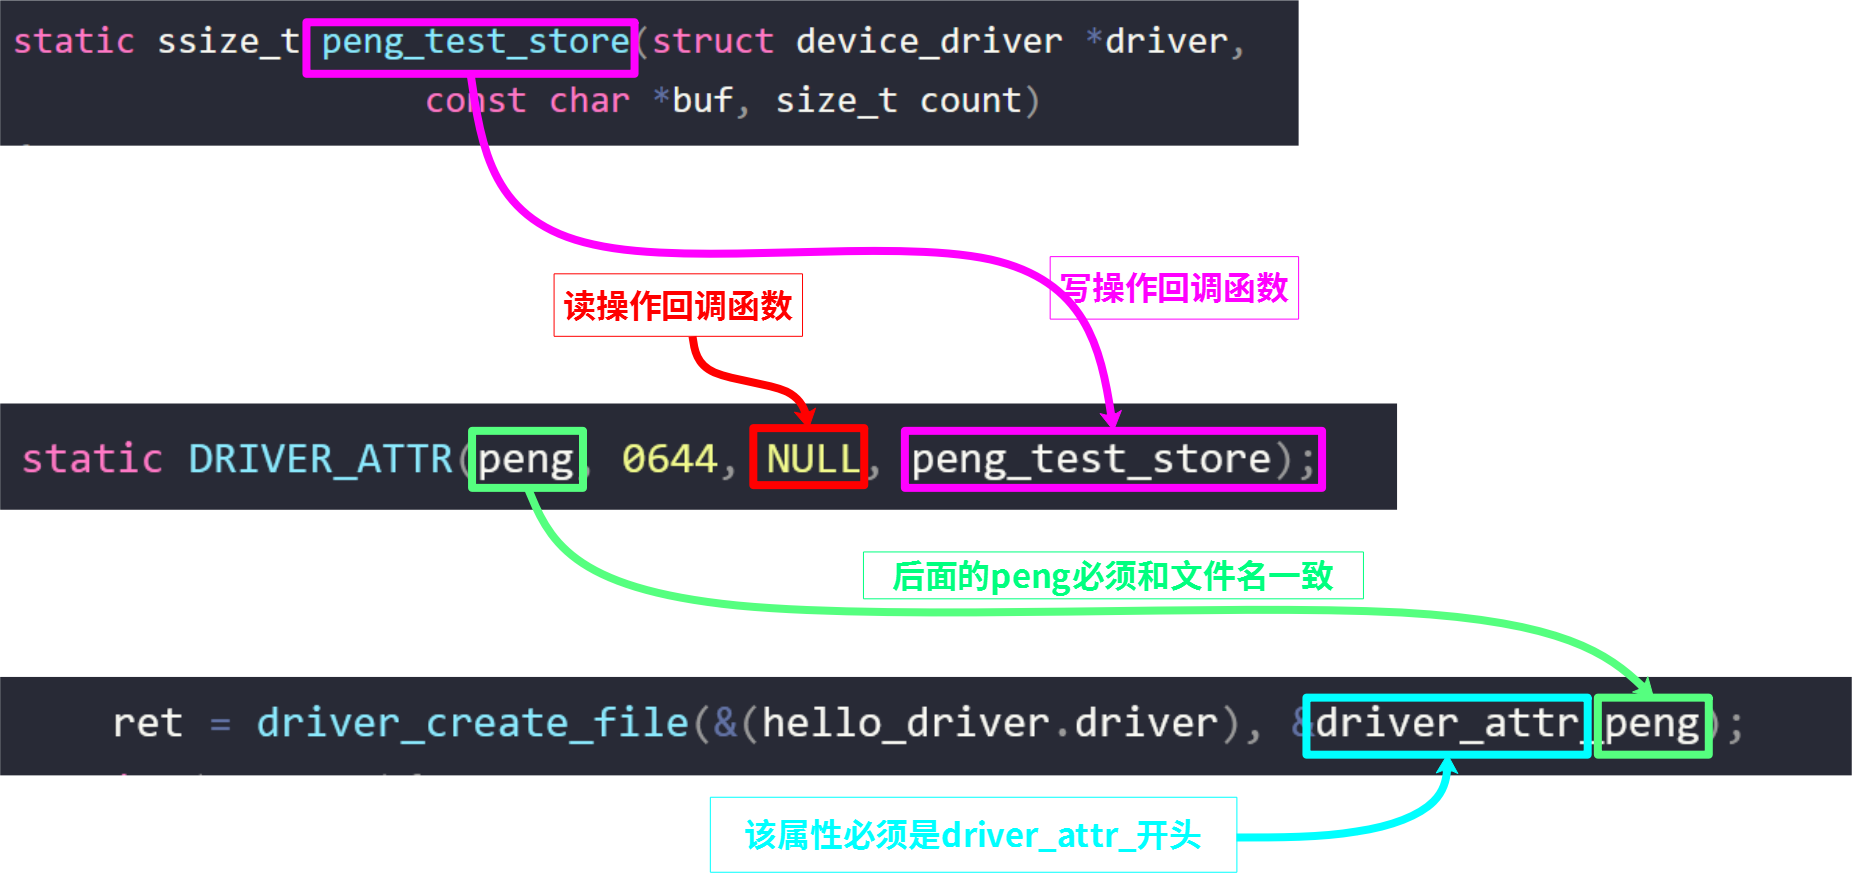
	_name:名称,也就是将在sys fs中生成的文件名称。

	_mode:上述文件的访问权限,与普通文件相同,UGO的格式,最高权限0644,否则会报错。

	_show:显示函数,cat该文件时,此函数被调用。

	_store:写函数,echo内容到该文件时,此函数被调用。
3. 使用步骤
定义一个写操作的回调函数:
static ssize_t peng_test_store(struct device_driver *driver,

					const char *buf, size_t count)

{

//对参数进行检查

	if(NULL == buf || count >255 || count == 0 || strnchr(buf, count, 0x20))

		return -1;

	printk("buf:%s count:%d\n",buf,count);

	return count;

}
声明该函数与文件节点关系
static DRIVER_ATTR(peng, 0644, NULL, peng_test_store);
创建文件节点:
	ret = driver_create_file(&(hello_driver.driver), &driver_attr_peng);

	if (ret < 0){

		dev_err(&pdev->dev, "could not create sysfs files\n");

		ret = -ENOENT;

	}
这几个名字之间关系如下:
4. 源码
本实验代码分为两个模块
device、driver,
分别定义结构体platform_device、platform_driver并注册到platform总线。
完整源码如下:
device.c
#include <linux/init.h>

#include <linux/module.h>

#include <linux/platform_device.h>

#include <linux/ioport.h>

static void hello_release(struct device *dev)

{

     return;

}

static struct platform_device hello_device =

{

	.name = "duang",

	.id = -1,

	.dev.release = hello_release,

};

static int hello_init(void)

{

	printk("hello_init \n");

	return platform_device_register(&hello_device);

}

static void hello_exit(void)

{

	printk("hello_exit \n");

	platform_device_unregister(&hello_device);

	return;

}

MODULE_LICENSE("GPL");

module_init(hello_init);

module_exit(hello_exit);
driver.c
#include <linux/init.h>

#include <linux/module.h>

#include <linux/kdev_t.h>

#include <linux/fs.h>

#include <linux/cdev.h>

#include <linux/device.h>

#include <asm/io.h>

#include <linux/platform_device.h>

#include <linux/ioport.h>

static int hello_probe(struct platform_device *pdev);

static 	int hello_remove(struct platform_device *pdev);

static ssize_t peng_test_store(struct device_driver *driver,

					const char *buf, size_t count)

{

	if(NULL == buf || count >255 || count == 0 || strnchr(buf, count, 0x20))

		return -1;

	printk("buf:%s count:%d\n",buf,count);

	return count;

}

static DRIVER_ATTR(peng, 0644, NULL, peng_test_store);

static struct platform_driver hello_driver =

{

	.probe = hello_probe,

	.driver.name = "duang",

	.remove = hello_remove,

};

struct resource *res;

static int hello_probe(struct platform_device *pdev)

{

	int ret;

	printk("match ok \n");

	ret = driver_create_file(&(hello_driver.driver), &driver_attr_peng);

	if (ret < 0){

		dev_err(&pdev->dev, "could not create sysfs files\n");

		ret = -ENOENT;

	}

	return 0;

}

static 	int hello_remove(struct platform_device *pdev)

{

	printk("hello_remove \n");

	return 0;

}

static int hello_init(void)

{

	printk("hello_init \n");

	return platform_driver_register(&hello_driver);

}

static void hello_exit(void)

{

	printk("hello_exit \n");

	platform_driver_unregister(&hello_driver);

	return;

}

MODULE_LICENSE("GPL");

module_init(hello_init);

module_exit(hello_exit);
Makefile
ifneq ($(KERNELRELEASE),)

obj-m:=device.o driver.o

else

KDIR :=/lib/modules/$(shell uname -r)/build

#KDIR :=/home/peng/linux-3.14

PWD  :=$(shell pwd)

all:

	make -C $(KDIR) M=$(PWD) modules

clean:

	rm -f *.ko *.o *.mod.o *.symvers *.cmd  *.mod.c *.order

endif
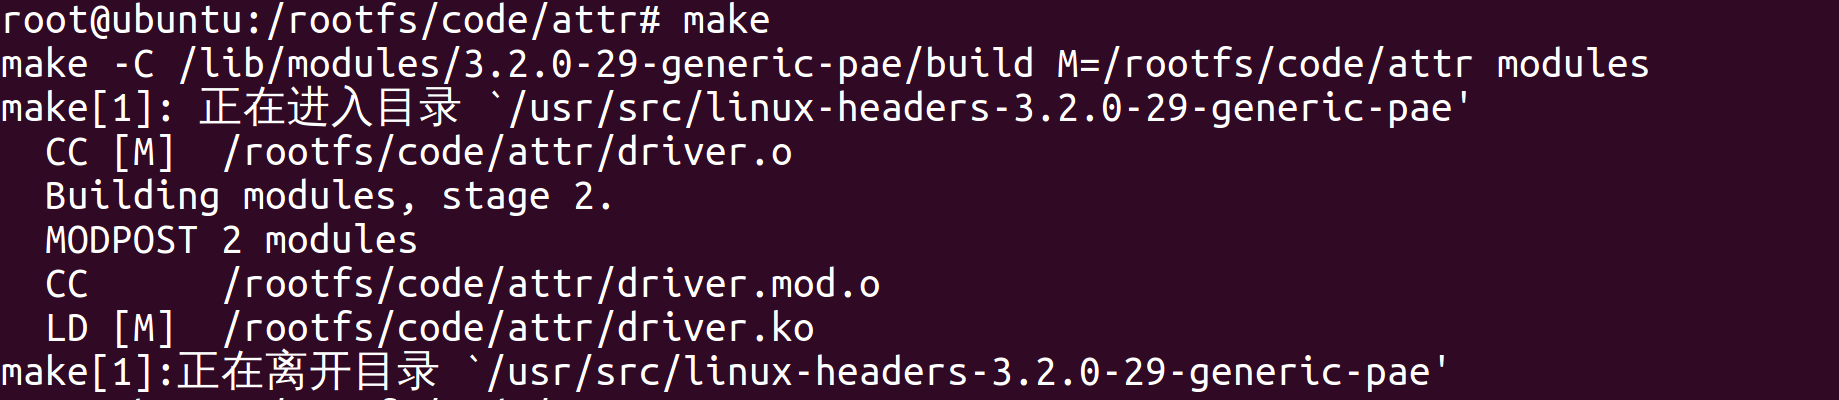
5. 编译运行
第一步:编译
第二步:加载模块驱动
第三步:查看生成的文件节点:

第四步:
通过下面命令向节点输入一个数字(要管理员权限):
echo 1 > peng
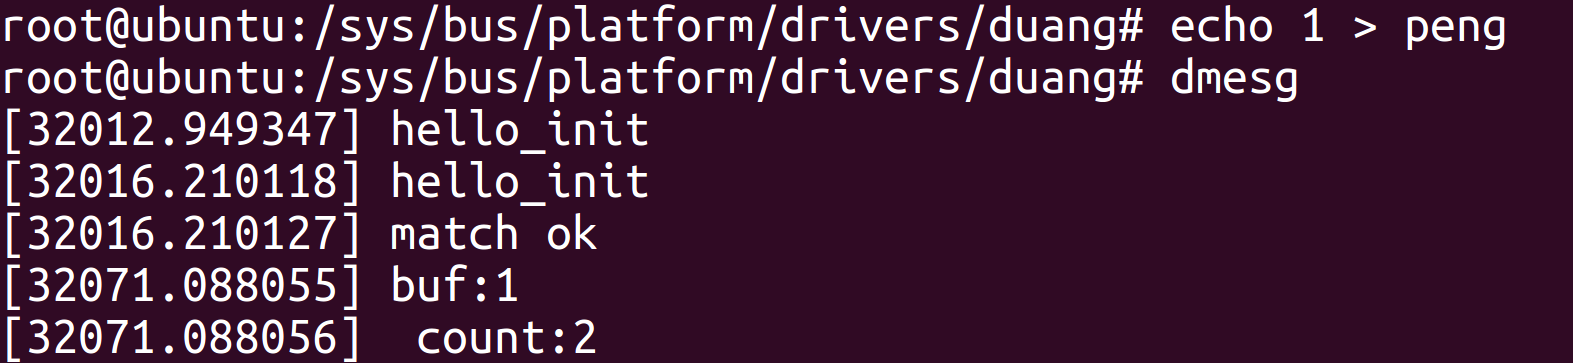 由结果可知,我们通过向文件
peng写入一个字符,实现了调用函数peng_test_store(),并且字符1传递给了参数buf,字符个数传递给了count。
其中目录duang是由结构体变量hello_driver 给出:
static struct platform_driver hello_driver =

{

	.driver.name = "duang",

};
6. 一次注册多个节点
需要借助结构体
struct attribute
以及函数
/**

 * sysfs_create_group - given a directory kobject, create an attribute group

 * @kobj:	The kobject to create the group on

 * @grp:	The attribute group to create

 *

 * This function creates a group for the first time.  It will explicitly

 * warn and error if any of the attribute files being created already exist.

 *

 * Returns 0 on success or error.

 */

int sysfs_create_group(struct kobject *kobj,

		       const struct attribute_group *grp)
此处就不验证了,直接从内核找个例子给大家学习下吧
drivers\input\touchscreen\ads7846.c
static ssize_t ads7846_pen_down_show(struct device *dev,

				     struct device_attribute *attr, char *buf)

{

	struct ads7846 *ts = dev_get_drvdata(dev);

	return sprintf(buf, "%u\n", ts->pendown);

}

static DEVICE_ATTR(pen_down, S_IRUGO, ads7846_pen_down_show, NULL);

static ssize_t ads7846_disable_show(struct device *dev,

				     struct device_attribute *attr, char *buf)

{

	struct ads7846 *ts = dev_get_drvdata(dev);

	return sprintf(buf, "%u\n", ts->disabled);

}

static ssize_t ads7846_disable_store(struct device *dev,

				     struct device_attribute *attr,

				     const char *buf, size_t count)

{

	struct ads7846 *ts = dev_get_drvdata(dev);

	unsigned int i;

	int err;

	err = kstrtouint(buf, 10, &i);

	if (err)

		return err;

	if (i)

		ads7846_disable(ts);

	else

		ads7846_enable(ts);

	return count;

}

static DEVICE_ATTR(disable, 0664, ads7846_disable_show, ads7846_disable_store);

static struct attribute *ads784x_attributes[] = {

	&dev_attr_pen_down.attr,

	&dev_attr_disable.attr,

	NULL,

};

static struct attribute_group ads784x_attr_group = {

	.attrs = ads784x_attributes,

};
err = sysfs_create_group(&mydevice->dev.kobj, &ads784x_attr_group);
7. 补充
当然_ATTR不是独生子女,他还有一系列的姊妹__ATTR_RO宏只有读方法,__ATTR_NULL等等
如对设备的使用        DEVICE_ATTR

对驱动使用               DRIVER_ATTR

对总线使用               BUS_ATTR

对类别 (class) 使用  CLASS_ATTR
好了,大家后面在调试驱动的时候别忘了有这些宏可以使用。
Linux驱动小技巧 | 利用DRIVER_ATTR实现调用内核函数的更多相关文章
- Linux驱动开发必看详解神秘内核(完全转载)
Linux驱动开发必看详解神秘内核 完全转载-链接:http://blog.chinaunix.net/uid-21356596-id-1827434.html IT168 技术文档]在开始步入L ...
- Linux应用小技巧
简介 本文针对Linux操作过程中提升工作效率问题,给出常见操作技巧,主要从Linux终端管理.显示git分支.终端快速检索历史命令等方面进行介绍. 本文内容主要以Ubuntu系统为例进行介绍. Li ...
- iOS开发小技巧--利用MJExtension解决数据结构复杂的模型转换
一.开发中难免会遇到,系统返回的数据中字典套集合,集合里面又套一层字典,然后字典里面还有字典或者集合等等的复杂结构的数据...MJExtension轻松搞定这类问题 1.解决方法一: 例:百思项目中帖 ...
- linux操作小技巧锦集
0.常用Linux命令 查看端口被占用情况: 1.netstat -tunlp|grep 端口号 2.lsof -i:端口号 tar 压缩文件命令: -c:建立一个压缩文件的参数指令(create 的 ...
- linux命令小技巧
一:命令行里怎么往上翻页 Shift+PageUP|PageDown 二:分页显示文件内容则可以用less工具过滤,然后用方向键或PageUp/PageDown上下翻 less /etc/passwd ...
- linux操作小技巧
巧妙利用别称 alias,让工作更有效率 在我的个人目录下/home/zdwu,打开.bashrc文件进行修改: 将 ll='ls -alF' 改为 ll='ls -ahlF',是的观察的结果显示更 ...
- windows和linux传输小技巧——FTP服务
目录 一.FTP简介 二.匿名用户访问设置 三.设置本地用户验证访问ftp 3.1.修改匿名用户.本地用户登录的默认根目录 四.使用user_list列表 一.FTP简介 FTP服务--用来传输文件的 ...
- iOS开发小技巧--利用运行时得到隐藏的成员变量
一.关于运行时,已经从网络上摘抄了一片文章,这里只有项目中自己的简单使用 -- 查找隐藏的成员变量 导入头文件 可以获得隐藏的成员变量,方法,属性等 代码: 打印效果图:
- iOS开发小技巧--利用苹果官方API播放视频(方法已经过时,了解一下)
- Linux终端小技巧
注释:以下都是自己遇到的问题,问题太多也记不住,每次上网查找又比较麻烦,索性记录一下随笔! 1.进程的挂载与运行 暂停运行一个进程:Ctrl+Z 其中这个进程可再被操作,如:后台运行.再次运行等 ...
随机推荐
- mysql子查询不支持limit问题解决
如果sql语句中的子查询包含limit 例如: select * from table where id in (select id from table limit 3) 会报错: This ver ...
- Kafka Stream 以及其他流处理框架对比
1. Kafka Stream Introduction 假设我们需要对kafka 消息做流数据分析,例如: 对部分消息做过滤 每分钟计算一次收到了多少消息 这种情况下,对于消息过滤以及定时统计,甚至 ...
- shell 根据 指定列 进行 去除 重复行
根据指定列进行去除重复行 这里的重复是指如果两行的某一列数据相同,则认为是重复数据. 例如:第1行与第2行数据,其中的第2列(以- 作为分隔符)明显是重复的. 100069 - ARM Compile ...
- KES数据库实践指南:探索KES数据库的事务隔离级别
引言 前两篇文章我们详细讲解了如何安装KES金仓数据库,并提供了快速查询和搭建基于coze平台的智能体的解决方案.今天,我们的焦点将放在并发控制机制和事务隔离级别上. 本文将通过一系列实验操作,深入探 ...
- .Net Core WebAPI Swagger Failed to load API definition
1.错误现象 1.1.写完一个测试API,Ctrl+F5运行,提示错误: Failed to load API definition.(如下图) 1.2.点击 http://localhost:516 ...
- yb课堂 实战之路由拦截和订单模块 《四十二》
前置守护 路由拦截功能开发 文档:https://router.vuejs.org/zh/guide/advanced/navigation-guards.html router里面配置需要登陆的路由 ...
- yolov5 筛选正样本流程 代码多图详解
yolov5正样本筛选原理 正样本全称是anchor正样本,正样本所指的对象是anchor box,即先验框. 先验框:从YOLO v2开始吸收了Faster RCNN的优点,设置了一定数量的预选框, ...
- 转载 | [AcSaveAsType -cad版本代号对应数字 ] & [AutoCAD的DWG文件格式版本代号列表]
1. AcSaveAsType -cad版本代号对应数字 doc.SaveAs("D:\AutoCAD\1.dwg", 61) # 将当前文件另存为PyAutoCAD_SaveA ...
- mysql 临时表的好处
客户端新建了一个会话,这个会话只是服务器与客户端1对1的关系,客户端可能在服务端建立一个临时表,满足客户端处理某些事务的需求,当客户端退出会话后,这个临时表自动drop,没有任何数据信息占用数据库空间 ...
- TypeScript 学习笔记 — 泛型的使用(七)
目录 一.指定函数参数类型 单个泛型 多个泛型 二.函数标注的方式 类型别名 type 接口 interface *案例分析: 三.默认泛型 四.泛型约束 五.泛型接口使用 六.类中的泛型 泛型(Ge ...