EaselJS 源码分析系列--第二篇
在 第一篇 中我们大致分析了从: 创建舞台 -> 添加显示对象-> 更新显示对象 的源码实现
这一篇将主要分析几个常用显示对象自各 draw 方法的实现
让我们看向例子 examples/Text_simple.html
这个例子中使用了三个显示对象类 Bitmap 、Text 、 Shape
Bitmap draw
以下例子中添加了一个 image
var image = new createjs.Bitmap("imagePath.png");

stage.addChild(image);
当调用 stage.update 后,会调用显示对象的 draw 方法,如果是 Container 类,则继续递归调用其 draw 方法
这样所有 stage 舞台上的显示对象的 draw 方法都会被调用到,注意 canvas 的上下文对象 ctx 参数都会被传入
分两步:
如果 DisplayObject 类内有缓存,则绘制缓存
如果没有缓存则循环显示列表调用每个 child 的 draw 方法 child 都为 DisplayObject 实例,还判断了 DisplayObject 实例的 isVisible 如果不可见则不绘制
// Container 类 源码 160 - 176 行

p.draw = function(ctx, ignoreCache) {

	if (this.DisplayObject_draw(ctx, ignoreCache)) { return true; }

	// 用 slice 的原因是防止绘制过程中 children 发生变更导致出错

	var list = this.children.slice();

	for (var i=0,l=list.length; i<l; i++) {

		var child = list[i];

		if (!child.isVisible()) { continue; }

		// draw the child:

		ctx.save();

		child.updateContext(ctx);

		child.draw(ctx);

		ctx.restore();

	}

	return true;

};
child 就为一个 Bitmap 对象
直接看 Bitmap 类实现的 draw 方法如下:
// Bitmap 类 源码 142-159

p.draw = function(ctx, ignoreCache) {

	if (this.DisplayObject_draw(ctx, ignoreCache)) { return true; }

	var img = this.image, rect = this.sourceRect;

	if (img.getImage) { img = img.getImage(); }

	if (!img) { return true; }

	if (rect) {

		// some browsers choke on out of bound values, so we'll fix them:

		var x1 = rect.x, y1 = rect.y, x2 = x1 + rect.width, y2 = y1 + rect.height, x = 0, y = 0, w = img.width, h = img.height;

		if (x1 < 0) { x -= x1; x1 = 0; }

		if (x2 > w) { x2 = w; }

		if (y1 < 0) { y -= y1; y1 = 0; }

		if (y2 > h) { y2 = h; }

		ctx.drawImage(img, x1, y1, x2-x1, y2-y1, x, y, x2-x1, y2-y1);

	} else {

		ctx.drawImage(img, 0, 0);

	}

	return true;

};
就三步:
有缓存则绘制缓存
如果有 rect 限制,有目标尺寸 rect 限制,则绘制成 rect 尺寸,调用 canvas 的 drawImage 原生方法并传入目标尺寸
如果没有 rect 限制,则直接调用 canvas 的 drawImage 原生方法
先不管 ctx.drawImage(img, x1, y1, x2-x1, y2-y1, x, y, x2-x1, y2-y1); 这一句,
具体语法可以查询 https://developer.mozilla.org/zh-CN/docs/Web/API/CanvasRenderingContext2D/drawImage
注意: ctx.drawImage(img, 0, 0); 后两个参数值是图象的 x, y 坐标,
都传了 0 好家伙直接 "hardcode" 了,绘制时不用考虑图像的位置吗?
都画在了 0, 0 位置画在左上角?
这不科学,如果用户指定了图像位置比如 x = 100, y = 80 那怎么办?
如果我来实现,直觉上就会想要把此处改为 ctx.drawImage(img, 0 + x, 0 + y);
但 EaselJS 并没有,但却又能正常工作?,先搁置,继续往下看就会明白
Text draw
绘制文本
创建一个文本 txt
txt = new createjs.Text("text on the canvas... 0!", "36px Arial", "#FFF");
直接看向 Text 的 draw 实例方法:
// Text 类 源码 208 - 217 行

p.draw = function(ctx, ignoreCache) {

	if (this.DisplayObject_draw(ctx, ignoreCache)) { return true; }

	var col = this.color || "#000";

	if (this.outline) { ctx.strokeStyle = col; ctx.lineWidth = this.outline*1; }

	else { ctx.fillStyle = col; }

	this._drawText(this._prepContext(ctx));

	return true;

};
依然先判断缓存
文本默认为黑色
如果有 outline 则 lineWidth 被设置限制宽度,用显示文本周边的框
调用 this._drawText(this._prepContext(ctx));
_prepContext 存着的上下文中预设的默认样式
Text 的 _drawText 方法是真正执行绘制文本的的逻辑(支持换行)
// Text 类 源码 339 - 390 行

p._drawText = function(ctx, o, lines) {

	var paint = !!ctx;

	if (!paint) {

		ctx = Text._workingContext;

		ctx.save();

		this._prepContext(ctx);

	}

	var lineHeight = this.lineHeight||this.getMeasuredLineHeight();

	var maxW = 0, count = 0;

	var hardLines = String(this.text).split(/(?:\r\n|\r|\n)/);

	for (var i=0, l=hardLines.length; i<l; i++) {

		var str = hardLines[i];

		var w = null;

		if (this.lineWidth != null && (w = ctx.measureText(str).width) > this.lineWidth) {

			// text wrapping:

			var words = str.split(/(\s)/);

			str = words[0];

			w = ctx.measureText(str).width;

			for (var j=1, jl=words.length; j<jl; j+=2) {

				// Line needs to wrap:

				var wordW = ctx.measureText(words[j] + words[j+1]).width;

				if (w + wordW > this.lineWidth) {

					if (paint) { this._drawTextLine(ctx, str, count*lineHeight); }

					if (lines) { lines.push(str); }

					if (w > maxW) { maxW = w; }

					str = words[j+1];

					w = ctx.measureText(str).width;

					count++;

				} else {

					str += words[j] + words[j+1];

					w += wordW;

				}

			}

		}

		if (paint) { this._drawTextLine(ctx, str, count*lineHeight); }

		if (lines) { lines.push(str); }

		if (o && w == null) { w = ctx.measureText(str).width; }

		if (w > maxW) { maxW = w; }

		count++;

	}

	if (o) {

		o.width = maxW;

		o.height = count*lineHeight;

	}

	if (!paint) { ctx.restore(); }

	return o;

	};
步骤:
paint为 false 即没有传 ctx 时 仅用于测量文本的尺寸,并不实际绘制到舞台上通过
String(this.text).split(/(?:\r\n|\r|\n)/);这一句将通过回车与换行符得到多行文本循环分解出的文本数组,ctx.measureText 测量文本宽度后判断是否大于 lineWidth 如果加上后面一断文本大于,则需新启一行
调用
_drawTextLine()方法绘制文本
调用 canvas 真实 api ctx.fillText 绘制文本
// Text 类 源码 399 - 403 行

p._drawTextLine = function(ctx, text, y) {

	// Chrome 17 will fail to draw the text if the last param is included but null, so we feed it a large value instead:

	if (this.outline) { ctx.strokeText(text, 0, y, this.maxWidth||0xFFFF); }

	else { ctx.fillText(text, 0, y, this.maxWidth||0xFFFF); }

};
发现没有 ctx.fillText 处传的 x 还是 hardcode 硬编码 0 而坐标 y 还是相对坐标,都绘制到 canvas 上了还不是绝对坐标能行吗?
不科学啊
是时候探究了!
updateContext
draw 方法内使用的坐标都是硬编码或相对坐标,但又可以如期绘制正确的绝对坐标位置
是时候看一下之前遗留的 updateContext 方法了
还记得第一篇中 stage.update 内 draw 方法前的一句 this.updateContext(ctx); 吗
实际上最终调用的是 DisplayObject 类的 updateContext 实例方法如下:
// DisplayObject.js 源码 787-810 行

p.updateContext = function(ctx) {

	var o=this, mask=o.mask, mtx= o._props.matrix;

	if (mask && mask.graphics && !mask.graphics.isEmpty()) {

		mask.getMatrix(mtx);

		ctx.transform(mtx.a,  mtx.b, mtx.c, mtx.d, mtx.tx, mtx.ty);

		mask.graphics.drawAsPath(ctx);

		ctx.clip();

		mtx.invert();

		ctx.transform(mtx.a,  mtx.b, mtx.c, mtx.d, mtx.tx, mtx.ty);

	}

	this.getMatrix(mtx);

	var tx = mtx.tx, ty = mtx.ty;

	if (DisplayObject._snapToPixelEnabled && o.snapToPixel) {

		tx = tx + (tx < 0 ? -0.5 : 0.5) | 0;

		ty = ty + (ty < 0 ? -0.5 : 0.5) | 0;

	}

	ctx.transform(mtx.a,  mtx.b, mtx.c, mtx.d, tx, ty);

	ctx.globalAlpha *= o.alpha;

	if (o.compositeOperation) { ctx.globalCompositeOperation = o.compositeOperation; }

	if (o.shadow) { this._applyShadow(ctx, o.shadow); }

};
o._props 是 src/easeljs/geom/DisplayProps.js DisplayProps 类的实例
DisplayProps 主要负责了显示对象的以下属性操作
visible、alpha、shadow、compositeOperation、matrix
mtx= o._props.matrix 在 DisplayObject 实例属性 _props 对象中得到 matrix
updateContext 就是在上下文中应用不同的 matrix 实现上下文中的“变幻”
首先就是对 mask 遮罩的处理,遮罩是通过绘制 Graphics 后对上下文进行 ctx.clip 实现的
如果存在 mask 当前显示对象有遮罩,通过 mask.getMatrix 把遮罩的 matrix
ctx.transform 将上下文变化至遮罩所在的“状态”
绘制遮罩 mask.graphics.drawAsPath(ctx)
还原矩阵 mtx.invert(); 回到当前显示对象的“状态”
至此 mask 部分处理完毕
回到当前显示对象的 getMatrix 获取矩阵后应用矩阵变化
getMatrix 做了两件事
- 如果显示对象有明确指定的 matrix 则应用 matrix
- 如果没有明确指定,则将显示对象的,x,y,scaleX, scaleY, rotation, skewW, skewY, regX, regY 合到 matrix上
// DisplayObject.js 源码 1020-1024 行

p.getMatrix = function(matrix) {

	var o = this, mtx = matrix || new createjs.Matrix2D();

	return o.transformMatrix ?  mtx.copy(o.transformMatrix) :

		(mtx.identity() && mtx.appendTransform(o.x, o.y, o.scaleX, o.scaleY, o.rotation, o.skewX, o.skewY, o.regX, o.regY));

};
注意这一句 mtx.appendTransform(o.x, o.y, o.scaleX, o.scaleY, o.rotation, o.skewX, o.skewY, o.regX, o.regY))
就是将当前显示对象的变幻属性合到矩阵中
得到新的 matrix 后调用 ctx.transform(mtx.a, mtx.b, mtx.c, mtx.d, tx, ty); 实现一系列变化
至于 src/easeljs/geom/Matrix2D.js 矩阵类
平时在 css 中的使用的变化 scale, rotate, translateX, translateY 最后都是矩阵变幻实现的
矩阵变幻的好处一次可以实现多种变化,只是不那么直观
至于矩阵为什么可以实现变幻,我这小学数学水平可讲不清楚,推荐 3blue1brown 的视频看完肯定会醍醐灌顶
我的总结是矩阵实现的是对坐标轴的线性变幻,直接将坐标轴原点变幻到绘制点!!
所以在具体 draw 绘制时 x,y 坐标可以硬编码或使用相对坐标,因为 draw 之前已经使用矩阵把整体坐标轴变幻到位了
绘制完后又会重置回来开始新的对象的变幻
Shape draw
Shape 类代码非常少,实现绘制的是 Graphics 类
Shape 只是作为 Graphics 实例的载体
使用 shape.graphics 属性即可访问
Shape.js 源码 106-110 行

p.draw = function(ctx, ignoreCache) {

	if (this.DisplayObject_draw(ctx, ignoreCache)) { return true; }

	this.graphics.draw(ctx, this);

	return true;

};
Graphics
矢量图形类 Graphics 在 src/easeljs/display/Graphics.js
通常 Graphics 用于绘制矢量图形
可单独使用,也可以在 Shape 实例内调用
var g = new createjs.Graphics();

g.setStrokeStyle(1);

g.beginStroke("#000000");

g.beginFill("red");

g.drawCircle(0,0,30);
要实现 Grapihcs 绘制,就得组合一系列绘图命令
一系列绘制命令被存储在了 _instructions 数组属性内
这些命令被称为 Command Objects 命令对象
源码 1653 行 - 2459 行都是命令对象
命令对象分别都暴露了一个 exec 方法
比如 MoveTo 命令
// Graphics.js 源码 1700 - 1702 行

(G.MoveTo = function(x, y) {

	this.x = x; this.y = y;

}).prototype.exec = function(ctx) { ctx.moveTo(this.x, this.y); };
比如圆形绘制命令
// Graphics.js 源码 2292 - 2295 行

(G.Circle = function(x, y, radius) {

	this.x = x; this.y = y;

	this.radius = radius;

}).prototype.exec = function(ctx) { ctx.arc(this.x, this.y, this.radius, 0, Math.PI*2); };
下面是圆角矩形的也是在 Graphics 静态方法
(G.RoundRect = function(x, y, w, h, radiusTL, radiusTR, radiusBR, radiusBL) {

		this.x = x; this.y = y;

		this.w = w; this.h = h;

		this.radiusTL = radiusTL; this.radiusTR = radiusTR;

		this.radiusBR = radiusBR; this.radiusBL = radiusBL;

	}).prototype.exec = function(ctx) {

		var max = (this.w<this.h?this.w:this.h)/2;

		var mTL=0, mTR=0, mBR=0, mBL=0;

		var x = this.x, y = this.y, w = this.w, h = this.h;

		var rTL = this.radiusTL, rTR = this.radiusTR, rBR = this.radiusBR, rBL = this.radiusBL;

		if (rTL < 0) { rTL *= (mTL=-1); }

		if (rTL > max) { rTL = max; }

		if (rTR < 0) { rTR *= (mTR=-1); }

		if (rTR > max) { rTR = max; }

		if (rBR < 0) { rBR *= (mBR=-1); }

		if (rBR > max) { rBR = max; }

		if (rBL < 0) { rBL *= (mBL=-1); }

		if (rBL > max) { rBL = max; }

		ctx.moveTo(x+w-rTR, y);

		ctx.arcTo(x+w+rTR*mTR, y-rTR*mTR, x+w, y+rTR, rTR);

		ctx.lineTo(x+w, y+h-rBR);

		ctx.arcTo(x+w+rBR*mBR, y+h+rBR*mBR, x+w-rBR, y+h, rBR);

		ctx.lineTo(x+rBL, y+h);

		ctx.arcTo(x-rBL*mBL, y+h+rBL*mBL, x, y+h-rBL, rBL);

		ctx.lineTo(x, y+rTL);

		ctx.arcTo(x-rTL*mTL, y-rTL*mTL, x+rTL, y, rTL);

		ctx.closePath();

	};
exec 方法才是真正调用 canvas context 绘制的地方
G 就是 Graphics 的简写,在 250 行 var G = Graphics;
这些单独的绘图命令其实就是 G 的一些静态方法,只是这些静态方法又拥有各自不同的 exec 实例方法实现具体的绘图
而 Graphics 的实例方法又会将绘图命令 append 一个 “静态方法的实例” 存储数组内
比如 lineTo , 注意是 new G.MoveTo(x,y) 一个命令
// Graphics.js 源码 469 - 471 行

p.moveTo = function(x, y) {

	return this.append(new G.MoveTo(x,y), true);

};
下面是 append 源码,命令都存在 _activeInstructions 数组内
// Graphics.js 源码 1024 - 1029 行

p.append = function(command, clean) {

	this._activeInstructions.push(command);

	this.command = command;

	if (!clean) { this._dirty = true; }

	return this;

};
再看通用的 draw 方法
// Graphics.js 源码 434-440 行

p.draw = function(ctx, data) {

	this._updateInstructions();

	var instr = this._instructions;

	for (var i=this._storeIndex, l=instr.length; i<l; i++) {

		instr[i].exec(ctx, data);

	}

};
draw 内的主要逻辑就是用循环调用 _instructions 存储的“命令对象”执行命令对象的 exec 方法
_instructions 的命令是通过 _updateInstructions 方法从 _activeInstructions 数组内复制的
// Graphics.js 源码 1593-1627 行

p._updateInstructions = function(commit) {

	var instr = this._instructions, active = this._activeInstructions, commitIndex = this._commitIndex;

	debugger

	if (this._dirty && active.length) {

		instr.length = commitIndex; // remove old, uncommitted commands

		instr.push(Graphics.beginCmd);

		var l = active.length, ll = instr.length;

		instr.length = ll+l;

		for (var i=0; i<l; i++) { instr[i+ll] = active[i]; }

		if (this._fill) { instr.push(this._fill); }

		if (this._stroke) {

			// doesn't need to be re-applied if it hasn't changed.

			if (this._strokeDash !== this._oldStrokeDash) {

				instr.push(this._strokeDash);

			}

			if (this._strokeStyle !== this._oldStrokeStyle) {

				instr.push(this._strokeStyle);

			}

			if (commit) {

				this._oldStrokeStyle = this._strokeStyle;

				this._oldStrokeDash = this._strokeDash;

			}

			instr.push(this._stroke);

		}

		this._dirty = false;

	}

	// 如果 commit 了,把 _activeInstructions 当前命令集合清空,且游标指向 this._instructions 的最后位置

	if (commit) {

		active.length = 0;

		this._commitIndex = instr.length;

	}

};
还有一些方法(如:beginStroke beginFill) 内调用了 _updateInstructions(true) 注意传的是 true
比如:
p.beginStroke = function(color) {

	return this._setStroke(color ? new G.Stroke(color) : null);

};

p._setStroke = function(stroke) {

	this._updateInstructions(true);

	if (this.command = this._stroke = stroke) {

		stroke.ignoreScale = this._strokeIgnoreScale;

	}

	return this;

};
注意: 这里收集的命令暂时不会被放到 this._instructions 数组内
直到有 append 方法执行过 dirty 为 true 了 才会把 stroke 命令添加到 this._instructions 数组
因为没有 append 任何实质的内容(圆,线,矩形等),则不需要执行 stroke ,beginFill 等命令,因为无意义
p._updateInstructions 到底干了啥?
主要是在 draw 之前不断收集命令, 在多处都有调用 _updateInstructions
这些操作 commit 均为 true 表明后面的绘制是新的开始,将之前的一系列绘制命令归为一个路径绘制,下一个得新启一个路径绘制
使用 this._commitIndex 游标重新指示命令数组内的位置
debugger 调试一下看看
在 easeljs-NEXT.js 的 5226 行加上 debugger
浏览器中打开 examples/Graphics_simple.html 文件,并打开浏览器调试工具
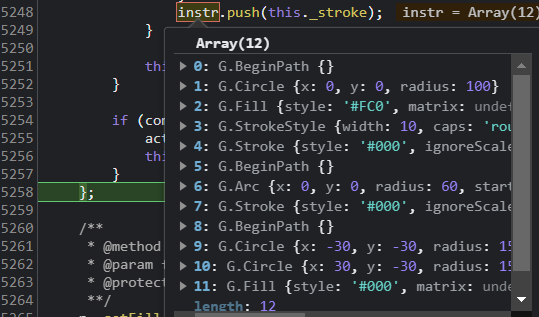
Graphics_simple.html 文件的 javascript 代码内有一个 drawSmiley 方法
function drawSmiley() {

	var s = new createjs.Shape();

	var g = s.graphics;

	//Head

	g.setStrokeStyle(10, 'round', 'round');

	g.beginStroke("#000");

	g.beginFill("#FC0");

	g.drawCircle(0, 0, 100); //55,53

	//Mouth

	g.beginFill(); // no fill

	g.arc(0, 0, 60, 0, Math.PI);

	//Right eye

	g.beginStroke(); // no stroke

	g.beginFill("#000");

	g.drawCircle(-30, -30, 15);

	//Left eye

	g.drawCircle(30, -30, 15);

	return s;

}
很明显通过 debugger 先调用了 setStrokeStyle

当调用 setStrokeStyle、beginStroke、beginFill 等都会执行 _updateInstructions 命令
当执行到 g.drawCircle(0, 0, 100); 此时命令才会被一起收集顺序如下
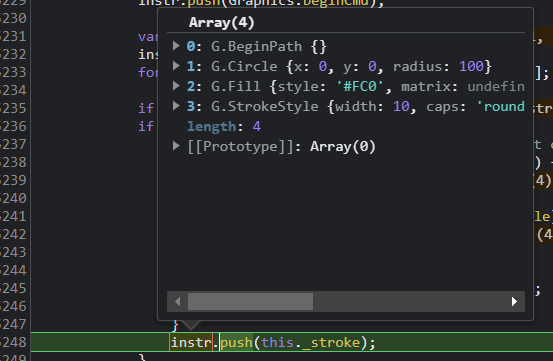
发现没有,与我们在调用顺序不一样
g.setStrokeStyle(10, 'round', 'round');

g.beginStroke("#000");

g.beginFill("#FC0");

g.drawCircle(0, 0, 100); //55,53
BeginPath -> Circle -> Fill -> StrokeStyle
这是 Canvas 真正正常执行的顺序
BeginPath 也在每次 dirty (append 方法导至 dirty 为 true) 时添加,beginPath 当然是另启一个新的路径绘制了
小结
这一篇分析的是,最常用的三个显示对象
下一篇分析另三个稍显高级的显示对象
博客园: http://cnblogs.com/willian/
github: https://github.com/willian12345/
EaselJS 源码分析系列--第二篇的更多相关文章
- 鸿蒙源码分析系列(总目录) | 百万汉字注解 百篇博客分析 | 深入挖透OpenHarmony源码 | v8.23
百篇博客系列篇.本篇为: v08.xx 鸿蒙内核源码分析(总目录) | 百万汉字注解 百篇博客分析 | 51.c.h .o 百篇博客.往期回顾 在给OpenHarmony内核源码加注过程中,整理出以下 ...
- [Tomcat 源码分析系列] (二) : Tomcat 启动脚本-catalina.bat
概述 Tomcat 的三个最重要的启动脚本: startup.bat catalina.bat setclasspath.bat 上一篇咱们分析了 startup.bat 脚本 这一篇咱们来分析 ca ...
- Thinkphp源码分析系列–开篇
目前国内比较流行的php框架由thinkphp,yii,Zend Framework,CodeIgniter等.一直觉得自己在php方面还是一个小学生,只会用别人的框架,自己也没有写过,当然不是自己不 ...
- MyBatis 源码分析系列文章导读
1.本文速览 本篇文章是我为接下来的 MyBatis 源码分析系列文章写的一个导读文章.本篇文章从 MyBatis 是什么(what),为什么要使用(why),以及如何使用(how)等三个角度进行了说 ...
- Spring IOC 容器源码分析系列文章导读
1. 简介 Spring 是一个轻量级的企业级应用开发框架,于 2004 年由 Rod Johnson 发布了 1.0 版本.经过十几年的迭代,现在的 Spring 框架已经非常成熟了.Spring ...
- Bootstrap源码分析系列之初始化和依赖项
在上一节中我们介绍了Bootstrap整体架构,本节我们将介绍Bootstrap框架第二部分初始化及依赖项,这部分内容位于源码的第8~885行,打开源码这部分内容似乎也不是很难理解.但是请站在一个开发 ...
- Netty 源码分析系列(二)Netty 架构设计
前言 上一篇文章,我们对 Netty做了一个基本的概述,知道什么是Netty以及Netty的简单应用. Netty 源码分析系列(一)Netty 概述 本篇文章我们就来说说Netty的架构设计,解密高 ...
- 鸿蒙内核源码分析(字符设备篇) | 字节为单位读写的设备 | 百篇博客分析OpenHarmony源码 | v67.01
百篇博客系列篇.本篇为: v67.xx 鸿蒙内核源码分析(字符设备篇) | 字节为单位读写的设备 | 51.c.h.o 文件系统相关篇为: v62.xx 鸿蒙内核源码分析(文件概念篇) | 为什么说一 ...
- 鸿蒙内核源码分析(文件概念篇) | 为什么说一切皆是文件 | 百篇博客分析OpenHarmony源码 | v62.01
百篇博客系列篇.本篇为: v62.xx 鸿蒙内核源码分析(文件概念篇) | 为什么说一切皆是文件 | 51.c.h.o 本篇开始说文件系统,它是内核五大模块之一,甚至有Linux的设计哲学是" ...
- 鸿蒙内核源码分析(编译过程篇) | 简单案例窥视GCC编译全过程 | 百篇博客分析OpenHarmony源码| v57.01
百篇博客系列篇.本篇为: v57.xx 鸿蒙内核源码分析(编译过程篇) | 简单案例窥视编译全过程 | 51.c.h.o 编译构建相关篇为: v50.xx 鸿蒙内核源码分析(编译环境篇) | 编译鸿蒙 ...
随机推荐
- v-if与v-show
v-if的特点 v-if:是真实的条件控制语句,每当我们满足条件的时候就会显示元素,不满足条件的时候不显示元素(不存在元素没有) v-if:有一套自己的条件控制语句v-if; v-else-if; v ...
- 迁移学习(PAT)《Pairwise Adversarial Training for Unsupervised Class-imbalanced Domain Adaptation》
论文信息 论文标题:Pairwise Adversarial Training for Unsupervised Class-imbalanced Domain Adaptation论文作者:Weil ...
- cocos2d-x返回Android游戏黑屏解决办法
返回Android游戏黑屏解决办法这几天逛cocos2d-x.org论坛,发现cocos2d-x的作者放出来一个帖子,用来解决返回Android游戏加载资源时黑屏的问题.帖子过些日子估计就沉了,所以转 ...
- LLM(大语言模型)解码时是怎么生成文本的?
Part1配置及参数 transformers==4.28.1 源码地址:transformers/configuration_utils.py at v4.28.1 · huggingface/tr ...
- 小知识:使用oracle用户查看RAC集群资源状态
正常情况按照标准配置的环境变量,只能grid用户查看RAC集群资源状态. crsctl stat res -t 但是绝大部分操作其实都是oracle用户来操作,比如启停数据库,操作完成以后就需要检查下 ...
- C# 反射 判断类型是否是列表
1 /// <summary> 2 /// 判断类型是否为可操作的列表类型 3 /// </summary> 4 /// <param name="type&q ...
- MySQL概述与安装
MySQL数据库 概要: 一.MySQL数据库的概述 二.MySQL数据库的搭建 三.MySQL数据库软件的使用 四.MySQL数据类型 五.MySQL数据库数据的操作 一.初始MySQL数据库 1. ...
- 做了个vscode 小插件,用于修改window 的颜色以区分同时打开的不同工作区,快用起来吧!
Coralize marketplace/coralize 以高效且便捷的方式自定义Visual Studio Code工作区窗口的状态栏.标题栏以及活动边栏等颜色!这将对那些需要同时打开多个vsco ...
- 【python爬虫】bilibili每周必看页面视频图片爬取
此博客仅作为交流学习 对于使用bilibili上学习和娱乐的小伙伴们有时会看到视频博主发布的视频封面好看想要得到,但是苦于没有方法,这次我用python来爬取bilibili每周必看页面视频图片. 首 ...
- 2021-11-06:3的幂。给定一个整数,写一个函数来判断它是否是 3 的幂次方。如果是,返回 true ;否则,返回 false 。整数 n 是 3 的幂次方需满足:存在整数 x 使得 n ==
2021-11-06:3的幂.给定一个整数,写一个函数来判断它是否是 3 的幂次方.如果是,返回 true :否则,返回 false .整数 n 是 3 的幂次方需满足:存在整数 x 使得 n == ...