Flask+SQLAlchemy+alembic+Flask-RESTful使用
前言
其实准备把这篇删掉,先写Flask-restful相关的,后来想想大体框架还是先写出来,这两天踩了很多坑,有的谷歌也没有答案.一直摸索也总算是开始了.
正文
SQLAlchemy/alembic 的 使用方法之前写过,详见我的博客,今天讲讲如何与 flask-restful 结合一起(只是简单的讲讲搭配,Flask-restful以后会详细讲述)
搭建大体框架
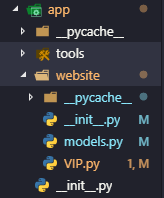
其实与普通的 Flask 差不多,只不过app的功能模块中我们需要加一个 models 文件存放我们建立的 model,在按功能写py,大致如下

编辑model
models.py
# -*- coding=utf- -*-

from sqlalchemy import create_engine

from sqlalchemy.orm import sessionmaker, relationship, backref

from sqlalchemy.ext.declarative import declarative_base

from sqlalchemy import Column, String, Integer, ForeignKey, DateTime

# 用户名:密码@访问地址:端口/数据库?编码方式

engine = create_engine('mysql+mysqldb://root:***@***:***/website?charsite=utf8mb4')

# 创建DBSession类型

DBSession = sessionmaker(bind=engine)

# 创建Base基类

Base = declarative_base()

class AdminUser(Base):

    # 超级用户表

    __tablename__ = 'admin_user'   # 表名

    id = Column(Integer, primary_key=True)  # 主键

    username = Column(String(), nullable=False, index=True, unique=True)  # 用户名,Varchar12位,不可为空,常规索引

    pwd = Column(String(), nullable=False)  # 密码,不可为空

    token = Column(String(), nullable=True)  # token

    token_end_time = Column(DateTime, nullable=True)  # token过期时间

class Vip(Base):

    # VIP用户

    __tablename__ = 'vip'  # 表名

    id = Column(Integer, primary_key=True)  # id

    name = Column(String(), nullable=False, index=True, unique=True)  # name

    pwd = Column(String(), nullable=False)  # pwd

    money = Column(Integer, nullable=False)  # 金币

    status = Column(Integer, nullable=False)  # 账号状态(:正常,:封禁,:审核)

    fk_vip_on_vip_lv = Column(Integer, ForeignKey('vip_lv.id'), nullable=False)  # 关联VIPLV等级(多对一)

    VipLv = relationship('VipLv', backref=backref('Vip', uselist=True))

class VipInfo(Base):

    # VIP信息

    __tablename__ = 'vip_info'  # 表名

    id = Column(Integer, primary_key=True)  # id

    info = Column(String(),  nullable=True)  # 备注,可为空

    last_time = Column(DateTime, nullable=True)  # 最后登陆时间,可为空

    fk_vip_info_on_vip = Column(Integer, ForeignKey('vip.id'), unique=True, index=True, nullable=False)  # 关联外键VIP.id(一对一)

    Vip = relationship('Vip', backref=backref('VipInfo', uselist=False))  # 设置关联使VIPInfo能查询到VIP

class VipLv(Base):

    # VIP等级

    __tablename__ = 'vip_lv'  # 表名

    id = Column(Integer, primary_key=True)  # id

    lv = Column(Integer, nullable=False)  # 等级

    name = Column(String(), nullable=False)  # 等级名称

    info = Column(String(), nullable=False)  # 等级说明

    month_money = Column(Integer, nullable=True)  # 月费

    year_money = Column(Integer, nullable=True)  # 年费

class VipOrder(Base):

    # VIP订单

    __tablename__ = 'vip_order'  # 表名

    id = Column(Integer, primary_key=True)  # id

    found_time = Column(DateTime, nullable=False)  # 订单创建时间

    check_status = Column(Integer, nullable=False)  # 订单确认状态,1成功/0失败/2待确认/3已过期

    err_info = Column(String(), nullable=True)  # 订单错误原因(订单错误时填写)

    success_time = Column(DateTime, nullable=True)  # 订单确认时间

    fk_vip_order_on_vip_lv = Column(Integer, ForeignKey('vip_lv.id'), nullable=False)  # 关联外键VIP等级(多对一)

    VipLv = relationship('VipLv', backref=backref('VipLv', uselist=True))

    money = Column(Integer, nullable=False)  # 订单金额

    go_time = Column(DateTime, nullable=False)  # 开始时间

    on_time = Column(DateTime, nullable=False)  # 结束时间

# if __name__ == '__main__':

#     Base.metadata.create_all(engine)
初始化Flask-restful/蓝图
我们在 website下的 __init__中初始化 restful
# -*- coding=utf- -*-

from flask import Blueprint

from flask_restful import Api

from .VIP import Vip, Token

website_1_0 = Blueprint('website_1_0', __name__, url_prefix='/api/v1.0')  # 生成蓝图,名称为website_1_0,设置蓝图下的统一前缀为/api/v1.

api = Api(website_1_0)  # 初始化api

# 下方是添加路由控制

# api.add_resource(引入view的视图类, 匹配url)

api.add_resource(Vip, '/website/vip/<int:vip_id>')  # 获取VIP常用信息(匹配url带有int数字的传给Vip视图,url的参数命名为vip_id)
导入注册蓝图/restful
在app下的__init__.py中
# -*- coding=utf- -*-

from flask import Flask

from datetime import timedelta

from flask_restful import Api

# from flask_wtf.csrf import CsrfProtect

from flask_cors import *  # 导入模块

import datetime

def create_app():

    app = Flask(__name__)

    CORS(app, supports_credentials=True)  # 设置跨域

    # CsrfProtect(app)

    # from .website import website

    # app.register_blueprint(website)

    # from .website.views import VIP

    # VIP.init_app(app)

    from .website import api

    api.init_app(app)  # restful需要initaoo

    from .website import website_1_0

    app.register_blueprint(website_1_0)  # 结合蓝图使用

    return app
写Vip相关的视图类
vip.py
# -*- coding=utf- -*-

from flask_restful import reqparse, abort, Api, Resource, request

# from . import website

from flask import render_template, Flask, \

    request, redirect, url_for

from app.website.models import DBSession, Vip, VipInfo, AdminUser, VipLv, VipOrder

from ..tools import info_tool

class Vip(Resource):

    # VIP信息(单)

    def get(self, vip_id):

        # 获取vip基本信息

        from app.website.models import DBSession, Vip

        session = DBSession()

        obj = session.query(Vip).filter(Vip.id==vip_id).first()

        inf = info_tool.oneobj_to_safe(obj)  # info_tool是我自己写的序列化

        return inf
这样就能成功将其组合到一起了
Flask+SQLAlchemy+alembic+Flask-RESTful使用的更多相关文章
- flask, SQLAlchemy, sqlite3 实现 RESTful API 的 todo list, 同时支持form操作
flask, SQLAlchemy, sqlite3 实现 RESTful API, 同时支持form操作. 前端与后台的交互都采用json数据格式,原生javascript实现的ajax.其技术要点 ...
- flask SQLAlchemy中一对多的关系实现
SQLAlchemy是Python中比较优秀的orm框架,在SQLAlchemy中定义了多种数据库表的对应关系, 其中一对多是一种比较常见的关系.利用flask sqlalchemy实现一对多的关系如 ...
- Python Flask高级编程之RESTFul API前后端分离精讲 (网盘免费分享)
Python Flask高级编程之RESTFul API前后端分离精讲 (免费分享) 点击链接或搜索QQ号直接加群获取其它资料: 链接:https://pan.baidu.com/s/12eKrJK ...
- python3 + flask + sqlalchemy +orm(1):链接mysql 数据库
1.pycharm中新建一个flask项目 2.按装flask.PyMySQL.flask-sqlalchemy 3.项目下面新建一个config.py 文件 DEBUG = True #dialec ...
- python 全栈开发,Day142(flask标准目录结构, flask使用SQLAlchemy,flask离线脚本,flask多app应用,flask-script,flask-migrate,pipreqs)
昨日内容回顾 1. 简述flask上下文管理 - threading.local - 偏函数 - 栈 2. 原生SQL和ORM有什么优缺点? 开发效率: ORM > 原生SQL 执行效率: 原生 ...
- Flask SQLAlchemy & model
Flask-SQLAlchemy Flask-SQLAlchemy库让flask更方便的使用SQLALchemy,是一个强大的关系形数据库框架,既可以使用orm方式操作数据库,也可以使用原始的SQL命 ...
- Python利用flask sqlalchemy实现分页效果
Flask-sqlalchemy是关于flask一个针对数据库管理的.文中我们采用一个关于员工显示例子. 首先,我们创建SQLALCHEMY对像db. from flask import Flask, ...
- flask建表遇到的错误: flask,sqlalchemy.exc.OperationalError: (MySQLdb._exceptions.OperationalError) (1071, 'Specified key was too long; max key length is 767 bytes')
error:flask,sqlalchemy.exc.OperationalError: (MySQLdb._exceptions.OperationalError) (1071, 'Specifie ...
- Flask – SQLAlchemy成员增加
目录 简介 结构 展示 技术 运行 代码 创建数据库表单 views视图 home主页 添加成员addnew.html 展示页show_all 简介 结构 $ tree -I "__pyca ...
随机推荐
- scrollbar样式设置
转载:https://segmentfault.com/a/1190000012800450?utm_source=tag-newest author:specialCoder 一 前言 在CSS 中 ...
- java篇 之 java概念
Jvm:java虚拟机,让java拥有跨平台的能力,一次编写,导出运行 Java优点:提供了一个解释性环境(多线程,可执行程序跨平台,加快开发,支持动态更新) 没有指针,有垃圾将回收器(回收内存) 执 ...
- Shodan的http.favicon.hash语法详解与使用技巧
在Shodan搜索中有一个关于网站icon图标的搜索语法,http.favicon.hash,我们可以使用这个语法来搜索出使用了同一icon图标的网站,不知道怎么用的朋友请参考我上一篇文章. 通过上一 ...
- markdown生成的a标签如何在新页面打开
原始的超链接语法这样写:[超链接的名字](url) 在新窗口中打开:[超链接的名字](url?_blank) 在本窗口中打开:[超链接的名字](url?_self)默认是在本窗口中打开 但上面的说法貌 ...
- CF1157A-Reachable Numbers题解
原题地址 题目大意:有一个函数\(f(x)\),效果是将\(x+1\)后,去掉末尾所有的\(0\),例如: \(f(599)=6\),因为\(599+1=600→60→6\) \(f(7)=8\),因 ...
- vue 中的通过搜索框进行数据过滤的过程
<template> <div> <input type="text" v-model="searchId" placeholde ...
- Digao 连接Mysql 连接不上解决办法
错误一:No module named 'MySQLdb' 原因:python3连接MySQL不能再使用mysqldb,取而代之的是pymysql. 解决方法:在python的MySQL包中,即路径: ...
- 请求转发 和 URL 重定向
五 请求转发 和 URL 重定向 1 请求转发和重定向 干什么用? 是我们在java后台servlet中 由一个servlet跳转到 另一个 servlet/jsp 要使用的技术 前端发送请求到后台 ...
- java 键盘录入(Scanner)
键盘录入(Scanner)• 键盘录入数据概述– 我们目前在写程序的时候, 数据值都是固定的, 但是实际开发中, 数据值肯定是变化的, 所以, 把数据改进为键盘录入, 提高程序的灵活性.• 如何实现键 ...
- XML配置spring session jdbc实现session共享
概述 session的基础知识就不再多说. 通常,我们会把一个项目部署到多个tomcat上,通过nginx进行负载均衡,提高系统的并发性.此时,就会存在一个问题.假如用户第一次访问tomcat1,并登 ...
