虹软离线人脸识别 ArcFace 2.0 Demo [C++]
环境: win10(10.0.16299.0)+ VS2017
sdk版本:ArcFace v2.0
OPENCV3.43版本
x64平台Debug、Release配置都已通过编译
下载地址:https://download.csdn.net/download/cngwj/10763108

配置过程
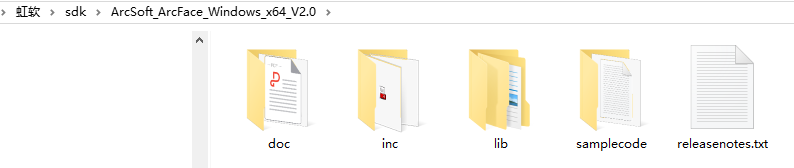
->0x01 下载sdk:
虹安sdk https://ai.arcsoft.com.cn
->0x02 工程配置:
1、 添加工程的头文件目录:
a) 右键单击工程名, 选择属性---配置属性---c/c++---常规---附加包含目录
b) 添加头文件存放目录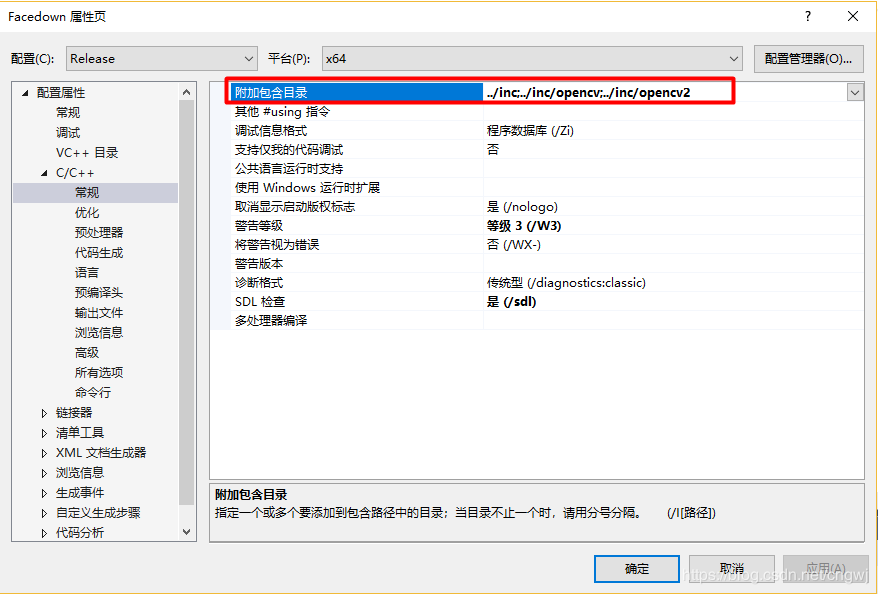
2、 添加文件引用的 lib 静态库路径:
a) 右键单击工程名,选择属性---配置属性---链接器---常规---附加库目录
b) 添加 lib 文件存放
3、 添加工程引用的 lib 库:
a) 右键单击工程名,选择属性---配置属性---链接器---输入---附加依赖项
b) 添加依赖的 lib 库名称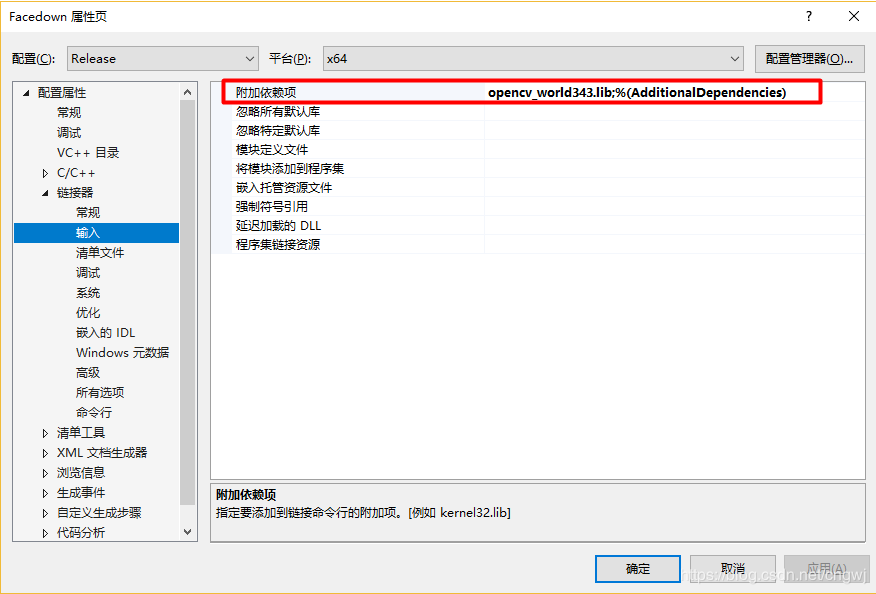
4、自定义可执行文件输出目录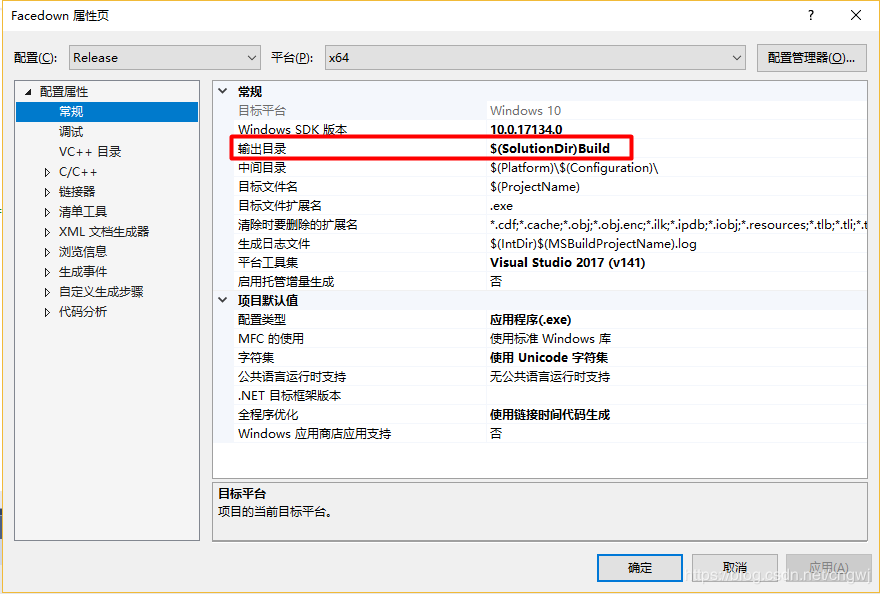
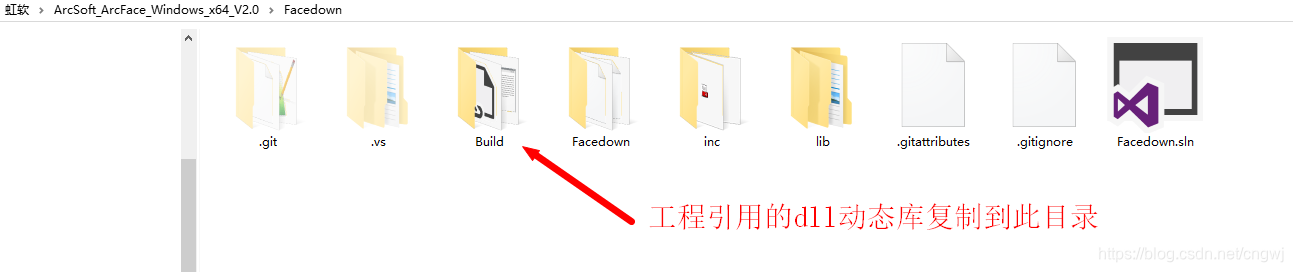
5、 添加工程引用的 dll 动态库:
a) 把引用的 dll 放到工程的可执行文件所在的目录下(复制到Build目录)
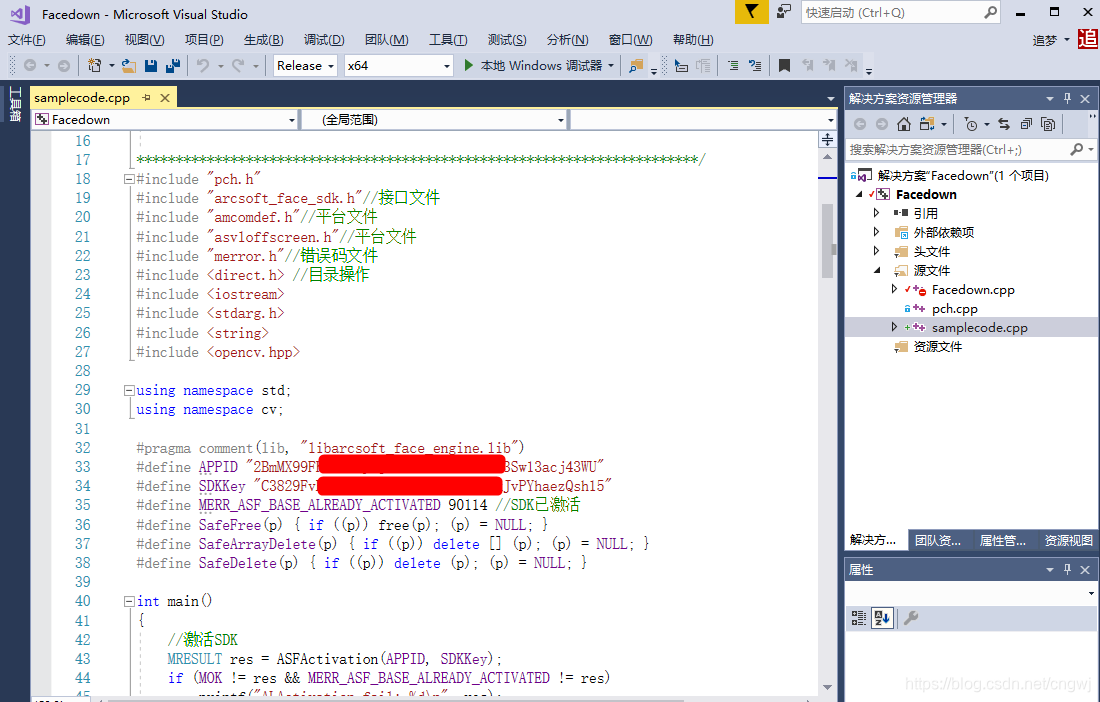
6、添加自己申请的APPID
/************************************************************************
* Copyright(c) 2018
* All rights reserved.
* File: samplecode.cpp
* Brief: Powered by ArcSoft
环境: win10(10.0.16299.0)+ VS2017
sdk版本:ArcFace v2.0
x64平台Debug、Release配置都已通过编译
* Version: 0.1
* Author: 一念无明
* Email: cngwj@outlook.com
* Date: 2018.11.3
* History:
2018.11.3 建立项目
************************************************************************/
#include "pch.h"
#include "arcsoft_face_sdk.h"//接口文件
#include "amcomdef.h"//平台文件
#include "asvloffscreen.h"//平台文件
#include "merror.h"//错误码文件
#include <direct.h> //目录操作
#include <iostream>
#include <stdarg.h>
#include <string>
#include <opencv.hpp> using namespace std;
using namespace cv; #pragma comment(lib, "libarcsoft_face_engine.lib")
#define APPID ""
#define SDKKey ""
#define MERR_ASF_BASE_ALREADY_ACTIVATED 90114 //SDK已激活
#define SafeFree(p) { if ((p)) free(p); (p) = NULL; }
#define SafeArrayDelete(p) { if ((p)) delete [] (p); (p) = NULL; }
#define SafeDelete(p) { if ((p)) delete (p); (p) = NULL; } int main()
{
//激活SDK
MRESULT res = ASFActivation(APPID, SDKKey);
if (MOK != res && MERR_ASF_BASE_ALREADY_ACTIVATED != res)
printf("ALActivation fail: %d\n", res);
else
printf("ALActivation sucess: %d\n", res); //初始化引擎
MHandle handle = NULL;
MInt32 mask = ASF_FACE_DETECT | ASF_FACERECOGNITION | ASF_AGE | ASF_GENDER | ASF_FACE3DANGLE;
res = ASFInitEngine(ASF_DETECT_MODE_IMAGE, ASF_OP_0_ONLY, 16, 5, mask, &handle);
if (res != MOK)
printf("ALInitEngine fail: %d\n", res);
else
printf("ALInitEngine sucess: %d\n", res); // 人脸检测
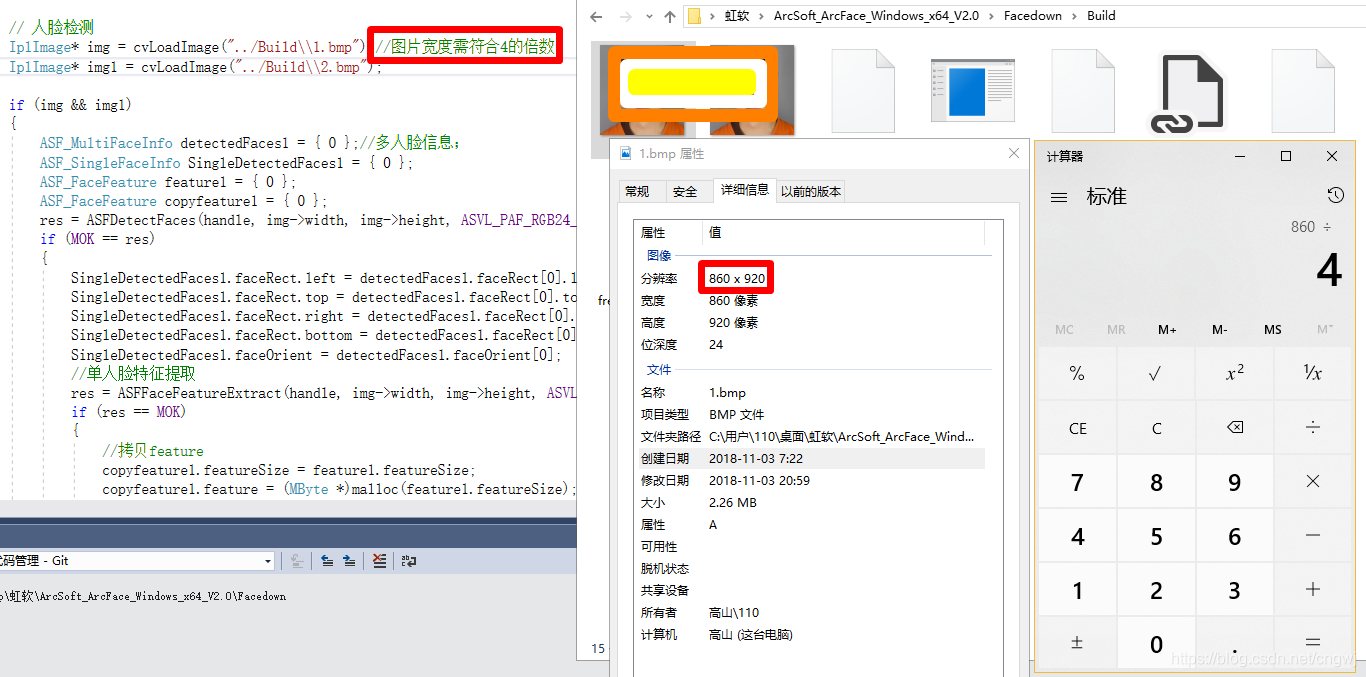
IplImage* img = cvLoadImage("../Build\\1.bmp");//图片宽度需符合4的倍数
IplImage* img1 = cvLoadImage("../Build\\2.bmp"); if (img && img1)
{
ASF_MultiFaceInfo detectedFaces1 = { 0 };//多人脸信息;
ASF_SingleFaceInfo SingleDetectedFaces1 = { 0 };
ASF_FaceFeature feature1 = { 0 };
ASF_FaceFeature copyfeature1 = { 0 };
res = ASFDetectFaces(handle, img->width, img->height, ASVL_PAF_RGB24_B8G8R8, (MUInt8*)img->imageData, &detectedFaces1);
if (MOK == res)
{
SingleDetectedFaces1.faceRect.left = detectedFaces1.faceRect[0].left;
SingleDetectedFaces1.faceRect.top = detectedFaces1.faceRect[0].top;
SingleDetectedFaces1.faceRect.right = detectedFaces1.faceRect[0].right;
SingleDetectedFaces1.faceRect.bottom = detectedFaces1.faceRect[0].bottom;
SingleDetectedFaces1.faceOrient = detectedFaces1.faceOrient[0];
//单人脸特征提取
res = ASFFaceFeatureExtract(handle, img->width, img->height, ASVL_PAF_RGB24_B8G8R8, (MUInt8*)img->imageData, &SingleDetectedFaces1, &feature1);
if (res == MOK)
{
//拷贝feature
copyfeature1.featureSize = feature1.featureSize;
copyfeature1.feature = (MByte *)malloc(feature1.featureSize);
memset(copyfeature1.feature, 0, feature1.featureSize);
memcpy(copyfeature1.feature, feature1.feature, feature1.featureSize);
}
else
printf("ASFFaceFeatureExtract 1 fail: %d\n", res);
}
else
printf("ASFDetectFaces 1 fail: %d\n", res); //第二张人脸提取特征
ASF_MultiFaceInfo detectedFaces2 = { 0 };
ASF_SingleFaceInfo SingleDetectedFaces2 = { 0 };
ASF_FaceFeature feature2 = { 0 };
res = ASFDetectFaces(handle, img1->width, img1->height, ASVL_PAF_RGB24_B8G8R8, (MUInt8*)img1->imageData, &detectedFaces2);
if (MOK == res)
{
SingleDetectedFaces2.faceRect.left = detectedFaces2.faceRect[0].left;
SingleDetectedFaces2.faceRect.top = detectedFaces2.faceRect[0].top;
SingleDetectedFaces2.faceRect.right = detectedFaces2.faceRect[0].right;
SingleDetectedFaces2.faceRect.bottom = detectedFaces2.faceRect[0].bottom;
SingleDetectedFaces2.faceOrient = detectedFaces2.faceOrient[0]; res = ASFFaceFeatureExtract(handle, img1->width, img1->height, ASVL_PAF_RGB24_B8G8R8, (MUInt8*)img1->imageData, &SingleDetectedFaces2, &feature2);
if (MOK != res)
printf("ASFFaceFeatureExtract 2 fail: %d\n", res);
}
else
printf("ASFDetectFaces 2 fail: %d\n", res); // 单人脸特征比对
MFloat confidenceLevel;
res = ASFFaceFeatureCompare(handle, ©feature1, &feature2, &confidenceLevel);
if (res != MOK)
printf("ASFFaceFeatureCompare fail: %d\n", res);
else
printf("ASFFaceFeatureCompare sucess: %lf\n", confidenceLevel); // 人脸信息检测
MInt32 processMask = ASF_AGE | ASF_GENDER | ASF_FACE3DANGLE;
res = ASFProcess(handle, img1->width, img1->height, ASVL_PAF_RGB24_B8G8R8, (MUInt8*)img1->imageData, &detectedFaces1, processMask);
if (res != MOK)
printf("ASFProcess fail: %d\n", res);
else
printf("ASFProcess sucess: %d\n", res); // 获取年龄
ASF_AgeInfo ageInfo = { 0 };
res = ASFGetAge(handle, &ageInfo);
//printf("年龄: %d\n", ageInfo);
if (res != MOK)
printf("ASFGetAge fail: %d\n", res);
else
printf("ASFGetAge sucess: %d\n", res); // 获取性别
ASF_GenderInfo genderInfo = { 0 };
res = ASFGetGender(handle, &genderInfo);
if (res != MOK)
printf("ASFGetGender fail: %d\n", res);
else
printf("ASFGetGender sucess: %d\n", res); // 获取3D角度
ASF_Face3DAngle angleInfo = { 0 };
res = ASFGetFace3DAngle(handle, &angleInfo);
if (res != MOK)
printf("ASFGetFace3DAngle fail: %d\n", res);
else
printf("ASFGetFace3DAngle sucess: %d\n", res); SafeFree(copyfeature1.feature); //释放内存
} //获取版本信息
const ASF_VERSION* pVersionInfo = ASFGetVersion(handle);
printf("版本号: %s\n", pVersionInfo->Version); //反初始化
res = ASFUninitEngine(handle);
if (res != MOK)
printf("ALUninitEngine fail: %d\n", res);
else
printf("ALUninitEngine sucess: %d\n", res); getchar();
return 0;
}
用其它照片测试需要注意图片的宽度
虹软离线人脸识别 ArcFace 2.0 Demo [C++]的更多相关文章
- Android 离线人脸识别 ArcFace 2.0 Demo开发分享
环境要求 1.运行环境 armeabi-v7a 2.系统要求 Android 5.0 (API Level 21)及以上 3.开发环境 Android Studio 下载地 ...
- C# 离线人脸识别 ArcSoft V2.0 Demo
本来打算做个C#版demo,但没用成功.使用虹软最新人脸识别技术开发完成 过程如下: 1. 传入一张单人脸照片: 2.调用检测人脸函数ASFDetectFaces,成功返回人脸信息的指针: 3.使用 ...
- C++ 虹软人脸识别 ArcFace 2.0 Demo
环境配置: 开发环境:Win10 + VS 2013 SDK版本:ArcFace v2.0 OpenCV版本:2.4.9 平台配置: x64.x86下Release.Debug SDK 下载地址:戳这 ...
- 基于Arcface 免费离线人脸识别 2.0 Demo C#
本来打算做个C#版demo,但没用成功.使用虹软最新人脸识别技术开发完成 过程如下: 1. 传入一张单人脸照片: 2.调用检测人脸函数ASFDetectFaces,成功返回人脸信息的指针: 3.使用 ...
- 虹软人脸识别iOS SDK2.0
最近公司要在APP上添加一个人脸识别功能,在网上搜了一圈,发现虹软的人脸识别SDK挺好用的,而且还免费,所以就下载了他们的SDK研究了一下.总的来看功能挺好用的,只是demo上面部分功能不是很完善,所 ...
- 虹软AI 人脸识别SDK接入 — 参数优化篇
引言 使用了免费的人脸识别算法,感觉还是很不错的,但是初次接触的话会对一些接口的参数有些疑问的.这里分享一下我对一些参数的验证结果(这里以windows版本为例,linux.android基本一样), ...
- 百度离线人脸识别sdk的使用
1.1下载sdk运行 百度离线人脸识别sdk的使用 1.2配置环境 添加至项目,可以拖动复制或者以类库形式添加face-resource此文件夹 放到根目录上一层 激活文件与所有dll引用放到根目录嫌 ...
- windows下百度离线人脸识别本地部署与使用(nodejs做客户端,c++做服务端,socket做通信)
1.离线人脸识别本地部署 详情请阅读百度人脸识别官网 2.nodejs做socket通信的客户端 为什么不直接通过调用c++编译的exe获得人脸识别结果? 原因:exe运行时会加载很多模型而消耗很多时 ...
- C# 离线人脸识别Demo 使用ArcFace 2.0开发完成
环境: win7以上 VS2013以上 sdk版本:ArcFace v2.0 x86 x64平台Debug.Release配置都已通过编译 下载地址:https://github ...
随机推荐
- Java面向对象——类,对象和方法
1.类的概念 在生活中,说到类,可以联想到类别,同类,会想到一类人,一类事物等等.而这一类人或事物都是具有相同特征或特点和行为的,我们根据不同的特征或特点和行为将他们归类或分类.同时,当我们认识一个新 ...
- FB面经 Prepare: Count Unique Island
数unique island, 比如 110000 110001 001101 101100 100000 总共两个unique岛,不是四个 方法可以是记录每次新的岛屿搜索的路径,left,right ...
- python数据类型之字典类型
# 字典常用方法clear(), get(), pop(), update(),copy(),items(), popitem(),values(), fromkeys(), keys(),setde ...
- ubuntu16.04利用deb包安装mysql
https://blog.csdn.net/zht741322694/article/details/79013093
- NetBeans远程调试Linux c++ 11项目
NetBeans远程调试Linux c++ 11项目 由于好多原因,好久没有写博客了,随着c++ 11的普及率越来越高,开发c++ 项目的人也越来越多,可以说c++ 11 给了c++ 这门语言第二次生 ...
- 2018-2019-2 《网络对抗技术》Exp3 免杀原理与实践 20165215
目录 基础问题回答 (1)杀软是如何检测出恶意代码的? (2)免杀是做什么? (3)免杀的基本方法有哪些? 实践内容 任务一:正确使用msf编码器,msfvenom生成如jar之类的其他文件,veil ...
- 小米手机跨域问题,返回resphone:undefined,status 0
小米手机跨域问题,返回resphone:undefined,status 0我小米note2的手机登录不上,返回resphone:undefined,status 0 我手机登录不了的问题解决了,后台 ...
- JS实现div的抖动:缓动式抖动
代码如下: <!DOCTYPE html> <html> <head> <meta charset="UTF-8"> <tit ...
- Java8将List转为Map
1.实体 public class Hosting { private int id; private String name; private long websites; public Hosti ...
- 'OFFSET' 附近有语法错误。 在 FETCH 语句中选项 NEXT 的用法无效。
在使用asp.net core的时候,采用take().skip()分页的时候报如下错误: SqlException: 'OFFSET' 附近有语法错误. 在 FETCH 语句中选项 NEXT 的用法 ...