
快速搭建基于Spring Boot + Spring Security 环境
个人博客网:https://wushaopei.github.io/ (你想要这里多有)
1、Spring Security 权限管理框架介绍
简介: Spring Security 提供了基于javaEE的企业应有个你软件全面的安全服务。这里特别强调支持使用SPring框架构件的项目,Spring框架是企业软件开发javaEE方案的领导者。
Spring Security 的两个目标: “认证” 与“授权”。
- “认证”,是建立一个他声明的主题的过程(一个“主体”一般是指用户,设备或一些可以在你的应用程序中执行动作的其他系统)。
- “授权” 指确定一个主体是否允许在你的应用程序执行一个动作的过程。为了抵达需要授权的店,主体的身份已经有认证过程建立。这个概念是通用的而不只在Spring Security中。


在SpringSecurity 中,请求进入后会被拦截器拦截到,并交由认证管理器首先处理;这是在身份验证层,Spring Security 的支持多种认证模式。包括 Basic、Digest、X.509、LDAP、Form(基于表单的认证) 等多种HTTP 认证。
浅析:
Basic 认证:在HTTP1.0提出的认证方法,针对特定的用户和资源,需要提供特定的密码认证后方可访问,其中密码是使用明文传输的;一个请求到来时,浏览器弹出对话框,让用户输入用户名和密码,并用BASE 64 进行编码进行传输,服务器接受并解析这些信息,并认证通过,才会允许继续访问。
Digest认证: 解决Basic 认证的安全问题,当访问时,浏览器依旧弹出对话框,让用户输入用户名和密码,浏览器会对用户名、密码、HTTP请求方法、被请求资源的URI进行组合后进行MD5运算,然后把计算得到的摘要信息发送给服务器;服务器获取报文头部相关认证信息后获取到 username ,同时获取到密码,同样对用户名、密码、HTTP请求方法、被请求资源的URI进行组合后和 response 进行比较,如果相同,才算认证通过。
2、Spring Security 常用权限拦截器:

主要功能性拦截器有 11 个, FilterChainProxy 对拦截器进行过滤操作并代理执行!
3、Spring Security 项目 Demo
(1)环境搭建及使用
- 基于Spring Boot + Spring Security 环境
- 常用 Case 实现
(2)创建SpringBoot 工程

(3)整合SpringSecurity 依赖
	        <!--springsecurity 主要依赖-->

                <dependency>

			<groupId>org.springframework.boot</groupId>

			<artifactId>spring-boot-starter-security</artifactId>

		</dependency>

		<dependency>

			<groupId>org.springframework.security</groupId>

			<artifactId>spring-security-test</artifactId>

		</dependency>
(4)主启动类配置:
@RestController          //返回响应体为json

@SpringBootApplication

@EnableAutoConfiguration  //扫描Bean注入到容器中

public class Bootstrap {

	public static void main(String[] args) {

		SpringApplication.run(Bootstrap.class, args);

	}

        @RequestMapping("/") // 测试接口

	public String home (){

		return "hello spring boot";

	}

        @RequestMapping("/hello") //测试接口

	public String hello (){

		return "hello spring boot";

	}

}
(5)配置 Servlet 初始化
/**

 * @ClassName ServletInitializer 告诉程序,项目启动时从 Bootstrap 开始

 * @Description TODO

 * @Author wushaopei

 * @Date 2019/9/19 10:30

 * @Version 1.0

 */

public class ServletInitializer extends SpringBootServletInitializer {

    @Override

    protected SpringApplicationBuilder configure(SpringApplicationBuilder application){

        return application.sources(Bootstrap.class);

    }

}
(6)启动SpringBoot 项目- - run 主启动类:
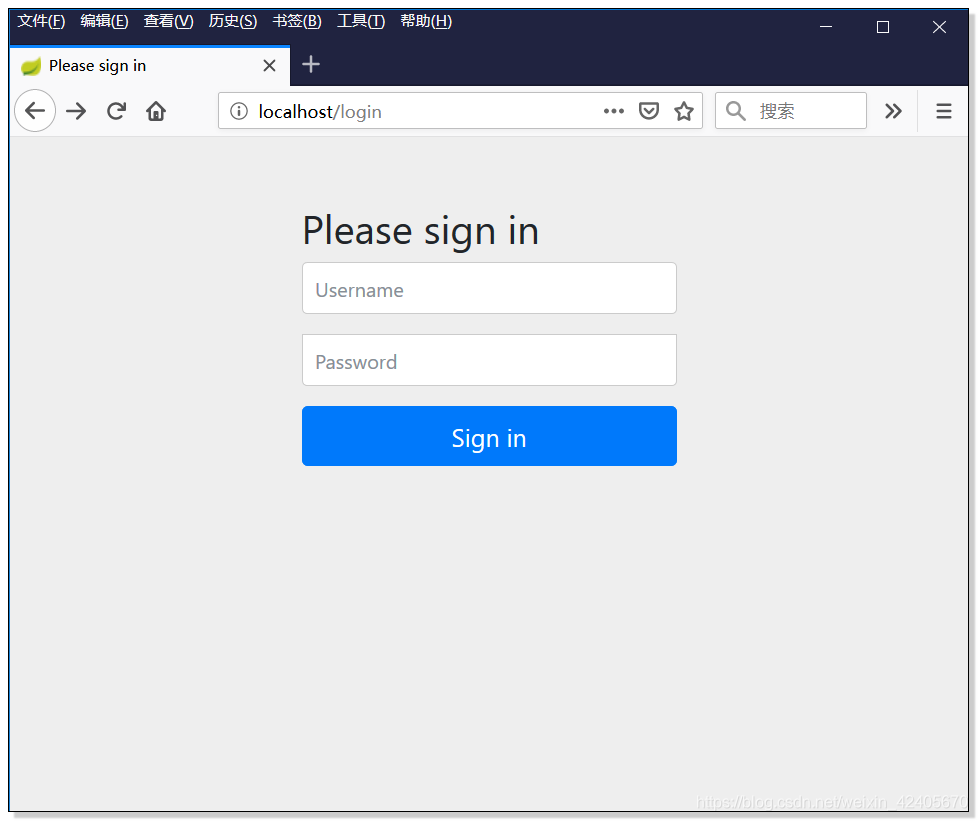
启动SpringBoot 项目进行接口访问时,弹出登录界面,说明SpringSecurity生效了
4、SpringSecurity拦截配置:
注意:在 3 的基础上,对工程进一步配置:
(1)创建 SpringSecurityConfig 类管理 拦截配置:
@Configuration     // 将Bean 放到容器中管理

@EnableWebSecurity // 用于将Security 生成 Bean

public class SpringSecurityConfig extends WebSecurityConfigurerAdapter {

    /*

     * 接口请求拦截

     **/

    @Override

    protected void configure(HttpSecurity http) throws Exception {

        http.authorizeRequests()  //安全请求策略

                .antMatchers("/").permitAll() //可放行请求配置

                .anyRequest().authenticated()    //其他请求进行拦截

                .and()

                .logout().permitAll()  // 注销任意访问

                .and()

                .formLogin();

        http.cors().disable();

    }

    /*

    *  前端拦截

    * */

    @Override

    public void configure(WebSecurity web){

        // 忽视 js 、css 、 images 后缀访问

        web.ignoring().antMatchers("/js/**","/css/**","/images/**");

    }

}
该 SpringSecurityConfig 继承 WebSecurityConfigurerAdapter 类,并重写 configure(HttpSecurity http)和 configure(WebSecurity web)两个方法,分别针对 接口请求 和 静态页面 资源进行拦截。
接口请求: ip:port/ 的请求一律通过,主要进入到 Bootstrap 中的 RequestMapping(“/”)接口中;并对 “/”后带有标识地址的请求进行拦截认证;
静态资源: 此处对静态 js 、css、images 三者进行放行。
效果截图:
配置 SpringSecurity 后,默认可以通过 “/” 的接口请求; 而当进行 如“/hello”接口请求时会被拦截进行验证


5、基于SpringSecurity 权限管理 Case 实操
权限管理 Case 的需求有两个要求:
- 第一点 :只要能登录即可;
- 第二点:有指定的角色,每个角色有指定的权限.
(1)只要能登录即可,功能体现:
在SpringSecurityConfig.java中配置用户信息:
/*

*  告诉程序,系统中有个用户 用户名为 admin ,密码为 admin  角色为 ADMIN

* */

@Override

protected void configure(AuthenticationManagerBuilder auth) throws Exception {

        auth.inMemoryAuthentication().withUser("admin").password("admin").roles("ADMIN");

}
注意 :
在springboot使用spring security 做权限管理 ,使用内存用户验证,会返回无响应报错:

java.lang.IllegalArgumentException: There is no PasswordEncoder mapped for the id "null"
解决方法:
这是因为Spring boot 2.0.3引用的security 依赖是 spring security 5.X版本,此版本需要提供一个PasswordEncorder的实例,否则后台汇报错误:

java.lang.IllegalArgumentException: There is no PasswordEncoder mapped for the id "null"

并且页面毫无响应。

因此,需要创建PasswordEncorder的实现类。
创建PasswordEncorder 实体类后可通过两种方式完成明文验证通过:
第一种:直接在配置好的 PasswordEncorder 类上添加 @Component 装配 MyPasswordEncoder 为Bean 注入到容器即可;
@Component

public class MyPasswordEncoder implements PasswordEncoder {

    @Override

    public String encode(CharSequence charSequence) {

        return charSequence.toString();

    }

    @Override

    public boolean matches(CharSequence charSequence, String s) {

        return s.equals(charSequence.toString());

    }

}
然后继续使用
  /*

    *  告诉程序,系统中有个用户 用户名为 admin ,密码为 admin  角色为 ADMIN

    * */

    @Override

    protected void configure(AuthenticationManagerBuilder auth) throws Exception {

        //可以设置内存指定的登录的账号密码,指定角色

        //不加.passwordEncoder(new MyPasswordEncoder())或者注入该类的Bean

        //就不是以明文的方式进行匹配,会报错

        auth.inMemoryAuthentication().withUser("admin").password("admin").roles("ADMIN");

    }
进行 密码明文登录,可以成功

第二种:在auth.inMemoryAuthentication()后面使用.passwordEncoder(new MyPasswordEncoder())对登录信息进行包装后提交即可;这样也可以成功
//这样,页面提交时候,密码以明文的方式进行匹配。

auth.inMemoryAuthentication().passwordEncoder(new MyPasswordEncoder()).withUser("wsp").password("wsp").roles("ADMIN");
推荐: 最好是使用第一种 装载成 Bean 后注入容器,对于开发效率更高,也更便捷。
(2)有指定的角色,每个角色有指定的权限,功能体现:
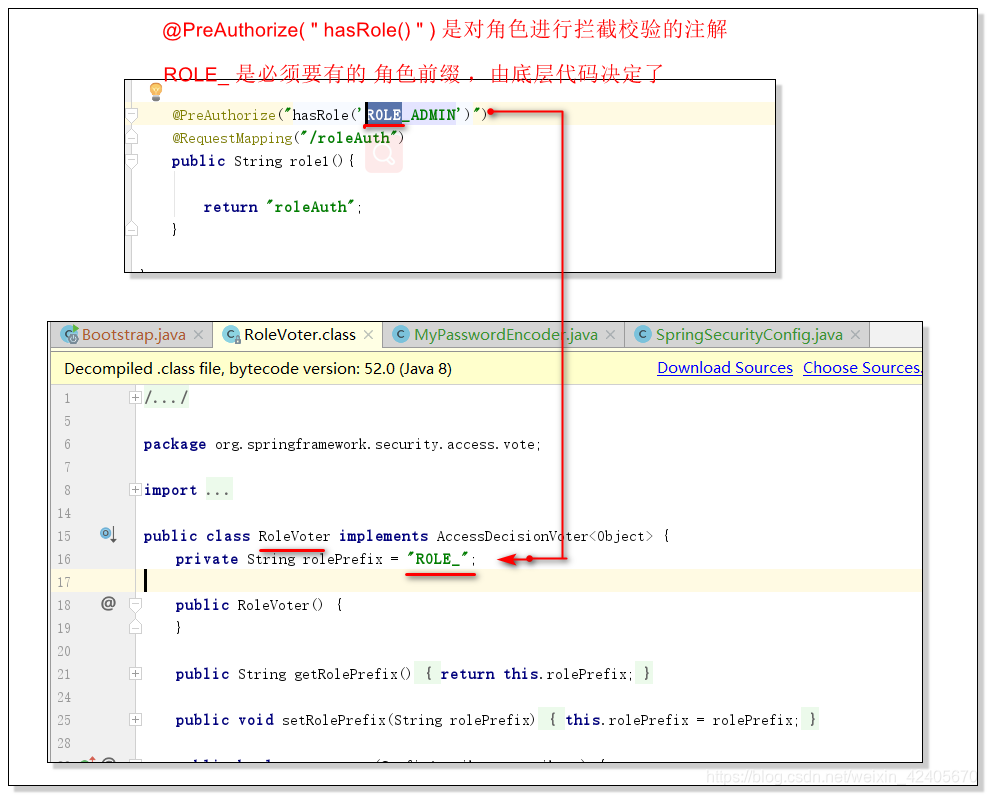
① 创建接口 role1() 并对其添加 @PreAuthorize("hasRole('ROLE_ADMIN')") 以进行角色拦截
    @PreAuthorize("hasRole('ROLE_ADMIN')") // 角色拦截校验注解

    @RequestMapping("/roleAuth")

    public String role1(){

       return "roleAuth";

    }
(2)角色拦截 - - 功能解析:
@PreAuthorize("hasRole('ROLE_ADMIN')") 注解说明:
②并在 SpringSecurityConfig.java 中创建新用户,以提供测试:
@Override

    protected void configure(AuthenticationManagerBuilder auth) throws Exception {

        //可以设置内存指定的登录的账号密码,指定角色

        //不加.passwordEncoder(new MyPasswordEncoder())

        //就不是以明文的方式进行匹配,会报错

        auth.inMemoryAuthentication().withUser("admin").password("admin").roles("ADMIN");

        auth.inMemoryAuthentication().withUser("demo").password("demo").roles("DEMO");

        .passwordEncoder(new MyPasswordEncoder())。

        //这样,页面提交时候,密码以明文的方式进行匹配。

        auth.inMemoryAuthentication().passwordEncoder(new MyPasswordEncoder()).withUser("wsp").password("wsp").roles("ADMIN");

    }
③ 创建好接口后,进行登录尝试,发现,使用 用户为 demo ,角色 为 DEMO 依旧可以通过该接口
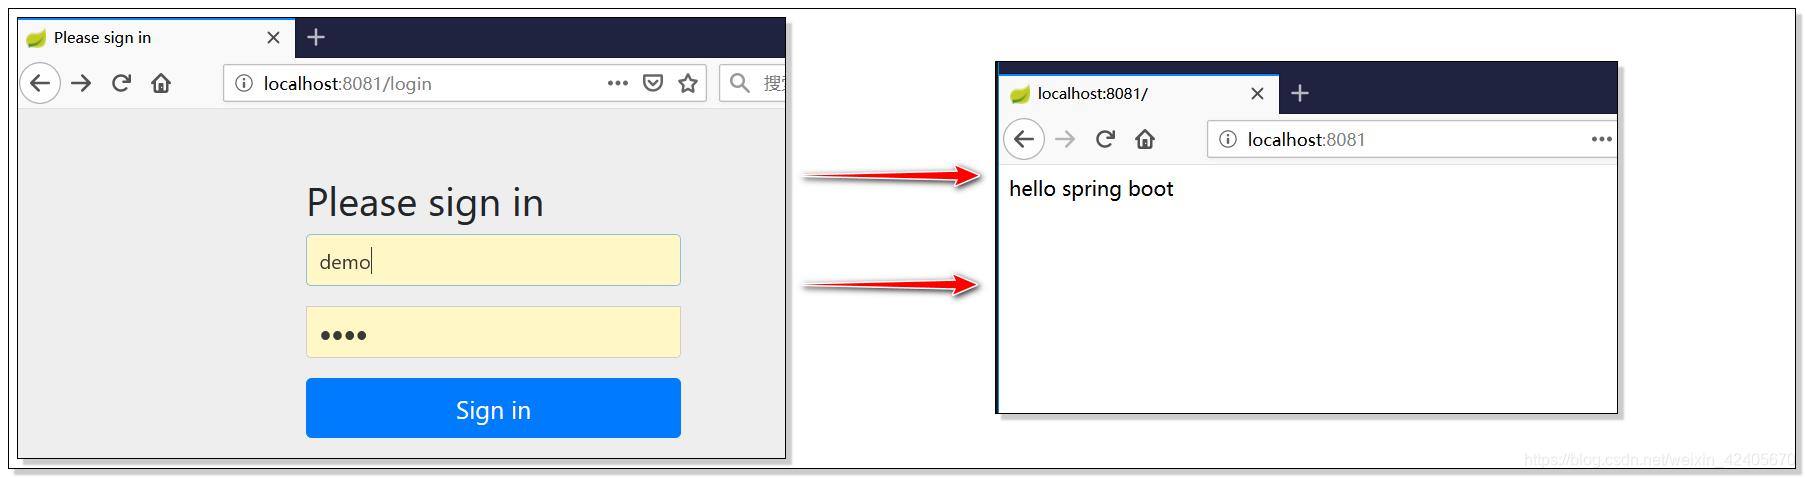
问题解析:
这是因为还需要再添加一个@EnableGlobalMethodSecurity(prePostEnabled = true) 注解到 启动器上,以让 @PreAuthorize("hasRole('ROLE_ADMIN')") 这个注解生效,完整 启动类代码如下:
@RestController

@SpringBootApplication

@EnableAutoConfiguration

@EnableGlobalMethodSecurity(prePostEnabled = true)

public class Bootstrap {

	public static void main(String[] args) {

		SpringApplication.run(Bootstrap.class, args);

	}

	@RequestMapping("/")

	public String home (){

		return "hello spring boot";

	}

	@RequestMapping("/hello")

	public String hello (){

		return "hello spring boot";

	}

	@PreAuthorize("hasRole('ROLE_ADMIN')")

	@RequestMapping("/roleAuth")

	public String role1(){

		return "roleAuth";

	}

}
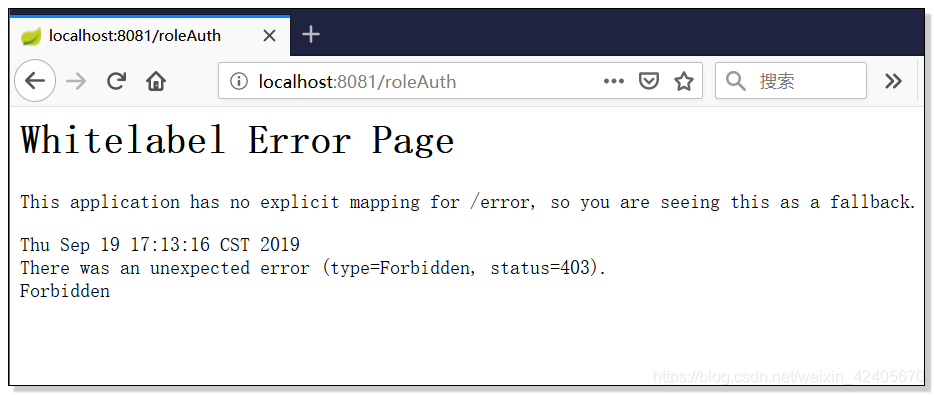
添加注解后:
使用 demo 进行登录:
使用admin进行登录:
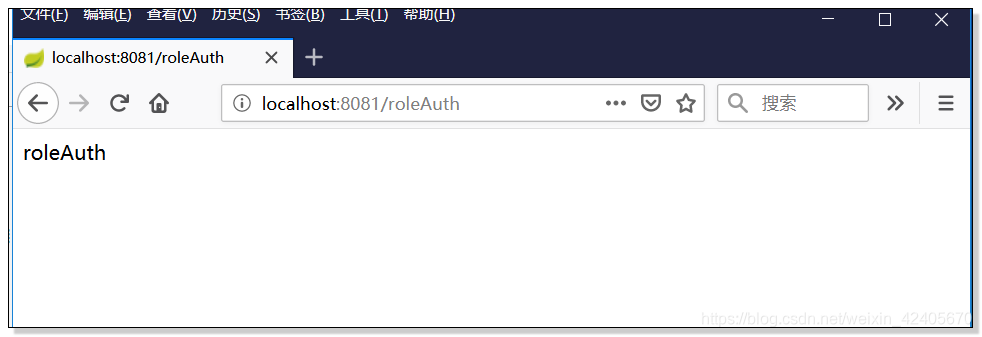
(3)数据库管理实现:
通过数据库获取用户信息进行登录认证
创建 MyUserService.java类,并装载 Bean 到 容器中,在SpringSecurityConfig.java 中进行配置:
@Component

public class MyUserService implements UserDetailsService{

    @Override

    public UserDetails loadUserByUsername(String s) throws UsernameNotFoundException {

        return null;

    }

}
SpringSecurityConfig.java 中 configure(AuthenticationManagerBuilder auth)方法修改为通过注入MyUserService 的Bean实现数据库查询
    @Autowired

    private MyUserService myUserService;

    @Override

    protected void configure(AuthenticationManagerBuilder auth) throws Exception {

           auth.userDetailsService(myUserService); // 通过注入 MyUserService 的方式实现数据库查询用户信息的登录认证

    }
密码的自定义验证:
创建 MyPasswordEncoder 类,实现 PasswordEncoder 接口类;重写 encode(CharSequence obj和 matches(CharSequence obj,String str) 方法:
@Component

public class MyPasswordEncoder implements PasswordEncoder {

    private final static String SALT = "wenmin";

    @Override

    public String encode(CharSequence charSequence) {

        return MD5Util.MD5Encode(charSequence.toString(),SALT);

    }

    @Override

    public boolean matches(CharSequence rawPassword, String encodedPassword) {

        return MD5Util.isPasswordValid(encodedPassword,rawPassword.toString(),SALT);

    }

}
说明:第一个是加密的方法,第二个是匹配密码,具体操作是加密方法加密后与原始密码在匹配方法中进行匹配
底层逻辑解析:
passwordEncoder. isPasswordValid(userDetails.getPassword(), presentedPassword, salt) 这个实现是在接口PasswordEncoder的实现类MessageDigestPasswordEncoder中实现的。

MessageDigestPasswordEncoder类:

public boolean isPasswordValid(String encPass, String rawPass, Object salt) {

        String pass1 = "" + encPass;

        String pass2 = encodePassword(rawPass, salt);

        return pass1.equals(pass2);

    }

其中 encodePassword(rawPass, salt)方法如下:

public String encodePassword(String rawPass, Object salt) {

        String saltedPass = mergePasswordAndSalt(rawPass, salt, false);

        MessageDigest messageDigest = getMessageDigest();

        byte[] digest;

        try {

            digest = messageDigest.digest(saltedPass.getBytes("UTF-8"));

        } catch (UnsupportedEncodingException e) {

            throw new IllegalStateException("UTF-8 not supported!");

        }

        // "stretch" the encoded value if configured to do so

        for (int i = 1; i < iterations; i++) {

            digest = messageDigest.digest(digest);

        }

        if (getEncodeHashAsBase64()) {

            return new String(Base64.encode(digest));

        } else {

            return new String(Hex.encode(digest));

        }

    }

使用的是MD5加密方法。
引入自定义的登录信息验证器
auth.userDetailsService(myUserService).passwordEncoder(new MyPasswordEncoder());
相关注解说明:
@PreAuthorize("hasRole('ROLE_ADMIN')") 方法调用前进行权限检查
@PostAuthorize("hasRole('')") 方法调用后进行权限检查
@PreFilter("") 方法调用前针对集合类参数或返回值进行过滤
@PostFilter("") 方法调用后针对集合类参数或返回值进行过滤
6、Spring Security 的优缺点
优点:
提供了一套安全框架,而且这个框架是可以用的;
提供了很多用户认证的功能,实现相关接口即可,节约大量开发工作;
基于spring,易于集成到 spring 项目中,且封装了许多方法。
缺点:
配置文件多,角色被“编码”到配置文件盒源文件中,RBAC 不明显;
对于系统中用户、角色、权限之间的关系,没有可操作的界面;
大数据量情况下,几乎不可用。
https://github.com/wushaopei/SPRING_BOOT/tree/master/Spring-boot-Security
快速搭建基于Spring Boot + Spring Security 环境的更多相关文章
- 如何快速搭建基于python+appium的自动化测试环境
首先申明本文是基本于Python与Android来快速搭建Appium自动化测试环境: 主要分为以下几个步骤: 前提条件: 1)安装与配置python环境,打开 Python官网,找到“Downloa ...
- 快速搭建Spring Boot + Apache Shiro 环境
个人博客网:https://wushaopei.github.io/ (你想要这里多有) 一.Apache Shiro 介绍及概念 概念:Apache Shiro是一个强大且易用的Java安全框 ...
- 基于Spring Boot+Spring Security+JWT+Vue前后端分离的开源项目
一.前言 最近整合Spring Boot+Spring Security+JWT+Vue 完成了一套前后端分离的基础项目,这里把它开源出来分享给有需要的小伙伴们 功能很简单,单点登录,前后端动态权限配 ...
- 256.Spring Boot+Spring Security: MD5是加密算法吗?
说明 (1)JDK版本:1.8 (2)Spring Boot 2.0.6 (3)Spring Security 5.0.9 (4)Spring Data JPA 2.0.11.RELEASE (5)h ...
- 255.Spring Boot+Spring Security:使用md5加密
说明 (1)JDK版本:1.8 (2)Spring Boot 2.0.6 (3)Spring Security 5.0.9 (4)Spring Data JPA 2.0.11.RELEASE (5)h ...
- Spring Boot+Spring Security:获取用户信息和session并发控制
说明 (1)JDK版本:1.8(2)Spring Boot 2.0.6(3)Spring Security 5.0.9(4)Spring Data JPA 2.0.11.RELEASE(5)hiber ...
- Spring Boot+Spring Security+JWT 实现 RESTful Api 认证(一)
标题 Spring Boot+Spring Security+JWT 实现 RESTful Api 认证(一) 技术 Spring Boot 2.Spring Security 5.JWT 运行环境 ...
- Spring boot +Spring Security + Thymeleaf 认证失败返回错误信息
[Please make sure to select the branch corresponding to the version of Thymeleaf you are using] Stat ...
- Cola Cloud 基于 Spring Boot, Spring Cloud 构建微服务架构企业级开发平台
Cola Cloud 基于 Spring Boot, Spring Cloud 构建微服务架构企业级开发平台: https://gitee.com/leecho/cola-cloud
随机推荐
- STM32 串口USART DMA方式发送接收数据
硬件:stm32f103cbt6 软件:STM32F10x_StdPeriph_Lib_V3.5.0 文章目录 头文件 USART3_DR的地址 DMA的通道 DMA的中断 USART接收回调函数 头 ...
- Windows命令行:xcopy、move、rename
Windows命令行,xcopy复制粘贴,move剪切粘贴,rename/ren重命名.当简单事情重复做时,Windows命令行有用武之地了.批命令中,暂时用不到的行,用两个冒号注释掉. 不同路径下, ...
- HBase 安装snappy压缩软件以及相关编码配置
HBase 安装snappy压缩软件以及相关编码配置 前言 在使用HBase过程中因为数据存储冗余.备份数等相关问题占用过多的磁盘空间,以及在入库过程中为了增加吞吐量所以会采用相关的压缩算法来压缩 ...
- vue打包 报错问题记录
1. assetsPublicPath: '/' 修改为 assetsPublicPath: './' 2. untils.js里面增加 publicPath: '../../' 重新运行 ...
- 初识Page Object
PageObject是UI自动化测试项目开发实践的最佳设计模式之一,它的主要特点体现在对界面交互细节的封装上,使测试用例更加专注于业务的操作,从而提高测试用例的可维护性. 1.认识Page Objec ...
- apache httpd 不记录head 的请求。
比如说用了阿里云的slb ,然后他会检测服务器是否正常运行,通常会发大量的HEAD 请求过来. 这样有规则的请求是可以屏蔽的.步骤如下: 在 <Directory />中添加 SetEnv ...
- mysql和oracle 关于多表join的区别
http://stackoverflow.com/questions/10953143/join-performance-oracle-vs-mysql 翻译自上面的链接. Given a query ...
- sh: react-scripts: command not found after running npm start
今天遇到一堆bug,从早上10点到现在8成的时间都像是浪费了..... https://stackoverflow.com/questions/40546231/sh-react-scripts-co ...
- vue在钩子中引用方法不成功
在组建创建成功后调用methods里的方法fn1,失败,提示not a function: created(){ getData(){} } solution: created(){ this.get ...
- 王艳 201771010127《面向对象程序设计(java)》第一周学习总结
王艳 201771010127<面向对象程序设计(java)>第一周学习总结 第一部分:课程准备部分 填写课程学习 平台注册账号, 平台名称 注册账号 博客园:www.cnblogs.co ...