spring源码解析之前置知识点
本文是作者原创,版权归作者所有.若要转载,请注明出处.
最近在看spring源码,但是spring的体系太庞大了,在这里记录一下阅读源码中遇到知识点
@PostConstruct
被注解的方法,在对象加载完依赖注入后执行
看个demo
package com.day01.config;

import org.springframework.context.annotation.ComponentScan;

import org.springframework.context.annotation.Configuration;

@Configuration

@ComponentScan("com.day01")

public class SpringConfig {

}
IndexDao
package com.day01.service;

import org.springframework.stereotype.Component;

@Component

public class IndexDao {

    public IndexDao(){

        System.out.println("IndexDao  构造方法");

    }

}
IndexService
@Service

public class IndexService {

    @Autowired

    private IndexDao indexDao;

    public IndexService(){

        System.out.println("IndexService  构造方法");

    }

    @PostConstruct

    public void init(){

        System.out.println("IndexService  init方法");

    }

    public void hello(){

        System.out.println("IndexService");

    }

}
Testday01
public static void main(String[] args) {

        AnnotationConfigApplicationContext applicationContext=new AnnotationConfigApplicationContext(SpringConfig.class);

        IndexService indexService = (IndexService) applicationContext.getBean("indexService");

        indexService.hello();

    }
看结果

可以看出在spring项目中,在一个bean的初始化过程中,方法执行先后顺序为Constructor > @Autowired > @PostConstruct
BeanPostProcessor
BeanPostProcessor是Spring框架的提供的一个扩展点,通过实现BeanPostProcessor接口,程序员就可插手bean实例化的过程
看demo
@Component

public class TestBeanPostProcessor implements BeanPostProcessor {

    /**

     * 在bean初始化之前执行

     */

    @Override

    public Object postProcessBeforeInitialization(Object bean, String beanName) throws BeansException {

        if (beanName.equals("indexService")){

            System.out.println("indexService  postProcessBeforeInitialization");

        }

        //这里也可以产生代理对象 Proxy.newProxyInstance(),也是aop实现的原理

        return bean;

    }

    /**

     * 初始化之后

     */

    @Override

    public Object postProcessAfterInitialization(Object bean, String beanName) throws BeansException {

        if (beanName.equals("indexService")){

            System.out.println("indexService  postProcessAfterInitialization");

        }

        return bean;

    }

}
运行上文的Testday01,看下结果
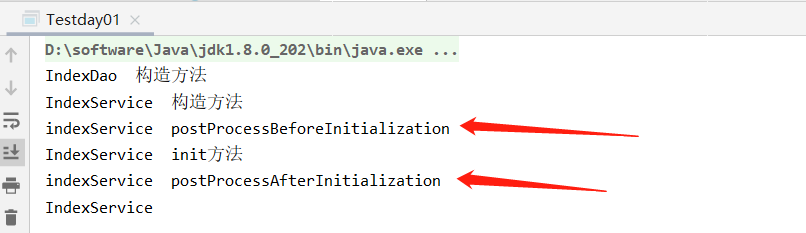
可以看出
===Spring IOC容器实例化Bean===

===调用BeanPostProcessor的postProcessBeforeInitialization方法===

===调用bean实例的初始化方法===

===调用BeanPostProcessor的postProcessAfterInitialization方法===
值得说明的是这个接口可以设置多个,会形成一个列表,那么如何确定他们的执行顺序呢?
Ordered和PriorityOrdered
Spring提供了Ordered和PriorityOrdered接口,来处理相同接口实现类的优先级问题
看个demo
TestBeanPostProcessor
@Component

public class TestBeanPostProcessor implements BeanPostProcessor , PriorityOrdered {

    /**

     * 在bean初始化之前执行

     */

    @Override

    public Object postProcessBeforeInitialization(Object bean, String beanName) throws BeansException {

        if (beanName.equals("indexService")){

            System.out.println("indexService  postProcessBeforeInitialization");

        }

        //这里也可以产生代理对象 Proxy.newProxyInstance(),也是aop实现的原理

        return bean;

    }

    /**

     * 在bean初始化之前执行

     */

    @Override

    public Object postProcessAfterInitialization(Object bean, String beanName) throws BeansException {

        if (beanName.equals("indexService")){

            System.out.println("indexService  postProcessAfterInitialization");

        }

        return bean;

    }

    @Override

    public int getOrder() {

        return 100;//注意这里

    }

}
TestBeanPostProcessor2
@Component

public class TestBeanPostProcessor2 implements BeanPostProcessor , PriorityOrdered {

    /**

     * 在bean初始化之前执行

     */

    @Override

    public Object postProcessBeforeInitialization(Object bean, String beanName) throws BeansException {

        if (beanName.equals("indexService")){

            System.out.println("indexService  postProcessBeforeInitialization2");

        }

        //这里也可以产生代理对象 Proxy.newProxyInstance(),也是aop实现的原理

        return bean;

    }

    /**

     * 在bean初始化之前执行

     */

    @Override

    public Object postProcessAfterInitialization(Object bean, String beanName) throws BeansException {

        if (beanName.equals("indexService")){

            System.out.println("indexService  postProcessAfterInitialization2");

        }

        return bean;

    }

    @Override

    public int getOrder() {

        return 99;

    }

}
运行test类,看结果
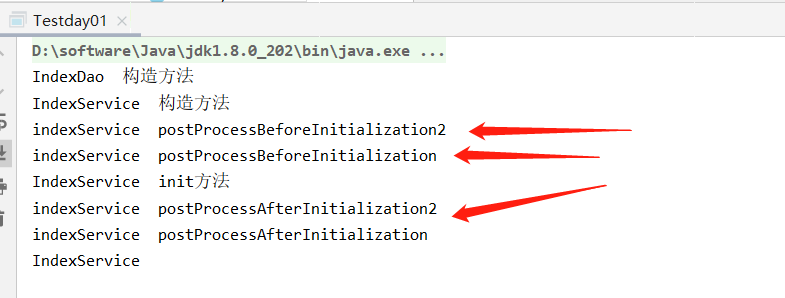
这段代码的逻辑:
1. 若对象o1是Ordered接口类型,o2是PriorityOrdered接口类型,那么o2的优先级高于o1
2. 若对象o1是PriorityOrdered接口类型,o2是Ordered接口类型,那么o1的优先级高于o2
3. 其他情况,若两者都是Ordered接口类型或两者都是PriorityOrdered接口类型,调用Ordered接口的getOrder方法得到order值,order值越大,优先级越小
若2个对象中有一个对象实现了PriorityOrdered接口,那么这个对象的优先级更高。
若2个对象都是PriorityOrdered或Ordered接口的实现类,那么比较Ordered接口的getOrder方法得到order值,值越低,优先级越高
BeanFactoryPostProcessor
spring的扩展点之一:实现该接口,可以在spring的bean创建之前修改beandefinitions属性。
例如可以把bean的scope从singleton改为prototype,也可以把property的值给修改掉。
可以同时配置多个BeanFactoryPostProcessor,并通过设置'order'属性来控制各个BeanFactoryPostProcessor的执行次序
看个demo
@Component

public class TestBeanFactoryPostProcessor implements BeanFactoryPostProcessor {

    @Override

    public void postProcessBeanFactory(ConfigurableListableBeanFactory beanFactory) throws BeansException {

        System.out.println("===============TestBeanFactoryPostProcessor============");

    }

}
测试类
public static void main(String[] args) {

        AnnotationConfigApplicationContext applicationContext=new AnnotationConfigApplicationContext(SpringConfig.class);

        //AnnotationConfigApplicationContext applicationContext=new AnnotationConfigApplicationContext(IndexService.class);

        IndexService indexService = (IndexService) applicationContext.getBean("indexService");

        indexService.hello();

        IndexService indexService2 = (IndexService) applicationContext.getBean("indexService");

        System.out.println(indexService);

        System.out.println(indexService2);

    }
运行一下,看结果

可以看到,spring管理的bean默认是单例的,我们把indexService改成prototype试一下
@Component

public class TestBeanFactoryPostProcessor implements BeanFactoryPostProcessor {

    @Override

    public void postProcessBeanFactory(ConfigurableListableBeanFactory beanFactory) throws BeansException {

        System.out.println("===============TestBeanFactoryPostProcessor============");

        BeanDefinition indexService = beanFactory.getBeanDefinition("indexService");

        String scope = indexService.getScope();

        System.out.println(scope);//singleton

        //indexService.setScope("singleton");

        indexService.setScope("prototype");//设置为原型

        System.out.println(scope);//singleton

    }

}
看下结果

BeanDefinitionRegistryPostProcessor
BeanDefinitionRegistryPostProcessor继承了BeanFactoryPostProcessor接口,并可以注册bean到spring容器中,一共要实现以下两个方法:
void postProcessBeanFactory(ConfigurableListableBeanFactory beanFactory) throws BeansException:

该方法的实现中,主要用来对bean定义做一些改变。

void postProcessBeanDefinitionRegistry(BeanDefinitionRegistry registry) throws BeansException:

该方法用来注册更多的bean到spring容器中,详细观察入参BeanDefinitionRegistry接口,看看这个参数能带给我们什么能力。
看个demo
public class IndexService2  {

    private ApplicationContext applicationContext;

    public IndexService2(){

        System.out.println("IndexService2  构造方法");

    }

    @PostConstruct

    public void init(){

        System.out.println("IndexService2  init方法");

    }

    public void hello(){

        System.out.println("IndexService2 hello");

    }

}
注意:IndexService2并没有@Component注解,说明这个类并没有交给spring管理,继续
@Component

public class MyBeanDefinitionRegistryPostProcessor implements BeanDefinitionRegistryPostProcessor {

    @Override

    public void postProcessBeanDefinitionRegistry(BeanDefinitionRegistry registry) throws BeansException {

        GenericBeanDefinition genericBeanDefinition = new GenericBeanDefinition();

        genericBeanDefinition.setScope("singleton");

        genericBeanDefinition.setBeanClass(IndexService2.class);//将IndexService2交给spring管理

        registry.registerBeanDefinition("indexService2",genericBeanDefinition);

    }

    @Override

    public void postProcessBeanFactory(ConfigurableListableBeanFactory beanFactory) throws BeansException {

        System.out.println("===============MyBeanDefinitionRegistryPostProcessor============");

    }

}
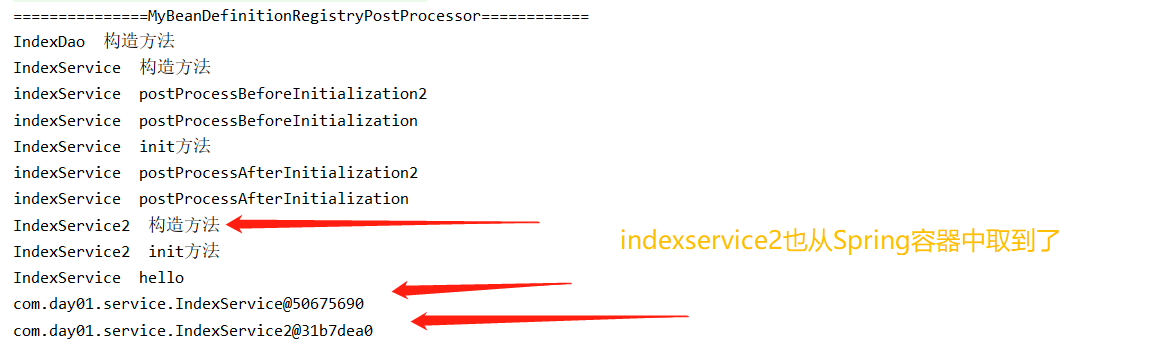
注意上述代码中通过BeanDefinitionRegistryPostProcessor 将IndexService2手动注册交给spring管理
运行test类
public static void main(String[] args) {

        AnnotationConfigApplicationContext applicationContext=new AnnotationConfigApplicationContext(SpringConfig.class);

        //AnnotationConfigApplicationContext applicationContext=new AnnotationConfigApplicationContext(IndexService.class);

        IndexService indexService = (IndexService) applicationContext.getBean("indexService");

        indexService.hello();

        IndexService2 indexService2 = (IndexService2) applicationContext.getBean("indexService2");

        System.out.println(indexService);

        System.out.println(indexService2);

    }
看结果
ApplicationContextAware
我们可以通过注解@Autowired 很简单方便获取bean,虽然这种方法很简单方便,但是有些特殊场景用不了,比如静态方法中不能使用

此时可以借助ApplicationContextAware获取bean
看个demo
@Service

public class TestServiceImpl {

    public String hello(){

        return "hello world";

    }

}
这里无法注入TestServiceImpl 无法使用,看demo
@Component

public class ApplicationContextUtil implements ApplicationContextAware {

    private static ApplicationContext applicationContext = null;

    @Autowired

    private TestServiceImpl testService;

    /**

     * 实现ApplicationContextAware接口, 注入Context到静态变量中.

     */

    @Override

    public void setApplicationContext(ApplicationContext applicationContext) throws BeansException {

        ApplicationContextUtil.applicationContext = applicationContext;

    }

    /**

     * 获取静态变量中的ApplicationContext.

     */

    public static ApplicationContext getApplicationContext() {

        return applicationContext;

    }

    /**

     * 从静态变量applicationContext中得到Bean, 自动转型为所赋值对象的类型.

     */

    @SuppressWarnings("unchecked")

    public static <T> T getBean(String name) {

        return (T) applicationContext.getBean(name);

    }

    /**

     * 从静态变量applicationContext中得到Bean, 自动转型为所赋值对象的类型.

     */

    public static <T> T getBean(Class<T> requiredType) {

        return applicationContext.getBean(requiredType);

    }

    /*public static String test(){

        String hello = testService.hello();

    }*/

}
看测试类
public static void main(String[] args) {
AnnotationConfigApplicationContext applicationContext=new AnnotationConfigApplicationContext(SpringConfig.class);
//AnnotationConfigApplicationContext applicationContext=new AnnotationConfigApplicationContext(IndexService.class);
IndexService indexService = (IndexService) applicationContext.getBean("indexService");
indexService.hello();
System.out.println(indexService);
/*IndexService2 indexService2 = (IndexService2) applicationContext.getBean("indexService2");
System.out.println(indexService2);*/
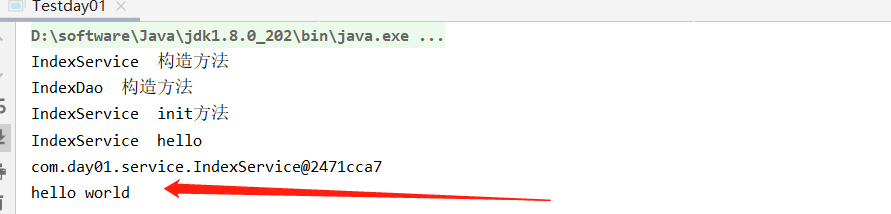
String testServiceImpl = ((TestServiceImpl) ApplicationContextUtil.getBean("testServiceImpl")).hello();
System.out.println(testServiceImpl);
}
看结果
ok,今天就先到这里,以后有新的内容随时补充吧
spring源码解析之前置知识点的更多相关文章
- spring 源码解析
1. [文件] spring源码.txt ~ 15B 下载(167) ? 1 springн┤┬вио╬Ш: 2. [文件] spring源码分析之AOP.txt ~ 15KB 下载( ...
- Spring源码解析之八finishBeanFactoryInitialization方法即初始化单例bean
Spring源码解析之八finishBeanFactoryInitialization方法即初始化单例bean 七千字长文深刻解读,Spirng中是如何初始化单例bean的,和面试中最常问的Sprin ...
- Spring源码解析 - AbstractBeanFactory 实现接口与父类分析
我们先来看类图吧: 除了BeanFactory这一支的接口,AbstractBeanFactory主要实现了AliasRegistry和SingletonBeanRegistry接口. 这边主要提供了 ...
- Spring源码解析——循环依赖的解决方案
一.前言 承接<Spring源码解析--创建bean>.<Spring源码解析--创建bean的实例>,我们今天接着聊聊,循环依赖的解决方案,即创建bean的ObjectFac ...
- Spring源码解析-ioc容器的设计
Spring源码解析-ioc容器的设计 1 IoC容器系列的设计:BeanFactory和ApplicatioContext 在Spring容器中,主要分为两个主要的容器系列,一个是实现BeanFac ...
- Spring源码解析系列汇总
相信我,你会收藏这篇文章的 本篇文章是这段时间撸出来的Spring源码解析系列文章的汇总,总共包含以下专题.喜欢的同学可以收藏起来以备不时之需 SpringIOC源码解析(上) 本篇文章搭建了IOC源 ...
- Spring源码解析之PropertyPlaceholderHelper(占位符解析器)
Spring源码解析之PropertyPlaceholderHelper(占位符解析器) https://blog.csdn.net/weixin_39471249/article/details/7 ...
- Spring源码解析之BeanFactoryPostProcessor(三)
在上一章中笔者介绍了refresh()的<1>处是如何获取beanFactory对象,下面我们要来学习refresh()方法的<2>处是如何调用invokeBeanFactor ...
- Spring源码解析之ConfigurationClassPostProcessor(二)
上一个章节,笔者向大家介绍了spring是如何来过滤配置类的,下面我们来看看在过滤出配置类后,spring是如何来解析配置类的.首先过滤出来的配置类会存放在configCandidates列表, 在代 ...
随机推荐
- 深入理解Java枚举
深入理解Java枚举 重新认识Java枚举 老实说,挺羞愧的,这么久了,一直不知道Java枚举的本质是啥,虽然也在用,但是真不知道它的底层是个啥样的 直到2020年4月28日的晚上20点左右,我才真的 ...
- 设置共享内存大小 【windows】
hMapFile = CreateFileMapping( INVALID_HANDLE_VALUE, // use paging file NULL, // default security PAG ...
- Spring Boot中使用Swagger CodeGen生成REST client
文章目录 什么是Open API规范定义文件呢? 生成Rest Client 在Spring Boot中使用 API Client 配置 使用Maven plugin 在线生成API Spring B ...
- mysql硬件优化
导致宕机的原因: 1. 运行环境: 35%,运行环境可以看做是支持数据库服务器运行的系统和资源集合,包括操作系统,硬盘以及网络 2. 性能:35% 3. 复制 20% 4 ...
- JavaSE——装饰设计模式+简单加密解密工程
2019独角兽企业重金招聘Python工程师标准>>> 声明:本栏目所使用的素材都是凯哥学堂VIP学员所写,学员有权匿名,对文章有最终解释权:凯哥学堂旨在促进VIP学员互相学习的基础 ...
- Frame Relay Voice Traffic Shaping and Frament
本文全称应该是:Frame Relay Voice-Adaptive Traffic Shaping and Fragmentation,标题限制字数,没办法了 帧中继的流量整型向来是个头疼的地方 ...
- caffe学习笔记(1)安装 - Ubuntu 15.04
官方安装手册 备注:使用系统 - Ubuntu 15.04 64位操作系统(若系统位于虚拟机上,在安装CUDA后,Ubuntu将无法进入图形界面) /************************* ...
- CF思维联系– Codeforces-990C Bracket Sequences Concatenation Problem(括号匹配+模拟)
ACM思维题训练集合 A bracket sequence is a string containing only characters "(" and ")" ...
- ST函数(ST表)RMQ O(1)查询 离线
ST算法是基于倍增的动态规划算法. #include<iostream> #include<cstdio> #include<cstdlib> #include&l ...
- python(递归函数)
1.描述: 递归函数:在函数内部,可以调用其他函数.如果一个函数在内部调用自身本身,这个函数就是递归函数. 2.递归函数特性: 必须有一个明确的结束条件: 每次进入更深一层递归时,问题规模相比上次递归 ...