(转)解决png图片在IE6下不透明的方法
来源于:http://xzl52199.blog.163.com/blog/static/95206446201142174540220/
一、传统的JavaScript方法
思路:
1、一个专门解决png图片无法在IE6正常显示的JS类DD_belatePNG.js,
2、在页面中引入该类,并且指定对那些页面元素起作用
eg:<script>DD_belatePNG.fix('img')</script> 表示对img标签,这里可以写类名
代码:
DD_belatePNG.js文件
/**

* DD_belatedPNG: Adds IE6 support: PNG images for CSS background-image and HTML <IMG/>.

* Author: Drew Diller

* Email: drew.diller@gmail.com

* URL: http://www.dillerdesign.com/experiment/DD_belatedPNG/

* Version: 0.0.8a

* Licensed under the MIT License: http://dillerdesign.com/experiment/DD_belatedPNG/#license

*Ò»Á÷ËزÄÍøwww.16sucai.com

* Example usage:

* DD_belatedPNG.fix('.png_bg'); // argument is a CSS selector

* DD_belatedPNG.fixPng( someNode ); // argument is an HTMLDomElement

**/

/*

PLEASE READ:

Absolutely everything in this script is SILLY.  I know this.  IE's rendering of certain pixels doesn't make sense, so neither does this code!

*/

var DD_belatedPNG = {

    ns: 'DD_belatedPNG',

    imgSize: {},

    delay: 10,

    nodesFixed: 0,

    createVmlNameSpace: function () { /* enable VML */

        if (document.namespaces && !document.namespaces[this.ns]) {

            document.namespaces.add(this.ns, 'urn:schemas-microsoft-com:vml');

        }

    },

    createVmlStyleSheet: function () { /* style VML, enable behaviors */

        /*

            Just in case lots of other developers have added

            lots of other stylesheets using document.createStyleSheet

            and hit the 31-limit mark, let's not use that method!

            further reading: http://msdn.microsoft.com/en-us/library/ms531194(VS.85).aspx

        */

        var screenStyleSheet, printStyleSheet;

        screenStyleSheet = document.createElement('style');

        screenStyleSheet.setAttribute('media', 'screen');

        document.documentElement.firstChild.insertBefore(screenStyleSheet, document.documentElement.firstChild.firstChild);

        if (screenStyleSheet.styleSheet) {

            screenStyleSheet = screenStyleSheet.styleSheet;

            screenStyleSheet.addRule(this.ns + '\\:*', '{behavior:url(#default#VML)}');

            screenStyleSheet.addRule(this.ns + '\\:shape', 'position:absolute;');

            screenStyleSheet.addRule('img.' + this.ns + '_sizeFinder', 'behavior:none; border:none; position:absolute; z-index:-1; top:-10000px; visibility:hidden;'); /* large negative top value for avoiding vertical scrollbars for large images, suggested by James O'Brien, http://www.thanatopsic.org/hendrik/ */

            this.screenStyleSheet = screenStyleSheet;

            /* Add a print-media stylesheet, for preventing VML artifacts from showing up in print (including preview). */

            /* Thanks to Rémi Prévost for automating this! */

            printStyleSheet = document.createElement('style');

            printStyleSheet.setAttribute('media', 'print');

            document.documentElement.firstChild.insertBefore(printStyleSheet, document.documentElement.firstChild.firstChild);

            printStyleSheet = printStyleSheet.styleSheet;

            printStyleSheet.addRule(this.ns + '\\:*', '{display: none !important;}');

            printStyleSheet.addRule('img.' + this.ns + '_sizeFinder', '{display: none !important;}');

        }

    },

    readPropertyChange: function () {

        var el, display, v;

        el = event.srcElement;

        if (!el.vmlInitiated) {

            return;

        }

        if (event.propertyName.search('background') != -1 || event.propertyName.search('border') != -1) {

            DD_belatedPNG.applyVML(el);

        }

        if (event.propertyName == 'style.display') {

            display = (el.currentStyle.display == 'none') ? 'none' : 'block';

            for (v in el.vml) {

                if (el.vml.hasOwnProperty(v)) {

                    el.vml[v].shape.style.display = display;

                }

            }

        }

        if (event.propertyName.search('filter') != -1) {

            DD_belatedPNG.vmlOpacity(el);

        }

    },

    vmlOpacity: function (el) {

        if (el.currentStyle.filter.search('lpha') != -1) {

            var trans = el.currentStyle.filter;

            trans = parseInt(trans.substring(trans.lastIndexOf('=')+1, trans.lastIndexOf(')')), 10)/100;

            el.vml.color.shape.style.filter = el.currentStyle.filter; /* complete guesswork */

            el.vml.image.fill.opacity = trans; /* complete guesswork */

        }

    },

    handlePseudoHover: function (el) {

        setTimeout(function () { /* wouldn't work as intended without setTimeout */

            DD_belatedPNG.applyVML(el);

        }, 1);

    },

    /**

    * This is the method to use in a document.

    * @param {String} selector - REQUIRED - a CSS selector, such as '#doc .container'

    **/

    fix: function (selector) {

        if (this.screenStyleSheet) {

            var selectors, i;

            selectors = selector.split(','); /* multiple selectors supported, no need for multiple calls to this anymore */

            for (i=0; i<selectors.length; i++) {

                this.screenStyleSheet.addRule(selectors[i], 'behavior:expression(DD_belatedPNG.fixPng(this))'); /* seems to execute the function without adding it to the stylesheet - interesting... */

            }

        }

    },

    applyVML: function (el) {

        el.runtimeStyle.cssText = '';

        this.vmlFill(el);

        this.vmlOffsets(el);

        this.vmlOpacity(el);

        if (el.isImg) {

            this.copyImageBorders(el);

        }

    },

    attachHandlers: function (el) {

        var self, handlers, handler, moreForAs, a, h;

        self = this;

        handlers = {resize: 'vmlOffsets', move: 'vmlOffsets'};

        if (el.nodeName == 'A') {

            moreForAs = {mouseleave: 'handlePseudoHover', mouseenter: 'handlePseudoHover', focus: 'handlePseudoHover', blur: 'handlePseudoHover'};

            for (a in moreForAs) {

                if (moreForAs.hasOwnProperty(a)) {

                    handlers[a] = moreForAs[a];

                }

            }

        }

        for (h in handlers) {

            if (handlers.hasOwnProperty(h)) {

                handler = function () {

                    self[handlers[h]](el);

                };

                el.attachEvent('on' + h, handler);

            }

        }

        el.attachEvent('onpropertychange', this.readPropertyChange);

    },

    giveLayout: function (el) {

        el.style.zoom = 1;

        if (el.currentStyle.position == 'static') {

            el.style.position = 'relative';

        }

    },

    copyImageBorders: function (el) {

        var styles, s;

        styles = {'borderStyle':true, 'borderWidth':true, 'borderColor':true};

        for (s in styles) {

            if (styles.hasOwnProperty(s)) {

                el.vml.color.shape.style[s] = el.currentStyle[s];

            }

        }

    },

    vmlFill: function (el) {

        if (!el.currentStyle) {

            return;

        } else {

            var elStyle, noImg, lib, v, img, imgLoaded;

            elStyle = el.currentStyle;

        }

        for (v in el.vml) {

            if (el.vml.hasOwnProperty(v)) {

                el.vml[v].shape.style.zIndex = elStyle.zIndex;

            }

        }

        el.runtimeStyle.backgroundColor = '';

        el.runtimeStyle.backgroundImage = '';

        noImg = true;

        if (elStyle.backgroundImage != 'none' || el.isImg) {

            if (!el.isImg) {

                el.vmlBg = elStyle.backgroundImage;

                el.vmlBg = el.vmlBg.substr(5, el.vmlBg.lastIndexOf('")')-5);

            }

            else {

                el.vmlBg = el.src;

            }

            lib = this;

            if (!lib.imgSize[el.vmlBg]) { /* determine size of loaded image */

                img = document.createElement('img');

                lib.imgSize[el.vmlBg] = img;

                img.className = lib.ns + '_sizeFinder';

                img.runtimeStyle.cssText = 'behavior:none; position:absolute; left:-10000px; top:-10000px; border:none; margin:0; padding:0;'; /* make sure to set behavior to none to prevent accidental matching of the helper elements! */

                imgLoaded = function () {

                    this.width = this.offsetWidth; /* weird cache-busting requirement! */

                    this.height = this.offsetHeight;

                    lib.vmlOffsets(el);

                };

                img.attachEvent('onload', imgLoaded);

                img.src = el.vmlBg;

                img.removeAttribute('width');

                img.removeAttribute('height');

                document.body.insertBefore(img, document.body.firstChild);

            }

            el.vml.image.fill.src = el.vmlBg;

            noImg = false;

        }

        el.vml.image.fill.on = !noImg;

        el.vml.image.fill.color = 'none';

        el.vml.color.shape.style.backgroundColor = elStyle.backgroundColor;

        el.runtimeStyle.backgroundImage = 'none';

        el.runtimeStyle.backgroundColor = 'transparent';

    },

    /* IE can't figure out what do when the offsetLeft and the clientLeft add up to 1, and the VML ends up getting fuzzy... so we have to push/enlarge things by 1 pixel and then clip off the excess */

    vmlOffsets: function (el) {

        var thisStyle, size, fudge, makeVisible, bg, bgR, dC, altC, b, c, v;

        thisStyle = el.currentStyle;

        size = {'W':el.clientWidth+1, 'H':el.clientHeight+1, 'w':this.imgSize[el.vmlBg].width, 'h':this.imgSize[el.vmlBg].height, 'L':el.offsetLeft, 'T':el.offsetTop, 'bLW':el.clientLeft, 'bTW':el.clientTop};

        fudge = (size.L + size.bLW == 1) ? 1 : 0;

        /* vml shape, left, top, width, height, origin */

        makeVisible = function (vml, l, t, w, h, o) {

            vml.coordsize = w+','+h;

            vml.coordorigin = o+','+o;

            vml.path = 'm0,0l'+w+',0l'+w+','+h+'l0,'+h+' xe';

            vml.style.width = w + 'px';

            vml.style.height = h + 'px';

            vml.style.left = l + 'px';

            vml.style.top = t + 'px';

        };

        makeVisible(el.vml.color.shape, (size.L + (el.isImg ? 0 : size.bLW)), (size.T + (el.isImg ? 0 : size.bTW)), (size.W-1), (size.H-1), 0);

        makeVisible(el.vml.image.shape, (size.L + size.bLW), (size.T + size.bTW), (size.W), (size.H), 1 );

        bg = {'X':0, 'Y':0};

        if (el.isImg) {

            bg.X = parseInt(thisStyle.paddingLeft, 10) + 1;

            bg.Y = parseInt(thisStyle.paddingTop, 10) + 1;

        }

        else {

            for (b in bg) {

                if (bg.hasOwnProperty(b)) {

                    this.figurePercentage(bg, size, b, thisStyle['backgroundPosition'+b]);

                }

            }

        }

        el.vml.image.fill.position = (bg.X/size.W) + ',' + (bg.Y/size.H);

        bgR = thisStyle.backgroundRepeat;

        dC = {'T':1, 'R':size.W+fudge, 'B':size.H, 'L':1+fudge}; /* these are defaults for repeat of any kind */

        altC = { 'X': {'b1': 'L', 'b2': 'R', 'd': 'W'}, 'Y': {'b1': 'T', 'b2': 'B', 'd': 'H'} };

        if (bgR != 'repeat' || el.isImg) {

            c = {'T':(bg.Y), 'R':(bg.X+size.w), 'B':(bg.Y+size.h), 'L':(bg.X)}; /* these are defaults for no-repeat - clips down to the image location */

            if (bgR.search('repeat-') != -1) { /* now let's revert to dC for repeat-x or repeat-y */

                v = bgR.split('repeat-')[1].toUpperCase();

                c[altC[v].b1] = 1;

                c[altC[v].b2] = size[altC[v].d];

            }

            if (c.B > size.H) {

                c.B = size.H;

            }

            el.vml.image.shape.style.clip = 'rect('+c.T+'px '+(c.R+fudge)+'px '+c.B+'px '+(c.L+fudge)+'px)';

        }

        else {

            el.vml.image.shape.style.clip = 'rect('+dC.T+'px '+dC.R+'px '+dC.B+'px '+dC.L+'px)';

        }

    },

    figurePercentage: function (bg, size, axis, position) {

        var horizontal, fraction;

        fraction = true;

        horizontal = (axis == 'X');

        switch(position) {

            case 'left':

            case 'top':

                bg[axis] = 0;

                break;

            case 'center':

                bg[axis] = 0.5;

                break;

            case 'right':

            case 'bottom':

                bg[axis] = 1;

                break;

            default:

                if (position.search('%') != -1) {

                    bg[axis] = parseInt(position, 10) / 100;

                }

                else {

                    fraction = false;

                }

        }

        bg[axis] = Math.ceil(  fraction ? ( (size[horizontal?'W': 'H'] * bg[axis]) - (size[horizontal?'w': 'h'] * bg[axis]) ) : parseInt(position, 10)  );

        if (bg[axis] % 2 === 0) {

            bg[axis]++;

        }

        return bg[axis];

    },

    fixPng: function (el) {

        el.style.behavior = 'none';

        var lib, els, nodeStr, v, e;

        if (el.nodeName == 'BODY' || el.nodeName == 'TD' || el.nodeName == 'TR') { /* elements not supported yet */

            return;

        }

        el.isImg = false;

        if (el.nodeName == 'IMG') {

            if(el.src.toLowerCase().search(/\.png$/) != -1) {

                el.isImg = true;

                el.style.visibility = 'hidden';

            }

            else {

                return;

            }

        }

        else if (el.currentStyle.backgroundImage.toLowerCase().search('.png') == -1) {

            return;

        }

        lib = DD_belatedPNG;

        el.vml = {color: {}, image: {}};

        els = {shape: {}, fill: {}};

        for (v in el.vml) {

            if (el.vml.hasOwnProperty(v)) {

                for (e in els) {

                    if (els.hasOwnProperty(e)) {

                        nodeStr = lib.ns + ':' + e;

                        el.vml[v][e] = document.createElement(nodeStr);

                    }

                }

                el.vml[v].shape.stroked = false;

                el.vml[v].shape.appendChild(el.vml[v].fill);

                el.parentNode.insertBefore(el.vml[v].shape, el);

            }

        }

        el.vml.image.shape.fillcolor = 'none'; /* Don't show blank white shapeangle when waiting for image to load. */

        el.vml.image.fill.type = 'tile'; /* Makes image show up. */

        el.vml.color.fill.on = false; /* Actually going to apply vml element's style.backgroundColor, so hide the whiteness. */

        lib.attachHandlers(el);

        lib.giveLayout(el);

        lib.giveLayout(el.offsetParent);

        el.vmlInitiated = true;

        lib.applyVML(el); /* Render! */

    }

};

try {

    document.execCommand("BackgroundImageCache", false, true); /* TredoSoft Multiple IE doesn't like this, so try{} it */

} catch(r) {}

DD_belatedPNG.createVmlNameSpace();

DD_belatedPNG.createVmlStyleSheet();
html文件
<!DOCTYPE html PUBLIC "-//W3C//DTD XHTML 1.0 Transitional//EN" "http://www.w3.org/TR/xhtml1/DTD/xhtml1-transitional.dtd">

<html xmlns="http://www.w3.org/1999/xhtml">

<head>

<meta http-equiv="Content-Type" content="text/html; charset=utf-8" />

<meta http-equiv="X-UA-Compatible" content="IE=edge,chrome=1">

<title>IE6png透明图不显示的问题</title>

<!--[if IE 6]>

<script type="text/javascript" src="DD_belatedPNG.js"></script>

<script type="text/javascript">DD_belatedPNG.fix('img')</script>

<![endif]-->

</head>

<body>

    <div class="png_test">

        <img src="png_test.png" />

    </div>

</body>

</html>
<script type="text/javascript">DD_belatedPNG.fix('img')</script>
DD_belatedPNG.fix('a,img,li')这一句里面的a、img、li是指定这个js适用的标签,像你这个例子的话,改成DD_belatedPNG.fix('#div0')就可以了,也可以用“*”,表示适用于所有页面元素,不过这样的话,页面执行效率会有点低。
二、滤镜方法filter
<!DOCTYPE html PUBLIC "-//W3C//DTD XHTML 1.0 Transitional//EN" "http://www.w3.org/TR/xhtml1/DTD/xhtml1-transitional.dtd">

<html xmlns="http://www.w3.org/1999/xhtml">

<head>

<meta http-equiv="Content-Type" content="text/html; charset=utf-8" />

<meta http-equiv="X-UA-Compatible" content="IE=edge,chrome=1">

<title>IE6png透明图不显示的问题</title>

<style type="text/css">

.png_test{

        width: 128px;

        height: 128px;

        background:url('png_test.png') no-repeat;

        _background:none;

        _filter:progid:DXImageTransform.Microsoft.AlphaImageLoader(src="png_test.png");

}

</style>

</head>

<body>

    <div class="png_test">

    </div>

</body>

</html>
三、不透明问题的综合
1. css滤镜
2. 老JavaScript方法
3. jQuery实现
4. flash实现
3.jQuery png背景透明插件
相对于前面的方法,jQuery的IE6下png透明插件相对要强大些。
此插件js下载:jquery.pngFix.pack.js
使用的时候还要链接jQuery文件。
此js的强大之处在于不仅支持IE6下img标签的png背景透明,background-image的背景透明,还支持image类型的input的png背景透明那个,而且实现的精确控制,即您可以让页面上任意一张png图片背景透明而其他不受影响。
您可以在这个页面上感受到此png 背景透明插件的强大。
4.使用flash装载png图片
使用flash装载png的原理是:flash对png的透明背景支持非常好,只要用户安装了flash插件,通过flash显示的png图片的背景必定是透明的。
实现的方法有两类,一种适合对flash不太熟的,就是直接将图片嵌入到flash中,方法如下:打开flash软件->设置舞台大小->将 png图片拖到舞台(或导入到舞台)->导出flash->将swf插入在页面中->完毕;但是这种方法维护不讨方便,如果要更换图 片,还要动flash源文件。另外一种就是与页面交互,从页面获取图片路径,最简单的方法之一就是通过FlashVars传参,再在flash中写上极短 代码就可以了。
页面上显示了flash获取页面参数的ActionScript代码,ActionScript 3.0代码,需要至少flash cs3版本的flash软件,直接写在第一帧上就可以了,另外设置舞台大小与图片一样大。
(二)、产生的问题
1.无法响应单击事件
这个问题在各个解决方法中都是存在的(即使是flash封装png的方法,其本身也不能响应click事件,只能背景透明情况下响应 onmousedown事件),不是指本身无法响应单击事件,而是其内部的标签无法响应。举个简单的例子吧,一个div标签,里面有个a标签,a标签有个 链接指向或有个js响应事件,而这个div标签有个png透明背景的图片,且在IE6下经过透明处理,那么这个a标签就是聋子的耳朵——摆设,只能看不能 用。多说不宜,眼见为实,如果您现在使用的是Firefox,chrome或是opera,Safari,但是您有该死的IE6浏览器,建议您委曲求全,也进来看看。
2.图片大小控制受到限制
这个问题在css png透明滤镜和老式的JavaScript方法中会遇到。问题简述如下:咳咳,一个img标签的src路径指向的是个含透明背景或半透明的png图片 (例如:<img src=”xx.png” />),并且在IE6下,此图片受css滤镜或老式的JavaScript png透明处理,那么对该图片进行的任何大小限制拉伸都是瞎子点灯——白费蜡。再具体点说吧,假设我们这里的xx.png原始大小128像素*128像 素,您使用css,img{width:256px; height:256px;}或是直接<img src=”xx.png” alt=”" width=”256″ height=”256″ />再或者是用上style<img style=”width: 256px; height: 256px;” src=”xx.png” alt=”" />要将他拉伸到256像素*256像素,您会发现有条比蜀道更难走的路——这张图片还是以其原始的大小显示,只是占据的空间变了。

3.无法对背景图片进行background-position定位
有个名词叫做css sprite。貌似是说很多背景图片集中到一张大图上,通过background-position定位,用到哪张图片就显示那部分区域,这好处大大的 多,使用流行的很啊,优化大小,减小服务器压力,好处很多,里面颇有学问,但不是本文重点,不偏题。这个css sprite背景定位技巧在web2.0中可谓呼风唤雨,如鱼得水,但是遇到IE6浏览器,有时候他也只能哭了。如果背景图片是个含有透明背景的png图 片,同时应用了IE6下背景透明显示处理的话,则该背景图片对background-position完全免疫。随便上面那个demo实例页面,保存下 来,给这些background-image为png的图片再添加个background-position试试(比如background- position:-100px -100px;)您会发现不管用。ps:要是IE6浏览器,不然没有效果的哦!
(三)、问题响应的解决方法
1.无法响应单击事件
要解决内部标签无法响应单击事件的问题,关键要把内部标签拿到外部,使用其他方法进行覆盖定位;或是不拿出来,使用另外的一个透明层或是透明图片进行定位 与覆盖。最关键了一个词:覆盖;最难点:定位。说到覆盖性质的定位,无非两类,一是相对或绝对定位,二是margin负值定位。由于IE6下,父标签是 position:relative;或是position:absolute属性时,里面的绝对定位层有时候会莫名消失,所以自己偏好于margin负 值定位以及position:relative的负值定位。在此问题的demo实例页面最后一栏给了一个解决方法,margin负值定位解决的。方法很 多,也很自由,就是覆盖,定位。
2.图片大小控制受到限制
这个问题的解决,说出来您不要笑我,就是去使用强大的jQuery png透明插件吧。这个插件不仅可以让指定的png透明,还支持image类型的input的png图片背景透明,更加重要的是其支持png图片的任意拉伸。
3.无法对背景图片进行background-position定位
无法对背景图片进行background-position定位,那就拿到页面上进行定位就好了。使用img标签,src链接此背景大图,或是用span 标签,其高宽就是整个大背景图的高宽,背景图片就是大背景图,在页面上对img或span这类标签进行定位,即可实现您想通过background- position实现的效果。
两大方法,margin定位与position定位。
这里需要分情况叙述。
首先,如果您直接使用的是css 滤镜或是传统的png透明JavaScript的话,这里的定位就是纯粹的margin定位或是absolute定位。这里概念说得比较含糊,实例说明吧。例如,我们将使用下面这张png按钮图片作为实例素材进行说明。
a.如果您使用的是css png透明滤镜,则需要将此png图片写在背景里,否则滤镜不起作用。写法如下:<img src=”http://www.zhangxinxu.com/study/image/pixel.gif” width=”640″ height=”80″ style=”background-image:url(http://image.zhangxinxu.com/image/blog/200908/png_btn.png);” />(说明:这里的background-image要写在css里面,这里是为了方便说明才用style表示的)然后您所要做的就是对这个img 标签进行margin定位或absolute定位。
例如,我这样写,<div style=”width:160px; height:40px; overflow:hidden;”><img src=”http://www.zhangxinxu.com/study/image/pixel.gif” width=”640″ height=”80″ style=”background-image:url(http://image.zhangxinxu.com/image/blog/200908/png_btn.png); margin:-40px 0 0;” /></div>所显示的结果就是“首页”这个按钮鼠标经过的状态。通过margin控制图片的位置,由于父标签高宽以设定且溢出隐 藏,所以就可以通过对图片的定位实现类似于background-position控制的效果。absolute绝对定位与margin定位其实是一样 的,都是定位,应用的css属性不同而已。
b.如果您使用的是传统的JavaScript使得png透明,那么写法可以自由些。<img src=”http://image.zhangxinxu.com/image/blog/200908/png_btn.png” />的写法也是可以的,其定位与上面是一样的,直接通过设定class用css控制即可,一般不会出现莫名的错误的。
c.如果您使用的是jQuery png透明插件,则问题似乎不那么简单的。原版的jQuery png透明插件使用页面上定位解决background-position不起作用的问题是由局限性的。例如出现overflow:hidden失效的问 题,img标签不受控制的问题,无法使用绝对定位的问题。我对其插件代码简单分析了下,找到上述问题的原因,并对原来的JavaScript代码做了些修 改,使其支持页面上的类似background-position的定位效果。所以建议您下载修改后的png插件js。
另外,这里img标签失效是由于此插件处理透明的原理是,将原来的img标签隐藏,用一个span标签获取img标签的相关样式属性,将src链接的 png图片以background-image的形式表示,并应用png透明滤镜。也就是说,代码执行的结果是将img标签换成span标签。所以如果您 通过img标签控制图片的位置大小或是其他什么属性都是徒劳的。解决方法是用id或class进行控制,您给img标签赋一个class,例 如”png_pos”,则插件执行后,这个class会转移到span标签上,所以对”png_pos”这个class设置的样式不会丢失,依旧在页面上 表现出来,而且不会出现兼容性的问题。
下面这张图显示的就是页面定位后的效果图,支持hover事件,鼠标经过导航按钮按钮背景变化的效果,乍看去像是background-position定位的效果,实际上是在页面上使用margin定位的效果。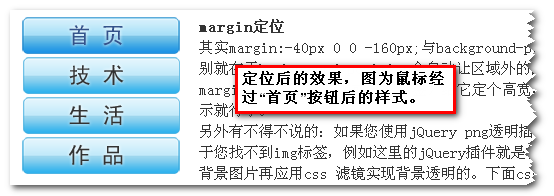
(四)、相关延伸的问题
1.png8与png24的透明显示
说了这么多IE6不支持png背景透明指的是png24格式保存的含有透明背景的图片,而以png8格式存储的png图片的全透明背景是支持的。一个支持 而另外一个不支持的原因在于:png24的透明背景是Alpha透明背景,而png8格式的全透明背景是索引透明背景与gif的透明背景是同一个类型。
如下显示:
我曾经遇到过png图片的半透明层直接被css png透明滤镜当作完全透明层处理掉的情况。但是今天我反复尝试都没有出现这个情况,我想可能当时的png图片是用fireworks制作,保存的时候将 图层分层信息也保存进去了。既然,没有再次出现这样的问题,自己也不宜多说,妄下定论。
所说IE6支持png8的背景透明,但是最终的图片效果跟gif的其实差别不太,都存在一个同样的问题,锯齿。就像上面这张图,所说png8格式的 图片长得貌似还不错,水灵水灵的。只要是正好是个白色背景,而png默认也是白色锯齿的,一重合,正好就看上去不错了。可以要是是个深色背景,那就是白骨 精遇见孙悟空——原形毕露啊。
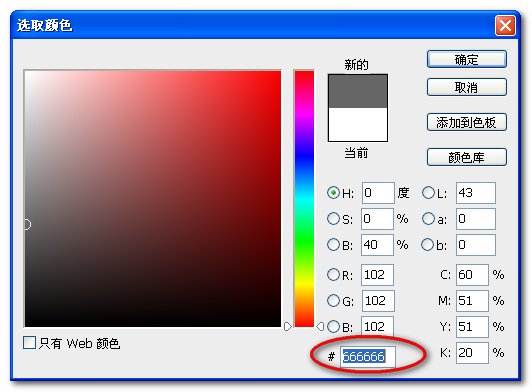
有关锯齿的问题,我会单独写篇文章,这里先简单说个处理方法,例如上面的图片,背景色为#666666灰色时,png白色锯齿显露,解决方法是在photoshop保存图片的时候,将杂边的颜色设为跟背景色一致就行了,例如这里杂边颜色就设为#666666,
然后保存即可。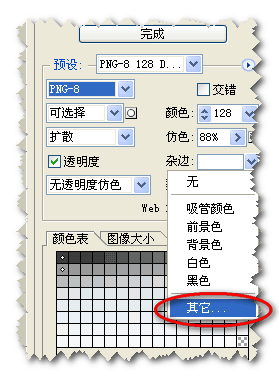
2. IE7的alpha半透明滤镜与png背景透明
IE7 alpha半透明滤镜会影响其png24 Alpha透明通道的正常显示。下图为demo实例页面效果截图:
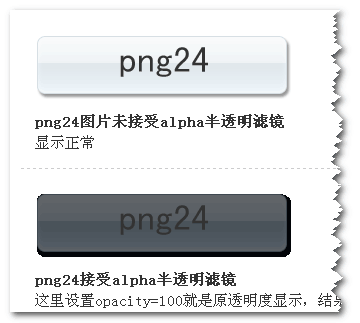
图中可以看到本应透明显示的部分现在确是黑色的一团,怎一个“丑”字了得。
(五)、小结
IE6注定要退出历史舞台,但是目前国内的状况来看,比如网吧,都是IE6浏览器;我的一些刚接触电脑不久的亲戚也都是使用的IE6浏览器。IE8 的出现蚕食的只是IE7的比重,对IE6对没有什么大的影响,所以这个退出的时间还真不好说,至少目前一段时间还是很有比重的,因此IE6下的些问题不得 不拿出来说说,png透明的问题是非常典型的一个问题。这里我也只是将自己碰到的问题整理总结了一下,有些地方可能说得比较含糊,有些地方可能有遗漏,还 有些则是不想展开的太多,乱了主线。不管怎样,算是博客的第一篇技术类的文章吧,断断续续也写了还几天,希望这些糟糕的文字和略显业余的实例页面能对大家 有帮助。至少在写的过程中我是学到了不少的。共同进步吧!
(转)解决png图片在IE6下不透明的方法的更多相关文章
- 前端问题——png图片在IE6下透明失效,解决办法
今天,一位同事问我问题,png 图片在IE6下透明背景失效. 解决办法,在网上查了很多,最后还是采用两种方案来解决这个问题 1.把这个网页的png格式图片变更为gif格式的图片.问题解决 2.就是让这 ...
- png格式的图片在IE6 下透明解决方案
FF和IE7已经直接支持透明的png图了,下面这个主要是解决IE6下透明PNG图片有灰底的 style="FILTER: progid:DXImageTransform.Microsoft. ...
- 解决PNG图片在IE6中背景不透明方法_解决IE6中PNG背
解决PNG图片在IE6中背景不透明方法_解决IE6中PNG背 目录 解决代码 解决png图片在html中 解决png作为网页背景-css 1.解决PNG图片在IE6中背景不透明的CSS与JS代码 ...
- 解决IE6下PNG透明的JS插件:DD_belatedPNG.js
DD_belatedPNG是一款解决IE6下PNG透明的JS插件,支持background-position和background-repeat属性,支持伪类.使用方法: <!--[if lte ...
- IE6下Png透明最佳解决方案(推荐) Unit PNG Fix
引自:http://www.yeeyan.org/articles/view/98510/67784 网络上解决IE6下Png透明解决方案有很多,例如 IE PNG Fix from TwinHeli ...
- web标准:img图片在ie6下显示空白的bug解决方案
在进行页面的DIV+CSS排版时,遇到IE6(当然有时Firefox下也会偶遇)浏览器中的图片元素img下出现多余空白的问题绝对是常见的对于该问题的解决方法也是“见机行事”. 1.将图片转换为块级对象 ...
- ie8下jquery改变PNG的opacity出现黑边,ie6下png透明解决办法
目前互联网对于网页效果要求越来越高,不可避免的用到PNG图片,PNG分为几种格 式,PNG8 PNG24 PNG32,其中最常用的,也是显示效果和大小比较适中的则是PNG24,支持半透明,透明,颜色也 ...
- DD_belatedPNG,IE6下PNG透明解决方案
我们知道IE6是不支持透明的PNG的,这无疑限制了网页设计的发挥空间. 然而整个互联网上解决这个IE6的透明PNG的方案也是多不胜数,从使用IE特有的滤镜或是expression,再到javascr ...
- 在ie6下的png图片的兼容问题
png图片在ie6下是这样的: 正确样式: 这样解决: html代码: <body> <div class="gys"></div> </ ...
随机推荐
- Castle ActiveRecord配置中需要注意的地方
关于Castle 的开发可参考李会军老师的Castle 开发系列文章,里面有关于ActiveRecord学习实践系列和Castle IOC容器系列两个部分,是比较好的教程. 这里主要说明在Castle ...
- xampp install
the way of restart: sudo /opt/lampp/lampp restart config root: /opt/lampp/etc/httpd.conf /opt/lampp/ ...
- Hibernate Session 获取connection
Hibernate Session 获取connection 由于最近一个项目要用到一条辅助的SQL ,hibernate里面的SQLQuery API 总的SQL语句不能包含 : 冒号, 固放弃Hi ...
- The Promise of Deep Learning
The Promise of Deep Learning By Yoshua Bengio Humans have long dreamed of creating machines that thi ...
- 【HDU 3949】 XOR (线性基,高斯消元)
XOR Time Limit: 2000/1000 MS (Java/Others) Memory Limit: 32768/32768 K (Java/Others)Total Submiss ...
- TortoiseSVN下载,安装,配置,常用操作 svn教程
一. 首先在百度搜索并下载 TortoiseSVN 推荐从官网下载,软件分为32位和64位版本,下载时请根据自己的系统位数进行下载:
- ANDROID_MARS学习笔记_S04_001_OAuth简介
一.OAuth简介
- Windows.document对象
一.找到元素: docunment.getElementById("id"):根据id找,最多找一个:var a =docunment.getElementById("i ...
- 安装Chive提示CDbConnection failed to open the DB connection.
最近初学PHP,看到Chive这个好玩的数据库管理工具,在登录时遇到这样的错误提示信息: CDbConnection failed to open the DB connection. 我的PHP版本 ...
- java学习多线程之创建多线程一
现在我们有这么一个需求,就是在主线程在运行的同时,我们想做其他的任务,这个时候我们就用到了多线程.那么如何创建多线程,我们知道在系统当中qq的多线程创建是由操作系统来完成的,那么如果我们想在java当 ...