iOS UITableView的使用大全-备用
首先、对UITableView进行讲解,下面有对它进行实际的应用
UITableView
显示大型内容的列表
单行,多列
垂直滚动,没有水平滚动
大量的数据集
性能强大,而且普遍存在于iPhone的应用程序中
TableView Styles
UITableView有两个默认的内置风格,第一个是UITableViewStylePlain(简明风格,简明风格表明表格视图自身没有真正地在你自己实际地提供任何外观之前提供很多的外观,大部分情况下,它会做的唯一的事情是它会给你这些header和footer,在顶部的章节header有章节F,它是当前固定在屏幕的顶部,即使你滚动那个内容章节的header F会保持在那里,直到所有F的内容都移走,然后它滚出去。表格视图还提供你在右边的索引部分,那只用在简易风格的表格视图中,你能够获取它。)另一种风格是UITableViewStyleGrouped风格(组团风格),UITableViewStyleGrouped表格视图是UIKit提供的另外一个默认风格,它给围绕章节分段的外观,它是垂直条纹的背景,顶部是白色圆形分段,你默认通过UITableView:StyleGrouped获得该类型的外观。
表格视图以及组成部分
在顶部,我们有表格header,它是UITableView上的一个可设置的属性,它只是个UIView,你能创建任何UIView子类或用UIImageView或UILable分配并设置它们为表格视图的tableheader view ,然后表格视图会安置它到你其余的内容之上,它会随着内容上下滚动。
在表格视图的内容底部,我们有表格footer,与header一样是UIView的任意子视图,它是你设置的UITableView的属性,然后表格视图会安置它到你其余的内容之下,在表格header和footer视图之间的是章节内容。
在章节中,有章节的header和章节的footer,在它们之间是所有的独立单元,就是Tablecell。
使用TableViews
在表格视图中显示数据
定制显示的外观和行为
一个直接的解决方法
表格视图用来显示一列数据,所以使用一个数组
[myTableView setList : myListOfStuff];//该方法不存在,想法比较天真
该方法争议性
所有的数据必须事先装载
所有的数据都装载在内存中
更加灵活的方案
另外一个对象为表格视图提供数据
不是一次性全部取得
只取现在需要展示的数据
像一个委托,它是纯粹的数据导向,它只向数据源询问数据
UITableViewDataSource(数据源协议)
提供章节和行的数目
//optionalmethod ,default to 1 if not implemented
-(NSInteger)numberOfSectionsInTableView:(UITableView*)tableView;
//requiredmethod
-(NSInteger)tableView:(UITableView *)tableView numberOfRowsInSection:(NSInteger)section;
必要的时候向表格视图提供所要显示的cells
//required method
-(UITableViewCell*)tableView:(UITableView *)tableView cellForRowAtIndexPath:(NSIndexPath *)indexPath;//在该方法中,UITableViewCell是UIView的一个子类,它知道如何在表格视图滚轴,知道如何绘制分组风格表格视图和组群风格表格视图,它必须自己是一个UITableViewCell或者UITableViewCell的子类。
NSIndexPath
是Foundation框架中的一个普通的类,它提供了到嵌套数列的树中特定节点的路径,事实上,它是一个整数阵列,表格视图使用这个去表现在特定章节中的特定行,UITableView用的所有索引路径正好有两个元素,第一个是章节,第二个是行。
NSIndexPath和TableViews
@interfaceNSIndexPath (UITableView) {
}
+(NSIndexPath*)indexPathForRow:(NSUInteger)row inSection:(NSUInteger)section;
@property(nonatomic,readonly)NSUIntegerrow;
@property(nonatomic,readonly)NSUIntegersection;
@end
SingleSection Table View
返回行数
-(NSInteger)tableView:(UITableView*)tableView numberOfRowsInSection:(NSInteger)section{
return[myStringcount];
}
请求时提供一个单元
-(UITableViewCell*)tableView:(UITableView*)tableView cellForRowAtIndexPath:(NSIndexPath*)indexPath {
UITableViewCell*cell = ......;
cell.textLabel.text=[myStringobjectAtIndex:indexPath.row];
return[cell autorelease];
}
单元复用(cellreuse)
当你轻滑屏幕,你必须一次滚动上百行的文字,很多很多的不同单元,它不会完成的很好,每次一个消失,你破坏呢个表格视图单元,然后为下一个创建新的,我们最终会做的是当一个表格视图单元从顶部消失,它会放在一个复用队列中,并且在你的TableViewCellforRowIndexPath方法中,你可以选择,当然你应该总是这样做,你有机会去在分配新的单元前,向表格视图询问复用队列其中的一个单元,如果一个单元已经从顶部滚轴消失,对于显示当前可视的东西,它不会必须的,你能取得它改变它的内容为你所需要显示的新行而它会被重新滚进底部。(有点像循环瀑布)
-(UITableViewCell*)dequeueReusableCellWithindentifier:(NSString*)identifier;
//取回可复用的一个单元
-(UITableViewCell*)tableView:(UITableView*)tableView cellForRowAtIndexPath:(NSIndexPath*)indexPath {
UITableViewCell*cell = [tableViewdequeueReusableCellWithIdentifier:@"MyIdentifier"];
if(cell== nil){
cell=[[[UITableViewCell alloc] initWithStyle:.....reuseIdentifier:@"MyIdentifier"]autorelease];
}
cell.text= [myStringobjectAtIndex:indexPath.row];
returncell;
}
触发一个更新
什么时候数据源会被请求数据
当一行变得可视
完全更新会被响应当使用reloadData
-(void)viewWillAppear:(BOOL)animated {
[superviewWillAppear:animated]; //所有的数据重新被加载,然后在放到复用队列中
[self.tableViewreloadData];
}
章节和行进行重载数据
-(void)insertSections:(NSIndexSet*)sectionswithRowAnimation:(UITableViewRowAniamtion)animation;//可以插入整个章节
-(void)ideleteSections:(NSIndexSet*)sectionswithRowAnimation:(UITableViewRowAniamtion)animation;//可以删除整个章节
-(void)reloadSections:(NSIndexSet*)sections withRowAnimation:
(UITableViewRowAniamtion)animation;//在iPhoneos 3.0中重载章节数据(上面两个方法的合并)
它们能重载部分的数据,而不会把所有东西都丢掉
-(void)insertRowsAtIndexPaths:(NSArray*)indexPahts withRowAnimation:(UITableViewRowAniamtion)animation;
-(void)deleteRowsAtIndexPaths:(NSArray*)indexPahts withRowAnimation:(UITableViewRowAniamtion)animation;
-(void)reloadRowsAtIndexPaths:(NSArray*)indexPahts withRowAnimation:(UITableViewRowAniamtion)animation;
其它的数据源方法
为章节的header和footer设置标题(表格的header和footer是表格视图上的属性,你只分配那些视图章节header和footer是依据章节的,因此它们由委派功能所提供)
允许编辑和重排单元
外观和行为
UITableViewDelegate
可定制外观和行为
逻辑独立于视图
数据源和委派经常是相同的对象(事实上,很少情况下数据源不是委派)
表格视图的外观和行为
定制表格视图单元的外观
-(void)tableView:(UITableView *) tableView willDisplayCell:(UITableViewCell *)cellforRowAtIndexPath:(NSIndexPath *)indexPath;
这个会在表格视图的其中一个单元变为可视前立刻被调用,它是你在表格视图单元显示在屏幕上之前的外观定制的最后机会,它保证一旦你调用这个方法,我们不会涉及任何单元的外观,这之后,你改变的任何东西都会显示在屏幕上,如果有一些东西你可能在TableViewcellForRowAtIndexPath方法中不知道,你想稍微懒惰地做这个,这会在那之后最后的机会去修改外观。
验证和响应所选择的变化
使用表格视图委派功能,对于选择会有不同的功能
-(NSIndexPath*)tableView:(UITableView *)tableViewwillSelectRowAtIndexPath:(NSIndexPath *)indexPath;
-(void)tableView:(UITableView *)tableView didSelectRowAtIndexPath:(NSIndexPath*)indexPath;//用户选择完成抬起手指,在该方法中,你可能决定去分配新的UIViewController,然后推它到self.navigationContrller,因此一些新事物滑进来,行选择通常会触发一个事件。选择通常不是一个持续的事情,它通常不会在你轻敲之后保持选择状态,通常会谈出选择然后完成一个行为,或者你把它滑出屏幕,当然滑回来时会淡出。在iphone应用程序中你也会看到连续的选择,我们在表格试图中是支持持续选择的,如果用户选择一行而你没有反选它,我们不会替你反选,过去在iPhoneOS 2.0中不是这样的,如果你不反选它,这个行为是不确定的,我们现在支持这个持续选择行为。
响应选择
-(void)tableView:(UITableView *)tableView didSelectRowAtIndexPath:(NSIndexPath*)indexPath {
NSIntegerrow = indexPath.row ;
idobjectToDispaly = [myObjects ObjectAtIndex:row ];
MyViewController* myViewController = …....;
myViewController.object = objectToDispaly ;
[self.navigationControllerpushViewController: myViewController animated:YES];
}
修改和禁用选择
-(NSIndexPath*)tableView:(UITableView *)tableViewwillSelectRowAtIndexPath:(NSIndexPath *)indexPath {
if(indexPath.row== ….) {
returnnil;
}
else{ return indexPath ;}
}
UITableViewController
是UIViewController的子类,如果你想用全屏表格试图风格,它会是很便利的起点,表格试图会被自动创建,这包括控制器,表格视图,数据源和委派,它在你第一次出现时替你调用reloadData,它在用户导航回去时反选,会知道你之前所选的item。UITableViewController在正确的时间替你处理反选的事情,它还会闪烁滚动指示条,实际上这是iPhone人机界面的一部分。
TableView cells
指定的初始化程序
-(id)initWithFrame:(CGRect)frame reuseIdentifier:(NSString *)reuseIdentifier ;
//旧的版本,现在已经不是默认的初始化程序了
-(id)initWithStyle:(UITableviewCellStyle)style reuseIdentifier:(NSString *)reuseIdentifier ;
//新版本
单元风格(cellstyle)
基本属性
UITableViewCell有一个图像视图和一到两个的文本标签
cell.imageView.image= [UIImage imageNamed:@”vitolidok.png”];
cell.textLabel.text= @”Vitol Idol”;
cell.detailTextLabel.text=@”Billy Idol”;
如果你在表格视图单元的默认风格上设置detailTextLabel.text,它是不会做任何事情,因为它不显示一个额外的detailText。
附件类型
//UITableView委托方法
-(UITableViewCellAccessoryType)tableView:(UITableView*)table accessoryTypeForRowWithIndexPath:(NSIndexPath *) indexPath;
-(void)tableView:(UITableView *)tableViewaccessoryButtonTappedForRowWithIndexPath:(NSIndexPath *) indexPath {
//只有是在蓝色描述的按钮(也就是上面的第二个)
NSIntegerrow = indexPath.row.
}
定制内容视图
在有些情况下,简单的图像和文本是不够的
UITableViewCell有一个contentview 属性
为contentview 添加额外的视图
-(UITableViewCell*) tableView :(UITableView) tableViewcellForRowAtIndexPath:(NSIndexPath *)indexPath {
UITableViewCell*cell = ….......;
CGRectframe = cell.contentView.bounds;
UILabel*myLabel = [[UILabel alloc] initWithFrame :frame];
myLabel.text= ….;
[cell.contentViewaddSubview : myLabel];
[myLabelrelease];
}
其次,实际的使用方法
第一种,正常的使用方法
//
// TableViewViewController.m
// TableView
//
// Created by ch_soft on 11-11-7.
// Copyright 2011年 __MyCompanyName__. All rights reserved.
//
#import "TableViewViewController.h"
@implementation TableViewViewController
- (void)dealloc
{
[super dealloc];
}
- (void)didReceiveMemoryWarning
{
// Releases the view if it doesn't have a superview.
[super didReceiveMemoryWarning];
// Release any cached data, images, etc that aren't in use.
}
#pragma mark - View lifecycle
// Implement viewDidLoad to do additional setup after loading the view, typically from a nib.
- (void)viewDidLoad
{
dataArray = [[NSMutableArray alloc] initWithObjects:@"1",@"2",@"3",@"4",@"5",nil];
edit=NO;
[super viewDidLoad];
UIButton * button=[UIButton buttonWithType:UIButtonTypeCustom];
button.frame=CGRectMake(10,10, 60,20);
[button addTarget:self action:@selector(edit:) forControlEvents:UIControlEventTouchUpInside];
[button setTitle:@"eidt" forState:UIControlStateNormal];
[self.view addSubview:button];
//创建一个tableview
tableview=[[UITableView alloc] initWithFrame:CGRectMake(10, 40, 300, 400)style:UITableViewStylePlain];
[self.view addSubview:tableview];
tableview.delegate=self;
tableview.dataSource=self;
[tableview release];
}
-(void)edit:(id)sender
{
[tableview setEditing:!tableview.editing animated:YES];
if (edit) {
edit=NO;
[tableview setEditing:NO];
}else
{
edit=YES;
[tableview setEditing:YES];
}
}
#pragma mark TableView Delegate
//对编辑的状态下提交的事件响应
-(void)tableView:(UITableView *)tableView commitEditingStyle:(UITableViewCellEditingStyle)editingStyle forRowAtIndexPath:(NSIndexPath *)indexPath
{
NSLog(@"commond eidting style ");
if (editingStyle == UITableViewCellEditingStyleDelete) {
[dataArray removeObjectAtIndex:indexPath.row];
// Delete the row from the data source.
[tableview deleteRowsAtIndexPaths:[NSArray arrayWithObject:indexPath]withRowAnimation:UITableViewRowAnimationFade];
}
else if (editingStyle == UITableViewCellEditingStyleInsert) {
// Create a new instance of the appropriate class, insert it into the array, and add a new row to the table view.
}
}
//响应选中事件
-(void)tableView:(UITableView *)tableView didSelectRowAtIndexPath:(NSIndexPath *)indexPath{
NSLog(@"did selectrow");
}
//行将显示的时候调用
-(void)tableView:(UITableView *)tableView willDisplayCell:(UITableViewCell *)cell forRowAtIndexPath:(NSIndexPath *)indexPath
{
NSLog(@"will display cell");
}
//点击了附加图标时执行
-(void)tableView:(UITableView *)tableView accessoryButtonTappedForRowWithIndexPath:(NSIndexPath*)indexPath
{
NSLog(@"accessoryButtonTappedForRowWithIndexPath");
}
//开始移动row时执行
-(void)tableView:(UITableView *)tableView moveRowAtIndexPath:(NSIndexPath *)sourceIndexPath toIndexPath:(NSIndexPath*)destinationIndexPath
{
NSLog(@"moveRowAtIndexPath");
}
//开发可以编辑时执行
-(void)tableView:(UITableView *)tableView willBeginEditingRowAtIndexPath:(NSIndexPath *)indexPath
{
NSLog(@"willBeginEditingRowAtIndexPath");
}
//选中之前执行
-(NSIndexPath*)tableView:(UITableView *)tableView willSelectRowAtIndexPath:(NSIndexPath *)indexPath
{
NSLog(@"willSelectRowAtIndexPath");
return indexPath;
}
//将取消选中时执行
-(NSIndexPath *)tableView:(UITableView *)tableView willDeselectRowAtIndexPath:(NSIndexPath*)indexPath
{
NSLog(@"willDeselectRowAtIndexPath");
return indexPath;
}
//移动row时执行
-(NSIndexPath *)tableView:(UITableView *)tableView targetIndexPathForMoveFromRowAtIndexPath:(NSIndexPath *)sourceIndexPath toProposedIndexPath:(NSIndexPath *)proposedDestinationIndexPath
{
NSLog(@"targetIndexPathForMoveFromRowAtIndexPath");
//用于限制只在当前section下面才可以移动
if(sourceIndexPath.section != proposedDestinationIndexPath.section){
return sourceIndexPath;
}
return proposedDestinationIndexPath;
}
//删除按钮的名字
-(NSString*)tableView:(UITableView *)tableView titleForDeleteConfirmationButtonForRowAtIndexPath:(NSIndexPath *)indexPath
{
return @"删除按钮的名字";
}
//让表格可以修改,滑动可以修改
-(BOOL)tableView:(UITableView *)tableView canEditRowAtIndexPath:(NSIndexPath *)indexPath
{
return YES;
}
//让行可以移动
-(BOOL)tableView:(UITableView *)tableView canMoveRowAtIndexPath:(NSIndexPath *)indexPath
{
return YES;
}
-(UITableViewCellEditingStyle)tableView:(UITableView *)tableView editingStyleForRowAtIndexPath:(NSIndexPath *)indexPath
{
//
NSLog(@"手指撮动了");
return UITableViewCellEditingStyleDelete;
}
#pragma mark TableView DataSource
-(NSInteger)numberOfSectionsInTableView:(UITableView *)tableView{
return 1;
}
-(NSInteger)tableView:(UITableView *)tableView numberOfRowsInSection:(NSInteger)section{
return [dataArray count];
}
-(UITableViewCell *)tableView:(UITableView *)tableView cellForRowAtIndexPath:(NSIndexPath*)indexPath
{
NSString * indetify=@"cell";
UITableViewCell *cell=[tableView dequeueReusableCellWithIdentifier:indetify];
if (cell==nil) {
cell=[[UITableViewCell alloc] initWithStyle:UITableViewCellStyleDefaultreuseIdentifier:indetify];
}
cell.textLabel.text=[dataArray objectAtIndex:indexPath.row];
cell.accessoryType=UITableViewCellAccessoryCheckmark;//添加附加的样子
return cell;
}
- (void)viewDidUnload
{
[super viewDidUnload];
// Release any retained subviews of the main view.
// e.g. self.myOutlet = nil;
}
- (BOOL)shouldAutorotateToInterfaceOrientation:(UIInterfaceOrientation)interfaceOrientation
{
// Return YES for supported orientations
return (interfaceOrientation == UIInterfaceOrientationPortrait);
}
@end
第二种,使用自定义UITbaleViewCell方法。
其实很简单,只需要定义一个UItableViewCell的子类,然后在初始化cell的时候,使用自定义的cell生成cell就可以了。
@interface CustomTableCell :UITableViewCell {
}
@end
上篇文章介绍了如何用UITableView显示表格,并讲了几种UITableViewCell的风格。不过有时候我们需要自己定义UITableViewCell的风格,其实就是向行中添加子视图。添加子视图的方法主要有两种:使用代码以及从.xib文件加载。当然后一种方法比较直观。
我们这次要自定义一个Cell,使得它像QQ好友列表的一行一样:左边是一张图片,图片的右边是三行标签:

当然,我们不会搞得这么复杂,只是有点意思就行。
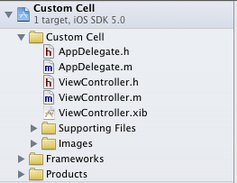
1、运行Xcode 4.2,新建一个Single View Application,名称为Custom Cell:

2、将图片资源导入到工程。为此,我找了14张50×50的.png图片,名称依次是1、2、……、14,放在一个名为Images的文件夹中。将此文件夹拖到工程中,在弹出的窗口中选中Copy items into…

添加完成后,工程目录如下:
3、创建一个UITableViewCell的子类:选中Custom Cell目录,依次选择File — New — New File,在弹出的窗口,左边选择Cocoa Touch,右边选择Objective-C class:

单击Next,输入类名CustomCell,Subclass of选择UITableViewCell:

之后选择Next和Create,就建立了两个文件:CustomCell.h和CustomCell.m。
4、创建CustomCell.xib:依次选择File — New — New File,在弹出的窗口,左边选择User Interface,右边选择Empty:

单击Next,选择iPhone,再单击Next,输入名称为CustomCell,选择好位置:

单击Create,这样就创建了CustomCell.xib。
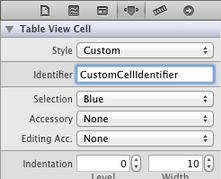
5、打开CustomCell.xib,拖一个Table View Cell控件到面板上:

选中新加的控件,打开Identity Inspector,选择Class为CustomCell;然后打开Size Inspector,调整高度为60。
6、向新加的Table View Cell添加控件:拖放一个ImageView控件到左边,并设置大小为50×50。然后在ImageView右边添加三个Label,设置标签字号,最上边的是14,其余两个是12:

接下来向CustomCell.h添加Outlet映射,将ImageView与三个Label建立映射,名称分别为imageView、nameLabel、decLabel以及locLable,分别表示头像、昵称、个性签名,地点。
选中Table View Cell,打开Attribute Inspector,将Identifier设置为CustomCellIdentifier:
为了充分使用这些标签,还要自己创建一些数据,存在plist文件中,后边会做。
7、打开CustomCell.h,添加属性:
@property (copy, nonatomic) UIImage *image;

@property (copy, nonatomic) NSString *name;

@property (copy, nonatomic) NSString *dec;

@property (copy, nonatomic) NSString *loc;
8、打开CustomCell.m,向其中添加代码:
8.1 在@implementation下面添加代码:
@synthesize image;

@synthesize name;

@synthesize dec;

@synthesize loc;
8.2 在@end之前添加代码:
- (void)setImage:(UIImage *)img {

    if (![img isEqual:image]) {

        image = [img copy];

        self.imageView.image = image;

    }

}

-(void)setName:(NSString *)n {

    if (![n isEqualToString:name]) {

        name = [n copy];

        self.nameLabel.text = name;

    }

}

-(void)setDec:(NSString *)d {

    if (![d isEqualToString:dec]) {

        dec = [d copy];

        self.decLabel.text = dec;

    }

}

-(void)setLoc:(NSString *)l {

    if (![l isEqualToString:loc]) {

        loc = [l copy];

        self.locLabel.text = loc;

    }

}
这相当于重写了各个set函数,从而当执行赋值操作时,会执行我们自己写的函数。
好了,现在自己定义的Cell已经可以使用了。
不过在此之前,我们先新建一个plist,用于存储想要显示的数据。建立plist文件的方法前面的文章有提到。我们建好一个friendsInfo.plist,往其中添加数据如下:

注意每个节点类型选择。
9、打开ViewController.xib,拖一个Table View到视图上,并将Delegate和DataSource都指向File’ Owner,就像上一篇文章介绍的一样。
10、打开ViewController.h,向其中添加代码:
#import <UIKit/UIKit.h>

@interface ViewController : UIViewController<UITableViewDelegate, UITableViewDataSource>

@property (strong, nonatomic) NSArray *dataList;

@property (strong, nonatomic) NSArray *imageList;

@end
11、打开ViewController.m,添加代码:
11.1 在首部添加:
#import "CustomCell.h"
11.2 在@implementation后面添加代码:
@synthesize dataList;

@synthesize imageList;
11.3 在viewDidLoad方法中添加代码:
- (void)viewDidLoad

{

    [super viewDidLoad];

    // Do any additional setup after loading the view, typically from a nib.

    //加载plist文件的数据和图片

    NSBundle *bundle = [NSBundle mainBundle];

    NSURL *plistURL = [bundle URLForResource:@"friendsInfo" withExtension:@"plist"];

    NSDictionary *dictionary = [NSDictionary dictionaryWithContentsOfURL:plistURL];

    NSMutableArray *tmpDataArray = [[NSMutableArray alloc] init];

    NSMutableArray *tmpImageArray = [[NSMutableArray alloc] init];

    for (int i=0; i<[dictionary count]; i++) {

        NSString *key = [[NSString alloc] initWithFormat:@"%i", i+1];

        NSDictionary *tmpDic = [dictionary objectForKey:key];

        [tmpDataArray addObject:tmpDic];

        NSString *imageUrl = [[NSString alloc] initWithFormat:@"%i.png", i+1];

        UIImage *image = [UIImage imageNamed:imageUrl];

        [tmpImageArray addObject:image];

    }

    self.dataList = [tmpDataArray copy];

    self.imageList = [tmpImageArray copy];

}
11.4 在ViewDidUnload方法中添加代码:
self.dataList = nil;

self.imageList = nil;
11.5 在@end之前添加代码:
#pragma mark -

#pragma mark Table Data Source Methods

- (NSInteger)tableView:(UITableView *)tableView numberOfRowsInSection:(NSInteger)section {

    return [self.dataList count];

}

- (UITableViewCell *)tableView:(UITableView *)tableView cellForRowAtIndexPath:(NSIndexPath *)indexPath {

    static NSString *CustomCellIdentifier = @"CustomCellIdentifier";

    static BOOL nibsRegistered = NO;

    if (!nibsRegistered) {

        UINib *nib = [UINib nibWithNibName:@"CustomCell" bundle:nil];

        [tableView registerNib:nib forCellReuseIdentifier:CustomCellIdentifier];

        nibsRegistered = YES;

    }

    CustomCell *cell = [tableView dequeueReusableCellWithIdentifier:CustomCellIdentifier];

    NSUInteger row = [indexPath row];

    NSDictionary *rowData = [self.dataList objectAtIndex:row];

    cell.name = [rowData objectForKey:@"name"];

    cell.dec = [rowData objectForKey:@"dec"];

    cell.loc = [rowData objectForKey:@"loc"];

    cell.image = [imageList objectAtIndex:row];

    return cell;

}

#pragma mark Table Delegate Methods

- (CGFloat)tableView:(UITableView *)tableView heightForRowAtIndexPath:(NSIndexPath *)indexPath {

    return 60.0;

}

- (NSIndexPath *)tableView:(UITableView *)tableView

  willSelectRowAtIndexPath:(NSIndexPath *)indexPath {

    return nil;

}
12、运行:

感谢分享
iOS UITableView的使用大全-备用的更多相关文章
- 开源 iOS 项目分类索引大全 - 待整理
开源 iOS 项目分类索引大全 GitHub 上大概600个开源 iOS 项目的分类和介绍,对于你挑选和使用开源项目应该有帮助 系统基础库 Category/Util sstoolkit 一套Cate ...
- IOS UITableView NSIndexPath属性讲解
IOS UITableView NSIndexPath属性讲解 查看UITableView的帮助文档我们会注意到UITableView有两个Delegate分别为:dataSource和deleg ...
- iOS中block类型大全
iOS中block类型大全 typedef的block 作为属性的block 作为变量的block 作为方法变量入参的block 作为方法参数的block 无名block 内联函数的block 递归调 ...
- iOS UITableView划动删除的实现
标签:划动删除 iphone 滑动删除 ios UITableView 原创作品,允许转载,转载时请务必以超链接形式标明文章 原始出处 .作者信息和本声明.否则将追究法律责任.http://rainb ...
- iOS UITableView Tips(2)
#TableView Tips(2) (本来想一章就结束TableView Tips,但是发现自己还是太天真了~too young,too simple) ##架构上的优化 在Tips(1)中指出了一 ...
- iOS常用第三方库大全,史上最全第三方库收集
下拉刷新 EGOTableViewPullRefresh – 最早的下拉刷新控件. SVPullToRefresh – 下拉刷新控件. MJRefresh – 仅需一行代码就可以为UITableVie ...
- iOS UITableView 与 UITableViewController
很多应用都会在界面中使用某种列表控件:用户可以选中.删除或重新排列列表中的项目.这些控件其实都是UITableView 对象,可以用来显示一组对象,例如,用户地址薄中的一组人名.项目地址. UITab ...
- iOS - UITableView中Cell重用机制导致Cell内容出错的解决办法
"UITableView" iOS开发中重量级的控件之一;在日常开发中我们大多数会选择自定Cell来满足自己开发中的需求, 但是有些时候Cell也是可以不自定义的(比如某一个简单的 ...
- iOS中NSLog输出格式大全
iOS开发中的输出格式大全: %@ 对象 %d, %i 整数%u 无符整形%f ...
随机推荐
- HDOJ 1028 Ignatius and the Princess III(递推)
Problem Description "Well, it seems the first problem is too easy. I will let you know how fool ...
- hdu4746:2013杭州网络赛I 莫比乌斯反演
题意: 有5000组询问,每组询问求有多少i,j满足i∈[1,n],j∈[1,m]且gcd(i,j)的质因子数目<=p. n,m<=500000 思路: 首先预处理出每个数的质因子数目分别 ...
- [Java] 垃圾回收机制 ( Garbage Collection ) 简介
自动垃圾回收( Automatic Garbage Collection ) 自动垃圾回收,是指在堆(Heap)内存上分辨哪些对象还在被使用,哪些对象没有被使用,并清除没有被使用的对象.所以,这里的垃 ...
- Ubuntu环境下NFS服务器搭建
看到鸟哥私房菜对NFS的介绍,就想试试玩一下.看起来步骤也很简单. 1.背景名词. NFS(Network File System) 作用:让所有的Unix-like 机器通过网络共享彼此的文件 局限 ...
- B - I Hate It - hdu 1754
Description 很多学校流行一种比较的习惯.老师们很喜欢询问,从某某到某某当中,分数最高的是多少. 这让很多学生很反感. 不管你喜不喜欢,现在需要你做的是,就是按照老师的要求,写一个程序,模拟 ...
- 修改mysql数据存储的地址
修改mysql数据存储的地址 修改步骤如下 1,修改前为默认路径/var/lib/mysql/,计划修改为/data/mysql/data mysql> show variables like ...
- 在DataTable和DataView中查找指定记录
一.在DataTable中查找 1. 使用Select方法查找没有主键的表DataTable的Select方法返回一个DataRow数组,有四个重载的函数. DataRow[] drs = dt.Se ...
- Git常用命令清单
创建 在指定目录创建工作仓库,未指定时在当前目录 git init [dir] 创建不包含工作区的仓库 git init --bare 克隆远程仓库到本地 git clone url 配置 git c ...
- [Redux] Avoiding Array Mutations with concat(), slice(), and ...spread
For Redux, you cannot use mutable methods like push, splice. Need to use immutable methods such as c ...
- boost 特点
功能强大 跨平台 开源 免费 构造精巧 C++扩展库