端口扫描 开启 防火墙 iptables SELinux
Linux 如何打开端口 - lclc - 博客园 https://www.cnblogs.com/lcword/p/5869522.html
linux如何查看端口相关信息_百度经验 https://jingyan.baidu.com/article/fdbd4277fba4dab89e3f48ab.html
[root@bigdata-server-01 sysconfig]# find / | grep iptables
/usr/sbin/iptables-restore
/usr/sbin/iptables
/usr/sbin/iptables-save
/usr/share/doc/iptables-1.4.21
/usr/share/doc/iptables-1.4.21/COPYING
/usr/share/doc/iptables-1.4.21/INCOMPATIBILITIES
/usr/share/man/man1/iptables-xml.1.gz
/usr/share/man/man8/iptables.8.gz
/usr/share/man/man8/iptables-extensions.8.gz
/usr/share/man/man8/iptables-restore.8.gz
/usr/share/man/man8/iptables-save.8.gz
/usr/share/mime/text/x-iptables.xml
/usr/bin/iptables-xml
/etc/sysconfig/iptables-config
/etc/selinux/targeted/active/modules/100/iptables
/etc/selinux/targeted/active/modules/100/iptables/hll
/etc/selinux/targeted/active/modules/100/iptables/cil
/etc/selinux/targeted/active/modules/100/iptables/lang_ext
/var/lib/yum/yumdb/i/b65e29d0ee30309c2cf4ba3ab0cce299f698651c-iptables-1.4.21-18.2.el7_4-x86_64
/var/lib/yum/yumdb/i/b65e29d0ee30309c2cf4ba3ab0cce299f698651c-iptables-1.4.21-18.2.el7_4-x86_64/from_repo
/var/lib/yum/yumdb/i/b65e29d0ee30309c2cf4ba3ab0cce299f698651c-iptables-1.4.21-18.2.el7_4-x86_64/checksum_data
/var/lib/yum/yumdb/i/b65e29d0ee30309c2cf4ba3ab0cce299f698651c-iptables-1.4.21-18.2.el7_4-x86_64/origin_url
/var/lib/yum/yumdb/i/b65e29d0ee30309c2cf4ba3ab0cce299f698651c-iptables-1.4.21-18.2.el7_4-x86_64/var_uuid
/var/lib/yum/yumdb/i/b65e29d0ee30309c2cf4ba3ab0cce299f698651c-iptables-1.4.21-18.2.el7_4-x86_64/changed_by
/var/lib/yum/yumdb/i/b65e29d0ee30309c2cf4ba3ab0cce299f698651c-iptables-1.4.21-18.2.el7_4-x86_64/var_infra
/var/lib/yum/yumdb/i/b65e29d0ee30309c2cf4ba3ab0cce299f698651c-iptables-1.4.21-18.2.el7_4-x86_64/from_repo_revision
/var/lib/yum/yumdb/i/b65e29d0ee30309c2cf4ba3ab0cce299f698651c-iptables-1.4.21-18.2.el7_4-x86_64/checksum_type
/var/lib/yum/yumdb/i/b65e29d0ee30309c2cf4ba3ab0cce299f698651c-iptables-1.4.21-18.2.el7_4-x86_64/reason
/var/lib/yum/yumdb/i/b65e29d0ee30309c2cf4ba3ab0cce299f698651c-iptables-1.4.21-18.2.el7_4-x86_64/command_line
/var/lib/yum/yumdb/i/b65e29d0ee30309c2cf4ba3ab0cce299f698651c-iptables-1.4.21-18.2.el7_4-x86_64/from_repo_timestamp
/var/lib/yum/yumdb/i/b65e29d0ee30309c2cf4ba3ab0cce299f698651c-iptables-1.4.21-18.2.el7_4-x86_64/installed_by
/var/lib/yum/yumdb/i/b65e29d0ee30309c2cf4ba3ab0cce299f698651c-iptables-1.4.21-18.2.el7_4-x86_64/releasever
[root@bigdata-server-01 sysconfig]#
service iptables start/stop
安装
解决CentOS7关闭/开启防火墙出现Unit iptables.service failed to load: No such file or directory. - CSDN博客 http://blog.csdn.net/c233728461/article/details/52679558
# yum install iptables
[root@bigdata-server-01 sysconfig]# systemctl enable iptables
Created symlink from /etc/systemd/system/basic.target.wants/iptables.service to /usr/lib/systemd/system/iptables.service.
[root@bigdata-server-01 sysconfig]# vim /etc/sysconfig/iptables
# sample configuration for iptables service
# you can edit this manually or use system-config-firewall
# please do not ask us to add additional ports/services to this default configuration
*filter
:INPUT ACCEPT [0:0]
:FORWARD ACCEPT [0:0]
:OUTPUT ACCEPT [0:0]
-A INPUT -m state --state RELATED,ESTABLISHED -j ACCEPT
-A INPUT -p icmp -j ACCEPT
-A INPUT -i lo -j ACCEPT
-A INPUT -p tcp -m state --state NEW -m tcp --dport 22 -j ACCEPT
-A INPUT -j REJECT --reject-with icmp-host-prohibited
-A FORWARD -j REJECT --reject-with icmp-host-prohibited
COMMIT
:set nu
: 11,11 copy 11
复制已有的22端口行,改为5000,为flask准备
重启
iptables
systemctl restart iptables
[root@hadoop3 ~]# find / | grep iptables
/home/data/xl_tmp/C/Users/Administrator.PC-201707311140/Desktop/desk/manual-master.tar/html/tutorial/configure-linux-iptables-firewall.html
/home/data/xl_tmp/C/Users/Administrator.PC-201707311140/Desktop/manual-master.tar/html/tutorial/configure-linux-iptables-firewall.html
/etc/sysconfig/iptables-config
/etc/sysconfig/iptables
/etc/selinux/targeted/modules/active/modules/iptables.pp
/var/lib/yum/yumdb/i/fb1ea5f54bb511b515a25d6b6de76a796fcf68b2-iptables-1.4.21-16.el7-x86_64
/var/lib/yum/yumdb/i/fb1ea5f54bb511b515a25d6b6de76a796fcf68b2-iptables-1.4.21-16.el7-x86_64/from_repo
/var/lib/yum/yumdb/i/fb1ea5f54bb511b515a25d6b6de76a796fcf68b2-iptables-1.4.21-16.el7-x86_64/reason
/var/lib/yum/yumdb/i/fb1ea5f54bb511b515a25d6b6de76a796fcf68b2-iptables-1.4.21-16.el7-x86_64/releasever
/var/lib/yum/yumdb/i/fb1ea5f54bb511b515a25d6b6de76a796fcf68b2-iptables-1.4.21-16.el7-x86_64/var_uuid
/var/lib/yum/yumdb/i/fb1ea5f54bb511b515a25d6b6de76a796fcf68b2-iptables-1.4.21-16.el7-x86_64/checksum_type
/var/lib/yum/yumdb/i/fb1ea5f54bb511b515a25d6b6de76a796fcf68b2-iptables-1.4.21-16.el7-x86_64/checksum_data
/var/lib/yum/yumdb/i/fb1ea5f54bb511b515a25d6b6de76a796fcf68b2-iptables-1.4.21-16.el7-x86_64/from_repo_revision
/var/lib/yum/yumdb/i/fb1ea5f54bb511b515a25d6b6de76a796fcf68b2-iptables-1.4.21-16.el7-x86_64/from_repo_timestamp
/var/lib/yum/yumdb/i/fb1ea5f54bb511b515a25d6b6de76a796fcf68b2-iptables-1.4.21-16.el7-x86_64/installed_by
/usr/bin/iptables-xml
/usr/sbin/iptables
/usr/sbin/iptables-restore
/usr/sbin/iptables-save
/usr/share/doc/iptables-1.4.21
/usr/share/doc/iptables-1.4.21/COPYING
/usr/share/doc/iptables-1.4.21/INCOMPATIBILITIES
/usr/share/man/man1/iptables-xml.1.gz
/usr/share/man/man8/iptables-extensions.8.gz
/usr/share/man/man8/iptables-restore.8.gz
/usr/share/man/man8/iptables-save.8.gz
/usr/share/man/man8/iptables.8.gz
/usr/share/mime/text/x-iptables.xml
[root@hadoop3 ~]#
https://www.howtogeek.com/177621/the-beginners-guide-to-iptables-the-linux-firewall/
iptables is a command-line firewall utility that uses policy chains to allow or block traffic. When a connection tries to establish itself on your system, iptables looks for a rule in its list to match it to. If it doesn’t find one, it resorts to the default action.
iptables almost always comes pre-installed on any Linux distribution. To update/install it, just retrieve the iptables package:
There are GUI alternatives to iptables like Firestarter, but iptables isn’t really that hard once you have a few commands down. You want to be extremely careful when configuring iptables rules, particularly if you’re SSH’d into a server, because one wrong command can permanently lock you out until it’s manually fixed at the physical machine.
Types of Chains
iptables uses three different chains: input, forward, and output.
Input – This chain is used to control the behavior for incoming connections. For example, if a user attempts to SSH into your PC/server, iptables will attempt to match the IP address and port to a rule in the input chain.
Forward – This chain is used for incoming connections that aren’t actually being delivered locally. Think of a router – data is always being sent to it but rarely actually destined for the router itself; the data is just forwarded to its target. Unless you’re doing some kind of routing, NATing, or something else on your system that requires forwarding, you won’t even use this chain.
There’s one sure-fire way to check whether or not your system uses/needs the forward chain.
[root@hadoop3 ~]# /usr/sbin/iptables -h
iptables v1.4.21
Usage: iptables -[ACD] chain rule-specification [options]
iptables -I chain [rulenum] rule-specification [options]
iptables -R chain rulenum rule-specification [options]
iptables -D chain rulenum [options]
iptables -[LS] [chain [rulenum]] [options]
iptables -[FZ] [chain] [options]
iptables -[NX] chain
iptables -E old-chain-name new-chain-name
iptables -P chain target [options]
iptables -h (print this help information)
Commands:
Either long or short options are allowed.
--append -A chain Append to chain
--check -C chain Check for the existence of a rule
--delete -D chain Delete matching rule from chain
--delete -D chain rulenum
Delete rule rulenum (1 = first) from chain
--insert -I chain [rulenum]
Insert in chain as rulenum (default 1=first)
--replace -R chain rulenum
Replace rule rulenum (1 = first) in chain
--list -L [chain [rulenum]]
List the rules in a chain or all chains
--list-rules -S [chain [rulenum]]
Print the rules in a chain or all chains
--flush -F [chain] Delete all rules in chain or all chains
--zero -Z [chain [rulenum]]
Zero counters in chain or all chains
--new -N chain Create a new user-defined chain
--delete-chain
-X [chain] Delete a user-defined chain
--policy -P chain target
Change policy on chain to target
--rename-chain
-E old-chain new-chain
Change chain name, (moving any references)
Options:
--ipv4 -4 Nothing (line is ignored by ip6tables-restore)
--ipv6 -6 Error (line is ignored by iptables-restore)
[!] --protocol -p proto protocol: by number or name, eg. `tcp'
[!] --source -s address[/mask][...]
source specification
[!] --destination -d address[/mask][...]
destination specification
[!] --in-interface -i input name[+]
network interface name ([+] for wildcard)
--jump -j target
target for rule (may load target extension)
--goto -g chain
jump to chain with no return
--match -m match
extended match (may load extension)
--numeric -n numeric output of addresses and ports
[!] --out-interface -o output name[+]
network interface name ([+] for wildcard)
--table -t table table to manipulate (default: `filter')
--verbose -v verbose mode
--wait -w [seconds] wait for the xtables lock
--line-numbers print line numbers when listing
--exact -x expand numbers (display exact values)
[!] --fragment -f match second or further fragments only
--modprobe=<command> try to insert modules using this command
--set-counters PKTS BYTES set the counter during insert/append
[!] --version -V print package version.
[root@hadoop3 ~]#
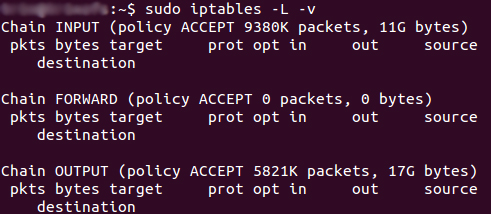
The screenshot above is of a server that’s been running for a few weeks and has no restrictions on incoming or outgoing connections. As you can see, the input chain has processed 11GB of packets and the output chain has processed 17GB. The forward chain, on the other hand, has not needed to process a single packet. This is because the server isn’t doing any kind of forwarding or being used as a pass-through device.
Output – This chain is used for outgoing connections. For example, if you try to ping howtogeek.com, iptables will check its output chain to see what the rules are regarding ping and howtogeek.com before making a decision to allow or deny the connection attempt.
The caveat
Even though pinging an external host seems like something that would only need to traverse the output chain, keep in mind that to return the data, the input chain will be used as well. When using iptables to lock down your system, remember that a lot of protocols will require two-way communication, so both the input and output chains will need to be configured properly. SSH is a common protocol that people forget to allow on both chains.
Policy Chain Default Behavior
Before going in and configuring specific rules, you’ll want to decide what you want the default behavior of the three chains to be. In other words, what do you want iptables to do if the connection doesn’t match any existing rules?
To see what your policy chains are currently configured to do with unmatched traffic, run the iptables -L command.
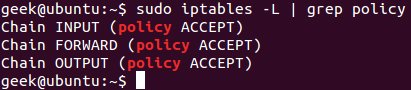
As you can see, we also used the grep command to give us cleaner output. In that screenshot, our chains are currently figured to accept traffic.
More times than not, you’ll want your system to accept connections by default. Unless you’ve changed the policy chain rules previously, this setting should already be configured. Either way, here’s the command to accept connections by default:
iptables --policy INPUT ACCEPTiptables --policy OUTPUT ACCEPTiptables --policy FORWARD ACCEPT
By defaulting to the accept rule, you can then use iptables to deny specific IP addresses or port numbers, while continuing to accept all other connections. We’ll get to those commands in a minute.
If you would rather deny all connections and manually specify which ones you want to allow to connect, you should change the default policy of your chains to drop. Doing this would probably only be useful for servers that contain sensitive information and only ever have the same IP addresses connect to them.
iptables --policy INPUT DROPiptables --policy OUTPUT DROPiptables --policy FORWARD DROP
Connection-specific Responses
With your default chain policies configured, you can start adding rules to iptables so it knows what to do when it encounters a connection from or to a particular IP address or port. In this guide, we’re going to go over the three most basic and commonly used “responses”.
Accept – Allow the connection.
Drop – Drop the connection, act like it never happened. This is best if you don’t want the source to realize your system exists.
Reject – Don’t allow the connection, but send back an error. This is best if you don’t want a particular source to connect to your system, but you want them to know that your firewall blocked them.
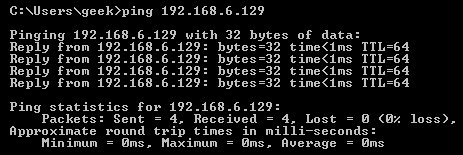
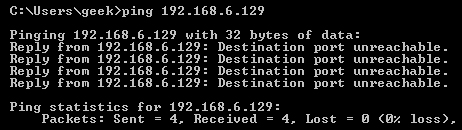
The best way to show the difference between these three rules is to show what it looks like when a PC tries to ping a Linux machine with iptables configured for each one of these settings.
Allowing the connection:
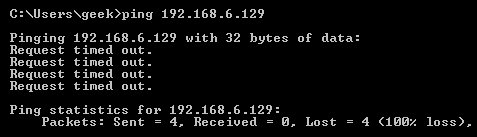
Dropping the connection:
Rejecting the connection:
Allowing or Blocking Specific Connections
With your policy chains configured, you can now configure iptables to allow or block specific addresses, address ranges, and ports. In these examples, we’ll set the connections to DROP, but you can switch them to ACCEPT or REJECT, depending on your needs and how you configured your policy chains.
Note: In these examples, we’re going to use iptables -A to append rules to the existing chain. iptables starts at the top of its list and goes through each rule until it finds one that it matches. If you need to insert a rule above another, you can use iptables -I [chain] [number] to specify the number it should be in the list.
Connections from a single IP address
This example shows how to block all connections from the IP address 10.10.10.10.
iptables -A INPUT -s 10.10.10.10 -j DROP
Connections from a range of IP addresses
This example shows how to block all of the IP addresses in the 10.10.10.0/24 network range. You can use a netmask or standard slash notation to specify the range of IP addresses.
iptables -A INPUT -s 10.10.10.0/24 -j DROP
or
iptables -A INPUT -s 10.10.10.0/255.255.255.0 -j DROP
Connections to a specific port
This example shows how to block SSH connections from 10.10.10.10.
iptables -A INPUT -p tcp --dport ssh -s 10.10.10.10 -j DROP
You can replace “ssh” with any protocol or port number. The -p tcp part of the code tells iptables what kind of connection the protocol uses. If you were blocking a protocol that uses UDP rather than TCP, then -p udp would be necessary instead.
This example shows how to block SSH connections from any IP address.
iptables -A INPUT -p tcp --dport ssh -j DROP
Connection States
As we mentioned earlier, a lot of protocols are going to require two-way communication. For example, if you want to allow SSH connections to your system, the input and output chains are going to need a rule added to them. But, what if you only want SSH coming into your system to be allowed? Won’t adding a rule to the output chain also allow outgoing SSH attempts?
That’s where connection states come in, which give you the capability you’d need to allow two way communication but only allow one way connections to be established. Take a look at this example, where SSH connections FROM 10.10.10.10 are permitted, but SSH connections TO 10.10.10.10 are not. However, the system is permitted to send back information over SSH as long as the session has already been established, which makes SSH communication possible between these two hosts.
iptables -A INPUT -p tcp --dport ssh -s 10.10.10.10 -m state --state NEW,ESTABLISHED -j ACCEPT
iptables -A OUTPUT -p tcp --sport 22 -d 10.10.10.10 -m state --state ESTABLISHED -j ACCEPT
Saving Changes
The changes that you make to your iptables rules will be scrapped the next time that the iptables service gets restarted unless you execute a command to save the changes. This command can differ depending on your distribution:
Ubuntu:
sudo /sbin/iptables-save
Red Hat / CentOS:
/sbin/service iptables save
Or
/etc/init.d/iptables save
Other Commands
List the currently configured iptables rules:
iptables -L
Adding the -v option will give you packet and byte information, and adding -n will list everything numerically. In other words – hostnames, protocols, and networks are listed as numbers.
To clear all the currently configured rules, you can issue the flush command.
iptables -F
windows 打开关闭防火墙 对比
C:\Users\sas>ping 192.168.2.160
正在 Ping 192.168.2.160 具有 32 字节的数据:
请求超时。
请求超时。
请求超时。
请求超时。
192.168.2.160 的 Ping 统计信息:
数据包: 已发送 = 4,已接收 = 0,丢失 = 4 (100% 丢失),
C:\Users\sas>ping 192.168.2.160
正在 Ping 192.168.2.160 具有 32 字节的数据:
来自 192.168.2.160 的回复: 字节=32 时间=1ms TTL=128
来自 192.168.2.160 的回复: 字节=32 时间<1ms TTL=128
来自 192.168.2.160 的回复: 字节=32 时间<1ms TTL=128
来自 192.168.2.160 的回复: 字节=32 时间<1ms TTL=128
192.168.2.160 的 Ping 统计信息:
数据包: 已发送 = 4,已接收 = 4,丢失 = 0 (0% 丢失),
往返行程的估计时间(以毫秒为单位):
最短 = 0ms,最长 = 1ms,平均 = 0ms
防火墙已经关闭
但是仍然
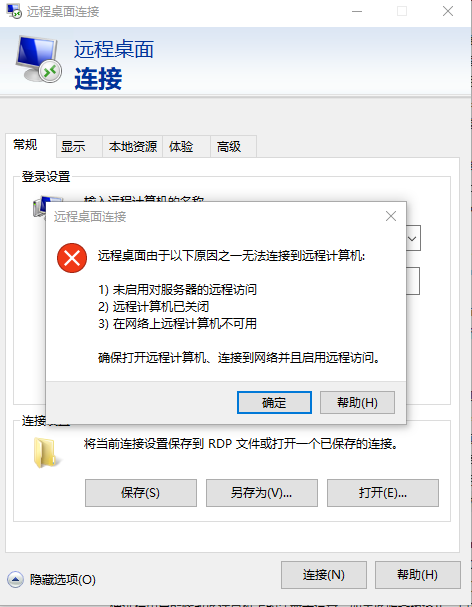
逐条检查
启用对远程服务器的访问
https://jingyan.baidu.com/album/8065f87f816f5323312498a1.html?picindex=5
注册表检查
打开注册表
C:\Windows\regedit.exe
计算机\HKEY_LOCAL_MACHINE\SYSTEM\CurrentControlSet\Control\Terminal Server
AllowRemoteRPC 设为1 允许
计算机\HKEY_LOCAL_MACHINE\SYSTEM\CurrentControlSet\Control\Terminal Server\WinStations\RDP-Tcp
检测端口是否被占用 netstat -at
设置3389为远程连接端口
PortNumber d3d 16进制 3389 =13+3*16+13*256 = 3328+61
SELinux_百度百科 https://baike.baidu.com/item/SELinux/8865268?fr=aladdin
【进程只能访问那些在他的任务中所需要文件】
systemctl stop firewalld.service
systemctl disable firewalld.service
端口扫描 开启 防火墙 iptables SELinux的更多相关文章
- CentOS7开启防火墙及特定端口
开启防火墙服务 以前为了方便,把防火墙都关闭了,因为现在项目都比较重要,害怕受到攻击,所以为了安全性,现在需要将防火墙开启,接下来介绍一下步骤. 1, 首先查看防火墙状态: firewall-cmd ...
- centos7篇---开启防火墙和特定端口
开启防火墙服务 以前为了方便,把防火墙都关闭了,因为现在项目都比较重要,害怕受到攻击,所以为了安全性,现在需要将防火墙开启,接下来介绍一下步骤.1, 首先查看防火墙状态: firewall-cmd - ...
- Linux关闭防火墙、SELinux
使用root权限: Linux关闭防火墙: 1. chkconfig –list|grep iptables 2. chkconfig iptables off 永久关闭防火墙 3. chkconfi ...
- [ Iptables ] Linux开启防火墙,切记仔细确定每个端口
一.缘由: 祸起Redis未授权访问漏洞被利用,删除了服务器的所有账号,导致无法登陆:这才不得不把开启防火墙提上日程.再次在开启防火墙过程中,一刀切造成了一些前段进程的端口被封,甚是后悔! 二.解决办 ...
- Linux对外提供服务 网络操作 端口操作 1.开启服务监听端口 2.设置防火墙,放行访问端口的包 iptables&netfilter 四表五链和通堵策略
主题: Linux服务器上软件提供服务 1.网络操作 2.端口操作 1.网络操作 本机必须能够ping通目标主机(本地虚拟机或者远程主机) 2.端口操作 1.开启服务监听端口 2.设置防火墙,放行访问 ...
- Centos7 iptables firewalld防火墙与selinux配置
一.iptables防火墙 1.基本操作 # 查看防火墙状态 service iptables status # 停止防火墙 service iptables stop # 启动防火墙 service ...
- linux下开启防火墙,打开端口
service iptables start时提示:“iptables: No config file. [WARNING]” 此时打 ...
- Linux防火墙(Iptables)的开启与关闭
Linux防火墙(iptables)的开启与关闭 Linux中的防火墙主要是对iptables的设置和管理. 1. Linux防火墙(Iptables)重启系统生效 开启: chkconfig ipt ...
- CentOS7关闭/开启防火墙出现 Unit iptables.service failed to load
在vm中安装好tomcat,而且在liunx中使用nc命令可以返回成功,但是更换到window中访问不到tomcat的情况,是由于linux防火墙的问题造成的,传统的解决方式有2中 第一种解决方案: ...
随机推荐
- MySQL 待解决死锁
官方文档:https://dev.mysql.com/doc/refman/5.6/en/innodb-locks-set.html 线上出现一个死锁现象,信息显示的是两条对同一个表的不同记录的upd ...
- redis介绍和安装和主从介绍(二)
redis正式安装过程 安装依赖,下载解压,编译安装 yum install gcc-c++ tcl wget http://download.redis.io/releases/redis-4.0. ...
- HDU 1693 Eat the Trees ——插头DP
[题目分析] 吃树. 直接插头DP,算是一道真正的入门题目. 0/1表示有没有插头 [代码] #include <cstdio> #include <cstring> #inc ...
- AnyChart图表仪表控件在Flex环境下使用
AnyChart控件是一款当前流行的数据可视化解决方案,使客户可以创建交互地.生动的图表.实时仪表和地图.同时支持Flash和HTML5显示,控件提供极好的视觉外观和配色方案能够使客户根据不同的需求设 ...
- GridView动态添加View
activity_main.xml <?xml version="1.0" encoding="utf-8"?> <LinearLayout ...
- 用“道”的思想解决费用流问题---取/不取皆是取 (有下界->有上界) / ACdreamoj 1171
题意: 给一个矩阵,给出约束:i(0<i<n)行至少去ai个数,j行至少取bi个数,要求取的数值之和最小. 开始一见,就直接建了二分图,但是,发现这是有下界无上界最小费用流问题,肿么办.. ...
- Delphi中的操作二进制文件的两个重要函数
Delphi中的操作二进制文件的两个重要函数 对于通过Byte数组进行文件操作的,在FTP中经常会使用到,我也是在Delphi调用Web Service进行文件的上传和下载时找到这两个函数的,挺好用的 ...
- 2017 ACM/ICPC Asia Regional Shenyang Online 记录
这场比赛全程心态爆炸…… 开场脑子秀逗签到题WA了一发.之后0贡献. 前期状态全无 H题想复杂了,写了好久样例过不去. 然后这题还是队友过的…… 后期心态炸裂,A题后缀数组理解不深,无法特判k = 1 ...
- Python使用eval强制转换字符串为字典时报错:File "<string>", line 1, in <module> NameError: name 'nan' is not defined
文本中保存的内容为: { 'QQQ': [0.067, 0.167, 0.2, 0.033, 0.233, 0.267, 0.1, 0.133], 'TTT': [0.5, 0.375, 0.25, ...
- python多线程实践小结
参考:http://www.cnblogs.com/tqsummer/archive/2011/01/25/1944771.html #!/usr/bin/env python import sys ...