CppUnit使用和源码解析
前言
CppUnit是一个开源的单元测试框架,支持Linux和Windows操作系统,在linux上可以直接进行源码编译,得到动态库和静态库,直接链接就可以正常使用,在Windows上可以使用VC直接进行编译,非常便于调试。CppUnit的源码框架被运用到了Java和Python等语言中,使用非常广泛,熟悉了一种语言下的CppUnit使用方法,其他语言测试框架也不在话下,本文以cppunit-1.12.1为例进行演示和说明。
一个例子
Linux下CppUnit源码编译和安装
- 解压源码文件到cppunit-1.12.1目录
- cd cppunit-1.12.1
- ./configure --prefix=安装路径(必须是绝对路径)
- make
- make install
编辑测试代码
一共三个文件main.cpp、simpleTest.h、simpleTest.c,目录下文件的组织结构如下所示:

三个文件的源码如下:
//main.cpp文件

#include "cppunit/TestResultCollector.h"

#include "cppunit/TextOutputter.h"

#include "cppunit/XmlOutputter.h"

#include "cppunit/CompilerOutputter.h"

#include "cppunit/TestResult.h"

#include "cppunit/TestRunner.h"

#include "cppunit/extensions/TestFactoryRegistry.h"

#include <cstdlib>

#include <ostream>

int main()

{

    CppUnit::TestResult r;

    CppUnit::TestResultCollector rc;

    r.addListener(&rc); // 准备好结果收集器

    CppUnit::TestRunner runner; // 定义执行实体

    runner.addTest(CppUnit::TestFactoryRegistry::getRegistry("alltest").makeTest());

    runner.run(r); // 运行测试

    //CppUnit::TextOutputter o(&rc, std::cout);

    //o.write(); // 将结果输出

	//std::ofstream file;

	//file.open("./UnitTest.xml");

	//CppUnit::XmlOutputter xo(&rc, file);

	//xo.write();

	CppUnit::CompilerOutputter co(&rc, std::cout);

	co.write();

    return rc.wasSuccessful() ? 0 : -1;

}
//SimpleTest .h文件

#include "cppunit/extensions/HelperMacros.h"

class SimpleTest : public CppUnit::TestFixture

{

    CPPUNIT_TEST_SUITE(SimpleTest);

    CPPUNIT_TEST(test1);

	CPPUNIT_TEST(test2);

    CPPUNIT_TEST_SUITE_END();

public:

	void test1();

	void test2();

};
//simpleTest.cpp文件

#include "simpleTest.h"

#include <string>

#include <iostream>

#include "cppunit/TestCase.h"

#include "cppunit/TestAssert.h"

CPPUNIT_TEST_SUITE_NAMED_REGISTRATION(SimpleTest, "alltest");

void SimpleTest::test2()

{

    CPPUNIT_ASSERT(3 == 3);

}

void SimpleTest::test1()

{

    CPPUNIT_ASSERT(2 == 2);

}
编译命令如下:
g++ main.cpp simpleTest.cpp -o test -I /home/chusiyong/cppunit/install/include -L /home/chusiyong/cppunit/install/lib -Wl,-Bstatic -lcppunit -Wl,-Bdynamic -ldl
运行可执行文件,结果如下:
OK (2)
表示所有用例都执行成功
源码分析
1.主要类的继承关系
- Test相关类
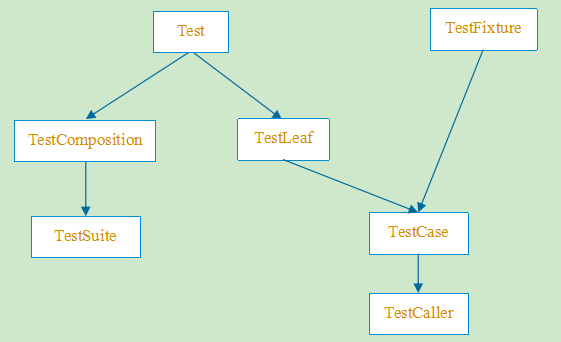
- Test类作为所有测试用例的基类,是一个抽象类,含有纯虚函数
- Test类主要的方法是run方法
- 采用Composition设计模式(类比文件和文件夹的设计方法)
- TestComposition类主要是实现类名的处理,并提供start和end的处理(配合TestListener使用)
- TestSuite类非常重要,里面可以包含多个Test类,使用Vector的方式保存
- TestFixture类主要提供setUp和tearDown方法,用于运行测试用例前和测试用例后执行
- TestLeaf类主要是实现Test类中的部分方法,在体现通用性的同时做安全措施,重写必要的virtual方法(实现Test类中模板方法中调用的函数),继承该类的子类只能是单个测试用例,不能包含子测试用例
- TestCase类是主要的测试类,每一个TestCase表示一个测试用例
- TestCaller类主要用来生成TestCase实例,将TestFixture类中的每一个测试方法,变成一个单独的TestCase实例(很重要),然后将TestCase实例加入到TestSuite中
//TestComposite.h

class CPPUNIT_API TestComposite : public Test

{

public:

  TestComposite( const std::string &name = "" );

  ~TestComposite();

  void run( TestResult *result );

  std::string getName() const;

private:

  const std::string m_name;

};

//TestComposite.cpp

void TestComposite::run( TestResult *result )

{

  ...

  doRunChildTests( result );

  ...

}

void TestComposite::doRunChildTests( TestResult *controller)

                                       //关键方法,调用每一个子用例的run方法

{

  int childCount = getChildTestCount();

  for ( int index =0; index < childCount; ++index )

  {

    if ( controller->shouldStop() )

      break;

    getChildTestAt( index )->run( controller );

  }

}

std::string TestComposite::getName() const //获取测试用例名称

{

  return m_name;

}
//TestSuite.h

class CPPUNIT_API TestSuite : public TestComposite

{

public:

  TestSuite( std::string name = "" );

  ~TestSuite();

  void addTest( Test *test ); //添加测试用例

  virtual void deleteContents(); //删除测试用例

  int getChildTestCount() const; //根据vector获取子用例个数

  Test *doGetChildTestAt( int index ) const;//根据index获取子用例对象

private:

  CppUnitVector<Test *> m_tests; //保存子用例

};

//TestSuite.cpp

void TestSuite::deleteContents() //删除所有测试用例

{

  int childCount = getChildTestCount();

  for ( int index =0; index < childCount; ++index )

    delete getChildTestAt( index );

  m_tests.clear();

}

void TestSuite::addTest( Test *test ) //添加测试用例

{

  m_tests.push_back( test );

}

int TestSuite::getChildTestCount() const //获取子测试用例的个数

{

  return m_tests.size();

}

Test *TestSuite::doGetChildTestAt( int index ) const//根据index获取子用例对象

{

  return m_tests[index];

}
//TestLeaf.h 没有实现run方法,不能生成实例对象

class CPPUNIT_API TestLeaf: public Test

{

public:

  int countTestCases() const;    //Test类中的checkIsValidIndex方法调用

  int getChildTestCount() const;//Test类中的checkIsValidIndex方法调用

  Test *doGetChildTestAt( int index ) const;//Test类中的getChildTestAt方法调用

};

//TestLeaf.cpp

int TestLeaf::countTestCases() const

{

  return 1;

}

int TestLeaf::getChildTestCount() const

{

  return 0;

}

Test *TestLeaf::doGetChildTestAt( int index ) const

{

  checkIsValidIndex( index );

  return NULL;    // never called, checkIsValidIndex() always throw.

}
//TestFixture.h

class CPPUNIT_API TestFixture //接口

{

public:

  virtual ~TestFixture() {};

  virtual void setUp() {};//运行用例前调用

  virtual void tearDown() {};//运行用例后调用

};
//TestCase.h

class CPPUNIT_API TestCase : public TestLeaf, public TestFixture

{

public:

    TestCase( const std::string &name );

    TestCase();

    ~TestCase();

    virtual void run(TestResult *result); //实现纯虚方法

    std::string getName() const; //获取用例名称

    virtual void runTest(); //子类实现

private:

    TestCase( const TestCase &other );

    TestCase &operator=( const TestCase &other );

private:

    const std::string m_name;

};

//TestCase.cpp

//说明:运行测试用例的时候,是采用的保护性运行方式,保证一个用例执行失败后续的用例可以继续执行

//采用try{...}catch{...}的模式,失败就抛异常,然后记录,继续执行

void TestCase::run( TestResult *result )

{

  result->startTest(this);

  if ( result->protect( TestCaseMethodFunctor( this, &TestCase::setUp ), this, "setUp() failed" ))

  {

    result->protect( TestCaseMethodFunctor( this, &TestCase::runTest ), this);

  }

  result->protect( TestCaseMethodFunctor( this, &TestCase::tearDown ), this, "tearDown() failed");

  result->endTest( this );

}
- TestCaseMethodFunctor类:函数对象,作用就是封装方法,便于使用
class TestCaseMethodFunctor : public Functor

{

public:

  typedef void (TestCase::*Method)();

  TestCaseMethodFunctor( TestCase *target,

                         Method method )

     : m_target( target )

     , m_method( method )

  {

  }

  bool operator()() const //重载()操作符

  {

    (m_target->*m_method)(); //直接调用测试用例的地方

    return true;

  }

private:

  TestCase *m_target;

  Method m_method;

};
template <class Fixture>

class TestCaller : public TestCase

{

public:

  TestCaller( std::string name, TestMethod test ) :

	    TestCase( name ),

	    m_ownFixture( true ),

	    m_fixture( new Fixture() ),

	    m_test( test )

  {

  }

  TestCaller(std::string name, TestMethod test, Fixture& fixture) :

	    TestCase( name ),

	    m_ownFixture( false ),

	    m_fixture( &fixture ),

	    m_test( test )

  {

  }

  TestCaller(std::string name, TestMethod test, Fixture* fixture) :

	    TestCase( name ),

	    m_ownFixture( true ),

	    m_fixture( fixture ),

	    m_test( test )

  {

  }

  ~TestCaller()

  {

    if (m_ownFixture)

      delete m_fixture;

  }

  void runTest()

  {

	(m_fixture->*m_test)(); //运行测试用例的地方

  }

  void setUp()

  {

  	m_fixture->setUp ();

  }

  void tearDown()

  {

	  m_fixture->tearDown ();

  }

  std::string toString() const

  {

  	return "TestCaller " + getName();

  }

private:

  TestCaller( const TestCaller &other );

  TestCaller &operator =( const TestCaller &other );

private:

  bool m_ownFixture;

  Fixture *m_fixture;   //new出来的测试对象,即TestCase

  typedef void (Fixture::*TestMethod)();

  TestMethod m_test;//Testcase中的一个测试方法

};
- TestListener相关类

- TestListener类和TestResult类之间是采用观察者模式,TestResult类将测试用例的执行结果通知给TestListener类
- TestListener类将保持的结果,通过OutPutter类显示出来
- TestSuccessListener类主要作用是实现多线程安全
class CPPUNIT_API TestListener

{

public:

  virtual ~TestListener() {}

  virtual void addFailure( const TestFailure & /*failure*/ ) {}

    //主要的函数,当测试用例执行失败时,调用该接口将结果保持到观察者实例中

};
//TestSuccessListener.h

class CPPUNIT_API TestSuccessListener : public TestListener,

                                        public SynchronizedObject

{

public:

  TestSuccessListener( SynchronizationObject *syncObject = 0 );

  virtual ~TestSuccessListener();

  virtual void reset();

  void addFailure( const TestFailure &failure ); //添加失败信息

  virtual bool wasSuccessful() const; //判断执行结果

private:

  bool m_success;

};

//TestSuccessListener.cpp

void TestSuccessListener::addFailure( const TestFailure &failure )

{

  ExclusiveZone zone( m_syncObject ); //多线程时的锁

  m_success = false;

}

bool TestSuccessListener::wasSuccessful() const

{

  ExclusiveZone zone( m_syncObject );

  return m_success;

}

void TestSuccessListener::reset()

{

  ExclusiveZone zone( m_syncObject );

  m_success = true;

}
//TestResultCollector.h

class CPPUNIT_API TestResultCollector : public TestSuccessListener

{

public:

  TestResultCollector( SynchronizationObject *syncObject = 0 );

  virtual ~TestResultCollector();

  void addFailure( const TestFailure &failure );

  virtual void reset();

  virtual int testErrors() const;

  virtual int testFailures() const;

  virtual int testFailuresTotal() const;

  virtual const TestFailures& failures() const;

protected:

  void freeFailures();

  typedef CppUnitDeque<Test *> Tests;

  Tests m_tests;

  typedef CppUnitDeque<TestFailure *> TestFailures;

  TestFailures m_failures;

  int m_testErrors;

};

//TestResultCollector.cpp

void TestResultCollector::freeFailures() //释放所有错误信息

{

  TestFailures::iterator itFailure = m_failures.begin();

  while ( itFailure != m_failures.end() )

    delete *itFailure++;

  m_failures.clear();

}

void TestResultCollector::reset() //将Listener的状态变成初始状态

{

  TestSuccessListener::reset();

  ExclusiveZone zone( m_syncObject );

  freeFailures();

  m_testErrors = 0;

  m_tests.clear();

}

void TestResultCollector::addFailure( const TestFailure &failure )//添加错误信息

{

  TestSuccessListener::addFailure( failure );

  ExclusiveZone zone( m_syncObject );

  if ( failure.isError() )

    ++m_testErrors;

  m_failures.push_back( failure.clone() );

}

int TestResultCollector::testFailuresTotal() const //返回错误信息的个数(包括error)

{

  ExclusiveZone zone( m_syncObject );

  return m_failures.size();

}

int TestResultCollector::testFailures() const //返回失败用例的个数(不包括error)

{

  ExclusiveZone zone( m_syncObject );

  return m_failures.size() - m_testErrors;

}

//返回错误信息

const TestResultCollector::TestFailures & TestResultCollector::failures() const

{

  ExclusiveZone zone( m_syncObject );

  return m_failures;

}

//返回error的个数

int TestResultCollector::testErrors() const

{

  ExclusiveZone zone( m_syncObject );

  return m_testErrors;

}
- TestFailure类:用于表示测试用例的执行结果,一个测试用例执行失败就会生成一个TestFailure类的实例
- TestFailure可以表示用例执行失败,也可以表示error,二者的区别是:测试用例执行失败时抛出的异常是已知的,如果执行用例时抛出未知异常,就是error
//TestFailure.cpp.h

class CPPUNIT_API TestFailure

{

public:

  TestFailure( Test *failedTest, Exception *thrownException, bool isError );

  virtual ~TestFailure ();

  virtual Test *failedTest() const;   //返回失败用例对象

  virtual Exception *thrownException() const; //返回抛出的对象

  virtual SourceLine sourceLine() const; //获取抛出异常的代码行号

  virtual bool isError() const; //判断是用例失败还是error

  virtual std::string failedTestName() const;//获取失败测试用例的名称

  virtual TestFailure *clone() const;//克隆

protected:

  Test *m_failedTest;

  Exception *m_thrownException;

  bool m_isError;

private:

  TestFailure( const TestFailure &other );

  TestFailure &operator =( const TestFailure& other );

};

//TestFailure.cpp

TestFailure::TestFailure( Test *failedTest,

                          Exception *thrownException,

                          bool isError ) :

    m_failedTest( failedTest ), //失败的用例

    m_thrownException( thrownException ), //抛出的异常

    m_isError( isError )//是用例失败还是未知异常

{

}
- 多线程安全同步机制
SynchronizedObject类起到一个域名的包装作用,防止名称空间被污染
SynchronizationObject类似一个基类,提供lock和unlock的接口,可以依据不同的平台进行继承实现互斥锁
ExclusiveZone类的作用是封装SynchronizationObject类,方便使用互斥锁,关键就是在构造函数中调用lock函数,析构函数中调用unlock函数,无需手动调用lock和unlock函数
class CPPUNIT_API SynchronizedObject
{
public: class SynchronizationObject //实现互斥锁的基类
{
public:
SynchronizationObject() {}
virtual ~SynchronizationObject() {} virtual void lock() {}
virtual void unlock() {}
}; SynchronizedObject( SynchronizationObject *syncObject =0 );
virtual ~SynchronizedObject(); protected: class ExclusiveZone //封装SynchronizationObject类的使用方式
{
SynchronizationObject *m_syncObject; public:
ExclusiveZone( SynchronizationObject *syncObject )
: m_syncObject( syncObject )
{
m_syncObject->lock(); //构造函数中调用lock函数
} ~ExclusiveZone()
{
m_syncObject->unlock();//析构函数中调用unlock函数
}
}; virtual void setSynchronizationObject( SynchronizationObject *syncObject ); protected:
SynchronizationObject *m_syncObject; private:
SynchronizedObject( const SynchronizedObject © );
void operator =( const SynchronizedObject © );
};
- TestResult类,与TestListener类组成观察者模式,其中TestResult类是被观察者,TestListener类是观察者
TestResult类的runTest方法是运行测试用例的源头,里面会执行测试用例,并将测试用例的执行结果通知给所有的观察者
TestResult类的runTest方法会调用每一个测试用例的run方法
TestResult类的关键代码如下:
//TestResult.h

class CPPUNIT_API TestResult : protected SynchronizedObject

{

public:

  TestResult( SynchronizationObject *syncObject = 0 );

  virtual ~TestResult();

  virtual void addListener( TestListener *listener );//添加测试用例

  virtual void removeListener( TestListener *listener );//移除测试用例

  virtual void addFailure( Test *test, Exception *e );//添加失败信息

  virtual void runTest( Test *test );//入口方法

protected:

  void addFailure( const TestFailure &failure ); //将失败的消息通知给所有的观察者

protected:

  typedef CppUnitDeque<TestListener *> TestListeners;

  TestListeners m_listeners;//保存所有的监听者

};

//TestResult.cpp

void TestResult::addListener( TestListener *listener )//添加测试用例

{

  ExclusiveZone zone( m_syncObject );

  m_listeners.push_back( listener );

}

void TestResult::removeListener ( TestListener *listener )//移除测试用例

{

  ExclusiveZone zone( m_syncObject );

  removeFromSequence( m_listeners, listener );

}

void TestResult::runTest( Test *test )//入口方法

{

  startTestRun( test );

  test->run( this );

  endTestRun( test );

}

void TestResult::addFailure( Test *test, Exception *e )//用例失败时被调用

{

  TestFailure failure( test, e, false );

  addFailure( failure );

}

void TestResult::addFailure( const TestFailure &failure )//将失败的消息通知给所有的观察者

{

  ExclusiveZone zone( m_syncObject );

  for ( TestListeners::iterator it = m_listeners.begin();

        it != m_listeners.end();

        ++it )

    (*it)->addFailure( failure );

}
- OutPutter相关类
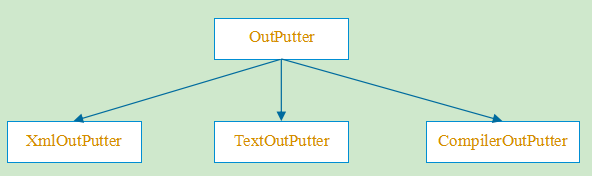
- OutPutter是公共的基类,提供统一的接口
class CPPUNIT_API Outputter

{

public:

  virtual ~Outputter() {}

  virtual void write() =0; //关键方法

};
TextOutputter类:将执行结果按照文本模式打印出来,一般是输出到屏幕(一般在调试中使用)
XmlOutPutter类:将执行结果按照xml模式打印出来,一般是保存到xml文件中(一般在自动化中使用)
CompilerOutPutter类:将执行的结果以编译器兼容的模式打印出来,便于调试,一般不怎么使用
总结:就是将TestResult类中的Failure信息以不同的格式输出
2. 创建测试用例的相关类
- 创建测试用例的相关类主要使用了工厂模式
- 创建的具体过程使用了宏进行简化
- 相关类如下
- ConcretTestFixtureFactory类:用于创建测试用例对象
class TestFixtureFactory

{

public:

  virtual TestFixture *makeFixture() =0; //用于创建具体测试用例的公共方法

  virtual ~TestFixtureFactory() {}

};

//使用工厂方法模式

template<class TestFixtureType>

class ConcretTestFixtureFactory : public CPPUNIT_NS::TestFixtureFactory

{

  TestFixture *makeFixture()

  {

    return new TestFixtureType(); //根据具象的类型创建实例

  }

};
- TestSuiteBuilderContextBase类:用于将测试用例对象添加到suite中
//TestSuiteBuilderContextBase.h

class CPPUNIT_API TestSuiteBuilderContextBase

{

public:

  TestSuiteBuilderContextBase( TestSuite &suite,

                               const TestNamer &namer,

                               TestFixtureFactory &factory );

  virtual ~TestSuiteBuilderContextBase();

  void addTest( Test *test );

protected:

  TestFixture *makeTestFixture() const; //创建测试用例

  TestSuite &m_suite; //用于保存测试用例的suite

  const TestNamer &m_namer; //保存suite的名称

  TestFixtureFactory &m_factory; //创建测试用例的工厂

};

//TestSuiteBuilderContextBase.cpp

TestSuiteBuilderContextBase::TestSuiteBuilderContextBase(

                                 TestSuite &suite,

                                 const TestNamer &namer,

                                 TestFixtureFactory &factory )

  : m_suite( suite )

  , m_namer( namer )

  , m_factory( factory )

{//构造函数

}

TestFixture *TestSuiteBuilderContextBase::makeTestFixture() const

{

  return m_factory.makeFixture();

}

void TestSuiteBuilderContextBase::addTest( Test *test ) //添加用例到suite

{

  m_suite.addTest( test );

}
- TestFactory类
class CPPUNIT_API TestFactory

{

public:

  virtual ~TestFactory() {}

  virtual Test* makeTest() = 0;

};
- TestSuiteFactory类:此处调用的TestCaseType::suite()返回的suite就是包含测试用例的suite
template<class TestCaseType>

  class TestSuiteFactory : public TestFactory

  {

  public:

    virtual Test *makeTest()

    {

      return TestCaseType::suite(); //关键方法,该方法的实现是宏定义

    }

  };
- TestFactoryRegistry类:用于从TestFactoryRegistryList类中获取指定名称的TestFactoryRegistry实例
- TestFactoryRegistryList类:单例类,根据名称保存所有的TestFactoryRegistry实例
- AutoRegisterSuite类:封装TestSuiteFactory的注册方式
3.框架入口类
- TestRunner类是整个CppUnit的入口类,将TestSuite类、TestResult类以及TestListener类联合在一起,然后提供统一的入口方法,便于使用
- TestListener实例包含在TestResult实例里面
- 部分代码如下:
//TestRunner.h
class CPPUNIT_API TestRunner
{
public:
TestRunner( );
virtual ~TestRunner();
//将需要运行的测试用例添加进来
virtual void addTest( Test *test );
//运行指定的测试用例
virtual void run( TestResult &controller, const std::string &testPath = "" ); protected:
//内部类,对suite进行了包装
class CPPUNIT_API WrappingSuite : public TestSuite
{
public:
WrappingSuite( const std::string &name = "All Tests" ); int getChildTestCount() const; std::string getName() const; void run( TestResult *result ); protected:
Test *doGetChildTestAt( int index ) const; bool hasOnlyOneTest() const; Test *getUniqueChildTest() const;
}; protected:
WrappingSuite *m_suite; private:
TestRunner( const TestRunner © );
void operator =( const TestRunner © );
private:
}; //TestRunner.cpp
void TestRunner::addTest( Test *test )
{
m_suite->addTest( test );
} void TestRunner::run( TestResult &controller,
const std::string &testPath )
{
TestPath path = m_suite->resolveTestPath( testPath );
Test *testToRun = path.getChildTest(); controller.runTest( testToRun );
}
4.重要宏的解析
- CPPUNIT_TEST_SUITE_NAMED_REGISTRATION
CPPUNIT_TEST_SUITE_NAMED_REGISTRATION(SimpleTest, "alltest");

//展开后如下

static CPPUNIT_NS::AutoRegisterSuite<SimpleTest> autoRegisterRegistry__12("alltest");
- CPPUNIT_TEST_SUITE、CPPUNIT_TEST以及CPPUNIT_TEST_SUITE_END宏,这三个红必须配合使用,不能单独使用,用于声明需要运行的测试用例
private:

	//根据typeid(SimpleTest)为名称生成TestNamer类的实例,就是对名称的封装

	static const CPPUNIT_NS::TestNamer &getTestNamer__()

	{

		static CPPUNIT_NS::TestNamer testNamer(typeid(SimpleTest));

		return testNamer;

	}

public:

	//将测试用例添加到suite中

	static void addTestsToSuite( CPPUNIT_NS::TestSuiteBuilderContextBase &baseContext )

	{

		CPPUNIT_NS::TestSuiteBuilderContext<SimpleTest> context(baseContext)

		context.addTest(( new CPPUNIT_NS::TestCaller<SimpleTest>(context.getTestNameFor( #testMethod), &SimpleTest::testMethod, context.makeFixture())))

	}

	//对外接口,被TestSuiteFactory中的makeTest方法调用,返回一个完整的suite,等待被运行

	static CPPUNIT_NS::TestSuite *suite()

	{

		const CPPUNIT_NS::TestNamer &namer = getTestNamer__();

		std::auto_ptr<CPPUNIT_NS::TestSuite> suite(new CPPUNIT_NS::TestSuite(namer.getFixtureName()));

		CPPUNIT_NS::ConcretTestFixtureFactory<SimpleTest> factory;

		CPPUNIT_NS::TestSuiteBuilderContextBase context(*suite.get(), namer, factory );

		SimpleTest::addTestsToSuite( context );

		return suite.release();

	}
CppUnit使用和源码解析的更多相关文章
- Go语言备忘录:net/http包的使用模式和源码解析
本文是晚辈对net/http包的一点浅显的理解,文中如有错误的地方请前辈们指出,以免误导! 转摘本文也请注明出处:Go语言备忘录:net/http包的使用模式和源码解析,多谢! 目录: 一.http ...
- Dubbo原理和源码解析之服务引用
一.框架设计 在官方<Dubbo 开发指南>框架设计部分,给出了引用服务时序图: 另外,在官方<Dubbo 用户指南>集群容错部分,给出了服务引用的各功能组件关系图: 本文将根 ...
- Dubbo原理和源码解析之标签解析
一.Dubbo 配置方式 Dubbo 支持多种配置方式: XML 配置:基于 Spring 的 Schema 和 XML 扩展机制实现 属性配置:加载 classpath 根目录下的 dubbo.pr ...
- Dubbo原理和源码解析之“微内核+插件”机制
github新增仓库 "dubbo-read"(点此查看),集合所有<Dubbo原理和源码解析>系列文章,后续将继续补充该系列,同时将针对Dubbo所做的功能扩展也进行 ...
- Dubbo原理和源码解析之服务暴露
github新增仓库 "dubbo-read"(点此查看),集合所有<Dubbo原理和源码解析>系列文章,后续将继续补充该系列,同时将针对Dubbo所做的功能扩展也进行 ...
- Go语言备忘录(3):net/http包的使用模式和源码解析
本文是晚辈对net/http包的一点浅显的理解,文中如有错误的地方请前辈们指出,以免误导! 转摘本文也请注明出处:Go语言备忘录(3):net/http包的使用模式和源码解析,多谢! 目录: 一.h ...
- Spring源码解析02:Spring IOC容器之XmlBeanFactory启动流程分析和源码解析
一. 前言 Spring容器主要分为两类BeanFactory和ApplicationContext,后者是基于前者的功能扩展,也就是一个基础容器和一个高级容器的区别.本篇就以BeanFactory基 ...
- Spring源码解析 | 第二篇:Spring IOC容器之XmlBeanFactory启动流程分析和源码解析
一. 前言 Spring容器主要分为两类BeanFactory和ApplicationContext,后者是基于前者的功能扩展,也就是一个基础容器和一个高级容器的区别.本篇就以BeanFactory基 ...
- rest-framework之视图和源码解析
视图和源码解析 通过使用mixin类编写视图: from rest_framework import mixins from rest_framework import generics class ...
随机推荐
- java8 探讨与分析匿名内部类、lambda表达式、方法引用的底层实现
问题解决思路:查看编译生成的字节码文件 目录 测试匿名内部类的实现 小结 测试lambda表达式 小结 测试方法引用 小结 三种实现方式的总结 对于lambda表达式,为什么java8要这样做? 理论 ...
- java关于传值与传引用
关于java传值还是传引用的问题经常出现在一些烦人的面试题中,主要考察个人对java基础的掌握情况. 首先明确一下:本地方法中,java的参数传递都是传值.但是如果是远程调用方法时,会将对象本身传递过 ...
- Python 简明教程 --- 15,Python 函数
微信公众号:码农充电站pro 个人主页:https://codeshellme.github.io 测试只能证明程序有错误,而不能证明程序没有错误. -- Edsger Dijkstra 目录 本节我 ...
- 理解与使用Javascript中的回调函数
在Javascript中,函数是第一类对象,这意味着函数可以像对象一样按照第一类管理被使用.既然函数实际上是对象:它们能被“存储”在变量中,能作为函数参数被传递,能在函数中被创建,能从函数中返回. 因 ...
- 让IE下载跟迅雷一样快?
网络上搜的没试过... 修改IE支持多线程即可: HKEY_CURRENT_USER\Software\Microsoft\Windows\CurrentVersion\Internet Settin ...
- 数据解析_xpath
重点推荐这种解析方式,xpath是最常用且最便捷高效的一种解析方式,通用性 1.解析原理 1.实例化一个etree的对象,且需要将被解析的页面源码数据加载到改对象中. 2.调用etree对象中的xpa ...
- CentOS7下普通账号通过systemctl管理服务需要输入root密码问题
问题描述: 使用普通账号test通过systemctl启动系统服务提示需要输入root密码: 解决方案: 根据上面提示得知权限由polkit进行管理,对应的是org.freedesktop.syste ...
- [Python] datetime.timedelta模块用法
python使用datetime模块timedelta实现日期时间相加: python计算明天的日期: from datetime import datetime from datetime impo ...
- css3渐进增强 VS 优雅降级
印象中,渐进增强和优雅降级这两个概念是在 CSS3 出现之后火起来的.由于低级浏览器不支持 CSS3,但是 CSS3 特效太优秀不忍放弃,所以在高级浏览器中使用CSS3,而在低级浏览器只保证最基本的功 ...
- Codeforces 1215D Ticket Game 题解
Codeforces 1215D Ticket Game 原题 题目 Monocarp and Bicarp live in Berland, where every bus ticket consi ...