SpringBoot整合Apache-CXF实践
一、Apache CXF是什么?
Apache CXF 是一个开源的 Services 框架,CXF 帮助您利用 Frontend 编程 API 来构建和开发 Services ,像 JAX-WS 。这些 Services 可以支持多种协议,比如:SOAP、XML/HTTP、RESTful HTTP 或者 CORBA ,并且可以在多种传输协议上运行,比如:HTTP、JMS 或者 JBI,CXF 大大简化了 Services 的创建,同时它继承了 XFire 传统,一样可以天然地和 Spring 进行无缝集成。
二、SpringBoot整合Apache CXF实践例子
本次例子为Client-Server(客户端-服务端)。还是以我最喜欢的Blog为例。
本次涉及两个项目,一个是blog-cxf-client,另外一个是blog-cxf-server。
1.blog-cxf-server
(1)导入Maven依赖
<dependencies>

    <!-- SpringBoot Web -->

    <dependency>

        <groupId>org.springframework.boot</groupId>

        <artifactId>spring-boot-starter-web</artifactId>

    </dependency>

    <!-- CXF webservice -->

    <dependency>

        <groupId>org.apache.cxf</groupId>

        <artifactId>cxf-spring-boot-starter-jaxws</artifactId>

        <version>3.2.4</version>

    </dependency>

    <!-- Lombok-->

    <dependency>

        <groupId>org.projectlombok</groupId>

        <artifactId>lombok</artifactId>

        <optional>true</optional>

    </dependency>

    <dependency>

        <artifactId>blog-cxf-server</artifactId>

        <groupId>com.blog.cxf</groupId>

        <version>1.0</version>

    </dependency>

</dependencies>
(2)编写相关代码
a.编写主类
package com.blog.cxf.server;

import org.springframework.boot.SpringApplication;

import org.springframework.boot.autoconfigure.SpringBootApplication;

import org.springframework.boot.autoconfigure.jdbc.DataSourceAutoConfiguration;

/**

 * @description:

 * @author: youcong

 * @time: 2020/10/24 22:30

 */

@SpringBootApplication(exclude = {DataSourceAutoConfiguration.class})

public class BlogCxfServerApplication {

    public static void main(String[] args) {

        SpringApplication.run(BlogCxfServerApplication.class, args);

        System.out.println("====启动Blog Cxf Server====");

    }

}
b.编写application.yml配置文件
# Tomcat

server:

  tomcat:

    uri-encoding: UTF-8

    #最小线程数

    min-spare-threads: 500

    #最大线程数

    max-threads: 2500

    #最大连接数

    max-connections: 5000

    #最大等待队列长度

    accept-count: 1000

    #请求头最大长度kb

    max-http-header-size: 1048576

    #启动APR(非阻塞IO)

    protocol: org.apache.coyote.http11.Http11AprProtocol

  port: 9090

# Spring

spring:

  application:

    # 应用名称

    name: blog-cxf-server

cxf:

  path: /cxf
c.编写service代码
UserService.java
package com.blog.cxf.server.service;

import com.blog.cxf.server.dto.UserReqDto;

import javax.jws.WebParam;

import javax.jws.WebService;

/**

 * @description:

 * @author: youcong

 * @time: 2020/10/24 22:32

 */

@WebService(targetNamespace = "http://service.server.cxf.blog.com/")

public interface UserService {

    /**

     * 添加用户

     * @param email

     * @param username

     * @param password

     * @return

     */

    int addUser(@WebParam(name = "email") String email, @WebParam(name = "username") String username, @WebParam(name = "password") String password);

    /**

     * 更新用户信息

     * @param userReqDto

     * @return

     */

    int updateUser(@WebParam(name="user")UserReqDto userReqDto);

}
UserServiceImpl.java
package com.blog.cxf.server.service.impl;

import com.blog.cxf.server.dto.UserReqDto;

import com.blog.cxf.server.service.UserService;

import org.springframework.stereotype.Component;

import javax.jws.WebService;

/**

 * @description:

 * @author: youcong

 * @time: 2020/10/24 22:35

 */

@WebService(serviceName = "userService",//对外发布的服务名

        targetNamespace = "http://service.server.cxf.blog.com/",//指定你想要的名称空间,通常使用使用包名反转

        endpointInterface = "com.blog.cxf.server.service.UserService")

@Component

public class UserServiceImpl implements UserService {

    public int addUser(String email, String username, String password) {

        System.out.println("注册用户:"+email);

        return 1;

    }

    public int updateUser(UserReqDto userReqDto) {

        return 1;

    }

}
数据传输类(UserReqDto.java):
package com.blog.cxf.server.dto;

import lombok.Data;

/**

 * @description:

 * @author: youcong

 * @time: 2020/10/24 22:49

 */

@Data

public class UserReqDto {

    private Long ID;

    private String email;

    private String username;

    private String password;

}
c.编写配置类(服务发布)
package com.blog.cxf.server.config;

import com.blog.cxf.server.service.UserService;

import com.blog.cxf.server.service.impl.UserServiceImpl;

import org.apache.cxf.Bus;

import org.apache.cxf.bus.spring.SpringBus;

import org.apache.cxf.jaxws.EndpointImpl;

import org.springframework.context.annotation.Bean;

import org.springframework.context.annotation.Configuration;

/**

 * @description:

 * @author: youcong

 * @time: 2020/10/24 22:37

 */

@Configuration

public class CxfConfig {

    @Bean(name = Bus.DEFAULT_BUS_ID)

    public SpringBus springBus() {

        return new SpringBus();

    }

    @Bean

    public UserService userService() {

        return new UserServiceImpl();

    }

    /**

     * 发布服务并指定访问URL

     * @return

     */

    @Bean

    public EndpointImpl userEnpoint() {

        EndpointImpl endpoint = new EndpointImpl(springBus(), userService());

        endpoint.publish("/user");

        return endpoint;

    }

}
(3)启动BlogCxfServerApplication主类并访问对应的WSDL
访问路径:
http://localhost:9090/cxf/user?wsdl
截图效果:
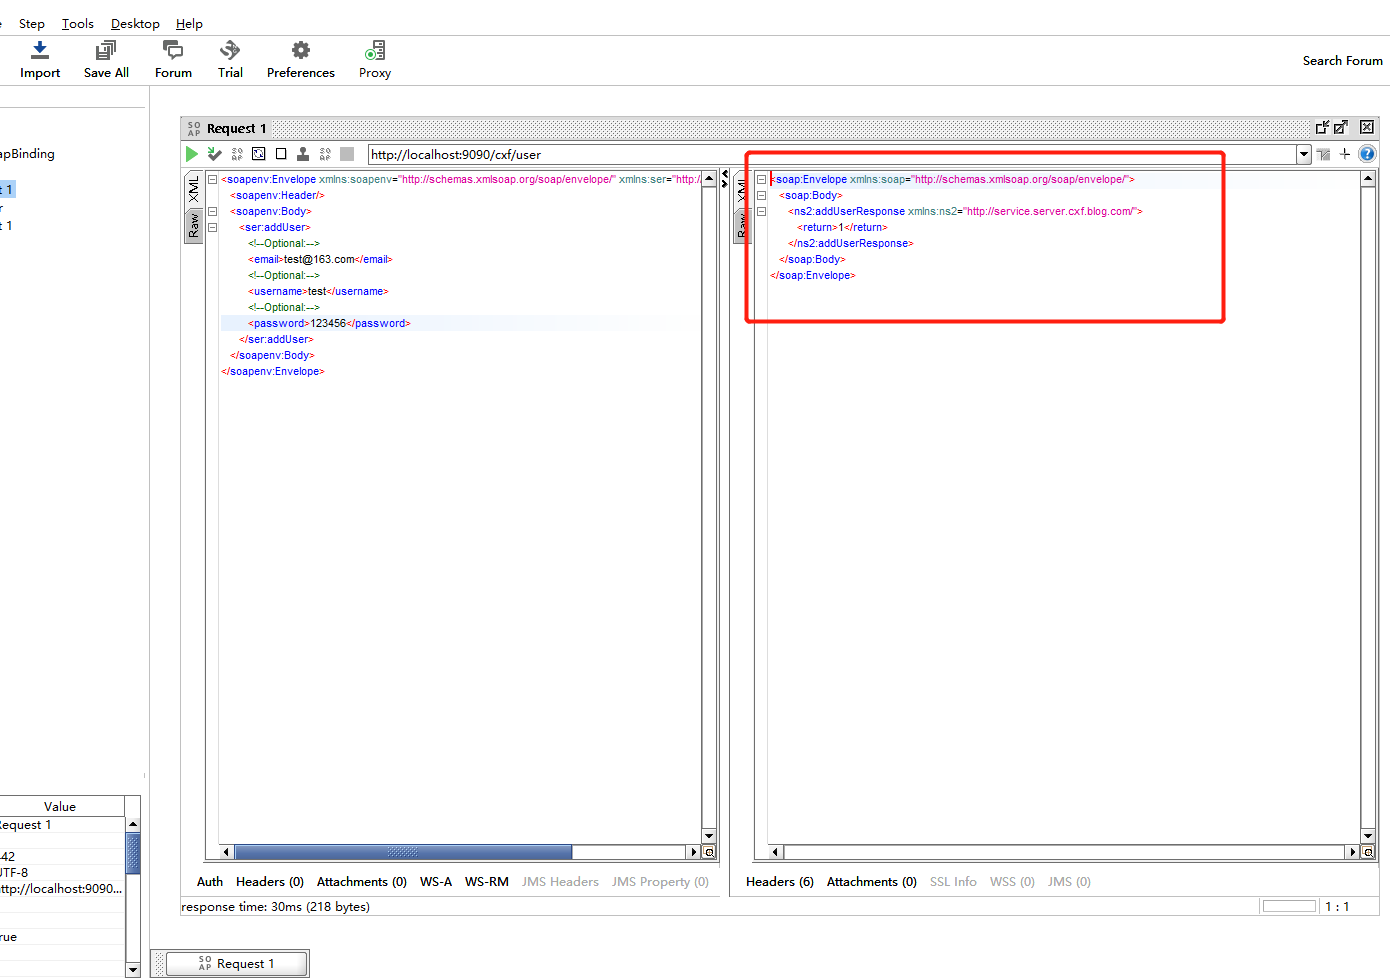
使用SOAP-UI工具进行测试: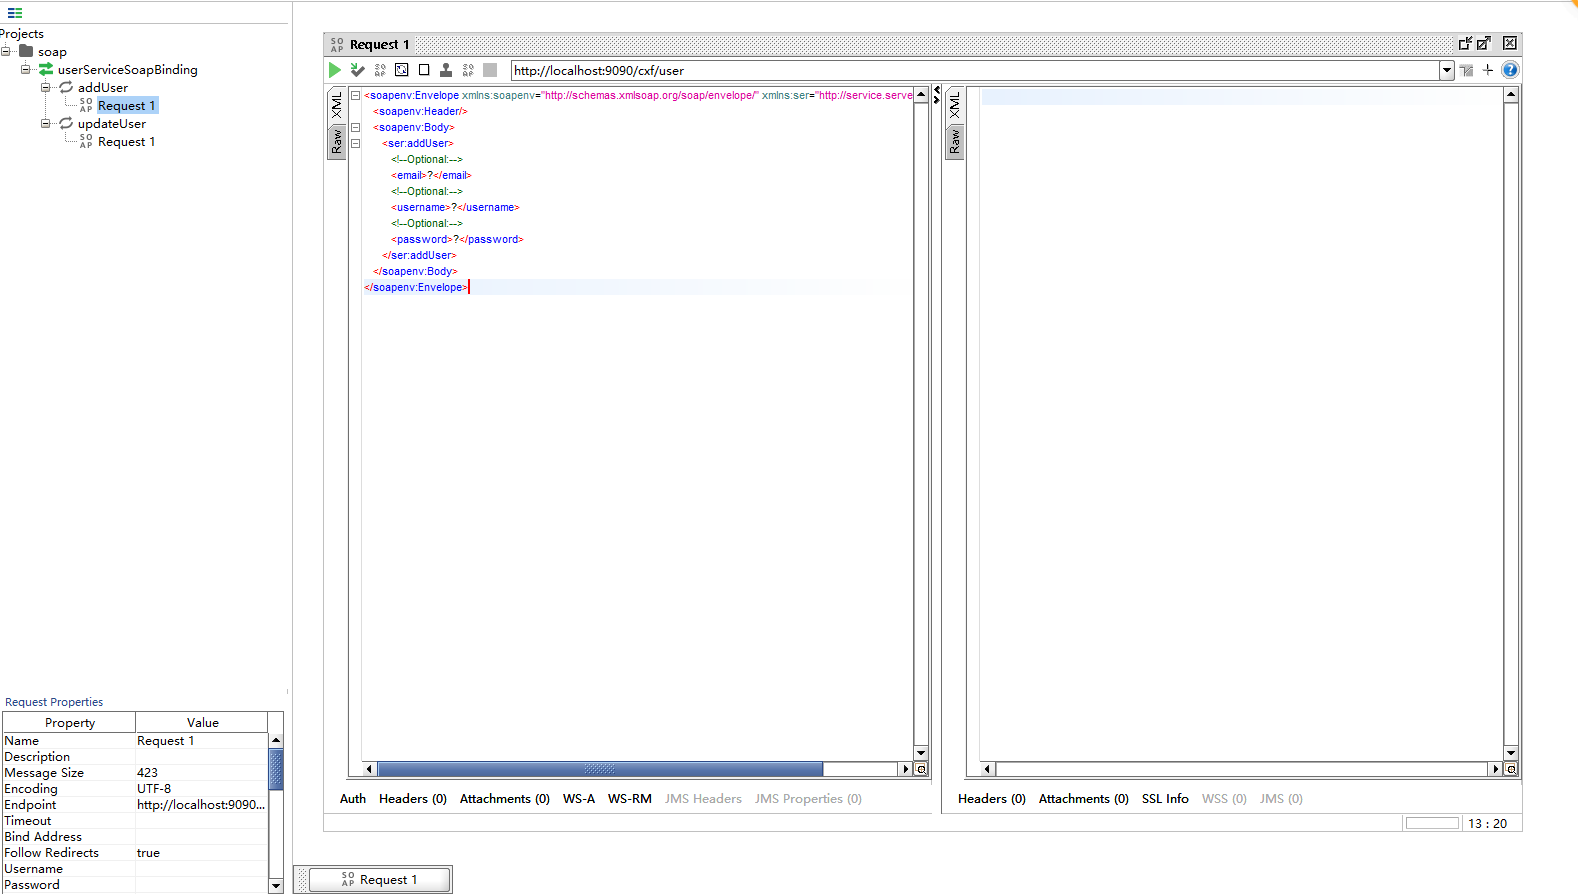
2.blog-cxf-client
(1)导入Maven依赖
<?xml version="1.0" encoding="UTF-8"?>

<project xmlns="http://maven.apache.org/POM/4.0.0"

         xmlns:xsi="http://www.w3.org/2001/XMLSchema-instance"

         xsi:schemaLocation="http://maven.apache.org/POM/4.0.0 http://maven.apache.org/xsd/maven-4.0.0.xsd">

    <parent>

        <artifactId>blog-cxf</artifactId>

        <groupId>com.blog.cxf</groupId>

        <version>1.0</version>

    </parent>

    <modelVersion>4.0.0</modelVersion>

    <artifactId>blog-cxf-client</artifactId>

    <dependencies>

        <!-- SpringBoot Web -->

        <dependency>

            <groupId>org.springframework.boot</groupId>

            <artifactId>spring-boot-starter-web</artifactId>

        </dependency>

        <!-- CXF webservice -->

        <dependency>

            <groupId>org.apache.cxf</groupId>

            <artifactId>cxf-spring-boot-starter-jaxws</artifactId>

            <version>3.2.4</version>

        </dependency>

        <!-- Lombok-->

        <dependency>

            <groupId>org.projectlombok</groupId>

            <artifactId>lombok</artifactId>

            <optional>true</optional>

        </dependency>

        <dependency>

            <artifactId>blog-cxf-server</artifactId>

            <groupId>com.blog.cxf</groupId>

            <version>1.0</version>

        </dependency>

    </dependencies>

</project>
(2)编写主类
package com.blog.cxf.client;

import org.springframework.boot.SpringApplication;

import org.springframework.boot.autoconfigure.SpringBootApplication;

import org.springframework.boot.autoconfigure.jdbc.DataSourceAutoConfiguration;

/**

 * @description:

 * @author: youcong

 * @time: 2020/10/24 23:35

 */

@SpringBootApplication(exclude = {DataSourceAutoConfiguration.class})

public class BlogCxfClientApplication {

    public static void main(String[] args) {

        SpringApplication.run(BlogCxfClientApplication.class, args);

        System.out.println("====启动Blog Cxf Client====");

    }

}
(3)编写application.yml
# Tomcat

server:

  tomcat:

    uri-encoding: UTF-8

    #最小线程数

    min-spare-threads: 500

    #最大线程数

    max-threads: 2500

    #最大连接数

    max-connections: 5000

    #最大等待队列长度

    accept-count: 1000

    #请求头最大长度kb

    max-http-header-size: 1048576

    #启动APR(非阻塞IO)

    protocol: org.apache.coyote.http11.Http11AprProtocol

  port: 9091

# Spring

spring:

  application:

    # 应用名称

    name: blog-cxf-client
(4)编写Controller
package com.blog.cxf.client.controller;

import com.blog.cxf.server.dto.UserReqDto;

import com.blog.cxf.server.service.UserService;

import org.apache.cxf.jaxws.JaxWsProxyFactoryBean;

import org.springframework.web.bind.annotation.*;

/**

 * @description:

 * @author: youcong

 * @time: 2020/10/24 23:37

 */

@RestController

@RequestMapping("/user")

public class UserApiController {

    @PostMapping("/add")

    public int add(@RequestParam String email, @RequestParam String username, @RequestParam String password) {

        try {

            // 接口地址

            String address = "http://127.0.0.1:9090/cxf/user?wsdl";

            // 代理工厂

            JaxWsProxyFactoryBean jaxWsProxyFactoryBean = new JaxWsProxyFactoryBean();

            // 设置代理地址

            jaxWsProxyFactoryBean.setAddress(address);

            // 设置接口类型

            jaxWsProxyFactoryBean.setServiceClass(UserService.class);

            // 创建一个代理接口实现

            UserService userService = (UserService) jaxWsProxyFactoryBean.create();

            return userService.addUser(email, username, password);

        } catch (Exception e) {

            e.printStackTrace();

            return -1;

        }

    }

}
注意:
实际中这段代码应该放在blog-cxf-server里面的Controller,然后客户端通过http-client或者其它http工具包进行请求。
还有如果是服务是都在一起,可按照maven依赖导入的方式来实现两个不同项目进行调用。
(5)使用PostMan测试
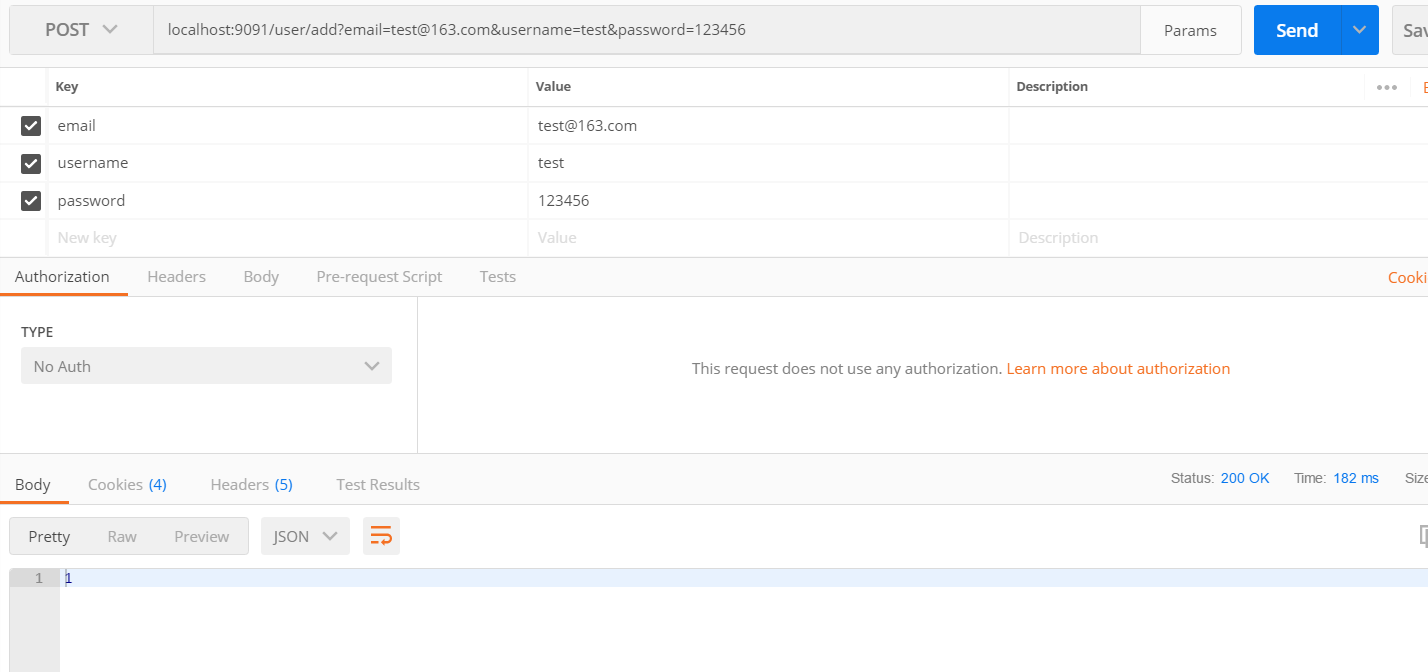
接着服务端控制台会打印如下:
三、代码例子
代码例子已上传到我的GitHub上。
代码地址:
https://github.com/developers-youcong/blog-cxf
SpringBoot整合Apache-CXF实践的更多相关文章
- springboot整合apache ftpserver详细教程(看这一篇就够了)
原创不易,如需转载,请注明出处https://www.cnblogs.com/baixianlong/p/12192425.html,否则将追究法律责任!!! 一.Apache ftpserver相关 ...
- Spring 3 整合Apache CXF WebService[转]
http://www.cnblogs.com/hoojo/archive/2012/07/13/2590593.html 在CXF2版本中,整合Spring3发布CXF WebService就更加简单 ...
- springboot 整合apache shiro
这几天因为项目需要,学习了下shiro,由此留下一些记录,也希望对初学shiro的朋友有帮助. springboot 是这两年新兴起来的一个项目,它的出现是为了减少springmvc开发过程中需要引入 ...
- SpringBoot整合Apache Shiro权限验证框架
比较常见的权限框架有两种,一种是Spring Security,另一种是Apache Shiro,两种框架各有优劣,个人感觉Shiro更容易使用,更加灵活,也更符合RABC规则,而且是java官方更推 ...
- SpringBoot整合Redis初实践
Redis是一个开源(BSD许可),内存存储的数据结构服务器,可用作数据库,高速缓存和消息队列代理. 有时,为了提升整个网站的性能,在开发时会将经常访问的数据进行缓存,这样在调用这个数据接口时,可以提 ...
- SpringBoot整合Apache Shiro
Subject 用户主体 (把操作交给SecurityManager)SecurityManager 安全管理器 (关联Realm)Realm Shiro连接数据的桥梁 引入maven依赖 < ...
- springboot 整合 CXF 版本异常 java.lang.NoClassDefFoundError:ServletRegistrationBean
在使用SpringBoot 项目整合webservice组件 CXF的时候,在启动时,抛出异常如下,查阅资料初步判断为版本问题.升级到高版本后正常启动. cxf 刚开始使用版本 3.1.7 后更新为 ...
- Springboot整合cxf后不能访问controller,不能访问接口
参考版本 springboot 1.4.X <=========> cxf-spring-boot-starter-jaxws 3.1.X springboot 1.5.X <=== ...
- SpringBoot整合Mybatis注解版---update出现org.apache.ibatis.binding.BindingException: Parameter 'XXX' not found. Available parameters are [arg1, arg0, param1, param2]
SpringBoot整合Mybatis注解版---update时出现的问题 问题描述: 1.sql建表语句 DROP TABLE IF EXISTS `department`; CREATE TABL ...
随机推荐
- switch-case 选择语句
0. 语句模型 Go 里的选择语句模型是这样的 switch 表达式 { case 表达式1: 代码块 case 表达式2: 代码块 case 表达式3: 代码块 case 表达式4: 代码块 cas ...
- 栈帧的内部结构--动态返回地址(Return Address)
每个栈帧中包含: 局部变量表(Local Variables) 操作数栈(Opreand Stack) 或表达式栈 动态链接 (Dynamic Linking) (或指向运行时常量的方法引用) 动态返 ...
- 注解在Spring中的运用(对象获取、对象单例/多例、值的注入、初始化/销毁方法、获取容器)
1.注解的方式获取对象 (1)导包: (2)书写配置文件(要保证已经导入了约束): <?xml version="1.0" encoding="UTF-8" ...
- 实战:一种在http请求中使用protobuffer+nginx+lua收集打点日志的方案
背景 app打点日志的上报和收集,是互联网公司的基本需求. 一.方案选择 1.1 protobuffer vs json 探究一种以最高效的方式上报和解析打点数据是一个系统性的问题,需要解决的子问题有 ...
- RESTful API 编写规范
RESTful API 编写规范 在一个RESTful系统里,客户端向服务端发起索取资源的操作只能通过HTTP协议语义来进行交互.最常用的HTTP协议语义有以下5个: GET GET:发送一条或者多条 ...
- spring多模块之间的调用
https://blog.csdn.net/tomcat_2014/article/details/50206197?locationNum=5
- Hadoop框架:HDFS读写机制与API详解
本文源码:GitHub·点这里 || GitEE·点这里 一.读写机制 1.数据写入 客户端访问NameNode请求上传文件: NameNode检查目标文件和目录是否已经存在: NameNode响应客 ...
- windows 10 启动修复无法自动修复此计算机
1. 失败后有两个选项卡:关机和高级选项,选择高级选项 2. 然后选择疑难解答 3. 选择高级选项 4. 选择回退到以前的版本 接下来需要登录,选择恢复到上一次正常启动的状态,注意选择保留数据,会有提 ...
- 在KEIL下查看单片机编程内存使用情况
原文链接:https://blog.csdn.net/D_azzle/article/details/83410141 截至到目前为止,本人接触单片机也有将近一年的时间.这一年以来也接触过了很具代表性 ...
- 【原创】经验分享:一个小小emoji尽然牵扯出来这么多东西?
前言 之前也分享过很多工作中踩坑的经验: 一个线上问题的思考:Eureka注册中心集群如何实现客户端请求负载及故障转移? [原创]经验分享:一个Content-Length引发的血案(almost.. ...