基于XMPP的IOS聊天客户端程序
简介:XMPP协议是一种基于Socket长连接、以XML格式进行基本信息交换、C/S S/S多种架构的聊天协议
XMPPServer 基于XMPP协议的服务端(例如eJabber、OpenFire)
openfire服务器安装和配置连接地址: http://www.cnblogs.com/hoojo/archive/2012/05/17/2506769.html
一.框架导入
1.在header search Path 中 添加 /user/include/libxml2
2.添加libxml2.dylib与libresolv.dylib
3.拷贝源码目录下的 Authentication Categories Core 和 Utilities 到项目根目录下并添加到项目中
二.核心库
1.XMPPStream 核心中的核心:xml流
2.XMPPElement xml基本元素/stanza
3.XMPPIQ 查询节点 Info/Query的缩写 类似于HTTP请求
4.XMPPJID 用户的标识/身份证
5.XMPPMessage 基本消息节点(XML)
6.XMPPPresence 出席节点(XML)
7.XMPPParser XML解析,Core中唯一一个不太重要的类
8.XMPPModule 各种功能模块的基类,继承它的模块均需在xmppStream中激活,基于多播代理,可添加多个委托实例
三.扩展库
1.XMPPRoster好友列表
2.XMPPReconnect重连
3.ProcessOne推送通知与快速重连
4.XMPPBandwidthMonitor 带宽监视
5.XMPPFileTransfer文件传输
6.XMPPRoom(XEP-0045)聊天室
7.XMPPvCard(XEP--0054)个人资料/名片
8.XMPPResultSet(XEP-0059)XML中的结果集
9.XMPPPubSub(XEP-0060) 发布/订阅模块
10.XMPPRegistration(XEP-0077)注册与密码修改
11.XMPPMessage+XEP_0085消息节点的聊天状态扩展
12.XMPPMessageArchiving(XEP-0136)聊天记录同步
13.XMPPMessageDeliveryReceipts(XEP-0184)接受消息回执
14.XMPPBlocking(XEP-0191)黑名单/屏蔽用户
15.XMPPStreamManagement(XEP-0198)XML流恢复(区别于Reconnect)
16.XMPPAutoPing(XEP-0199)心跳检测
17.XMPPAutoTime(XEP-0202)时间比对
18.NSXMLElement+XEP_0203(DelayedMessage)延迟消息
19.XMPPAttentionModule(XEP-0224)引起对方注意的消息模块,需激活
20.XMPPMessageCarbons(XEP-0280)同一个用户多设备登陆(jid的资源部分不同)时的消息多发
21.NSXMLElement+XEP_0297 XML节点扩展--消息转发
22.XMPPMessage+XEP_0308一种特殊消息:对已经发送的某条消息进行更改/订正
23.XMPPMessage+XEP_0333更佳先进的消息回执 Message的分类
24.XMPPElement+JSON(XEP-0335)在XML节点中插入JSON
四.xmpp建立连接并登录
1.新建一个 XMPPStream 对象,添加委托
添加委托方法 - (void)addDelegate:(id)delegate delegateQueue:(dispatch_queue_t)delegateQueue
参数 delegateQueue 为委托回调所使用的 GCD 队列,dispatch_get_main_queue() 获取主线程 GCD 队列
2.XMPPJid
JID 一般由三部分构成:用户名,域名和资源名,例如 test@example.com/Anthony 如果没有设置主机名,则使用 JID 的域名作为主机名 端口号是可选的,默认是 5222
3.身份认证
实现 - (void)xmppStreamDidConnect:(XMPPStream *)sender 委托方法
连接服务器成功后,回调该方法
身份认证方法 - (BOOL)authenticateWithPassword:(NSString *)inPassword error:(NSError **)errPtr
4.上线
实现 - (void)xmppStreamDidAuthenticate:(XMPPStream *)sender 委托方法 身份认证成功后,回调该方法 新建一个 XMPPPresence 对象,类型为 available,发送!
5.退出并断开连接
新建一个 XMPPPresence 对象,类型为 unavailable,发送!
断开连接
五.XMPP注册
1.判断xmpp否连接,是否带注册支持
[[self appDelegate] xmppStream] isConnected] && [[[self appDelegate]xmppStream] supportsInBandRegistration]
2.开始注册
设置myjid和密码 1.setMyJID 2.registerWithPassword
六.好友列表
1. 获取好友列表
注意本地数据库缓存 NSManagedObjectContext *context = [[[self appDelegate] xmppRosterStorage] mainThreadManagedObjectContext];
NSEntityDescription *entity = [NSEntityDescription entityForName:@"XMPPUserCoreDataStorageObject" inManagedObjectContext:context]; NSFetchRequest *request = [[NSFetchRequest alloc]init];
[request setEntity:entity];
NSError *error ;
NSArray *friends = [context executeFetchRequest:request error:&error];
2.对方添加好友时 更新列表 // 已经互为好友以后,会回调此
- (void)xmppRoster:(XMPPRoster *)sender didReceiveRosterItem:(NSXMLElement *)item {
NSString *subscription = [item attributeStringValueForName:@"subscription"];
if ([subscription isEqualToString:@"both"]) {
NSLog(@"双方已经互为好友");
if (self.buddyListBlock) {
// 更新好友列表
}
}
}
七.xmpp添加好友
[[[self appDelegate] xmppRoster] addUser:[XMPPJID jidWithString:@"admin@127.0.0.1"] withNickname:@"admin"];
八.xmpp发送消息和接收消息
1.发送消息
我们需要根据 XMPP 协议,将数据放到 标签内,例如:
Hello World!
- (void)sendMessage:(NSString *) message toUser:(NSString *) user {
NSXMLElement *body = [NSXMLElement elementWithName:@"body"];
[body setStringValue:message];
NSXMLElement *message = [NSXMLElement elementWithName:@"message"];
[message addAttributeWithName:@"type" stringValue:@"chat"];
NSString *to = [NSString stringWithFormat:@"%@@example.com", user];
[message addAttributeWithName:@"to" stringValue:to];
[message addChild:body];
[self.xmppStream sendElement:message];
}
2.接收消息
当接收到 标签的内容时,XMPPFramework 框架回调该方法
根据 XMPP 协议,消息体的内容存储在标签 内
(void)xmppStream:(XMPPStream *)sender didReceiveMessage:(XMPPMessage *)message {
NSString *messageBody = [[message elementForName:@"body"] stringValue];
}
为了方便程序调用,我们把XMPP的一些主要方法写在AppDelegate中
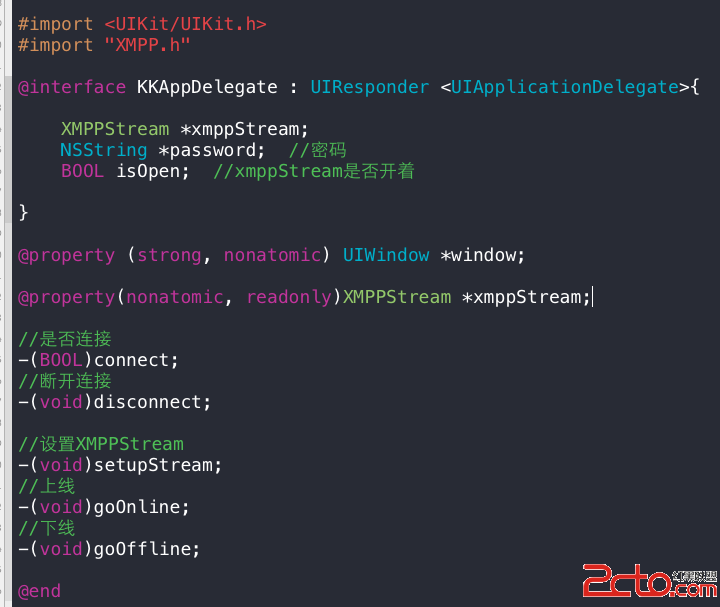
在AppDelegate.m下这几个方法为:
-(void)setupStream{

    //初始化XMPPStream

    xmppStream = [[XMPPStream alloc] init];

    [xmppStream addDelegate:self delegateQueue:dispatch_get_current_queue()];

}

-(void)goOnline{

    //发送在线状态

    XMPPPresence *presence = [XMPPPresence presence];

    [[self xmppStream] sendElement:presence];

}

-(void)goOffline{

    //发送下线状态

    XMPPPresence *presence = [XMPPPresence presenceWithType:@"unavailable"];

    [[self xmppStream] sendElement:presence];

}

-(BOOL)connect{

    [self setupStream];

    //从本地取得用户名,密码和服务器地址

    NSUserDefaults *defaults = [NSUserDefaults standardUserDefaults];

    NSString *userId = [defaults stringForKey:USERID];

    NSString *pass = [defaults stringForKey:PASS];

    NSString *server = [defaults stringForKey:SERVER];

    if (![xmppStream isDisconnected]) {

        return YES;

    }

    if (userId == nil || pass == nil) {

        return NO;

    }

    //设置用户

    [xmppStream setMyJID:[XMPPJID jidWithString:userId]];

    //设置服务器

    [xmppStream setHostName:server];

    //密码

    password = pass;

    //连接服务器

    NSError *error = nil;

    if (![xmppStream connect:&error]) {

        NSLog(@"cant connect %@", server);

        return NO;

    }

    return YES;

}

-(void)disconnect{

    [self goOffline];

    [xmppStream disconnect];

}

-(void)setupStream{

    //初始化XMPPStream

    xmppStream = [[XMPPStream alloc] init];

    [xmppStream addDelegate:self delegateQueue:dispatch_get_current_queue()];

}

-(void)goOnline{

    //发送在线状态

    XMPPPresence *presence = [XMPPPresence presence];

    [[self xmppStream] sendElement:presence];

}

-(void)goOffline{

    //发送下线状态

    XMPPPresence *presence = [XMPPPresence presenceWithType:@"unavailable"];

    [[self xmppStream] sendElement:presence];

}

-(BOOL)connect{

    [self setupStream];

    //从本地取得用户名,密码和服务器地址

    NSUserDefaults *defaults = [NSUserDefaults standardUserDefaults];

    NSString *userId = [defaults stringForKey:USERID];

    NSString *pass = [defaults stringForKey:PASS];

    NSString *server = [defaults stringForKey:SERVER];

    if (![xmppStream isDisconnected]) {

        return YES;

    }

    if (userId == nil || pass == nil) {

        return NO;

    }

    //设置用户

    [xmppStream setMyJID:[XMPPJID jidWithString:userId]];

    //设置服务器

    [xmppStream setHostName:server];

    //密码

    password = pass;

    //连接服务器

    NSError *error = nil;

    if (![xmppStream connect:&error]) {

        NSLog(@"cant connect %@", server);

        return NO;

    }

    return YES;

}

-(void)disconnect{

    [self goOffline];

    [xmppStream disconnect];

}这几个是基础方法,接下来就是XMPPStreamDelegate中的方法,也是接受好友状态,接受消息的重要方法

[objectc]

//连接服务器

- (void)xmppStreamDidConnect:(XMPPStream *)sender{

    isOpen = YES;

    NSError *error = nil;

    //验证密码

    [[self xmppStream] authenticateWithPassword:password error:&error];

}

//验证通过

- (void)xmppStreamDidAuthenticate:(XMPPStream *)sender{

    [self goOnline];

}

//收到消息

- (void)xmppStream:(XMPPStream *)sender didReceiveMessage:(XMPPMessage *)message{

//    NSLog(@"message = %@", message);

    NSString *msg = [[message elementForName:@"body"] stringValue];

    NSString *from = [[message attributeForName:@"from"] stringValue];

    NSMutableDictionary *dict = [NSMutableDictionary dictionary];

    [dict setObject:msg forKey:@"msg"];

    [dict setObject:from forKey:@"sender"];

    //消息委托(这个后面讲)

    [messageDelegate newMessageReceived:dict];

}

//收到好友状态

- (void)xmppStream:(XMPPStream *)sender didReceivePresence:(XMPPPresence *)presence{

//    NSLog(@"presence = %@", presence);

    //取得好友状态

    NSString *presenceType = [presence type]; //online/offline

    //当前用户

    NSString *userId = [[sender myJID] user];

    //在线用户

    NSString *presenceFromUser = [[presence from] user];

    if (![presenceFromUser isEqualToString:userId]) {

        //在线状态

        if ([presenceType isEqualToString:@"available"]) {

            //用户列表委托(后面讲)

            [chatDelegate newBuddyOnline:[NSString stringWithFormat:@"%@@%@", presenceFromUser, @"nqc1338a"]];

        }else if ([presenceType isEqualToString:@"unavailable"]) {

            //用户列表委托(后面讲)

            [chatDelegate buddyWentOffline:[NSString stringWithFormat:@"%@@%@", presenceFromUser, @"nqc1338a"]];

        }

    }

}

这里面有两个委托方法,一个是用户列表委托,还有一个就是消息委托,用户列表委托主要就是取得在线用户,更新用户TableView,消息委托就是取得好友发送的消息,并更新消息TableView,当然这两个TableView是在不同的Controller中的

定义完两个委托,我们就要在不同的Controller中实现这两个委托了

在好友Controller中实现<KKChatDelegate>并写入如下方法

[java]

//取得当前程序的委托

-(KKAppDelegate *)appDelegate{

    return (KKAppDelegate *)[[UIApplication sharedApplication] delegate];

}

//取得当前的XMPPStream

-(XMPPStream *)xmppStream{

    return [[self appDelegate] xmppStream];

}

//在线好友

-(void)newBuddyOnline:(NSString *)buddyName{

    if (![onlineUsers containsObject:buddyName]) {

        [onlineUsers addObject:buddyName];

        [self.tView reloadData];

    }

}

//好友下线

-(void)buddyWentOffline:(NSString *)buddyName{

    [onlineUsers removeObject:buddyName];

    [self.tView reloadData];

}

在viewDidLoad中加入

[java]

//设定在线用户委托

    KKAppDelegate *del = [self appDelegate];

    del.chatDelegate = self;

//设定在线用户委托

    KKAppDelegate *del = [self appDelegate];

    del.chatDelegate = self;这两行代码,让好友列表的委托实现方法在本程序中

在viewWillAppear中加入

[java]

[super viewWillAppear:animated];

NSString *login = [[NSUserDefaults standardUserDefaults] objectForKey:@"userId"];

if (login) {

    if ([[self appDelegate] connect]) {

        NSLog(@"show buddy list");

    }

}else {

    //设定用户

    [self Account:self];

}

    [super viewWillAppear:animated];

    NSString *login = [[NSUserDefaults standardUserDefaults] objectForKey:@"userId"];

    if (login) {

        if ([[self appDelegate] connect]) {

            NSLog(@"show buddy list");

        }

    }else {

        //设定用户

        [self Account:self];

    }

判断本地保存的数据中是否有userId,没有的话就跳转到登录页面

这里最重要的就是connect了,这一句话就是登录了,成功的话,页面就会显示好友列表了。

[java]

#pragma mark UITableViewDelegate

-(void)tableView:(UITableView *)tableView didSelectRowAtIndexPath:(NSIndexPath *)indexPath{

    //start a Chat

    chatUserName = (NSString *)[onlineUsers objectAtIndex:indexPath.row];

    [self performSegueWithIdentifier:@"chat" sender:self];

}

-(void)prepareForSegue:(UIStoryboardSegue *)segue sender:(id)sender{

    if ([segue.identifier isEqualToString:@"chat"]) {

        KKChatController *chatController = segue.destinationViewController;

        chatController.chatWithUser = chatUserName;

    }

}

当显示出好友列表,我们选择一个好友进行聊天

将当前好友名称发送给聊天页面

下面是聊天Controller了

在KKChatController.h中加入

[java]

NSMutableArray *messages;

NSMutableArray *messages;这是我们要显示的消息,每一条消息为一条字典

接下来就是每一条消息的显示了

[java]

-(UITableViewCell *)tableView:(UITableView *)tableView cellForRowAtIndexPath:(NSIndexPath *)indexPath{

    static NSString *identifier = @"msgCell";

    UITableViewCell *cell = [tableView dequeueReusableCellWithIdentifier:identifier];

    if (cell == nil) {

        cell = [[UITableViewCell alloc] initWithStyle:UITableViewCellStyleSubtitle reuseIdentifier:identifier];

    }

    NSMutableDictionary *dict = [messages objectAtIndex:indexPath.row];

    cell.textLabel.text = [dict objectForKey:@"msg"];

    cell.detailTextLabel.text = [dict objectForKey:@"sender"];

    cell.accessoryType = UITableViewCellAccessoryNone;

    return cell;

}

跟上面好友Controller一样,这里我们也需要XMPPStream

[java]

-(KKAppDelegate *)appDelegate{

    return (KKAppDelegate *)[[UIApplication sharedApplication] delegate];

}

-(XMPPStream *)xmppStream{

    return [[self appDelegate] xmppStream];

}

-(KKAppDelegate *)appDelegate{

    return (KKAppDelegate *)[[UIApplication sharedApplication] delegate];

}

-(XMPPStream *)xmppStream{

    return [[self appDelegate] xmppStream];

}

在ViewDidLoad中加入

[java]

KKAppDelegate *del = [self appDelegate];

del.messageDelegate = self;

KKAppDelegate *del = [self appDelegate];

del.messageDelegate = self;

设定消息委托由自己来接收和处理

#pragma mark KKMessageDelegate

···objectc

-(void)newMessageReceived:(NSDictionary *)messageCotent{

    [messages addObject:messageCotent];

    [self.tView reloadData];

}

#pragma mark KKMessageDelegate

-(void)newMessageReceived:(NSDictionary *)messageCotent{

    [messages addObject:messageCotent];

    [self.tView reloadData];

}

接下来最重要的就是发送消息了

- (IBAction)sendButton:(id)sender {

    //本地输入框中的信息

    NSString *message = self.messageTextField.text;

    if (message.length > 0) {

        //XMPPFramework主要是通过KissXML来生成XML文件

        //生成<body>文档

        NSXMLElement *body = [NSXMLElement elementWithName:@"body"];

        [body setStringValue:message];

        //生成XML消息文档

        NSXMLElement *mes = [NSXMLElement elementWithName:@"message"];

        //消息类型

        [mes addAttributeWithName:@"type" stringValue:@"chat"];

        //发送给谁

        [mes addAttributeWithName:@"to" stringValue:chatWithUser];

        //由谁发送

        [mes addAttributeWithName:@"from" stringValue:[[NSUserDefaults standardUserDefaults] stringForKey:USERID]];

        //组合

        [mes addChild:body];

        //发送消息

        [[self xmppStream] sendElement:mes];

        self.messageTextField.text = @"";

        [self.messageTextField resignFirstResponder];

        NSMutableDictionary *dictionary = [NSMutableDictionary dictionary];

        [dictionary setObject:message forKey:@"msg"];

        [dictionary setObject:@"you" forKey:@"sender"];

        [messages addObject:dictionary];

        //重新刷新tableView

        [self.tView reloadData];

    }

}
基于XMPP的IOS聊天客户端程序的更多相关文章
- [iPhone高级] 基于XMPP的IOS聊天客户端程序(IOS端一)
介绍完了服务器,这篇我们就要介绍重点了,写我们自己的IOS客户端程序 先看一下我们完成的效果图 首先下载xmppframework这个框架,下载 点ZIP下载 接下来,用Xcode新建一个工程 将以下 ...
- c++下基于windows socket的服务器客户端程序(基于UDP协议)
前天写了一个基于tcp协议的服务器客户端程序,今天写了一个基于UDP协议的,由于在上一篇使用TCP协议的服务器中注释已经较为详细,且许多api的调用是相同的,故不再另外注释. 使用UDP协议需要注意几 ...
- 基于select的python聊天室程序
python网络编程具体参考<python select网络编程详细介绍>. 在python中,select函数是一个对底层操作系统的直接访问的接口.它用来监控sockets.files和 ...
- 基于 SailingEase WinForm Framework 开发客户端程序(3:实现菜单/工具栏按钮的解耦及状态控制)
本系列文章将详细阐述客户端应用程序的设计理念,实现方法. 本系列文章以 SailingEase WinForm Framework 为基础进行设计并实现,但其中的设计理念及方法,亦适用于任何类型的客 ...
- 基于 JavaFX 开发的聊天客户端 OIM-即时通讯
OIM 详细介绍 一.简介 OIM是一套即时通讯的聊天系统,在这里献给大家,一方面希望能够帮助对即时通讯有兴趣研究的朋友,希望我们能够共同进步,另一个就是希望能够帮助到需要即时通讯系统的朋友或者企业, ...
- 浏览器网页判断手机是否安装IOS/Android客户端程序
IOS 原理如下: 为HTML页面中的超链接点击事件增加一个setTimeout方法. 如果在iPhone上面500ms内,本机有应用程序能解析这个协议并打开程序,则这个回调方法失效: 如果本机没有应 ...
- [XMPP]iOS聊天软件学习笔记[四]
昨天完成了聊天界面,基本功能算告一段落 开发时间:五天(工作时间) 开发工具:xcode6 开发平台:iOS8 XMPP框架:XMPPFramework git clone https://githu ...
- [XMPP]iOS聊天软件学习笔记[三]
今天做了好友界面,其实xmpp内部已经写好很多扩展模块,所以使用起来还是很方便的 开发时间:五天(工作时间) 开发工具:xcode6 开发平台:iOS8 XMPP框架:XMPPFramework gi ...
- [XMPP]iOS聊天软件学习笔记[二]
@import url(http://i.cnblogs.com/Load.ashx?type=style&file=SyntaxHighlighter.css);@import url(/c ...
随机推荐
- Spring MVC异常处理详解
Spring MVC中异常处理的类体系结构 下图中,我画出了Spring MVC中,跟异常处理相关的主要类和接口. 在Spring MVC中,所有用于处理在请求映射和请求处理过程中抛出的异常的类,都要 ...
- 天气webservices
Web现状 Web服务 概念 具有web服务 构成 UDDI WSDL 天气预报 web服务现状 记的以前看VB.NET时中间就介绍了WSDL,而今又学到web服务,所以用天气预报的实例学习一 ...
- Windows Azure Web Site (15) 取消Azure Web Site默认的IIS ARR
<Windows Azure Platform 系列文章目录> 我们知道,Azure Web Site (改名为Azure Web App)默认是可以保留Session的.Azure We ...
- Windows Azure Cloud Service (41) 修改云服务IIS托管管道模式为4.0经典模式
<Windows Azure Platform 系列文章目录> 这是笔者在之前的项目中遇到的问题,做一下总结,给网友做参考. 在一般情况下,Visual Studio开发的Cloud Se ...
- linux专题一之文件归档和压缩(tar、file、zip)
本文主要从以下几个方便来说明文件的归档和压缩,同时比较几种不同压缩方法的压缩比率及特点. 文件归档命令tar,tar.gz源码包的安装管理 创建tar包-解压-查询tar包内容 zip命令的用法 为 ...
- 【转载】[C#]枚举操作(从枚举中获取Description,根据Description获取枚举,将枚举转换为ArrayList)工具类
关键代码: using System; using System.Collections; using System.Collections.Generic; using System.Compone ...
- [转]俞敏洪:我和马云就差了8个字... [来自: news.mbalib.com]
我和马云差了 8 个字:越败越战,愈挫愈勇. 马云,我真的非常的佩服他,首先佩服他的是他跟我有同样的经历,我考了 3 年才考上了大学:他也是考了 3 年.我比他还要幸运一点,我考上的是北大的本科,马云 ...
- HoverTree项目添加了查看留言列表功能
HoverTree项目添加了查看留言列表功能 页面:HoverTreeWeb项目下hvtpanel/usermessage/messagelist.aspx 添加留言页面:addmessage.asx ...
- C#连接Excel示例代码和驱动
代码如下: string fileExt = Path.GetExtension(excelPath); string conn = ""; if (fileExt == &quo ...
- Linux下的C编程实战
Linux下的C编程实战(一) ――开发平台搭建 1.引言 Linux操作系统在服务器领域的应用和普及已经有较长的历史,这源于它的开源特点以及其超越Windows的安全性和稳定性.而近年来, Linu ...