iOS 页面间几种传值方式(属性,代理,block,单例,通知)
第二个视图控制器如何获取第一个视图控制器的部分信息
例如 :第二个界面中的lable显示第一个界面textField中的文本
这就需要用到属性传值、block传值
那么第一个视图控制器如何获的第二个视图控制器的部分信息
例如:第一个界面中的lable显示第二个界面textField中的文本
这就需要使用代理传值
页面间传值有八大传值方式,下面我们就简单介绍下页面间常用的五种传值方式:
(一)属性传值
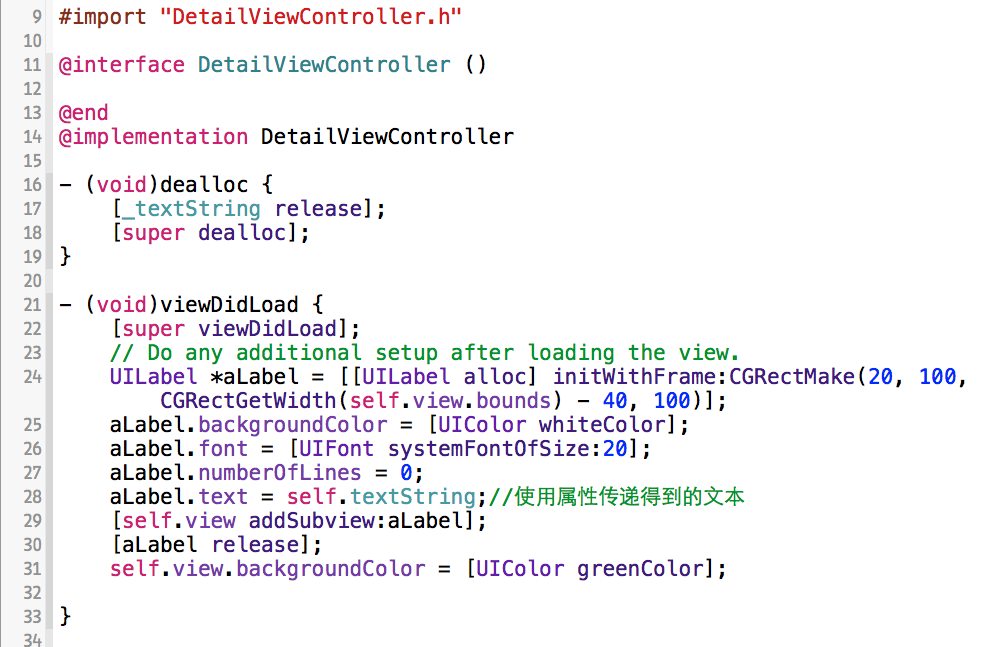
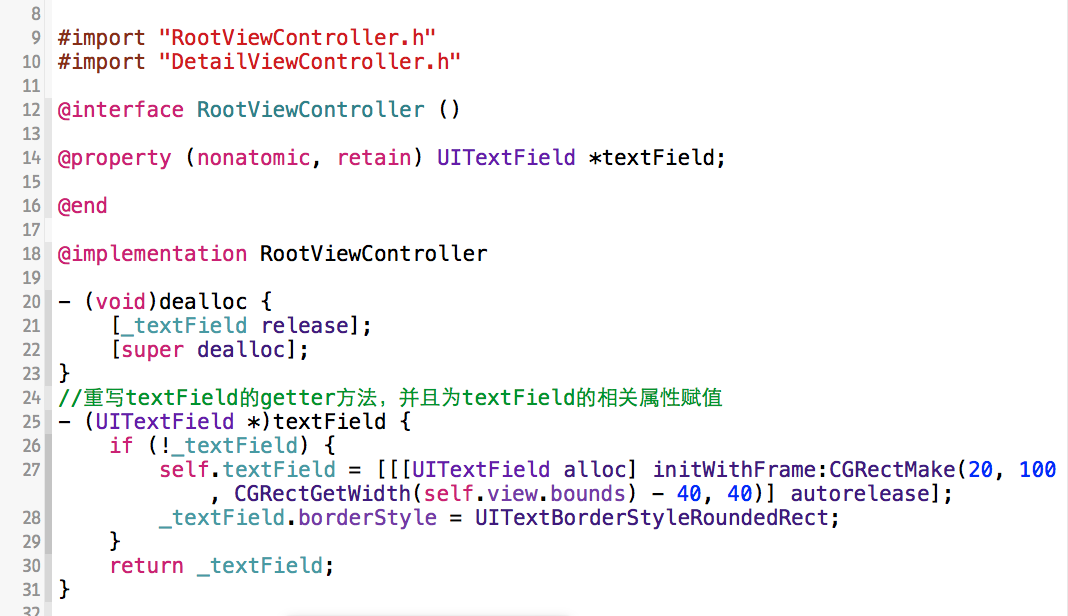
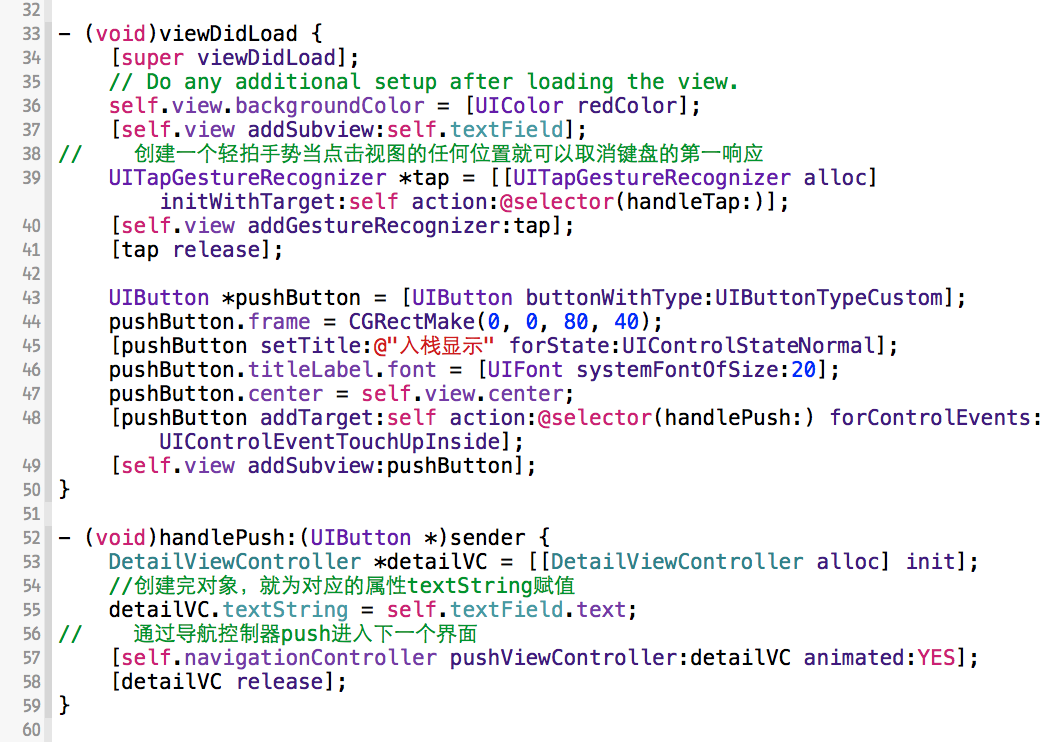
第二个界面中的lable显示第一个界面textField中的文本
首先我们建立一个RootViewControllers和一个DetailViewControllers,在DetailViewControllers中声明一个textString属性,用于接收传过来的字符串,
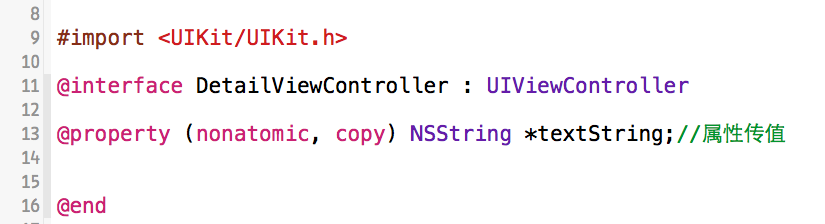
同时创建一个Lable用来显示传过的字符串
在RootViewControllers上引入DetailViewControllers同时声明一个textField属性用来输入字符串
然后在RootViewControllers上我们创建并添加一个button,当点击button时响应相应方法进行视图间的切换完成视图间的传值
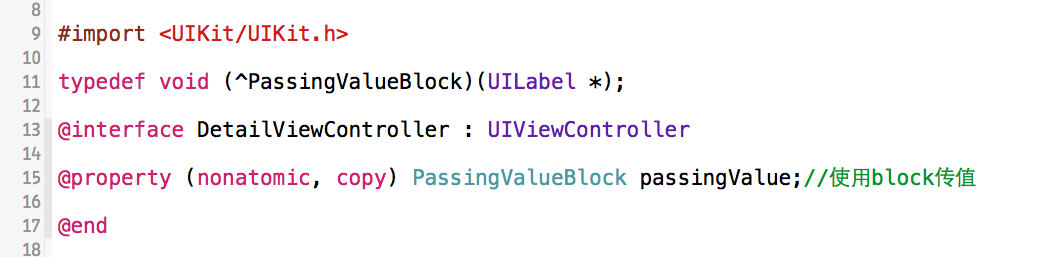
(二)Block传值
block传值也是从第二个界面给第一个界面传值
首先我们在DetailViewcontrollers的.h文件中,属性
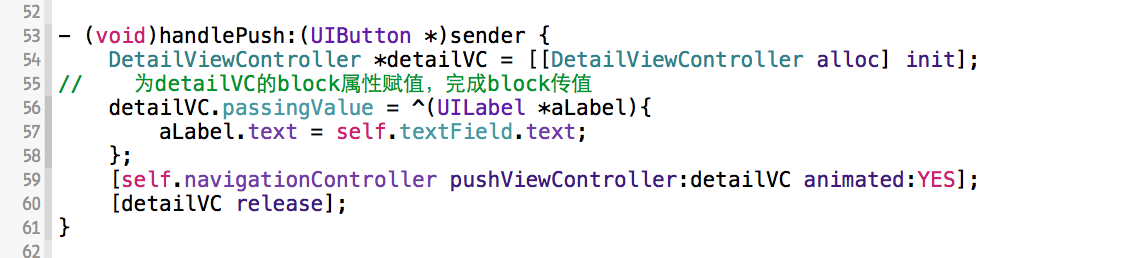
在RootViewControllers的.m文件中,其他不变,在button的响应方法里我们为block属性赋值完成block传值
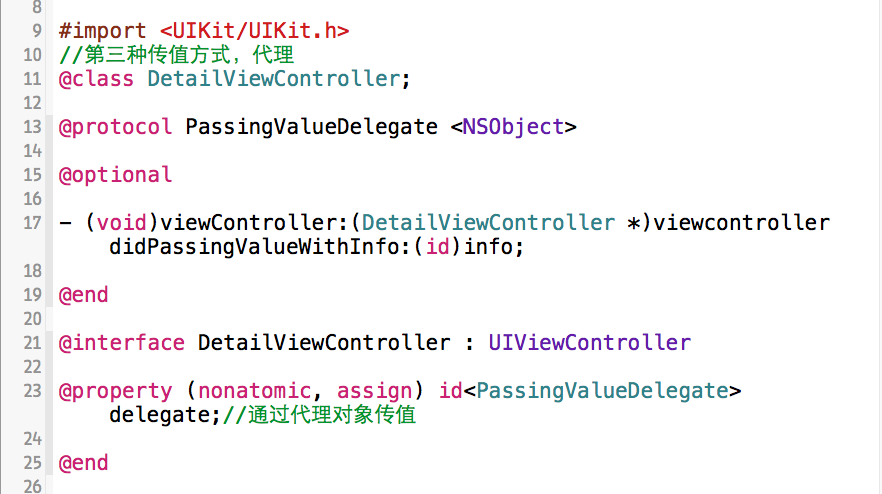
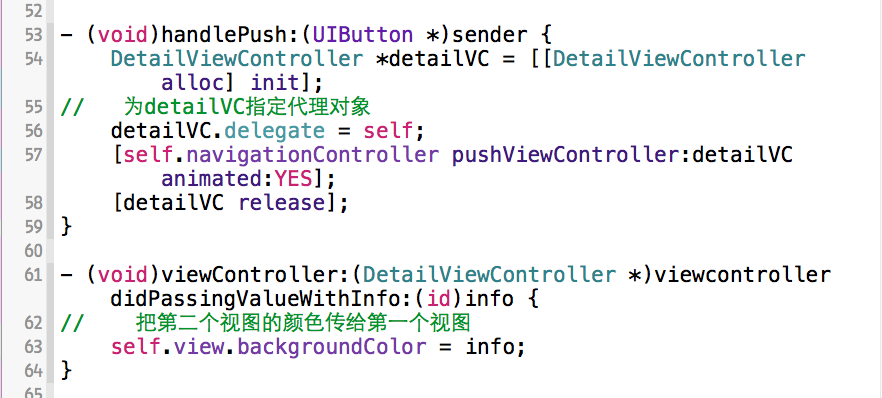
(三)代理传值
RootViewControllers页面push到DetailViewControllers页面,如果DetailViewControllers页面的信息想回传(回调)到RootViewControllers页面,用代理传值,其中DetailViewControllers定义协议和声明代理,RootViewControllers确认并实现代理,RootViewControllers作为DetailViewControllers的代理
首先在DetailViewControllers.h文件中我们创建协议方法
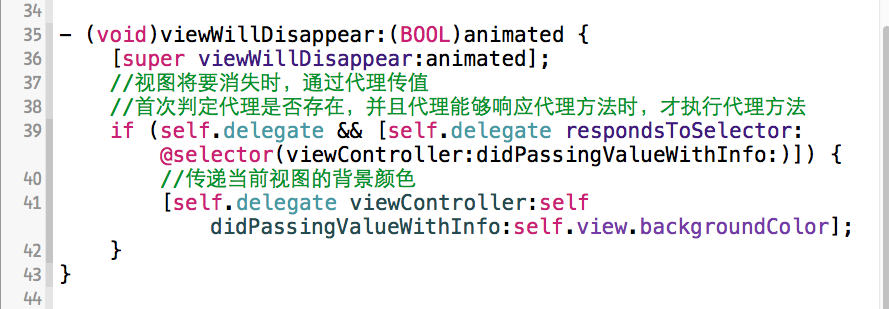
在DetailViewControllers的.m中我们判定代理对象存在时,为其绑定相应方法
RootViewControllers的.m文件中我们指定代理并让其执行代理的方法
(四)单例传值
单例传值(实现共享)
AppStatus.h 创建一个单例类 AppStatus

 1 #import <Foundation/Foundation.h>

 2

 3 @interface AppStatus : NSObject

 4 {

 5     NSString *_contextStr;

 6 }

 7

 8 @property(nonatomic,retain)NSString *contextStr;

 9

10 +(AppStatus *)shareInstance;

11

12 @end
AppStatus.m
 1 #import "AppStatus.h"

 2

 3 @implementation AppStatus

 4

 5 @synthesize contextStr = _contextStr;

 6

 7 static AppStatus *_instance = nil;

 8

 9 +(AppStatus *)shareInstance

10 {

11     if (_instance == nil)

12     {

13         _instance = [[super alloc]init];

14     }

15     return _instance;

16 }

17

18 -(id)init

19 {

20     if (self = [super init])

21     {

22

23     }

24     return self;

25 }

26

27 -(void)dealloc

28 {

29     [super dealloc];

30 }

31

32 @end
RootViewController.h
 1 #import "RootViewController.h"

 2 #import "DetailViewController.h"

 3 #import "AppStatus.h"

 4

 5 @interface RootViewController ()

 6

 7 @end

 8

 9 @implementation RootViewController

10

11 -(void)loadView

12 {

13     //核心代码

14     UIButton *btn = [UIButton buttonWithType:UIButtonTypeRoundedRect];

15     btn.frame = CGRectMake(0, 0, 100, 30);

16     [btn setTitle:@"Push" forState:0];

17     [btn addTarget:self action:@selector(pushAction:) forControlEvents:UIControlEventTouchUpInside];

18     [self.view addSubview:btn];

19 }

20

21 -(void)pushAction:(id)sender

22 {

23     tf = (UITextField *)[self.view viewWithTag:1000];

24

25  //单例传值  将要传递的信息存入单例中(共享中)

26   //  [[AppStatus shareInstance]setContextStr:tf.text]; 跟下面这种写法是等价的

27     [AppStatus shareInstance].contextStr = tf.text;

28     //导航push到下一个页面

29     //pushViewController 入栈引用计数+1,且控制权归系统

30     DetailViewController *detailViewController = [[DetailViewController alloc]init];

31

32     //导航push到下一个页面

33     [self.navigationController pushViewController:detailViewController animated:YES];

34     [detailViewController release];

35 }

36

37 @end
DetailViewController.h
1 #import <UIKit/UIKit.h>

2 @protocol ChangeDelegate;//通知编译器有此代理

3

4 @interface DetailViewController : UIViewController

5 {

6     UITextField *textField;

7 }

8

9 @end
DetailViewController.m
 1 #import "DetailViewController.h"

 2 #import "AppStatus.h"

 3

 4 @interface DetailViewController ()

 5

 6 @end

 7

 8 @implementation DetailViewController

 9

10 @synthesize naviTitle = _naviTitle;

11

12 -(void)loadView

13 {

14     self.view = [[[UIView alloc]initWithFrame:CGRectMake(0, 0, 320, 480)]autorelease];

15

16     //单例

17     self.title = [AppStatus shareInstance].contextStr;

18     textField = [[UITextField alloc]initWithFrame:CGRectMake(100, 100, 150, 30)];

19     textField.borderStyle = UITextBorderStyleLine;

20     [self.view addSubview:textField];

21     [textField release];

22

23     UIBarButtonItem *doneItem = [[UIBarButtonItem alloc] initWithBarButtonSystemItem:UIBarButtonSystemItemDonetarget:self action:@selector(doneAction:)];

24     self.navigationItem.rightBarButtonItem = doneItem;

25     [doneItem release];

26 }

27

28 //这个方法是执行多遍的  相当于刷新view

29 -(void)viewWillAppear:(BOOL)animated

30 {

31     [super viewWillAppear:animated];

32     tf = (UITextField *)[self.view viewWithTag:1000];

33     tf.text = [AppStatus shareInstance].contextStr;

34 }

35

36 //pop回前一个页面

37 -(void)doneAction:(id)sender

38 {

39     //单例传值

40     [AppStatus shareInstance].contextStr = textField.text;

41     [self.navigationController popToRootViewControllerAnimated:YES];

42 }
(五)通知传值
谁要监听值的变化,谁就注册通知 特别要注意,通知的接受者必须存在这一先决条件
A页面RootViewController.h
1 #import <UIKit/UIKit.h>

2 #import "DetailViewController.h"

3 @interface RootViewController : UIViewController<ChangeDelegate>

4 {

5     UITextField *tf;

6 }

7 @end
A页面RootViewController.m
 1 #import "IndexViewController.h"

 2 #import "DetailViewController.h"

 3 #import "AppStatus.h"

 4

 5 @implementation IndexViewController

 6

 7 -(void)dealloc

 8 {

 9     [[NSNotificationCenter defaultCenter] removeObserver:self

10                                                     name:@"CHANGE_TITLE" object:nil];

11     [super dealloc];

12 }

13

14 -(id)init

15 {

16     if (self = [super init])

17     {

18         [[NSNotificationCenter defaultCenter] addObserver:self

19                                                  selector:@selector(change:)

20                                                      name:@"CHANGE_TITLE"

21                                                    object:nil];

22     }

23     return self;

24 }

25

26 -(void)change:(NSNotification *)aNoti

27 {

28     // 通知传值

29     NSDictionary *dic = [aNoti userInfo];

30     NSString *str = [dic valueForKey:@"Info"];

31

32     UITextField *tf =  (UITextField *)[self.view viewWithTag:1000];

33     tf.text = str;

34 }

35

36 -(void)viewWillAppear:(BOOL)animated

37 {

38     [super viewWillAppear:animated];

39     /*

40     // 单例传值

41     UITextField *tf =  (UITextField *)[self.view viewWithTag:1000];

42     tf.text = [AppStatus shareInstance].contextStr;

43     */

44 }

45

46 @end
DetailViewController.h
1 #import <UIKit/UIKit.h>

2 @protocol ChangeDelegate;//通知编译器有此代理

3

4 @interface DetailViewController : UIViewController

5 {

6     UITextField *textField;

7 }

8 @end
DetailViewController.m
 1 #import "DetailViewController.h"

 2 #import "AppStatus.h"

 3

 4 @implementation DetailViewController

 5 @synthesize naviTitle = _naviTitle;

 6

 7 -(void)loadView

 8 {

 9     UIBarButtonItem *doneItem = [[UIBarButtonItem alloc] initWithBarButtonSystemItem:UIBarButtonSystemItemDonetarget:self action:@selector(doneAction:)];

10     self.navigationItem.rightBarButtonItem = doneItem;

11     [doneItem release];

12 }

13

14 // pop回前一个页面

15 -(void)doneAction:(id)sender

16 {

17 NSDictionary *dic = [NSDictionary dictionaryWithObject:textField.text forKey:@"Info"];

18

19 [[NSNotificationCenter defaultCenter] postNotificationName:@"CHANGE_TITLE" object:nil userInfo:dic];

20

21 [self.navigationController popViewControllerAnimated:YES];

22

23 }
iOS 页面间几种传值方式(属性,代理,block,单例,通知)的更多相关文章
- iOS页面间传值的五种方式总结(Delegate/NSNotification/Block/NSUserDefault/单例)
iOS页面间传值的方式(Delegate/NSNotification/Block/NSUserDefault/单例) iOS页面间传值的方式(NSUserDefault/Delegate/NSNot ...
- iOS页面间传值的方式(Delegate/NSNotification/Block/NSUserDefault/单例)
iOS页面间传值实现方法:1.通过设置属性,实现页面间传值:2.委托delegate方式:3.通知notification方式:4.block方式:5.UserDefault或者文件方式:6.单例模式 ...
- iOS页面间传值的方式(NSUserDefault/Delegate/NSNotification/Block/单例)
iOS页面间传值的方式(NSUserDefault/Delegate/NSNotification/Block/单例) 实现了以下iOS页面间传值:1.委托delegate方式:2.通知notific ...
- 【转】iOS页面间传值的方式(Delegate/NSNotification/Block/NSUserDefault/单例)-- 不错
原文网址:http://www.cnblogs.com/JuneWang/p/3850859.html iOS页面间传值的方式(NSUserDefault/Delegate/NSNotificatio ...
- iOS页面间传值的方式 (Delegate/NSNotification/Block/NSUserDefault/单例)
iOS页面间传值的方式(Delegate/NSNotification/Block/NSUserDefault/单例) iOS页面间传值的方式(NSUserDefault/Delegate/NSN ...
- iOS页面间传值的六种方式
一般ios页面间的传值方式分为6种:1.属性传值:2.block:3.delegate:4.UserDefault:5.单例:6.通知. 0&1.block 先说我最常用的block吧,属性传 ...
- iOS 页面间传值 之 属性传值,代理传值
手机 APP 运行,不同页面间传值是必不可少,传值的方式有很多(方法传值,属性传值,代理传值,单例传值) ,这里主要总结下属性传值和代理传值. 属性传值:属性传值是最简单,也是最常见的一种传值方式,但 ...
- ios页面间传递参数四种方式
ios页面间传递参数四种方式 1.使用SharedApplication,定义一个变量来传递. 2.使用文件,或者NSUserdefault来传递 3.通过一个单例的class来传递 4.通过Dele ...
- iOS 页面间传值 之 单例传值 , block 传值
ios 页面间传值有许多,前边已经分享过属性传值和代理传值,今天主要说一下单例传值和 block 传值 单例传值:单例模式一种常用的开发的模式,单例因为在整个程序中无论在何时初始化对象,获取到的都是同 ...
随机推荐
- java线程池ThreadPoolExecutor理解
Java通过Executors提供四种线程池,分别为:newCachedThreadPool创建一个可缓存线程池,如果线程池长度超过处理需要,可灵活回收空闲线程,若无可回收,则新建线程.newFixe ...
- 总结工作中常见的linux命令
本文是总结下自己在工作中遇到的常见linux 命令,会持续更新! 1.文件路径切换 进入 cd 返回上一级 cd .. 2.复制 cp 源文件名 目标文件夹 cp log.log test5 3.编 ...
- Oracle 12c In Memory Option初探
前情提要: Oracle OpenWorld 2013中Larry Ellison爆料的Oracle新特性:Oracle In Memory Database Option 1. 这个新特性将随着12 ...
- 分享前端Facebook及Twitter第三方登录
最近公司要求做海外的第三方登录:目前只做了Facebook和Twitter;国内百度到的信息太少VPN FQ百度+Google了很久终于弄好了.但是做第三方登录基本上都有个特点就是引入必须的js,设置 ...
- LayaAir学习笔记
1.Text文本类 var Text=laya.display.Text; Laya.init(620,400); Laya.stage.bgColor="#323232";//设 ...
- C 一些基础
C语言的几个输入输出函数 #include <stdio.h> getchar(),putchar() scanf(),printf() 1->getchar()与scanf()唯一 ...
- ASP.NET 画图与图像处理-生成高质量缩略图
http://www.cftea.com/c/2007/08/SG9WFLZJD62Z2D0O.asp
- Corn Fields——POJ3254状态压缩Dp
Corn Fields Time Limit: 2000MS Memory Limit: 65536K Description Farmer John has purchased a lush new ...
- Uva 1629 切蛋糕
题目链接:https://vjudge.net/contest/146179#problem/B 题意:一个矩形蛋糕上有好多个樱桃,现在要做的就是切割最少的距离,切出矩形形状的小蛋糕,让每个蛋糕上都有 ...
- apache2.4配置访问日志分割并过滤图片CSS等无用内容
相关信息 1.apache日志有访问日志和错误日志,错误日志根据日志级别来输出错误信息,而访问日志根据定义的日志格式来记录访问动作 2.访问日志格式在httpd.conf文件里面定义,在虚拟主机里面引 ...