android 相对布局例子代码
<?xml version="1.0" encoding="utf-8"?>
<LinearLayout xmlns:android="http://schemas.android.com/apk/res/android"
xmlns:app="http://schemas.android.com/apk/res-auto"
xmlns:tools="http://schemas.android.com/tools"
android:layout_width="match_parent"
android:layout_height="match_parent"
android:orientation="vertical"
tools:context="com.example.prize.mydemo1.Main3Activity">
<RelativeLayout
android:id="@+id/relative1"
android:layout_width="match_parent"
android:layout_height="match_parent"
android:background="#FFFFFF">
<!--layout_alignParentLeft 控件位置在布局左边-->
<!--layout_alignParentTop 控件位置在布局上面-->
<view
android:id="@+id/view1"
android:layout_width="match_parent"
android:layout_height="50dp"
android:layout_alignParentLeft="true"
android:layout_alignParentTop="true"
android:background="#550000"
/>
<!--layout_below 当前控件在目标控件下面-->
<!--layout_alignRight 向目标控件右边对齐-->
<view
android:id="@+id/view2"
android:layout_width="50dp"
android:layout_height="match_parent"
android:layout_below="@+id/view1"
android:layout_alignRight="@+id/view1"
android:background="#FF2222"
/>
<!--layout_alignParentBottom 控件位置在布局的下面-->
<!--layout_toLeftOf 当前控件在目标控件的左边-->
<view
android:id="@+id/view3"
android:layout_width="match_parent"
android:layout_height="50dp"
android:layout_alignParentBottom="true"
android:layout_toLeftOf="@id/view2"
android:background="#FF7777"
/>
<!--layout_above 当前控件在目标控件的上面-->
<view
android:id="@+id/view4"
android:layout_width="50dp"
android:layout_height="0dp"
android:layout_above="@+id/view3"
android:layout_below="@+id/view1"
android:background="#FF8F44"/>
<view
android:id="@+id/view5"
android:layout_width="match_parent"
android:layout_height="50dp"
android:layout_toLeftOf="@+id/view2"
android:layout_below="@id/view1"
android:layout_toRightOf="@id/view4"
android:background="#FFDA44"/>
<view
android:id="@+id/view6"
android:layout_width="50dp"
android:layout_height="match_parent"
android:layout_below="@+id/view5"
android:layout_above="@+id/view3"
android:layout_toLeftOf="@+id/view2"
android:background="#D6FF33"
/>
<view
android:id="@+id/view7"
android:layout_width="match_parent"
android:layout_height="50dp"
android:layout_above="@+id/view3"
android:layout_toLeftOf="@+id/view6"
android:layout_toRightOf="@+id/view4"
android:background="#B4FF44"
/>
<view
android:id="@+id/view8"
android:layout_width="50dp"
android:layout_height="match_parent"
android:layout_above="@+id/view7"
android:layout_toRightOf="@+id/view4"
android:layout_below="@+id/view5"
android:background="#99FF55"
/>
<view
android:id="@+id/view9"
android:layout_width="match_parent"
android:layout_height="50dp"
android:layout_below="@+id/view5"
android:layout_toLeftOf="@+id/view6"
android:layout_toRightOf="@+id/view8"
android:background="#44FF44"
/>
<view
android:id="@+id/view10"
android:layout_width="50dp"
android:layout_height="match_parent"
android:layout_toLeftOf="@+id/view6"
android:layout_below="@+id/view9"
android:layout_above="@+id/view7"
android:background="#55FF99"
/>
<view
android:id="@+id/view11"
android:layout_width="match_parent"
android:layout_height="50dp"
android:layout_above="@+id/view7"
android:layout_toLeftOf="@+id/view10"
android:layout_toRightOf="@+id/view8"
android:background="#55FFDD"
/>
<view
android:id="@+id/view12"
android:layout_width="50dp"
android:layout_height="match_parent"
android:layout_above="@+id/view11"
android:layout_toRightOf="@+id/view8"
android:layout_below="@+id/view9"
android:background="#55DDFF"
/>
<view
android:id="@+id/view13"
android:layout_width="match_parent"
android:layout_height="50dp"
android:layout_below="@id/view9"
android:layout_toRightOf="@+id/view12"
android:layout_toLeftOf="@+id/view10"
android:background="#44B4FF"
/>
</RelativeLayout>
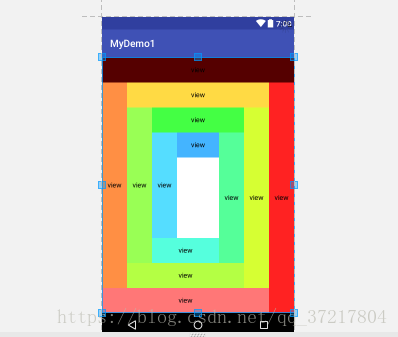
</LinearLayout>布局样子
android 相对布局例子代码的更多相关文章
- android studio布局文件/XML怎么代码补全
android studio中的布局文件代码补全方式是打第一个字母就提示了,而java代码有时候要按快捷键. 布局文件的话呢,要写在标签开始处才提示,在标签闭合处有时候不提示,有时候在内容里也会有不提 ...
- Android 使用纯Java代码布局
java布局 java代码布局和xml布局的区别 1.Java纯布局更加的灵活,比如自定义控件或一些特殊要求时,使用java代码布局 2.常用的xml布局是所见即所得的编写方式,以及xml本身拥有一些 ...
- 在Android中用纯Java代码布局
感谢大佬:https://www.jianshu.com/p/7aedea560f16 在Android中用纯Java代码布局 本文的完成了参考了一篇国外的教程,在此表示感谢. Android中的界面 ...
- 【腾讯Bugly干货分享】Android动态布局入门及NinePatchChunk解密
本文来自于腾讯bugly开发者社区,非经作者同意,请勿转载,原文地址:http://dev.qq.com/topic/57c7ff5d53bbcffd68c64411 作者:黄进——QQ音乐团队 摆脱 ...
- android的布局管理器
理论上通过setContentView(view)能够把一个view设置到activity中,但当你有很多个view控件的时候,就需要用android的布局管理器来管理view控件了. android ...
- Android 实现布局动态加载
Android 动态加载布局 通过使用LayoutInflater 每次点击按钮时候去读取布局文件,然后找到布局文件里面的各个VIEW 操作完VIEW 后加载进我们setContentView 方面里 ...
- Android相对布局(RelativeLayout)
Android相对布局(RelativeLayout) 备注:这里的视图和元素是等同的概念. RelativeLayout是一个允许子视图相对于其他兄弟视图或是父视图显示的视图组(通过ID指定).每个 ...
- Android的布局优化之include、merge 、viewstub
以前在写布局的时候总是喜欢用自己熟悉的方式去写,从来也没有想过优化怎么的,后来又一次在上班的时候老大拿着我写的一个页面说我这个不行.我说这不是和设计图上的一模一样的么?怎么就不行了?然后他就跟我说了一 ...
- 我的Android进阶之旅------>Android拍照小例子
今天简单的学习了一下android拍照的简单实现. 当然该程序是个小例子,非常简单,没有什么复杂的操作,但是可以学习到Android 拍照API流程. 1.在布局文件中添加一个 surfaceView ...
随机推荐
- SQL优化之count(*),count(列)
一.count各种用法的区别 1.count函数是日常工作中最常用的函数之一,用来统计表中数据的总数,常用的有count(*),count(1),count(列).count(*)和count(1)是 ...
- Linux之异步通知机制分析
1.概念: 异步通知机制:一旦设备就绪,则主动通知应用程序,这样应用程序根本就不需要查询设备状态,是一种“信号驱动的异步I/O”.信号是在软件层次上对中断机制的一种模拟,在原理上,一个进程收到一个信号 ...
- 串口转以太客户端(增加uci、可连接多个服务器)
1. 进入barrier_breaker/package/utils文件夹,新建ttl_client 2. 该目录下的Makefile # # Copyright (C) OpenWrt.org # ...
- python slave status 2
#!/usr/bin/env python import MySQLdbimport contextlib @contextlib.contextmanagerdef mysql(Host,Port, ...
- javascript 对象的原型
往往定义一个函数时,函数内部有关键字this时,就把这个函数当成对象,this相当于python中的self.都是对象中用到的,代表对象本身. js不像python,在函数内部定义的子函数,在每次创建 ...
- Windows消息【一】 消息队列
看了MSDN后,以下是我个人的理解! 消息能够被分为「队列化消息」和「非队列化消息」. 队列化消息是指当程序发生某事件时,由Windows主动捕获并把消息放入系统消息队列中,而程序在运行时会初始化一个 ...
- 死磕!Windows下Apache+PHP+phpmyadmin的配置
环境配置真的很烦很费时间,稍不小心就会出错,这是一个鸡肋体力劳动,耐心和忍耐少不了.这个资料已经非常详细了,其中变量和路径不是百分百吻合但是意思已经很清楚了.剩下的就是耐心的执行和琢磨了. 一. A ...
- 数据仓库专题(5)-如何构建主题域模型原则之站在巨人的肩上(二)NCR FS-LDM主题域模型划分
一.前言 分布式数据仓库模型的架构设计,受分布式技术的影响,很多有自己特色的地方,但是在概念模型和逻辑模型设计方面,还是有很多可以从传统数据仓库模型进行借鉴的地方.NCR FS-LDM数据模型是金融行 ...
- C++进阶--Koenig lookup 依赖于实参的名字查找
//############################################################################ /* * Koenig Lookup / ...
- C++进阶--公有继承的二元性
//########################################################################### /* * 公有继承的两元性 * * - 接口 ...