
第二十八篇-Fragment静态用法
效果图:
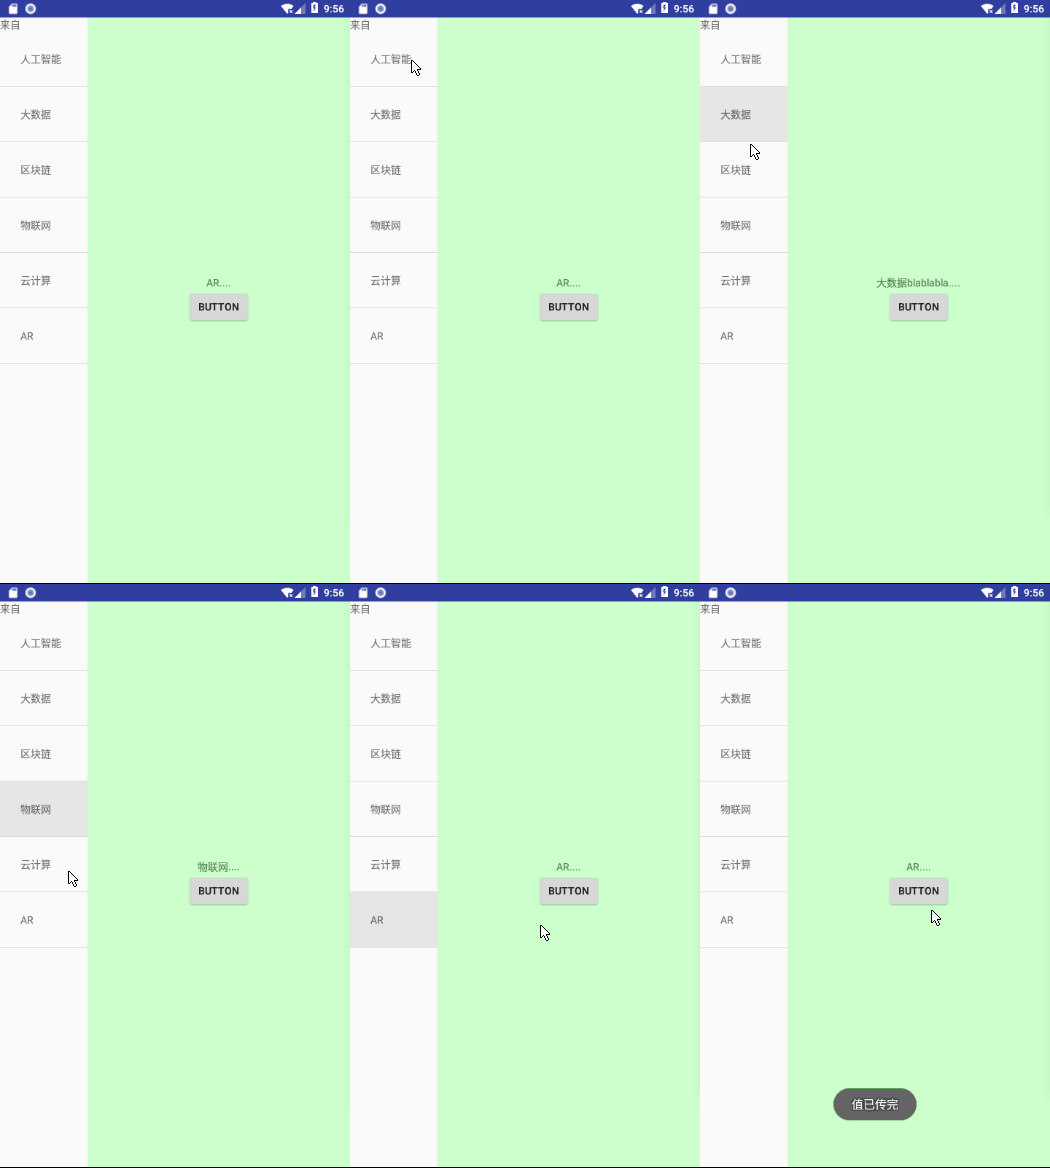
首先,先大致布局成这个形状
看动画中,横看分为两个区域,所以整体是一个水平排列
设置外层LinearLayout的参数
android:orientation="horizontal"
在看左边,上面是一个文本,下面是一个list,成线性排列,右边是一个Fragement
所以布局方式为:

然后,可以看出左边和右边空间比例为1:3
左边设置android:layout_weight="3"
右边设置android:layout_weight="1"
此时基本形状已经出来了。
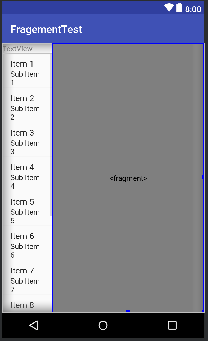
接下来设置Fragement,新建一个MyFragement.java的类。右键new--->java class
通过view添加一个布局文件进去
View view=inflater.inflate(R.layout.layout2,container,false);
layout2就是Fragement里面显示的页面,很简单,就一个textview加上一个button
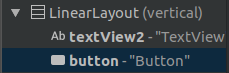
textview就是content里面的内容,button是设置左边textview中要显示的值。
将数据存到数组中
String[] name={"人工智能","大数据","区块链","物联网","云计算","AR"};
String[] content={"人工智能babababababb....","大数据blablabla....",
"区块链。。。。","物联网....","云计算...","AR...."};
通过Adapter添加到listView中
@Override
protected void onCreate(Bundle savedInstanceState) {
    super.onCreate(savedInstanceState);
    setContentView(R.layout.layout);
    listView=findViewById(R.id.listview1);
    textView=findViewById(R.id.textView);
    adapter=new ArrayAdapter<String>(MainActivity.this,R.layout.layout3,name);
    listView.setAdapter(adapter);
    manager=getSupportFragmentManager();//初始化
    MyFragment myFragment= (MyFragment) manager.findFragmentById(R.id.fragement1);
    final TextView textView1=myFragment.getView().findViewById(R.id.textView2);
    listView.setOnItemClickListener(new AdapterView.OnItemClickListener() {
        @Override
        public void onItemClick(AdapterView<?> parent, View view, int position, long id) {
            textView1.setText(content[position]);
        }
    });
}
apapter使数据绑定到控件变得更加简单和灵活...用途为容器提供子视图,利用视图的数据和元数据来构建每个子视图。
有 arrayAdapter ,simpleCursorAdapter, cursorAdapter resourceCursorAdapter 如果需要自定义适配器 可以扩展抽象类BaseAdapter
然后通过listView.setAdapter(adapter);
将内容放入listview中显示,当点击name里面的内容是,position是记录点击的索引位置,这时候将textview1里面的内容设置为content对应position的数据,所以name和content要对应好。
最后将代码附上。
layout.xml
<?xml version="1.0" encoding="utf-8"?>

<LinearLayout xmlns:android="http://schemas.android.com/apk/res/android"

    android:layout_width="match_parent"

    android:layout_height="match_parent"

    xmlns:tools="http://schemas.android.com/tools"

    android:orientation="horizontal"

    tools:context=".MainActivity">

    <LinearLayout

        android:layout_width="match_parent"

        android:layout_height="match_parent"

        android:layout_weight="3"

        android:orientation="vertical">

        <TextView

            android:id="@+id/textView"

            android:layout_width="match_parent"

            android:layout_height="wrap_content"

            android:text="TextView" />

        <ListView

            android:id="@+id/listview1"

            android:layout_width="match_parent"

            android:layout_height="match_parent" />

    </LinearLayout>

    <fragment

        android:id="@+id/fragement1"

        android:name="com.example.aimee.fragementtest.MyFragment"

        android:layout_width="match_parent"

        android:layout_height="match_parent"

        android:layout_weight="1">

    </fragment>

</LinearLayout>
layout2.xml
<?xml version="1.0" encoding="utf-8"?>

<LinearLayout xmlns:android="http://schemas.android.com/apk/res/android"

    android:layout_width="match_parent"

    android:gravity="center"

    android:background="#ccffcc"

    android:layout_height="match_parent"

    android:orientation="vertical">

    <TextView

        android:id="@+id/textView2"

        android:layout_width="wrap_content"

        android:layout_height="wrap_content"

        android:text="TextView" />

    <Button

        android:id="@+id/button"

        android:layout_width="wrap_content"

        android:layout_height="wrap_content"

        android:text="Button" />

</LinearLayout>
layout3.xml
<?xml version="1.0" encoding="utf-8"?>

<TextView xmlns:android="http://schemas.android.com/apk/res/android"

    android:layout_width="match_parent"

    android:padding="28dp"

    android:layout_height="match_parent">

</TextView>
MainActivity.java
package com.example.aimee.fragementtest;

import android.support.v4.app.FragmentActivity;

import android.support.v4.app.FragmentManager;

import android.support.v7.app.AppCompatActivity;

import android.os.Bundle;

import android.view.View;

import android.widget.AdapterView;

import android.widget.ArrayAdapter;

import android.widget.ListView;

import android.widget.TextView;

public class MainActivity extends FragmentActivity {

    ListView listView;

    TextView textView;

    FragmentManager manager;

    ArrayAdapter<String>adapter;

    String[] name={"人工智能","大数据","区块链","物联网","云计算","AR"};

    String[] content={"人工智能babababababb....","大数据blablabla....",

    "区块链。。。。","物联网....","云计算...","AR...."};

    @Override

    protected void onCreate(Bundle savedInstanceState) {

        super.onCreate(savedInstanceState);

        setContentView(R.layout.layout);

        listView=findViewById(R.id.listview1);

        textView=findViewById(R.id.textView);

        adapter=new ArrayAdapter<String>(MainActivity.this,R.layout.layout3,name);

        listView.setAdapter(adapter);

        manager=getSupportFragmentManager();//初始化

        MyFragment myFragment= (MyFragment) manager.findFragmentById(R.id.fragement1);

        final TextView textView1=myFragment.getView().findViewById(R.id.textView2);

        listView.setOnItemClickListener(new AdapterView.OnItemClickListener() {

            @Override

            public void onItemClick(AdapterView<?> parent, View view, int position, long id) {

                textView1.setText(content[position]);

            }

        });

    }

}
MyFragement.java
package com.example.aimee.fragementtest;

import android.os.Bundle;

import android.support.annotation.NonNull;

import android.support.annotation.Nullable;

import android.support.v4.app.Fragment;

import android.view.LayoutInflater;

import android.view.View;

import android.view.ViewGroup;

import android.widget.Button;

import android.widget.TextView;

import android.widget.Toast;

public class MyFragment extends Fragment {

    @Nullable

    @Override

    public View onCreateView(@NonNull LayoutInflater inflater, @Nullable ViewGroup container, @Nullable Bundle savedInstanceState) {

        View view=inflater.inflate(R.layout.layout2,container,false);

        Button button=view.findViewById(R.id.button);

        button.setOnClickListener(new View.OnClickListener() {

            @Override

            public void onClick(View v) {

                TextView textView=getActivity().findViewById(R.id.textView);

                textView.setText("来自");

                Toast.makeText(getActivity(),"值已传完",Toast.LENGTH_LONG).show();

            }

        });

        return view;

    }

}
Ok。
第二十八篇-Fragment静态用法的更多相关文章
- Android UI开发第二十八篇——Fragment中使用左右滑动菜单
Fragment实现了Android UI的分片管理,尤其在平板开发中,好处多多.这一篇将借助Android UI开发第二十六篇——Fragment间的通信. Android UI开发第二十七篇——实 ...
- 第二十九篇-Fragment动态用法
效果图: 上节学习了静态添加Fragment的方法,这节学习动态添加方法. 主页面 layout.xml Fragment页面 layout2.xml 实现功能,当点击主页面的button时,将Fra ...
- Python之路(第二十八篇) 面向对象进阶:类的装饰器、元类
一.类的装饰器 类作为一个对象,也可以被装饰. 例子 def wrap(obj): print("装饰器-----") obj.x = 1 obj.y = 3 obj.z = 5 ...
- Android UI开发第二十六篇——Fragment间的通信
为了重用Fragment的UI组件,创建的每个Fragment都应该是自包含的.有它自己的布局和行为的模块化组件.一旦你定义了这些可重用的Fragment,你就可以把它们跟一个Activity关联,并 ...
- Python之路【第二十八篇】:django视图层、模块层
1.视图函数 文件在view_demo 一个视图函数简称视图,是一个简单的Python 函数,它接受Web请求并且返回Web响应.响应可以是一张网页的HTML内容,一个重定向,一个404错误,一个XM ...
- Python之路【第二十八篇】:生成器与迭代器
#!/usr/bin/env python # -*- coding:utf-8 -*- #只要函数的代码里面出现了yield关键字,这个函数就不再是一个普通的函数了,叫做生成器函数 #执行生成器函数 ...
- 第二十八篇:SOUI中自定义控件开发过程
在SOUI中已经提供了大部分常用的控件,但是内置控件不可能满足用户的所有要求,因此一个真实的应用少不得还要做一些自定义控件. 学习一个新东西,最简单的办法就是依葫芦画瓢.事实上在SOUI系统中内置控件 ...
- 第二十八篇、自定义的UITableViewCell上有图片需要显示,要求网络网络状态为WiFi时,显示图片高清图;网络状态为蜂窝移动网络时,显示图片缩略图
1)SDWebImage会自动帮助开发者缓存图片(包括内存缓存,沙盒缓存),所以我们需要设置用户在WiFi环境下下载的高清图,下次在蜂窝网络状态下打开应用也应显示高清图,而不是去下载缩略图. 2)许多 ...
- flask第二十八篇——HTML【1】table标签
请关注公众号:自动化测试实战 以下内容参考:http://www.w3school.com.cn/tags/tag_table.asp <!DOCTYPE html> <html l ...
随机推荐
- 使用php导出excel并使用excel的求和统计函数对excel进行汇总
1. 使用excel的统计函数对excel进行多条件汇总求和: =SUMIFS($D$:$D$, $A$:$A$, :$B$, :$C$, "三级片") 例如: =SUMIFS(求 ...
- String、StringBuffer、StringBuilder三种类型的一点比较
简要记一点 以运行速度来说: StringBuilder>StringBuffer>String 以线程安全来说: StringBuilder线程不安全,而StringBuffer线程安全 ...
- Java反射交换两个整型变量的值
在一次面试中,做了这么一道题"交换两个整型变量的值",当时看到这个题目之后,会心一笑,这也太简单了--直接使用中间变量交换不就可以了吗?但是,面试官却说不需要返回值,在调用的地方, ...
- javap指令
栈和局部变量操作将常量压入栈的指令aconst_null 将null对象引用压入栈iconst_m1 将int类型常量-1压入栈iconst_0 将int类型常量0压入栈iconst_1 将int类型 ...
- 学习 Spring (十四) Introduction
Spring入门篇 学习笔记 Introduction 允许一个切面声明一个实现指定接口的通知对象,并且提供了一个接口实现类来代表这些对象 由 中的 元素声明该元素用于声明所匹配的类型拥有一个新的 p ...
- 用于Azure功能的Visual Studio 2017工具
今天我们很高兴地宣布发布第一个预览的Visual Studio 2017工具的Azure功能.这个预览介绍了一些令人兴奋的变化,我们以前的版本.此外,除了支持Visual Studio 2017之外, ...
- codeforces982F
The Meeting Place Cannot Be Changed CodeForces - 982F Petr is a detective in Braginsk. Somebody stol ...
- 【建模应用】PLS偏最小二乘回归原理与应用
@author:Andrew.Du 声明:本文为原创,转载请注明出处:http://www.cnblogs.com/duye/p/9031511.html,谢谢. 一.前言 1.目的: 我写这篇文章的 ...
- fpm 打包教程
常用yum命令: Yum安装时需要安装到指定的文件夹,则需要 --installroot yum install --installroot=/usr/src/ vim 常用rpm命令: 常用yum仓 ...
- setTimeout运行机制简要理解
经典例子辅助理解setTimeout工作原理 运行结果: 约1秒后输出:1,再过约1秒后输出:2,接着才立即输出:时间流逝了: 2002 毫秒最后输出:时间又流逝了: 2003 毫秒 在现有浏览器环境 ...