在GridControl控件上绑定图片的几种操作方式
我们知道,基于DevExpress的开发Winform的项目界面的时候,GridControl控件是经常用来绑定数据的,一般以常规的字符内容为主,有时候也会有图片的显示需要,那么如果显示图片,我们应该如何实现呢?本篇随笔介绍基于原生GridControl控件的图片绑定显示操作和基于我封装的分页控件(封装GridControl的分页控件)两种图片绑定显示的操作。
1、基于原生的GridControl控件图片绑定
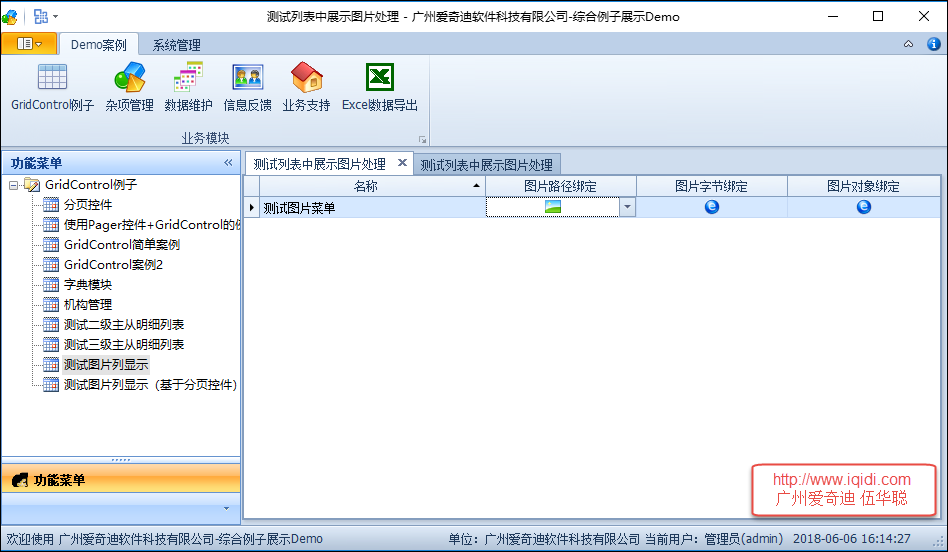
绑定图片,一般我们可以在单元格里面绑定byte[]类型或者Image类型,那么控件就会自动显示图片出来,当然我们也可以自定义对图片路径转换为图片然后显示的,不过就是额外需要增加一些处理而已。
本例子针对这三种方式分别进行介绍,图片的绑定操作。
为了方便演示,我们创建一个菜单对象类,然后构建一些数据用于列表的绑定操作,如下代码所示。
    /// <summary>

    /// 模拟一个菜单的对象,包括各种类型的图片信息

    /// </summary>

    public class MenuInfo

    {

        /// <summary>

        /// 编号

        /// </summary>

        public string ID { get; set; }

        /// <summary>

        /// 图标名称

        /// </summary>

        public string Name { get; set; }

        /// <summary>

        /// 图片路径

        /// </summary>

        public string ImageFilePath {get;set;}

        /// <summary>

        /// 图标字节

        /// </summary>

        public virtual byte[] EmbedIcon { get; set; }

        /// <summary>

        /// 图标图片对象

        /// </summary>

        public Image ImageIcon { get; set; }

        /// <summary>

        /// 构造函数

        /// 为了展示的方便,在构造函数里面构造相应的数据

        /// </summary>

        public MenuInfo()

        {

            this.ID = Guid.NewGuid().ToString();

            this.Name = "测试图片菜单";

            this.ImageFilePath = Path.Combine(System.Environment.CurrentDirectory, "app.ico");

            if (File.Exists(this.ImageFilePath))

            {

                this.EmbedIcon = FileUtil.FileToBytes(this.ImageFilePath);

                this.ImageIcon = ImageHelper.ImageFromUrl(this.ImageFilePath);

            }

        }
创建GridColumn的时候,我们可以利用GridVIew的扩展函数CreateColumn进行创建几个不同的列,如下代码所示。
   public partial class FrmRepositoryItemImageEdit : BaseForm

    {

        public FrmRepositoryItemImageEdit()

        {

            InitializeComponent();

            CreateGridView();

        }

        /// <summary>

        /// 创建gridView1列表所需显示的列

        /// </summary>

        private void CreateGridView()

        {

            //创建一个隐藏的ID列

            this.gridView1.CreateColumn("ID", "ID").Visible = false;

            //串一个名称的列,并指定宽度

            this.gridView1.CreateColumn("Name", "名称", );

            //创建一个图片路径的列,并指定它的编辑控件类型为RepositoryItemImageEdit

            //并为这个列实现ParseEditValue的方法,用于解析路径为具体的图片显示

            this.gridView1.CreateColumn("ImageFilePath", "图片路径绑定", ).CreateImageEdit().ParseEditValue += (s, e) =>

            {

                if (e.Value != null && e.Value is string && e.Value.ToString() != string.Empty)

                {

                    e.Value = Image.FromFile(string.Concat(e.Value));

                    e.Handled = true;

                }

            };

            //创建图片字节的列,用于显示图片

            this.gridView1.CreateColumn("EmbedIcon", "图片字节绑定", );

            //创建图片对象的列,用于显示图片

            this.gridView1.CreateColumn("ImageIcon", "图片对象绑定", );

        }
上面代码是创建GridView所需要显示的列信息,那么我们准备好数据源绑定到列表控件上就可以了,如下代码所示。
        /// <summary>

        /// 绑定列表数据

        /// </summary>

        private void BindData()

        {

            //构造只有一个记录的集合

            List<MenuInfo> menuList = new List<MenuInfo>()

            {

                new MenuInfo()

            };

            //绑定数据源到列表控件上

            this.gridControl1.DataSource = menuList;

        }
2、基于分页控件的图片绑定

很多时候,我们需要对数据库的数据进行分页显示,以提高显示的速度和效率,那么利用分页控件就可以获得很多这样统一的界面和高效率显示数据的好处,基于分页控件的处理本质上和上面的过程差不多,不过处理的代码需要变化一下,从而可以正常的实现图片绑定显示操作。
    /// <summary>

    /// 基于分页控件的图片显示案例

    /// </summary>

    public partial class FrmRepositoryItemImageEdit2 : BaseForm

    {

        public FrmRepositoryItemImageEdit2()

        {

            InitializeComponent();

            CreateGridView();

        }

        /// <summary>

        /// 创建gridView1列表所需显示的列

        /// </summary>

        private void CreateGridView()

        {

            this.winGridViewPager1.OnPageChanged += new EventHandler(winGridViewPager1_OnPageChanged);

            this.winGridViewPager1.OnRefresh += new EventHandler(winGridViewPager1_OnRefresh);

            this.winGridViewPager1.AppendedMenu = this.contextMenuStrip1;

            this.winGridViewPager1.ShowLineNumber = true;

            this.winGridViewPager1.BestFitColumnWith = false;//是否设置为自动调整宽度,false为不设置

            this.winGridViewPager1.gridView1.DataSourceChanged += new EventHandler(gridView1_DataSourceChanged);

        }

        /// <summary>

        /// 绑定数据后,分配各列的宽度

        /// </summary>

        private void gridView1_DataSourceChanged(object sender, EventArgs e)

        {

            //对图片路径的列,重新使用RepositoryItemPictureEdit类型

            //然后对该列的控件的ParseEditValue和FormatEditValue函数进行实现,从而实现路径到图片的显示

            var edit = this.winGridViewPager1.gridView1.Columns.ColumnByFieldName("ImageFilePath").CreatePictureEdit();

            edit.ParseEditValue += (s, se) =>

            {

                if (se.Value != null && se.Value.GetType() == typeof(string) && se.Value.ToString() != string.Empty)

                {

                    if (File.Exists(string.Concat(se.Value)))

                    {

                        var picture = ImageHelper.ImageFromUrl(string.Concat(se.Value));

                        se.Value = picture;

                        se.Handled = true;

                    }

                }

            };

            edit.FormatEditValue += (s, se) =>

            {

                if (File.Exists(string.Concat(se.Value)))

                {

                    var picture = ImageHelper.ImageFromUrl(string.Concat(se.Value));

                    se.Value = picture;

                    se.Handled = true;

                }

            };

            if (this.winGridViewPager1.gridView1.Columns.Count >  && this.winGridViewPager1.gridView1.RowCount > )

            {

                //统一设置100宽度

                foreach (DevExpress.XtraGrid.Columns.GridColumn column in this.winGridViewPager1.gridView1.Columns)

                {

                    column.Width = ;

                }

                //可特殊设置特别的宽度

                GridView gridView = this.winGridViewPager1.gridView1;

                if (gridView != null)

                {

                    //gridView.SetGridColumWidth("Note", 200);

                }

            }

        }
而在分页控件的数据绑定的时候,我们指定列名的中文名即可,如下代码所示
        /// <summary>

        /// 绑定列表数据

        /// </summary>

        private void BindData()

        {

            #region 添加别名解析

            this.winGridViewPager1.DisplayColumns = "Name,ImageFilePath,EmbedIcon,ImageIcon";

            this.winGridViewPager1.AddColumnAlias("ID", "编号");

            this.winGridViewPager1.AddColumnAlias("Name", "名称");

            this.winGridViewPager1.AddColumnAlias("ImageFilePath", "图片路径绑定");

            this.winGridViewPager1.AddColumnAlias("EmbedIcon", "图片字节绑定");

            this.winGridViewPager1.AddColumnAlias("ImageIcon", "图片对象绑定");

            this.winGridViewPager1.gridView1.OptionsBehavior.Editable = true;

            this.winGridViewPager1.gridView1.OptionsBehavior.ReadOnly = false;

            #endregion

            //构造只有一个记录的集合

            List<MenuInfo> menuList = new List<MenuInfo>()

            {

                new MenuInfo()

            };

            this.winGridViewPager1.DataSource = menuList;

        }
以上就是基于GridControl控件上绑定图片的几种操作方式,方便我们在项目中参考使用。
在GridControl控件上绑定图片的几种操作方式的更多相关文章
- 对话框上动态控件的创建、在Picture Control控件上显示图片
1 MFC对话框之上的动态控件的创建 对话框上的控件是MFC类的一个具体对象. 当在对话框之上使用静态控件时,可以根据类向导来为每个控件添加消息.响应函数以及变量. 当需要在对话框中动态的创建某个控 ...
- 保存图片控件上的图片到本地 出现错误:无法将类型为“System.Windows.Media.Imaging.BitmapFrameDecode”的对象强制转换为类型“System.Windows.Media.Imaging.BitmapImage”。
保存图片控件上的图片到本地 出现错误:无法将类型为“System.Windows.Media.Imaging.BitmapFrameDecode”的对象强制转换为类型“System.Windows.M ...
- Android控件上添加图片
项目中有一个点赞功能,点赞的小图标添加在点赞列表旁边,在xml里可以进行设置,也可以在代码中进行绘图. 下面是两种方法的设置: 1.xml里:一些控件:button.textView等等里面有个属性是 ...
- WPF DevExpress Chart控件 界面绑定数据源,不通过C#代码进行绑定
<Grid x:Name="myGrid" Loaded="Grid_Loaded" DataContext="{Binding PartOne ...
- WPF如何将数据库中的二进制图片数据显示在Image控件上
首先在xaml文件里定义一个Image控件,取名为img MemoryStream stream = new MemoryStream(获得的数据库对象): BitMapImage bmp = new ...
- Qt中,将以png为格式的图片在按钮控件上显示
在Qt编程中,我们常常会遇见这样或那样的小问题,这里,我介绍一个将png为格式的图片在按钮控件上显示的小功能. resistanceBtn = new QPushButton(element); re ...
- DevExpress GridControl控件行内新增、编辑、删除添加选择框
以下为内容以图片居多1234表示点击顺序 先新增一行 操作和新增数据行一样 打开ColumnEdit 选择new ButtenEdit new上方会出现一个系统命名的button 命名可以更改必须 ...
- DevExpress之GridControl控件小知识
DevExpress之GridControl控件小知识 一.当代码中的DataTable中有建数据关系时,DevExpress 的 GridControl 会自动增加一个子视图 .列名也就是子表的字段 ...
- DevExpress控件的GridControl控件小结
DevExpress控件的GridControl控件小结 (由于开始使用DevExpress控件了,所以要点滴的记录一下) 1.DevExpress控件组中的GridControl控件不能使横向滚动条 ...
随机推荐
- vue axios数据请求get、post方法的使用
我们常用的有get方法以及post方法,下面简单的介绍一下这两种请求方法 vue中使用axios方法我们先安装axios这个方法 npm install --save axios 安装之后采用按需引入 ...
- git 入门教程之协同开发
前面我们已经介绍过远程仓库的相关概念,不过那时并没有深入探讨,只是讲解了如何创建远程仓库以及推送最新工作成果到远程仓库,实际上远程仓库对于团队协同开发很重要,不仅仅是团队协同开发的基础,也是代码备份的 ...
- [20170607]再论Private Strand Flush Not Complete.txt
[20170607]再论Private Strand Flush Not Complete.txt --//曾经跟zergduan有过讨论,链接www.itpub.net/thread-2065703 ...
- myBase7.0破解
永久性破解 Mybase7Pro破解版下载:链接:https://pan.baidu.com/s/1ezb8bSqI0OPZnVgx-snA_Q 提取码:n72t 1.下载后安装 myBase-De ...
- SQL Server Browser探究
一.官网关于SQL SERVER Browser服务的解释(谷歌翻译后稍作修改的): https://docs.microsoft.com/en-us/sql/tools/configuration- ...
- ELK 处理 Percona 审计日志(填坑)
前提 1.有强烈的审计需求. 2.能允许10%-15%左右的性能损失. 3.有强烈的对数据库操作实时查看需求(一般都是为了领导要求). Logstash 比较坑的配置 1 2 3 4 5 6 7 ...
- CentOS 7.0下解决ifconfig: command not found的方法
在CentOS7.0中输入ifconfig命令会遇到-bash: ifconfig: command not found. 在CentOS最小安装时是没有附带ifconfig,我们进入sbin目录下可 ...
- Windows和Linux之间 rsync数据同步
转载于 https://www.linuxidc.com/Linux/2014-01/95722p2.htm rsync是类unix系统下的数据镜像备份工具,从软件的命名上就可以看出来了——rem ...
- LeetCode算法题-Reverse String(Java实现)
这是悦乐书的第205次更新,第217篇原创 01 看题和准备 今天介绍的是LeetCode算法题中Easy级别的第73题(顺位题号是344).编写一个以字符串作为输入并返回字符串的函数.例如: 输入: ...
- virtualbox+ievms:还你一个原装IE8
在web开发中,不可避免的一件事是浏览器兼容性问题,你永远无法想象项目正式上线后,坐在电脑前操作这套系统的人用的是什么版本的浏览器,IE(7,8,...),360,Chrome,火狐等,后面几个还好说 ...