
springboot整合es客户端操作elasticsearch(二)
在上章节中整合elasticsearch客户端出现版本问题进行了处理,这章来进行springboot整合得操作
环境:elaticsearch6.2.1,springboot 2.1.8 客户端版本采用6.6.1
一 pom.xml依赖引入
<?xml version="1.0" encoding="UTF-8"?>

<project xmlns="http://maven.apache.org/POM/4.0.0" xmlns:xsi="http://www.w3.org/2001/XMLSchema-instance"

         xsi:schemaLocation="http://maven.apache.org/POM/4.0.0 https://maven.apache.org/xsd/maven-4.0.0.xsd">

    <modelVersion>4.0.</modelVersion>

    <parent>

        <groupId>org.springframework.boot</groupId>

        <artifactId>spring-boot-starter-parent</artifactId>

        <version>2.1..RELEASE</version>

        <relativePath/> <!-- lookup parent from repository -->

    </parent>

    <groupId>com.cxy</groupId>

    <artifactId>elasticsearch</artifactId>

    <version>0.0.-SNAPSHOT</version>

    <name>elasticsearch</name>

    <description>Demo project for Spring Boot</description>

    <properties>

        <java.version>1.8</java.version>

    </properties>

    <dependencies>

        <dependency>

            <groupId>org.springframework.boot</groupId>

            <artifactId>spring-boot-starter-web</artifactId>

        </dependency>

        <dependency>

            <groupId>org.elasticsearch.client</groupId>

            <artifactId>elasticsearch-rest-high-level-client</artifactId>

            <version>6.6.</version>

        </dependency>

        <dependency>

            <groupId>org.elasticsearch</groupId>

            <artifactId>elasticsearch</artifactId>

            <version>6.6.</version>

        </dependency>

        <dependency>

            <groupId>org.springframework.boot</groupId>

            <artifactId>spring-boot-starter-test</artifactId>

            <scope>test</scope>

        </dependency>

        <dependency>

            <groupId>com.alibaba</groupId>

            <artifactId>fastjson</artifactId>

        </dependency>

        <dependency>

            <groupId>org.apache.commons</groupId>

            <artifactId>commons-io</artifactId>

        </dependency>

        <dependency>

            <groupId>org.apache.commons</groupId>

            <artifactId>commons-lang3</artifactId>

        </dependency>

        <dependency>

            <groupId>org.springframework.boot</groupId>

            <artifactId>spring-boot-starter-test</artifactId>

            <scope>test</scope>

        </dependency>

    </dependencies>

    <build>

        <plugins>

            <plugin>

                <groupId>org.springframework.boot</groupId>

                <artifactId>spring-boot-maven-plugin</artifactId>

            </plugin>

        </plugins>

    </build>

</project>
二 启动配置和yml文件
server:

  port: ${port:}

spring:

  application:

    name: xc-search-service

  elasticsearch:

    hostlist: ${eshostlist:127.0.0.1:}
package com.cxy.elasticsearch.config;

import org.apache.http.HttpHost;

import org.elasticsearch.client.RestClient;

import org.elasticsearch.client.RestHighLevelClient;

import org.springframework.beans.factory.annotation.Value;

import org.springframework.context.annotation.Bean;

import org.springframework.context.annotation.Configuration;

@Configuration

public class ElasticsearchConfig {

    @Value("${spring.elasticsearch.hostlist}")

    private String hostlist;

    @Bean

    public RestHighLevelClient restHighLevelClient(){

        //解析hostlist配置信息

        String[] split = hostlist.split(",");

        //创建HttpHost数组,其中存放es主机和端口的配置信息

        HttpHost[] httpHostArray = new HttpHost[split.length];

        for(int i=;i<split.length;i++){

            String item = split[i];

            httpHostArray[i] = new HttpHost(item.split(":")[], Integer.parseInt(item.split(":")[]), "http");

        }

        //创建RestHighLevelClient客户端

        return new RestHighLevelClient(RestClient.builder(httpHostArray));

    }

    //项目主要使用RestHighLevelClient,对于低级的客户端暂时不用

    @Bean

    public RestClient restClient(){

        //解析hostlist配置信息

        String[] split = hostlist.split(",");

        //创建HttpHost数组,其中存放es主机和端口的配置信息

        HttpHost[] httpHostArray = new HttpHost[split.length];

        for(int i=;i<split.length;i++){

            String item = split[i];

            httpHostArray[i] = new HttpHost(item.split(":")[], Integer.parseInt(item.split(":")[]), "http");

        }

        return RestClient.builder(httpHostArray).build();

    }

}
package com.cxy.elasticsearch;

import org.springframework.boot.SpringApplication;

import org.springframework.boot.autoconfigure.SpringBootApplication;

import org.springframework.context.annotation.ComponentScan;

@SpringBootApplication

@ComponentScan(basePackages={"com.cxy.elasticsearch"})//扫描本项目下的所有类

public class ElasticsearchApplication {

    public static void main(String[] args) {

        SpringApplication.run(ElasticsearchApplication.class, args);

    }

}
注:
@ComponentScan(basePackages={"com.cxy.elasticsearch"})//扫描本项目下的所有类
是可以不加得,只要目录保持在相关下就可以了
三 controller文件:
package com.cxy.elasticsearch.controller;

import org.elasticsearch.action.DocWriteResponse;

import org.elasticsearch.action.admin.indices.create.CreateIndexRequest;

import org.elasticsearch.action.admin.indices.create.CreateIndexResponse;

import org.elasticsearch.action.admin.indices.delete.DeleteIndexRequest;

import org.elasticsearch.action.get.GetRequest;

import org.elasticsearch.action.get.GetResponse;

import org.elasticsearch.action.index.IndexRequest;

import org.elasticsearch.action.index.IndexResponse;

import org.elasticsearch.action.support.master.AcknowledgedResponse;

import org.elasticsearch.client.IndicesClient;

import org.elasticsearch.client.RestClient;

import org.elasticsearch.client.RestHighLevelClient;

import org.elasticsearch.common.settings.Settings;

import org.elasticsearch.common.xcontent.XContentType;

import org.springframework.beans.factory.annotation.Autowired;

import org.springframework.stereotype.Controller;

import org.springframework.web.bind.annotation.RequestMapping;

import org.springframework.web.bind.annotation.RequestMethod;

import org.springframework.web.bind.annotation.RestController;

import java.io.IOException;

import java.text.SimpleDateFormat;

import java.util.Date;

import java.util.HashMap;

import java.util.Map;

@RestController

public class EsController {

    @Autowired

    RestHighLevelClient client;

    @Autowired

    RestClient restClient;

    @RequestMapping(value = "/createIndex" ,method = RequestMethod.POST)

    public String createIndex(){

        //创建索引请求对象

        CreateIndexRequest createIndexRequest = new CreateIndexRequest("chenxuyou3");

        // 设置参数

        createIndexRequest.settings(Settings.builder().put("number_of_shards","").put("number_of_replicas",""));

        //指定映射

        createIndexRequest.mapping("doc"," {\n" +

                " \t\"properties\": {\n" +

                "            \"studymodel\":{\n" +

                "             \"type\":\"keyword\"\n" +

                "           },\n" +

                "            \"name\":{\n" +

                "             \"type\":\"keyword\"\n" +

                "           },\n" +

                "           \"description\": {\n" +

                "              \"type\": \"text\",\n" +

                "              \"analyzer\":\"ik_max_word\",\n" +

                "              \"search_analyzer\":\"ik_smart\"\n" +

                "           },\n" +

                "           \"pic\":{\n" +

                "             \"type\":\"text\",\n" +

                "             \"index\":false\n" +

                "           }\n" +

                " \t}\n" +

                "}", XContentType.JSON);

        //指定索引操作的客户端

        IndicesClient indices = client.indices();

        //执行创建索引库

        CreateIndexResponse createIndexResponse = null;

        try {

            createIndexResponse = indices.create(createIndexRequest);

        } catch (IOException e) {

            e.printStackTrace();

        }

        boolean acknowledged = createIndexResponse.isAcknowledged();

        //获取返回结果

        System.err.println(acknowledged);

        return "ok";

    }

    @RequestMapping(value = "/deleteIndex",method = RequestMethod.POST)

    public String deleteIndex(){

        DeleteIndexRequest chenxuyou3 = new DeleteIndexRequest("chenxuyou2");

        IndicesClient indices = client.indices();

        AcknowledgedResponse delete =null;

        try {

            delete = indices.delete(chenxuyou3);

        } catch (IOException e) {

            e.printStackTrace();

        }

        boolean acknowledged = delete.isAcknowledged();

        System.err.println(acknowledged);

        return "";

    }

    @RequestMapping(value = "/addDoc",method = RequestMethod.POST)

    public String addDoc(){

//文档内容

        //准备json数据

        Map<String, Object> jsonMap = new HashMap<>();

        jsonMap.put("name", "spring cloud实战");

        jsonMap.put("description", "本课程主要从四个章节进行讲解: 1.微服务架构入门 2.spring cloud 基础入门 3.实战Spring Boot 4.注册中心eureka。");

        jsonMap.put("studymodel", "");

        SimpleDateFormat dateFormat =new SimpleDateFormat("yyyy-MM-dd HH:mm:ss");

        jsonMap.put("timestamp", dateFormat.format(new Date()));

        jsonMap.put("price", 5.6f);

        //创建索引创建对象

        //带有type的方法已经废弃

       // IndexRequest indexRequest = new IndexRequest("chenxuyou3","doc");

        IndexRequest indexRequest = new IndexRequest("chenxuyou3");

        //文档内容

        indexRequest.source(jsonMap);

        //通过client进行http的请求

        IndexResponse indexResponse = null;

        try {

            indexResponse = client.index(indexRequest);

        } catch (IOException e) {

            e.printStackTrace();

        }

        DocWriteResponse.Result result = indexResponse.getResult();

        System.err.println(result);

        return "ok";

    }

    @RequestMapping(value = "/selectDoc",method = RequestMethod.GET)

    public String selectDoc(){

        //查询请求对象

       // GetRequest getRequest = new GetRequest("chenxuyou2","doc","8tyV-m4B7rvW_ZY4LvVU");

        GetRequest getRequest = new GetRequest("chenxuyou3","doc","8tyV-m4B7rvW_ZY4LvVU");

        GetResponse getResponse = null;

        try {

            getResponse = client.get(getRequest);

        } catch (IOException e) {

            e.printStackTrace();

        }

        //得到文档的内容

        Map<String, Object> sourceAsMap = getResponse.getSourceAsMap();

        System.out.println(sourceAsMap);

        return "ok" ;

    }

}
注:
   //指定映射

        createIndexRequest.mapping("doc"," {\n" +

                " \t\"properties\": {\n" +

                "            \"studymodel\":{\n" +

                "             \"type\":\"keyword\"\n" +

                "           },\n" +

                "            \"name\":{\n" +

                "             \"type\":\"keyword\"\n" +

                "           },\n" +

                "           \"description\": {\n" +

                "              \"type\": \"text\",\n" +

                "              \"analyzer\":\"ik_max_word\",\n" +

                "              \"search_analyzer\":\"ik_smart\"\n" +

                "           },\n" +

                "           \"pic\":{\n" +

                "             \"type\":\"text\",\n" +

                "             \"index\":false\n" +

                "           }\n" +

                " \t}\n" +

                "}", XContentType.JSON);
这个就是我们平时在postman中配置得json文件
例如:
{

    "properties": {

        "description": {

            "type": "text",

            "analyzer": "ik_max_word",

            "search_analyzer": "ik_smart"

        },

        "name": {

            "type": "text",

            "analyzer": "ik_max_word",

            "search_analyzer": "ik_smart"

        },

        "pic": {

            "type": "text",

            "index": false

        },

        "price": {

            "type": "float"

        },

        "studymodel": {

            "type": "keyword"

        },

        "timestamp": {

            "type": "date",

            "format": "yyyy‐MM‐dd HH:mm:ss||yyyy‐MM‐dd||epoch_millis"

        }

    }

}
然后idea会进行编译下,所以导致阅读起来不是很好
调用删除aip接口:
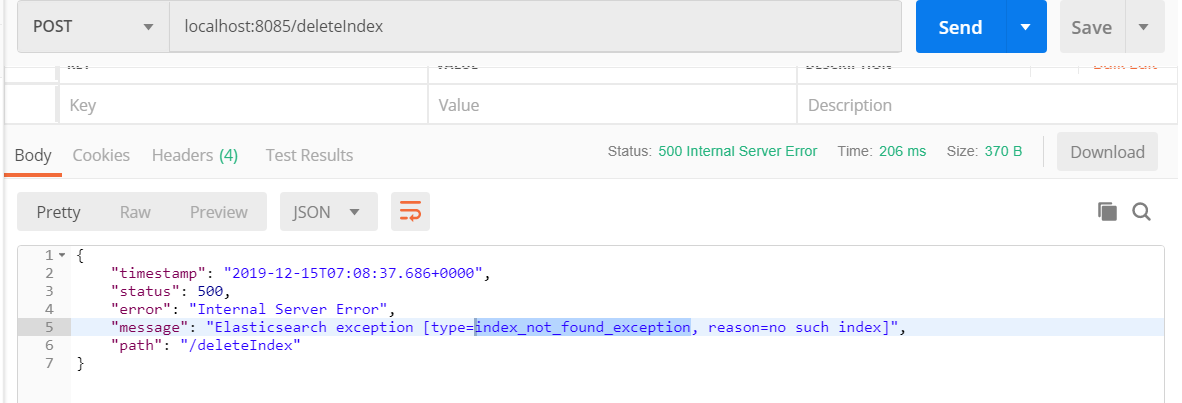
这个错误就是index不存在得意思。所以需要先调用下生成得,再进行删除
localhost:8085/createIndex
{

    "timestamp": "2019-12-15T07:10:34.015+0000",

    "status": ,

    "error": "Internal Server Error",

    "message": "Elasticsearch exception [type=resource_already_exists_exception, reason=index [chenxuyou3/sefNCOu1T8a7CKW463M83g] already exists]",

    "path": "/createIndex"

}
可以知道这个是存在得意思,随意修改代码再重新操作:
调用localhost:8085/addDoc
{

    "timestamp": "2019-12-15T07:13:38.902+0000",

    "status": ,

    "error": "Internal Server Error",

    "message": "Validation Failed: 1: type is missing;",

    "path": "/addDoc"

}
缺少type,由于在6版本中并没有删除所以需要修改这个部分代码
  //创建索引创建对象

        //带有type的方法已经废弃

        IndexRequest indexRequest = new IndexRequest("chenxuyou3","doc");

       // IndexRequest indexRequest = new IndexRequest("chenxuyou3");

        //文档内容
如图中,将type重新加入,就不会报错了
调用查询错误码405.请求方式有问题

修改方式再调用
控制台打印null
但是库里面确实有数据

id有问题,所以每次插入新数据时候id都不会一样,所以修改id
{price=5.6, studymodel=201001, name=spring cloud实战, description=本课程主要从四个章节进行讲解: 1.微服务架构入门 2.spring cloud 基础入门 3.实战Spring Boot 4.注册中心eureka。, timestamp=2019-12-15 15:15:29}
控制台打印出来数据。
所以这边对索引得删除与创建,文档得建立,和数据得查询已经完成。
下章进行文档得查询,修改,映射得修改查询
springboot整合es客户端操作elasticsearch(二)的更多相关文章
- springboot整合es客户端操作elasticsearch(五)
springboot整合es客户端操作elasticsearch的总结: 客户端可以进行可以对所有文档进行查询,就是不加任何条件: SearchRequest searchRequest = new ...
- springboot整合es客户端操作elasticsearch(四)
对文档查询,在实际开发中,对文档的查询也是偏多的,记得之前在mou快递公司,做了一套事实的揽件数据操作,就是通过这个来存储数据的,由于一天的数据最少拥有3500万数据 所以是比较多的,而且还要求查询速 ...
- springboot整合es客户端操作elasticsearch(三)
继续上个随笔: 那么我们只需要修改controller中文件就可以完成相关操作 本次主要是对文档得操作: 更新文档: package com.cxy.elasticsearch.controller; ...
- 使用Java客户端操作elasticsearch(二)
承接上文,使用Java客户端操作elasticsearch,本文主要介绍 常见的配置 和Sniffer(集群探测) 的使用. 常见的配置 前面已介绍过,RestClientBuilder支持同时提供一 ...
- SpringBoot整合ES+Kibana
前言:最近在写一个HTTP代理服务器,记录日志使用的是ES,所以涉及到SpringBoot和ES的整合,整合完毕后又涉及到数据可视化分析,所以使用了Kibana进行管理,有些坑,需要记录一下 Spri ...
- 使用Java客户端操作elasticsearch
Java REST客户端有两种风格: Java低级别REST客户端(Java Low Level REST Client,以后都简称低级客户端算了,难得码字):Elasticsearch的官方low- ...
- SpringBoot整合Mybatis完整详细版二:注册、登录、拦截器配置
接着上个章节来,上章节搭建好框架,并且测试也在页面取到数据.接下来实现web端,实现前后端交互,在前台进行注册登录以及后端拦截器配置.实现简单的未登录拦截跳转到登录页面 上一节传送门:SpringBo ...
- ElasticSearch(三)springboot整合ES
最基础的整合: 一.maven依赖 <parent> <groupId>org.springframework.boot</groupId> <artifac ...
- SpringBoot 整合es(elasticsearch)使用elasticsearch-rest-high-level-client实现增删改
引入依赖 <dependency> <groupId>org.projectlombok</groupId> <artifactId>lombok< ...
随机推荐
- HDU 5634 (线段树)
题目链接:http://acm.hdu.edu.cn/showproblem.php?pid=5634 题意:给出 n 个数,有三种操作,把区间的 ai 变为 φ(ai):把区间的 ai 变为 x:查 ...
- 在maven项目中如何引入另外一个项目(转)
原文链接:https://blog.csdn.net/jianfpeng241241/article/details/52654352 1 在Myeclipse中准备两个maven demo. , ...
- shell拷贝文件到另一台机器
#!/bin/bash data=$(date "+%Y-%m-%d %H:%M:%S") ip='192.168.10.14' password='fan' gitBak='/v ...
- (五)CWnd 所有窗口类的父类,CFrameWnd,Afx_xxx 全局函数,命名规范
CWnd::MessageBox: 只有CWnd的派生类才可以使用MessageBox 所以应用程序类中使用:AfxMessageBox // 初始化 OLE 库 if (!AfxOleInit()) ...
- 【CUDA 基础】6.3 重叠内和执行和数据传输
title: [CUDA 基础]6.3 重叠内和执行和数据传输 categories: - CUDA - Freshman tags: - 深度优先 - 广度优先 toc: true date: 20 ...
- vundle
vundle插件的使用方法: http://adam8157.info/blog/2011/12/use-vundle-to-manage-vim-plugins http://adam8157.in ...
- MySQL Innodb引擎和MyIASM引擎的区别
Innodb引擎 Innodb引擎提供了对数据库ACID事务的支持,并且实现了SQL标准的四种隔离级别.该引擎还提供了行级锁和外键约束,它的设计目标是处理大容量数据库系统,它本身其实就是基于MySQL ...
- codeforces405D
Toy Sum CodeForces - 405D Little Chris is very keen on his toy blocks. His teacher, however, wants C ...
- Django基础之命名URL和URL反向解析
在使用Django项目时,一个常见的需求是获得URL的最终形式,以用于嵌入到生成的内容中(视图中和显示给用户的URL等)或者用于处理服务器端的导航(重定向等). 人们强烈希望不要硬编码这些URL(费力 ...
- DOM元素
元素的三种创建方法 1.doumrnt.write(可以写类名,各种表情属性) script写在哪里就创建在哪 <button>点我</button> <sc ...