Celery分布式队列学习
1. celery介绍和使用
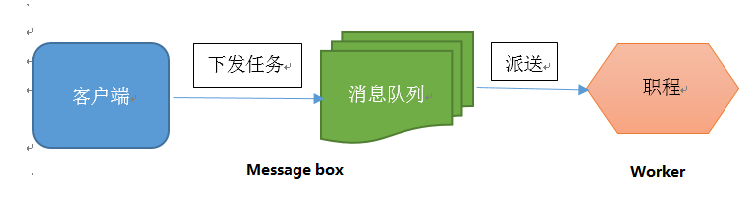
Celery 是一个 基于python开发的分布式异步消息任务队列(可以简单理解为python多进程或多线程中的queue),通过它可以轻松的实现任务的异步处理。celery的架构由三部分组成:消息中间件(message broker),任务执行单元(worker)和任务执行结果储存(task result store)。各个职责如下:
消息中间件
Celery本身不提供消息服务,但是可以方便的和第三方提供的消息中间件集成,包括RabbitMQ,Redis,MongoDB等。
任务执行单元
Worker是Celery提供的任务执行的单元,worker并发的运行在分布式的系统节点中
任务结果存储
Task result store用来存储Worker执行的任务的结果,Celery支持以不同方式存储任务的结果,包括Redis,MongoDB,Django ORM,AMQP等

安装celery和redis组件 (用redis做broker)
sudo pip install -U "celery[redis]"
sudo pip install celery
测试celery
新建一个python文件tasks.py
#/usr/bin/python

from celery import Celery

app = Celery('tasks',broker='redis://127.0.0.1:6379/0',backend='redis://127.0.0.1:6379/0')

# 'tasks'为module名称,broker为消息中间件,backend为任务结果存储地方(backend可以不设置,默认为disabledbackend)

#127.0.0.1:6379/0 为redis server安装的ip地址和端口,0为数据库编号(redis有0-16个数据库)

@app.task

def add(x, y):

    return x+y
启动celery worker来监听任务队列:
celery -A tasks worker --loglevel=info #tasks为上面module文件的名称
调用任务
再开一个终端,进入python环境
from tasks import add
add.delay(4,4)
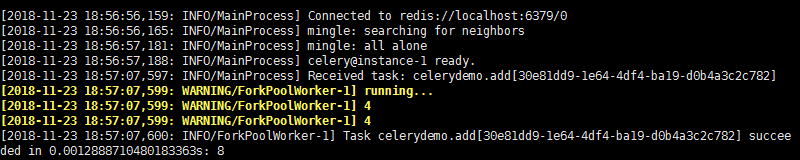
celery worker端执行结果如下,说明celery可以正常运行了
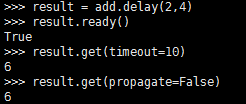
若设置了backend,可以查看任务执行结果
from tasks import add
result = add.delay(4,4)
#result.ready() #查看worker是否执行完任务
result.get(timeout=10) # 返回执行结果,若任务还未执行完成,等待10s,否则抛出异常
#result.get(propagate=False)
运行过程中出现的几个错误及解决方式:
bash:celery command not found:查看/usr/bin的确没有celery,最后发现celery安装在/usr/local/python-3.5.2/bin/目录下,而$PATH中不包括该目录,所以shell找不到celery命令,建立一个软连接就好了:sudo ln -s /usr/local/python-3.5.2/bin/celery /usr/bin/celery
AttributeError "'float' object has no attribute 'items'" :参考https://github.com/celery/celery/issues/5175发现原因,由于celery和redis 3.0版本兼容问题,需要回滚redis版本:pip install redis==2.10.6 (查看redis版本:pip show redis;)
2. celery在项目中的使用
建立一个python project,如下图所示
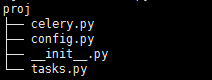
celery.py
#/usr/bin/python

#coding:utf-8

from __future__ import absolute_import

from celery import Celery

# absolute_import 保证从绝对路径引入celery,防止倒入时目录下celery.py文件覆盖celery库文件

app = Celery('proj', broker='redis://localhost',

        backend='redis://localhost', include=['proj.tasks'])

#将proj目录下tasks加进来

 app.config_from_object('proj.config')

#使用config.py作为配置文件,也可以直接在这里写相关配置信息

if __name__=='__main__':

    app.start()
tasks.py
#/usr/bin/python

#coding:utf-8

from __future__ import absolute_import

from proj.celery import app

@app.task

def add(x,y):

    print('running add..')

    return x+y

@app.task

def mul(x,y):

    print('running mul..')

    return x*y

@app.task

def sub(x,y):

    print('running sub..')

    return x-y
config.py
#/usr/bin/python

#coding:utf-8

from __future__ import absolute_import

#BROKER_URL='redis://localhost:6379/0'

#CELERY_RESULT_BACKEND='redis://localhost:6379/0'
在proj 所在路径下: celery -A proj worker -l info
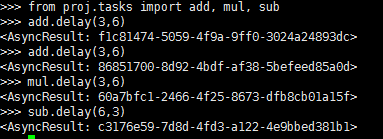
另外打开终端: from proj.tasks import add, mul, sub
add.delay(6,3)
后台启动多个worker :http://docs.celeryproject.org/en/latest/userguide/daemonizing.html#daemonizing
3,celery定时任务
http://docs.celeryproject.org/en/latest/userguide/periodic-tasks.html
利用celery beat任务模块可以完成定时任务,设定好任务的执行时间,celery就会定时自动帮你执行,还可以结合celery.schedules中的crontab模块来设置时间(类似于linux的crontab).新建periodic_task.py文件,代码如下:
#/usr/bin/python
#coding:utf-8
from celery import Celery
from celery.schedules import crontab app = Celery(broker='redis://localhost') #默认会采用broker_url='amqp://guest:guest@localhost:5672//',若未安装rabbitmq会报错@app.on_after_configure.connect
def setup_periodic_tasks(sender, **kwargs):
# Calls test('hello') every 10 seconds.
sender.add_periodic_task(10.0, test.s('hello'), name='add every 10') # Calls test('world') every 30 seconds
sender.add_periodic_task(30.0, test.s('world'), expires=10) # Executes every Monday morning at 7:30 a.m.
sender.add_periodic_task(
crontab(hour=7, minute=30, day_of_week=1),
test.s('Happy Mondays!'),
) @app.task
def test(arg):
print(arg)
上面是通过函数add_periodic_task()添加定时任务,也可以通过配置文件方式添加任务:
app.conf.beat_schedule = {

    'add-every-30-seconds': {

        'task': 'tasks.add',

        'schedule': 30.0,

        'args': (16, 16)

    },

}

app.conf.timezone = 'UTC'   #'Asia/Shanghai'
相关参数含义:
    task: The name of the task to execute.

    schedule:The frequency of execution.

        This can be the number of seconds as an integer, a timedelta, or a crontab. You can also define your own custom schedule types, by extending the interface of schedule.

    args: Positional arguments (list or tuple).

    kwargs: Keyword arguments (dict).

    options:Execution options (dict).

        This can be any argument supported by apply_async() – exchange, routing_key, expires, and so on.

    relative: If relative is true timedelta schedules are scheduled “by the clock.” This means the frequency is rounded to the nearest second, minute, hour or day depending on the period of the timedelta.

              By default relative is false, the frequency isn’t rounded and will be relative to the time when celery beat was started
启动任务调度器:celery beat
celery -A periodic_task beat
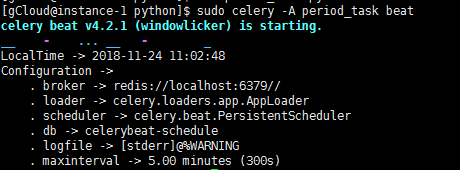
(beat需要存储任务的上一次执行时间到本地(默认celerybeat-schedule),所以需要有对当前文件路径的写权限,也可以自定义存储目录:如下命令)
celery -A proj beat -s /home/celery/var/run/celerybeat-schedule
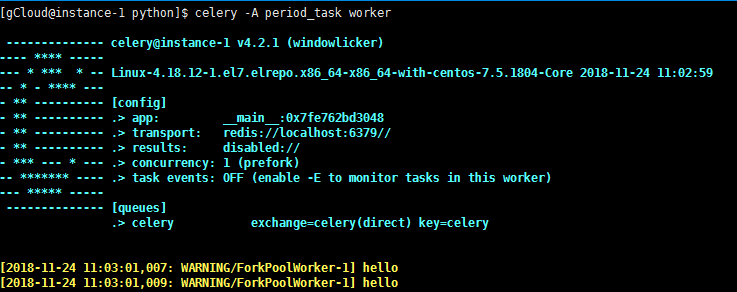
启动worker来执行任务:(另外打开终端)
celery -A periodic_task worker
利用corntab设置更复杂的定时时间,类似于linux中的corntab命令,linux crontab http://www.cnblogs.com/peida/archive/2013/01/08/2850483.html
如下面的每周一早上7:30
from celery.schedules import crontab

app.conf.beat_schedule = {

    # Executes every Monday morning at 7:30 a.m.

    'add-every-monday-morning': {

        'task': 'tasks.add',

        'schedule': crontab(hour=7, minute=30, day_of_week=1),

        'args': (16, 16),

    },

}
更多corntab示例:
| Example | Meaning |
crontab() |
Execute every minute. |
crontab(minute=0, hour=0) |
Execute daily at midnight. |
crontab(minute=0, hour='*/3') |
Execute every three hours: midnight, 3am, 6am, 9am, noon, 3pm, 6pm, 9pm. |
|
Same as previous. |
crontab(minute='*/15') |
Execute every 15 minutes. |
crontab(day_of_week='sunday') |
Execute every minute (!) at Sundays. |
|
Same as previous. |
|
Execute every ten minutes, but only between 3-4 am, 5-6 pm, and 10-11 pm on Thursdays or Fridays. |
crontab(minute=0,hour='*/2,*/3') |
Execute every even hour, and every hour divisible by three. This means: at every hour except: 1am, 5am, 7am, 11am, 1pm, 5pm, 7pm, 11pm |
crontab(minute=0, hour='*/5') |
Execute hour divisible by 5. This means that it is triggered at 3pm, not 5pm (since 3pm equals the 24-hour clock value of “15”, which is divisible by 5). |
crontab(minute=0, hour='*/3,8-17') |
Execute every hour divisible by 3, and every hour during office hours (8am-5pm). |
crontab(0, 0,day_of_month='2') |
Execute on the second day of every month. |
|
Execute on every even numbered day. |
|
Execute on the first and third weeks of the month. |
|
Execute on the eleventh of May every year. |
|
Execute on the first month of every quarter. |
官方文档:http://docs.celeryproject.org/en/latest/
参考博客:https://www.cnblogs.com/alex3714/p/6351797.html
https://www.cnblogs.com/forward-wang/p/5970806.html
Celery分布式队列学习的更多相关文章
- Celery ---- 分布式队列神器 ---- 入门
原文:http://python.jobbole.com/87238/ 参考:https://zhuanlan.zhihu.com/p/22304455 Celery 是什么? Celery 是一个由 ...
- Celery学习---Celery 分布式队列介绍及安装
Celery介绍和基本使用 Celery 是一个 基于python开发的分布式异步消息任务队列,通过它可以轻松的实现任务的异步处理, 如果你的业务场景中需要用到异步任务,就可以考虑使用celery, ...
- 分布式队列神器 Celery
Celery 是什么? Celery 是一个由 Python 编写的简单.灵活.可靠的用来处理大量信息的分布式系统,它同时提供操作和维护分布式系统所需的工具. Celery 专注于实时任务处理,支持任 ...
- 分布式队列Celery
Celery是什么? Celery 是一个由 Python 编写的简单.灵活.可靠的用来处理大量信息的分布式系统,它同时提供操作和维护分布式系统所需的工具. Celery 专注于实时任务处理,支持任务 ...
- 安装 rabbitmq ,通过生成器获取redis列表数据 与 Celery 分布式异步队列
一.安装rabbitmq @全体成员 超简易安装rabbitmq文档 1.安装配置epel源rpm -ivh http://dl.fedoraproject.org/pub/epel/6/i386/ ...
- 分布式队列 Celery
详情参见: 分布式队列神器 Celery 用户指南(User Guide) 1) Celery-4.1 用户指南: Application(应用) 2) Celery-4.1 用户指南: Task(任 ...
- 异步分布式队列Celery
异步分布式队列Celery 转载地址 Celery 是什么? 官网 Celery 是一个由 Python 编写的简单.灵活.可靠的用来处理大量信息的分布式系统,它同时提供操作和维护分布式系统所需的工具 ...
- 分布式深度学习DDL解析
分布式深度学习DDL解析 一.概述 给一个庞大的GPU集群,在实际的应用中,现有的大数据调度器会导致长队列延迟和低的性能,该文章提出了Tiresias,即一个GPU集群的调度器,专门适应分布式深度学习 ...
- Spring-data-redis: 分布式队列
Redis中list数据结构,具有"双端队列"的特性,同时redis具有持久数据的能力,因此redis实现分布式队列是非常安全可靠的.它类似于JMS中的"Queue&qu ...
随机推荐
- vue学习(8)-过渡transition&动画animate
进入之前 离开之后 v-enter---v-enter-to v-lea ...
- Android实习结束后的阶段性总结
2015年4月14日即将实习结束,在过去的五六个月里,对于Android开发还是学到了很多,临走前将以前做的笔记整理一下,自己也再回顾一次.零散是必然的,也可能只是一小段代码片段,但都是曾经我在学An ...
- 每天一个Linux命令之:chage
命令简介: 该命令用于密码时效管理.它可以修改账号和密码的有效期.对于chage命令的描述如下所示: The chage command changes the number of days betw ...
- 【Git】五、远程仓库
前面4节将的都是本地的git操作,这节开始讲合并到本地分支后,如何与远程仓库做交互 -------------------------------- 提要 //生成本地ssh密钥 $ ssh-keyg ...
- linux驱动程序与菜单关联
- 一图一知-TS之函数function
- 「SNOI2019」通信 分治建图
根据题意 每个点可以直接与S,T相连 也可以和前面的哨站相连 暴力建边的话 有n2条边 要用分治优化建边: 类似于归并排序 先对每一层分为左半边与右半边 对每一半都拿出来先排序去重后 直接排成一条链建 ...
- BZOJ 1188 / Luogu P3185 [HNOI2007]分裂游戏 (SG函数)
题意 有n个格子,标号为0 ~ n-1,每个格子上有若干石子,每次操作可以选一个0 ~ n-2的格子上的一颗石子,分裂为两颗,然后任意放在后面的两个格子内,这两个格子可以相同.求使先手必胜的第一步的方 ...
- BZOJ 2178: 圆的面积并 (辛普森积分)
code #include <set> #include <cmath> #include <cstdio> #include <cstring> #i ...
- keras计算指定层的输出
import keras model = keras.models.Sequential([ keras.layers.Dense(4, activation='relu', input_dim=1, ...