12、Nginx代理缓存服务
通常情况下缓存是用来减少后端压力, 将压力尽可能的往前推, 减少后端压力,提高网站并发延时

1.缓存常见类型
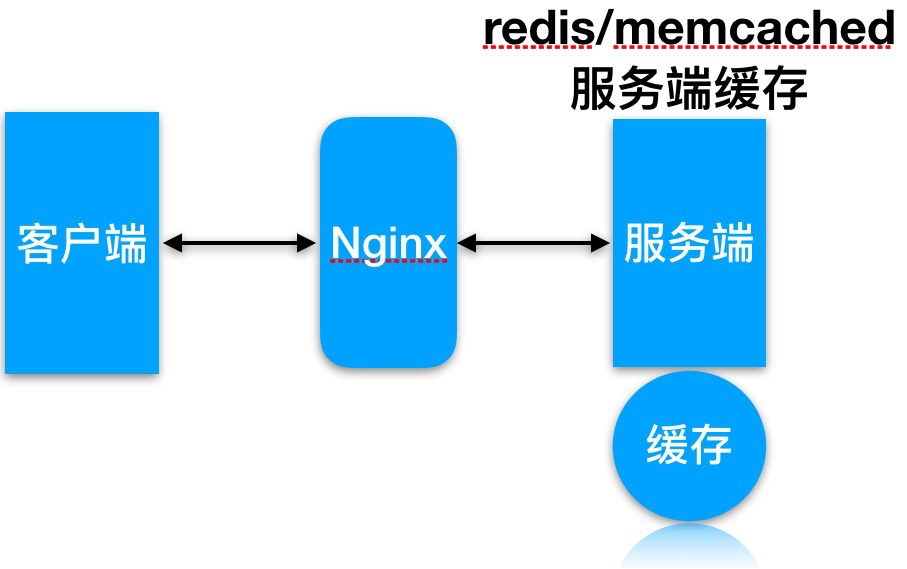
服务端缓存
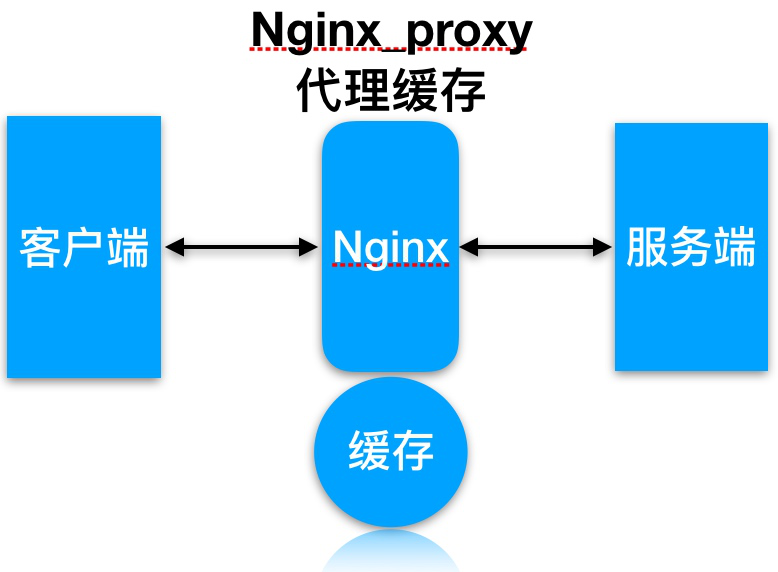
代理缓存, 获取服务端内容进行缓存
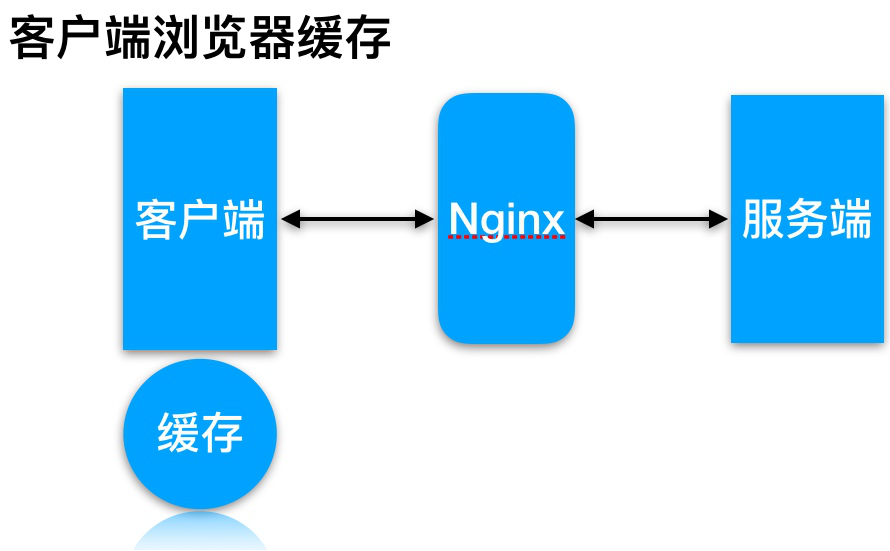
客户端浏览器缓存
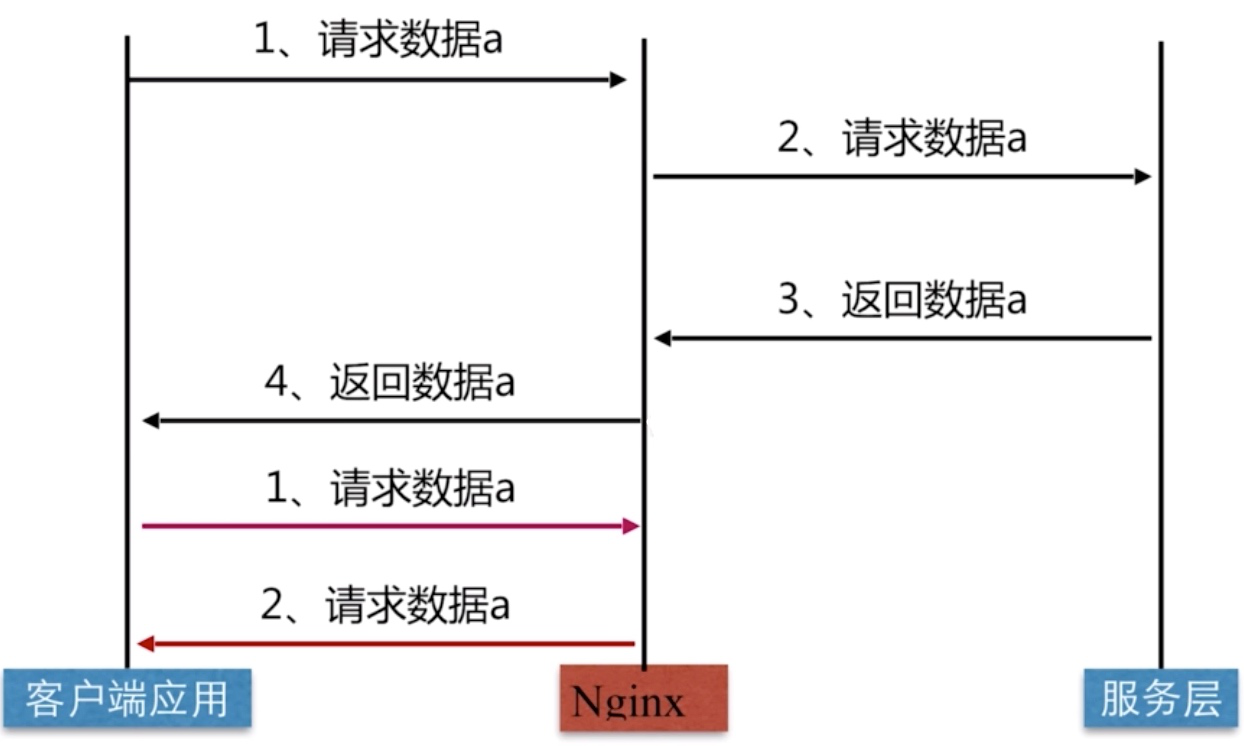
Nginx代理缓存原理
2.缓存配置语法
proxy_cache配置语法
Syntax: proxy_cache zone | off;

Default: proxy_cache off;

Context: http, server, location

#1.缓存路径

Syntax: proxy_cache_path path [levels=levels]

[use_temp_path=on|off] keys_zone=name:size [inactive=time]

[max_size=size] [manager_files=number] [manager_sleep=time][manager_threshold=time]

[loader_files=number] [loader_sleep=time] [loader_threshold=time] [purger=on|off]

[purger_files=number] [purger_sleep=time] [purger_threshold=time];

Default: —

Context: http

#2.缓存过期周期

Syntax: proxy_cache_valid [code ...] time;

Default: —

Context: http, server, location

#示例

proxy_cache_valid 200 302 10m;

proxy_cache_valid 404   1m;

#3.缓存的维度

Syntax: proxy_cache_key string;

Default:    proxy_cache_key $scheme$proxy_host$request_uri;

Context: http, server, location

#示例

proxy_cache_key "$host$request_uri $cookie_user";

proxy_cache_key $scheme$proxy_host$uri$is_args$args;
3.缓存配置实践
3.1.缓存准备
| 操作系统 | 应用服务 | 外网地址 | 内网地址 |
|---|---|---|---|
| CentOS7.5 | Nginx Proxy | 10.0.0.5 | 172.16.1.5 |
| CentOS7.5 | Nginx Web | 172.16.1.7 |
3.2.web节点准备
#建立相关目录

[root@web01 ~]# mkdir -p /soft/code{1..3}

#建立相关html文件

[root@web01 ~]# for i in {1..3};do echo Code1-Url$i > /soft/code1/url$i.html;done

[root@web01 ~]# for i in {1..3};do echo Code2-Url$i > /soft/code2/url$i.html;done

[root@web01 ~]# for i in {1..3};do echo Code3-Url$i > /soft/code3/url$i.html;done

#配置Nginx

[root@web01 ~]# cat /etc/nginx/conf.d/web_node.conf

server {

        listen 8081;

        root /soft/code1;

        index index.html;

}

server {

        listen 8082;

        root /soft/code2;

        index index.html;

}

server {

        listen 8083;

        root /soft/code3;

        index index.html;

}

#检查监听端口

[root@web01 ~]# netstat -lntp|grep 80

tcp        0      0 0.0.0.0:8081            0.0.0.0:*               LISTEN      50922/nginx: master

tcp        0      0 0.0.0.0:8082            0.0.0.0:*               LISTEN      50922/nginx: master

tcp        0      0 0.0.0.0:8083            0.0.0.0:*               LISTEN      50922/nginx: master
3.3.代理配置缓存
[root@lb01 ~]# mkdir /soft/cache

[root@lb01 ~]# cat /etc/nginx/conf.d/proxy_cache.conf

upstream cache {

    server 172.16.1.7:8081;

    server 172.16.1.7:8082;

    server 172.16.1.7:8083;

}

#proxy_cache存放缓存临时文件

#levels     按照两层目录分级

#keys_zone  开辟空间名, 10m:开辟空间大小, 1m可存放8000key

#max_size   控制最大大小, 超过后Nginx会启用淘汰规则

#inactive   60分钟没有被访问缓存会被清理

#use_temp_path  临时文件, 会影响性能, 建议关闭

proxy_cache_path /soft/cache levels=1:2 keys_zone=code_cache:10m max_size=10g inactive=60m use_temp_path=off;

server {

        listen 80;

        server_name cache.bgx.com;

#proxy_cache        开启缓存

#proxy_cache_valid  状态码200|304的过期为12h, 其余状态码10分钟过期

#proxy_cache_key    缓存key

#add_header         增加头信息, 观察客户端respoce是否命中

#proxy_next_upstream 出现502-504或错误, 会跳过此台服务器访问下台

        location / {

                proxy_pass http://cache;

                proxy_cache code_cache;

                proxy_cache_valid 200 304 12h;

                proxy_cache_valid any 10m;

                add_header Nginx-Cache "$upstream_cache_status";

                proxy_next_upstream error timeout invalid_header http_500 http_502 http_503  http_504;

                include proxy_params;

        }

}
3.4.客户端测试
#第一次访问无法命中

[root@lb01 ~]# curl -s -I http://cache.bgx.com/url3.html|grep "Nginx-Cache"

Nginx-Cache: MISS

#第二次访问命中

[root@lb01 ~]# curl -s -I http://cache.bgx.com/url3.html|grep "Nginx-Cache"

Nginx-Cache: HIT
4.缓存如何清理
如何清理proxy_cache代理的缓存
4.1.使用rm删除已缓存数据
[root@lb01 ~]# rm -rf /soft/cache/*

[root@lb01 ~]# curl -s -I http://cache.bgx.com/url3.html|grep "Nginx-Cache"

Nginx-Cache: MISS
4.2.通过ngx_cache_purge扩展模块清理, 需要编译安装Nginx
#建立对应目录

[root@lb01 ~]# mkdir /soft/src

[root@lb01 ~]# cd /soft/src

#下载Nginx包

[root@lb01 ~]# wget http://nginx.org/download/nginx-1.12.2.tar.gz

[root@lb01 ~]# tar xf nginx-1.12.2.tar.gz

#下载ngx_cache_purge

[root@lb01 ~]# wget http://labs.frickle.com/files/ngx_cache_purge-2.3.tar.gz

[root@lb01 ~]# tar xf ngx_cache_purge-2.3.tar.gz

#编译Nginx

[root@lb01 ~]# cd nginx-1.12.2/ && ./configure \

--prefix=/server/nginx --add-module=../ngx_cache_purge-2.3 \

--with-http_stub_status_module --with-http_ssl_module

[root@lb01 ~]# make && make install
4.3.增加清理缓存的location,配置如下内容
[root@lb01 ~]# cat /etc/nginx/conf.d/proxy_cache.conf

upstream cache {

    server 172.16.1.7:8081;

    server 172.16.1.7:8082;

    server 172.16.1.7:8083;

}

proxy_cache_path /soft/cache levels=1:2 keys_zone=code_cache:10m max_size=10g inactive=60m use_temp_path=off;

server {

    listen 80;

    server_name cache.bgx.com;

    location / {

        proxy_pass http://cache;

        proxy_cache code_cache;

        proxy_cache_valid 200 304 12h;

        proxy_cache_valid any 10m;

        add_header Nginx-Cache "$upstream_cache_status";

        proxy_next_upstream error timeout invalid_header http_500 http_502 http_503  http_504;

        include proxy_params;

        }

}

    location ~ /purge(/.*) {

        allow   127.0.0.1;

        allow   10.0.0.0/24;

        deny    all;

        proxy_cache_purge code_cache $host$1$is_args$args;

}

# 检测配置重新加载

[root@nginx conf.d]# /server/nginx/sbin/nginx -t

[root@nginx conf.d]# /server/nginx/sbin/nginx -s reload
4.4.使用浏览器访问建立缓存

4.5.通过访问purge/url地址,删除对应的缓存
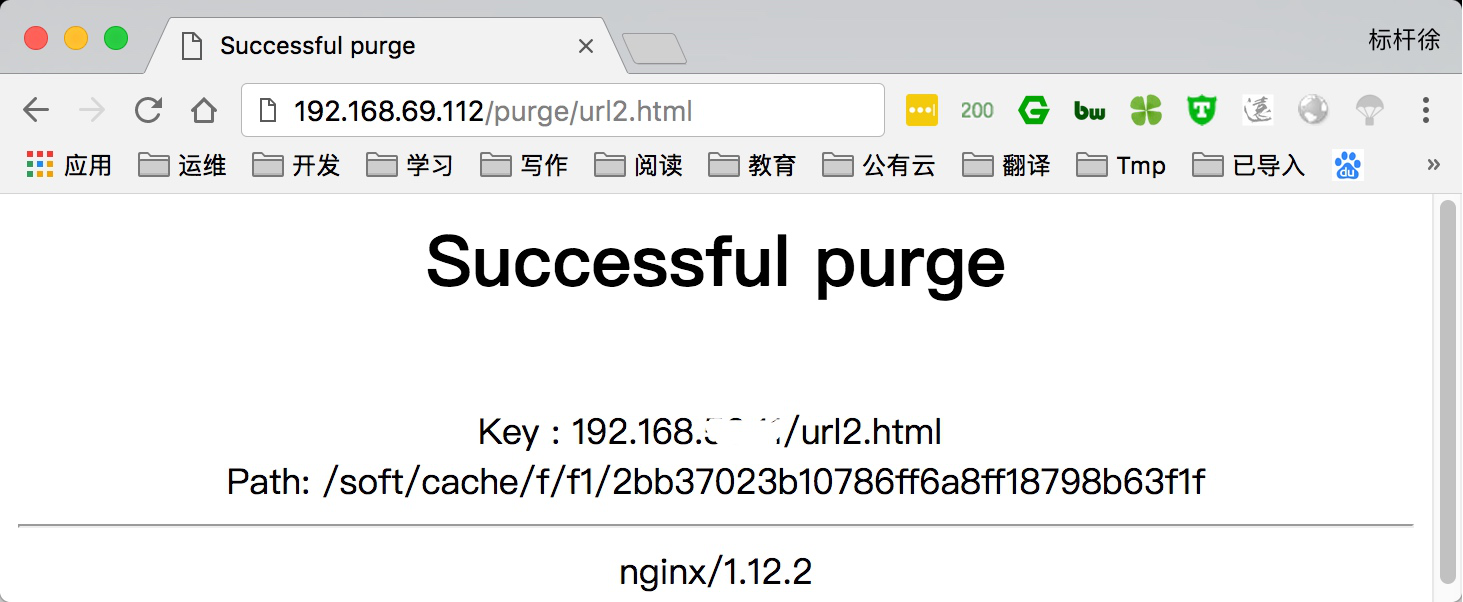
4.6.再次刷新就会因为缓存内容已清理,而出现404错误

5.指定页面不缓存
如何配置指定部分页面不进行proxy_Cache缓存
[root@lb01 ~]# cat /etc/nginx/conf.d/proxy_cache.conf

upstream cache{

    server 172.16.1.7:8081;

    server 172.16.1.7:8082;

    server 172.16.1.7:8083;

}

proxy_cache_path /soft/cache levels=1:2 keys_zone=code_cache:10m max_size=10g inactive=60m use_temp_path=off;

server {

    listen 80;

    server_name cache.bgx.com;

    #如果请求文件如下,则设定nocache为1

    if ($request_uri ~ ^/(url3|login|register|password)) {

        set $nocache 1;

    }

    location / {

        proxy_pass http://cache;

        proxy_cache code_cache;

        proxy_cache_valid 200 304 12h;

        proxy_cache_valid any 10m;

        proxy_cache_key $host$uri$is_args$args;

        proxy_no_cache $nocache $arg_nocache $arg_comment;  #不缓存变量为nocache

        proxy_no_cache $http_pargma $http_authorization;    #不缓存http参数以及http认证

        add_header Nginx-Cache "$upstream_cache_status";

        proxy_next_upstream error timeout invalid_header http_500 http_502 http_503  http_504;

        include proxy_params;

    }

}

#先清理所有缓存

[root@nginx ~]# rm -rf /soft/cache/*

#无论如何请求url3都无法命中

[root@nginx ~]# curl -s -I http://192.168.69.112/url3.html|grep "Nginx-Cache"

Nginx-Cache: MISS

[root@nginx ~]# curl -s -I http://192.168.69.112/url3.html|grep "Nginx-Cache"

Nginx-Cache: MISS

[root@nginx ~]# curl -s -I http://192.168.69.112/url3.html|grep "Nginx-Cache"

Nginx-Cache: MISS
6.缓存日志记录
通过日志记录proxy_cache命中情况与对应url
6.1.修改nginx的log_format格式,增加"$upstream_cache_status",该变量包含如下几种状态
MISS 未命中,请求被传送到后端
HIT 缓存命中,通过缓存返回数据
EXPIRED 缓存已经过期请求被传送到后端
UPDATING 正在更新缓存,将使用旧的应答
STALE 后端将得到过期的应答
[root@lb01 ~]# vim /etc/nginx/nginx.conf

http {

    log_format  main  '$http_user_agent' '$request_uri' '$remote_addr - $remote_user [$time_local] "$request" '

                      '$status $body_bytes_sent "$http_referer" '

                      '"$http_user_agent" "$http_x_forwarded_for"' '"$upstream_cache_status"';

}
6.2.在server标签中添加对应的access日志
server {

    ...

    access_log /var/log/nginx/proxy_cache.log main;

    ...

}
6.3.使用curl访问, 最后检查日志命令情况
[root@lb01 ~]# tail /var/log/nginx/proxy_cache.log

10.0.0.1 - - [19/Apr/2018:11:48:43 -0400] "HEAD /url3.html HTTP/1.1" 200 0 "-" "curl/7.29.0" "-""MISS"

10.0.0.1 - - [19/Apr/2018:11:48:45 -0400] "HEAD /url2.html HTTP/1.1" 200 0 "-" "curl/7.29.0" "-""HIT"

Nginx查看命中率
12、Nginx代理缓存服务的更多相关文章
- nginx的缓存服务
都知道缓存的目的是为了减小服务端的压力,可以在客户端直接取到数据 客户端---------------nginx(代理缓存)------------------服务端 代理缓存的描述: 就是客户端发送 ...
- 第16章 使用Squid部署代理缓存服务
章节概述: 本章节从代理缓存服务的工作原理开始讲起,让读者能够清晰理解正向代理(普通模式.透明模式)与反向代理的作用. 正确的使用Squid服务程序部署代理缓存服务可以有效提升访问静态资源的效率,降低 ...
- squid代理缓存服务
man.linuxde.net 1.squid是Linux系统中的代理缓存服务,通常用作WEB网站的前置缓存服务,能够代替用户向网站服务器请求页面数据并进行缓存. 2.squid服务特点:配置简单.效 ...
- nginx代理缓存
(1)缓存介绍 1.代理服务器端缓存作用 减少后端压力,提高网站并发延时 2.缓存常见类型 服务器端缓存:代理缓存,获取服务器端内容进行缓存 浏览器端缓存 3.nginx代理缓存:proxy_cach ...
- 代理缓存服务之Squid
代理缓存服务 Squid是linux系统中最为流行的一款高性能代理服务软件,通常用作Web网站的前置缓存服务,能够代替用户向网站服务器请求页面数据并进行缓存. 简单来说,Squid服务程序会按照收到的 ...
- Linux基础学习-使用Squid部署代理缓存服务
使用Squid部署代理缓存服务 Squid是Linux系统中最为流行的一款高性能代理服务软件,通常作为Web网站的前置缓存服务,能够代替用户向网站服务器请求页面数据并进行缓存.Squid服务配置简单. ...
- Nginx代理缓存功能
Nginx代理缓存功能 Nginx缓存主要是用于减轻后端服务器的负载,提高网站并发量,提升用户体验度. 注意:Nginx反向代理的缓存功能是由ngx_http_proxy_module提供, ...
- 《Linux就该这么学》培训笔记_ch16_使用Squid部署代理缓存服务
<Linux就该这么学>培训笔记_ch16_使用Squid部署代理缓存服务 文章最后会post上书本的笔记照片. 文章主要内容: 代理缓存服务 配置Squid服务程序 正向代理 标准正向代 ...
- 虚拟机中Linux环境下使用Squid部署代理缓存服务(及透明传输)
小知识: 正确的使用Squid服务程序部署代理缓存服务可以有效提升访问静态资源的效率,降低原服务器的负载. 不仅如此,还为读者们添加了对指定IP地址.网页关键词.网址与文件后缀的ACL访问限制功能的实 ...
随机推荐
- 【VBA】多条件去重
Function kaidan(txt)Dim i As IntegerDim arrSet d = CreateObject("scripting.dictionary")For ...
- 小D课堂 - 新版本微服务springcloud+Docker教程_3-01 什么是微服务的注册中心
笔记 第三章 SpringCloud核心组件注册中心 1.什么是微服务的注册中心 简介:讲解什么是注册中心,常用的注册中心有哪些 (画图) 理解注册中心:服务 ...
- 前端之路(一)之W3C是什么?
W3C 指万维网联盟(World Wide Web Consortium) W3C 最重要的工作是发展 Web 规范(称为推荐,Recommendations),这些规范描述了 Web 的通信协议(比 ...
- elk、kafka、zookeeper 安装
.elk解释 ELK分别是Elasticsearch.Logstash.Kibana三个开源框架缩写 Elasticsearch 开源分布式搜索引擎,提供存储.分析.搜索功能.特点:分布式.基于rea ...
- C 表达式中的汇编指令
asm 为 gcc 中的关键字,asm 表达式为在 C代码中嵌套汇编指令,该表达式只是单纯的替换出汇编代码,并不对汇编代码的含义进行解析. asm 表达式有两种形式,第二种 asm-qualifier ...
- nvm 安装及操作 node版本管理
安装 > curl -o- https://raw.githubusercontent.com/creationix/nvm/v0.31.1/install.sh | bash 安装完成后重启下 ...
- ERROR】Unable to open underlying table which is differently defined or of non-MyISAM type or ...
Error: Unable to open underlying table which is differently defined or of non-MyISAM type or doesn’t ...
- 安卓新发布机制----app bundle
Android App Bundle是一种改进的应用程序打包方式,能大幅度减少应用体积 unity可以直接导出appbundle,只需要在导出的时候勾选 但是通常项目有sdk离不开java端,我这里是 ...
- 【AMAD】dogpile.cache -- 一个Python缓存API,提供一套通用的接口来适配不同的缓存后端
简介 动机 作用 用法 个人评分 简介 Dogpile1由两套子系统组成,其中一个是基于另一个来构建的. dogpile提供了dogpile lock的概念,这个控制结构让一个线程可以被选为一些资源的 ...
- 解决android studio的Gradle一直在sync的办法
出现问题的原因就是gradle下载太慢了. 打开gradle-wrapper.properties文件.查看gradle版本.如下: distributionUrl=https\://services ...
