centos7使用haproxy1.7.5实现反向代理负载均衡实战
使用haproxy实现反向代理负载均衡实战
环境准备:两台虚拟机
# yum install -y gcc glibc gcc-c++ make screen tree lrzsz
node1源码编译安装haproxy
[root@node1 ~]# cd /usr/local/src
[root@node1 src]# wget http://www.haproxy.org/download/1.7/src/haproxy-1.7.5.tar.gz
[root@node1 src]# tar zxf haproxy-1.7.5.tar.gz
[root@node1 src]# cd haproxy-1.7.5
[root@node1 haproxy-1.7.5]# make TARGET=linux2628 PREFIX=/usr/local/haproxy-1.7.5
[root@node1 haproxy-1.7.5]# make install
[root@node1 haproxy-1.7.5]# cp /usr/local/sbin/haproxy /usr/sbin/
[root@node1 haproxy-1.7.5]# haproxy -v
HA-Proxy version 1.7.5 2017/04/03
Copyright 2000-2017 Willy Tarreau <willy@haproxy.org>
编辑Haproxy启动脚本
[root@node1 haproxy-1.7.5]# cp examples/haproxy.init /etc/init.d/haproxy
[root@node1 haproxy-1.7.5]# chmod 755 /etc/init.d/haproxy
针对配置文件的路径创建以下文件
[root@node1 haproxy-1.7.5]# useradd -r haproxy
[root@node1 haproxy-1.7.5]# mkdir /etc/haproxy
[root@node1 haproxy-1.7.5]# mkdir /var/lib/haproxy
[root@node1 haproxy-1.7.5]# mkdir /var/run/haproxy
编辑haproxy配置文件,配置log,并启动
[root@linux-node1 haproxy]# vim /etc/haproxy/haproxy.cfg
global
log 127.0.0.1 local3 info
chroot /var/lib/haproxy
user haproxy
group haproxy
daemon
defaults
log global
mode http
option httplog
option dontlognull
timeout connect 5000
timeout client 50000
timeout server 50000 frontend www_chinasoft_com
mode http
bind *:80
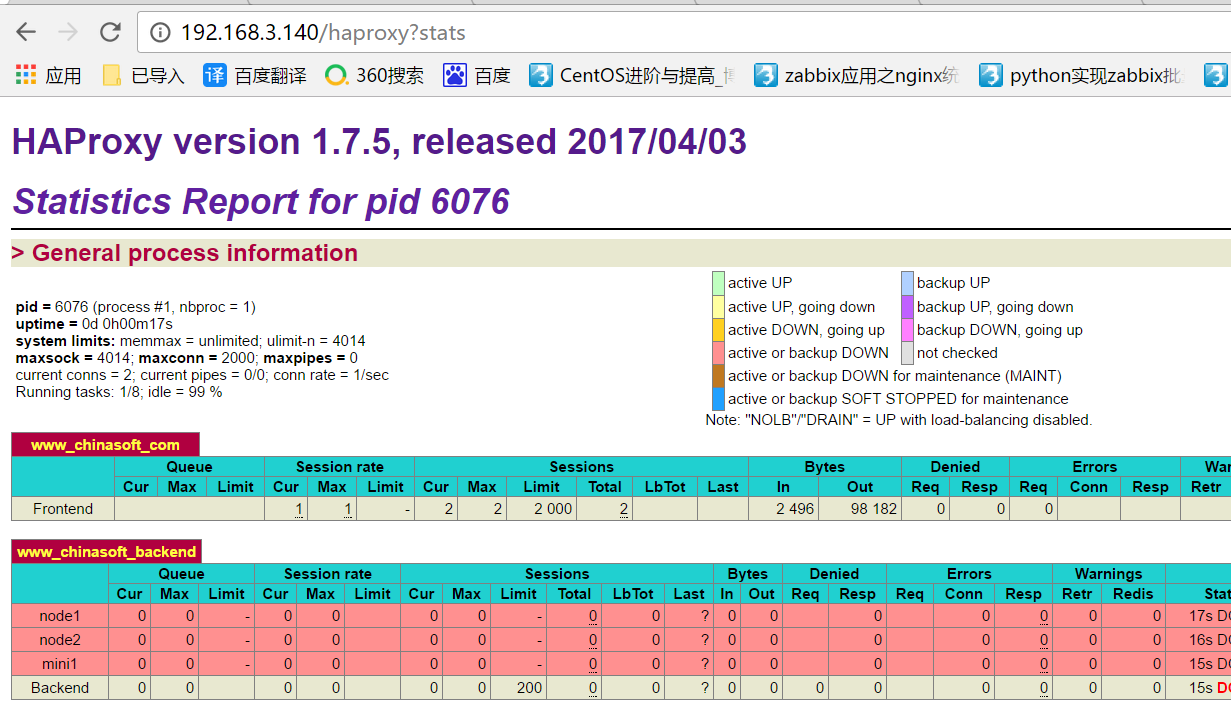
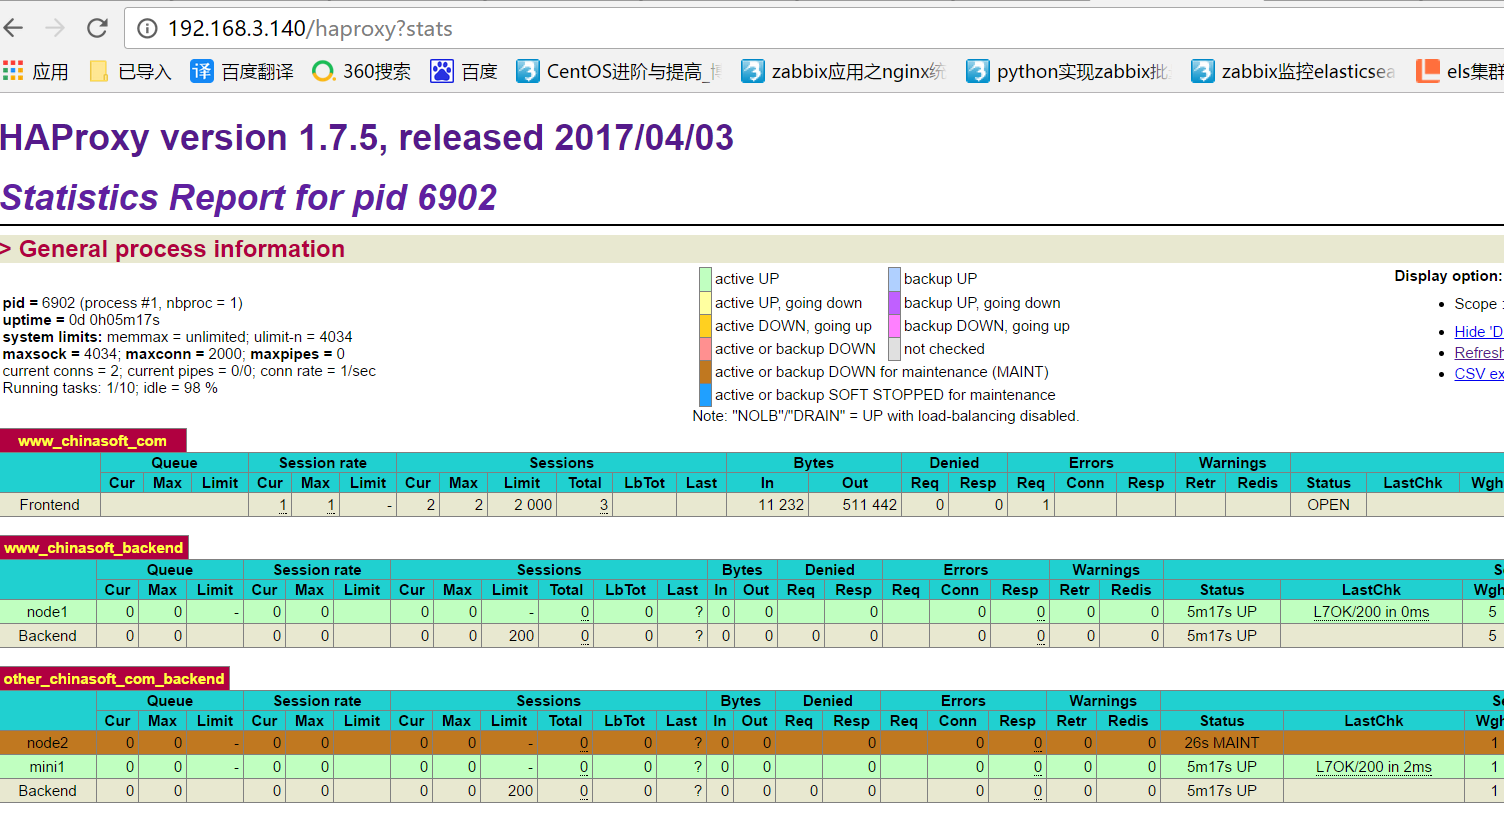
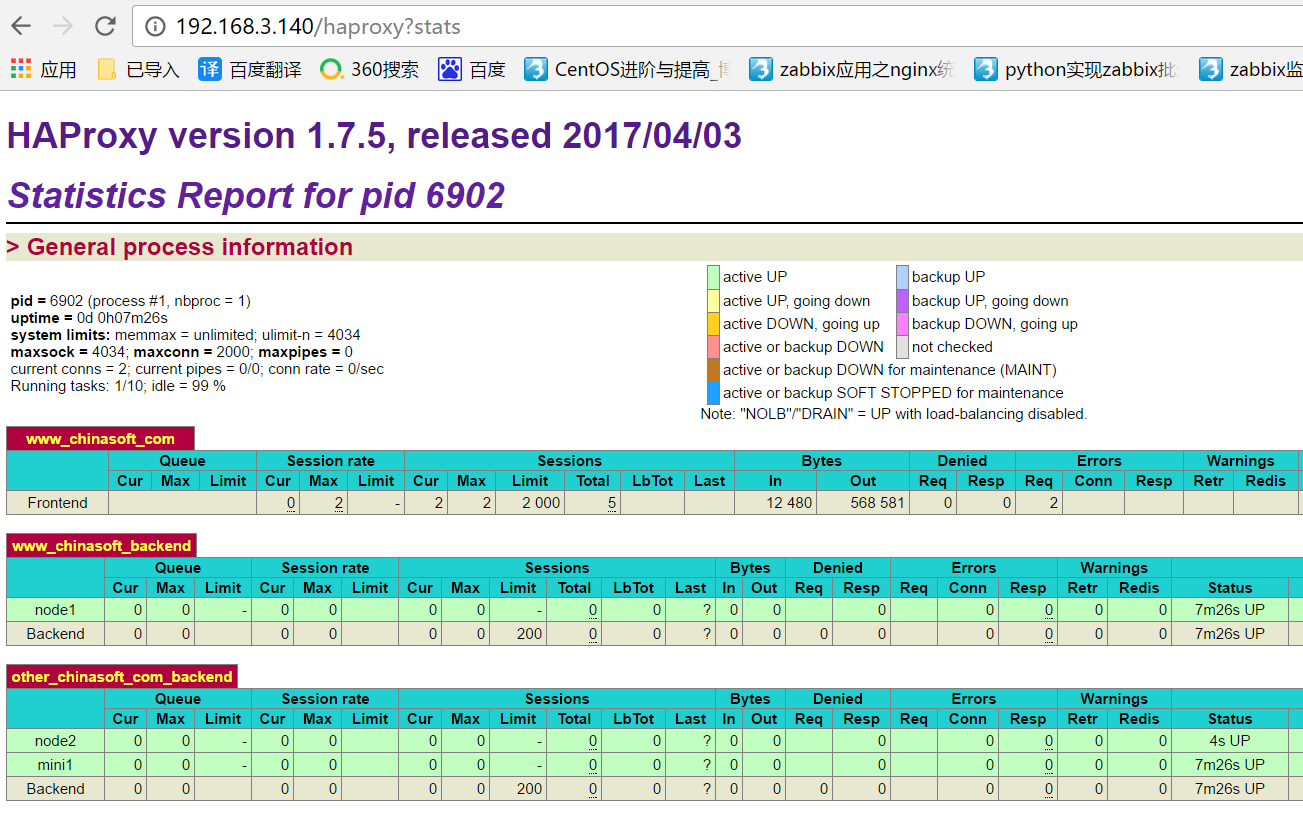
stats uri /haproxy?stats
default_backend www_chinasoft_backend backend www_chinasoft_backend
option httpchk GET /index.html
balance roundrobin
server node1 192.168.3.140:8080 check inter 2000 rise 3 fall 3 weight 5
server node2 192.168.3.200:8080 check inter 2000 rise 3 fall 3 weight 5
server mini1 192.168.3.12:8080 check inter 2000 rise 3 fall 3 weight 5
*******************************************************
global #全局配置,在所有配置段中都生效
log 127.0.0.1 local3 info #记录日志
chroot /var/lib/haproxy
user haproxy
group haproxy
daemon
defaults #默认配置,可以被前端和后端继承
log global #使用global的log设置
mode http #使用http模式,也可以使用tcp模式
option httplog #启动http请求的log
option dontlognull #在日志中不记录空连接(空连接:健康检查的链接)
timeout connect 5000 #长连接超时时间
timeout client 50000 #客户端连接超时
timeout server 50000 #RS连接超时
frontend www_chinasoft_com #前端配置 + 一个配置段的名字(最好不要乱写,和项目直接相关最佳)
mode http #使用http模式,也可以使用tcp模式
bind *:80 #监听80端口
stats uri /haproxy?stats #状态页面dashboard
default_backend www_chinasoft_com_backend #对应的backend名称
backend www_chinasoft_com_backend #对应的frontend的default_backend
#source cookie SERVERID
option httpchk GET /index.html #检测url
balance roundrobin #使用rr负载均衡方式
server node1 192.168.3.140:8080 check inter 2000 rise 3 fall 3 weight 5
server node2 192.168.3.200:8080 check inter 2000 rise 3 fall 3 weight 5
server mini1 192.168.3.12:8080 check inter 2000 rise 3 fall 3 weight 1 #RS健康检测时间间隔2秒,重试三次,失败三次不可用,权重1
*******************************************************

打开haproxy的日志
# vim /etc/rsyslog.conf

15 $ModLoad imudp #打开注释

16 $UDPServerRun 514 #打开注释

74 local3.* /var/log/haproxy.log #local3的路径
[root@node1 haproxy-1.7.5]# /etc/init.d/haproxy start
[root@node1 haproxy-1.7.5]# systemctl restart rsyslog.service
[root@node1 haproxy-1.7.5]# touch /var/log/haproxy.log
[root@node1 haproxy-1.7.5]# chown -R haproxy.haproxy /var/log/haproxy.log
[root@node1 haproxy-1.7.5]# /etc/init.d/haproxy restart
Restarting haproxy (via systemctl): [ OK ]
[root@node1 haproxy-1.7.5]# tail -f /var/log/haproxy.log
May 4 03:23:50 localhost haproxy[5793]: Stopping frontend www_chinasoft_com in 0 ms.
May 4 03:23:50 localhost haproxy[5793]: Stopping backend www_chinasoft_backend in 0 ms.
May 4 03:23:50 localhost haproxy[5793]: Proxy www_chinasoft_com stopped (FE: 0 conns, BE: 0 conns).
May 4 03:23:50 localhost haproxy[5793]: Proxy www_chinasoft_backend stopped (FE: 0 conns, BE: 0 conns).
May 4 03:23:50 localhost haproxy[5848]: Proxy www_chinasoft_com started.
[root@node1 ~]# sed -i 's/index.html/chinasoft.html/g' /etc/haproxy/haproxy.cfg
[root@node1 ~]# /etc/init.d/haproxy restart
Restarting haproxy (via systemctl): [ OK ]
[root@node1 ~]#
Message from syslogd@localhost at May 4 12:20:49 ...
haproxy[6076]: backend www_chinasoft_backend has no server available!
下面是检测url和uri的几种方式
option httpchk
option httpchk <uri>
option httpchk <method> <uri>
option httpchk <method> <uri> <version>
更改配置文件获取客户端的真实ip
在banckend配置段加入一个option
option forwardfor header X-REAL-IP #X-REAL-IP是自定义的一个名称
通过acl设置虚拟主机,一个前端可以对应多个后端,而实际生产环境建议一个frontend对应一个backend,并重载(生产不建议restart,restart会断开现有链接)
[root@node1 ~]# cat /etc/haproxy/haproxy.cfg

global

log 127.0.0.1 local3 info

chroot /var/lib/haproxy

user haproxy

group haproxy

daemon

defaults

log global

mode http

option httplog

option dontlognull

timeout connect 5000

timeout client 50000

timeout server 50000

frontend www_chinasoft_com

mode http

bind *:80

stats uri /haproxy?stats

default_backend www_chinasoft_backend    # 默认的backend

acl other_chinasoft_com hdr_end(host) other.chinasoft.com    # other_chinasoft_com:给此acl起一个名字;hdr(host):固定格式,用来识别host,如果没有匹配到acl,即访问default的bankcend

use_backend other_chinasoft_com_backend if other_chinasoft_com

backend www_chinasoft_backend

option forwardfor header X-REAL-IP

option httpchk GET /index.html

balance roundrobin

server node1 192.168.3.140:8080 check inter 2000 rise 3 fall 3 weight 5

backend other_chinasoft_com_backend

option forwardfor header X-REAL-IP

option httpchk GET /index.html

balance roundrobin

server node2 192.168.3.200:8080 check inter 2000 rise 3 fall 3 weight 1

server mini1 192.168.3.12:8080 check inter 2000 rise 3 fall 3 weight 1
在本地电脑使用host解析
192.168.3.140 www.chinasoft.com

192.168.3.140 other.chinasoft.com

192.168.3.12 other.chinasoft.com
通过浏览器访问不同的域名

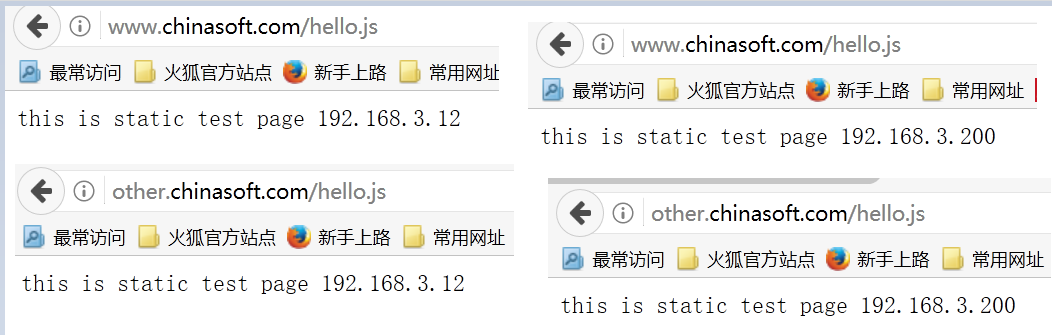
在fortend添加acl,根据静态文件,设置不同的backend(类似于location),注释的两行和前两行意义相同,分别是通过url正则匹配和url的后缀匹配
frontend www_chinasoft_com

mode http

bind *:80

stats uri /haproxy?stats

default_backend www_chinasoft_backend

acl other_chinasoft_com hdr_end(host) other.chinasoft.com

use_backend other_chinasoft_com_backend if other_chinasoft_com

#acl is_static_reg url_reg /*.(css|jpg|jpeg|png|js|gif)$

#use_backend other_chinasoft_com_backend if is_static_reg

acl is_static_path path_end .gif .png .css .jpg .jpeg

use_backend other_chinasoft_com_backend if is_static_path
[root@mini1 ~]# echo 'this is static test page <br> 192.168.3.12' > /var/www/html/hello.js
[root@mini3 ~]# echo 'this is static test page <br> 192.168.3.200' > /var/www/html/hello.js
[root@node1 html]# /etc/init.d/haproxy restart
Restarting haproxy (via systemctl): [ OK ]
其他形式的acl,正则或者UA(可以理解为nginx的location),更多形式的acl,请参考:http://cbonte.github.io/haproxy-dconv/configuration-1.6.html#acl
acl is_do_path url_reg /chuck.do

use_backend other_chuck-blog_com_backend if is_do_path

acl is_UA_path hdr_reg(User-Agent) -i andriod

use_backend other_chuck-blog_com_backend if is_UA_path
四、haproxy的动态维护
在配置文件添加socket
[root@node1 html]# head -8 /etc/haproxy/haproxy.cfg
global
log 127.0.0.1 local3 info
chroot /var/lib/haproxy
user haproxy
group haproxy
daemon
stats socket /var/lib/haproxy/haproxy.sock mode 600 level admin # 指定socket文件路径,权限,管理级别
stats timeout 2m # 指定超时时间
[root@node1 html]# /etc/init.d/haproxy restart
Restarting haproxy (via systemctl): [ OK ]
[root@node1 html]# ll /var/lib/haproxy/
total 0
srw------- 1 root root 0 May 4 14:38 haproxy.sock
安装socat
[root@node1 ~]# yum install -y socat
使用help查看socat的事情
[root@node1 ~]# echo 'help' | socat stdio /var/lib/haproxy/haproxy.sock

Unknown command. Please enter one of the following commands only :

help : this message

prompt : toggle interactive mode with prompt

quit : disconnect

disable agent : disable agent checks (use 'set server' instead)

disable health : disable health checks (use 'set server' instead)

disable server : disable a server for maintenance (use 'set server' instead)

enable agent : enable agent checks (use 'set server' instead)

enable health : enable health checks (use 'set server' instead)

enable server : enable a disabled server (use 'set server' instead)

set maxconn server : change a server's maxconn setting

set server : change a server's state, weight or address

get weight : report a server's current weight

set weight : change a server's weight (deprecated)

disable frontend : temporarily disable specific frontend

enable frontend : re-enable specific frontend

set maxconn frontend : change a frontend's maxconn setting

show servers state [id]: dump volatile server information (for backend <id>)

show backend : list backends in the current running config

shutdown frontend : stop a specific frontend

clear table : remove an entry from a table

set table [id] : update or create a table entry's data

show table [id]: report table usage stats or dump this table's contents

show errors : report last request and response errors for each proxy

clear counters : clear max statistics counters (add 'all' for all counters)

show info : report information about the running process

show stat : report counters for each proxy and server

show sess [id] : report the list of current sessions or dump this session

shutdown session : kill a specific session

shutdown sessions server : kill sessions on a server

show pools : report information about the memory pools usage

add acl : add acl entry

clear acl <id> : clear the content of this acl

del acl : delete acl entry

get acl : report the patterns matching a sample for an ACL

show acl [id] : report available acls or dump an acl's contents

add map : add map entry

clear map <id> : clear the content of this map

del map : delete map entry

get map : report the keys and values matching a sample for a map

set map : modify map entry

show map [id] : report available maps or dump a map's contents

show stat resolvers [id]: dumps counters from all resolvers section and

associated name servers

set maxconn global : change the per-process maxconn setting

set rate-limit : change a rate limiting value

set timeout : change a timeout setting

show env [var] : dump environment variables known to the process
查看info信息,内容值可以利用来监控
[root@node1 ~]# echo "show info" |socat stdio /var/lib/haproxy/haproxy.sock

Name: HAProxy

Version: 1.7.5

Release_date: 2017/04/03

Nbproc: 1

Process_num: 1

Pid: 6902

Uptime: 0d 0h03m26s

Uptime_sec: 206

Memmax_MB: 0

PoolAlloc_MB: 0

PoolUsed_MB: 0

PoolFailed: 0

Ulimit-n: 4034

Maxsock: 4034

Maxconn: 2000

Hard_maxconn: 2000

CurrConns: 0

CumConns: 3

CumReq: 3

Maxpipes: 0

PipesUsed: 0

PipesFree: 0

ConnRate: 0

ConnRateLimit: 0

MaxConnRate: 0

SessRate: 0

SessRateLimit: 0

MaxSessRate: 0

CompressBpsIn: 0

CompressBpsOut: 0

CompressBpsRateLim: 0

Tasks: 9

Run_queue: 1

Idle_pct: 100

node: node1
关闭linux-node2主机
[root@node1 ~]# echo "disable server other_chinasoft_com_backend/node2" |socat stdio /var/lib/haproxy/haproxy.sock
可以看到node2进入了维护(maintain)状态
打开node2主机(只对现有已经写到配置文件中的server生效,不能用来新增节点)
[root@node1 ~]# echo "enable server other_chinasoft_com_backend/node2" |socat stdio /var/lib/haproxy/haproxy.sock
五、生产环境遇到的问题
haproxy的本地端口可能用尽,解决方案如下4条
1)更改local的端口范围,调整内核参数
[root@node1 ~]# cat /proc/sys/net/ipv4/ip_local_port_range
32768 60999
2)调整timewait的端口复用,设置为1
[root@node1 ~]# cat /proc/sys/net/ipv4/tcp_tw_reuse
0
3)缩短tcp_wait的时间,不建议修改
[root@node1 ~]# cat /proc/sys/net/ipv4/tcp_fin_timeout
60
4)终极方案:增加为多个ip,自然端口数就够了
centos7使用haproxy1.7.5实现反向代理负载均衡实战的更多相关文章
- 反向代理负载均衡-----nginx
一:集群 1.1:集群的概念 集群是一组相互独立的.通过高速网络互联的计算机,他们构成了一个组,并以单一系统的模式加以管理.一个客户与集群相互作用时,集群像是一个独立的服务器.集群配置是用于提高 ...
- 反向代理负载均衡之nginx
一.集群 1.1 什么是集群 集群是一组相互独立的.通过高速网络互联的计算机,它们构成了一个组,并以单一系统的模式加以管理.一个客户与集群相互作用时,集群像是一个独立的服务器.集群配置是用于提高可用性 ...
- Centos7.4 Nginx反向代理+负载均衡配置
Ningx是一款高性能的HTTP和反向代理服务器,配置起来也比较简单. 测试环境: 172.16.65.190 Nginx-反向代理 172.16.65.191 Ningx-Web 172.16.65 ...
- Centos 7.6配置nginx反向代理负载均衡集群
一,实验介绍 利用三台centos7虚拟机搭建简单的nginx反向代理负载集群, 三台虚拟机地址及功能介绍 192.168.2.76 nginx负载均衡器 192.168.2.82 web ...
- 反向代理负载均衡之APACHE
反向代理负载均衡之APACHE 一.反向代理1.1 介绍反响代理 反向代理(Reverse Proxy)方式是指以代理服务器来接受internet上的连接请求,然后将请求转发给内部网络上的服务器,并将 ...
- Centos 7配置nginx反向代理负载均衡集群
一,实验介绍 利用三台centos7虚拟机搭建简单的nginx反向代理负载集群, 三台虚拟机地址及功能介绍 192.168.2.76 nginx负载均衡器 192.168.2.82 web ...
- 如何使用Weave以及Docker搭建Nginx反向代理/负载均衡服务器
Hi, 今天我们将会学习如何使用 Weave 和 Docker 搭建 Nginx 的反向代理/负载均衡服务器.Weave 可以创建一个虚拟网络将 Docker 容器彼此连接在一起,支持跨主机部署及自动 ...
- 项目实战2.2—nginx 反向代理负载均衡、动静分离和缓存的实现
实验一:实现反向代理负载均衡且动静分离 1.环境准备: 机器名称 IP配置 服务角色 备注 nginx VIP:172.17.11.11 反向代理服务器 开启代理功能 设置监控,调度 rs01 RIP ...
- Nginx 反向代理 负载均衡 虚拟主机配置
Nginx 反向代理 负载均衡 虚拟主机配置 通过本章你将学会利用Nginx配置多台虚拟主机,清楚代理服务器的作用,区分正向代理和反向代理的区别,搭建使用Nginx反向搭理和负载均衡,了解Nginx常 ...
随机推荐
- BloodHound官方使用指南
0x00 概观 1.BloodHound介绍 BloodHound是一种单页的JavaScript的Web应用程序,构建在Linkurious上,用Electron编译,NEO4J数据库是Power ...
- 跟我一起使用electron搭建一个文件浏览器应用吧(三)
第二篇博客中我们可以看到我们构建的桌面应用会显示我们的文件及文件夹. In the second blog, we can see that the desktop application we bu ...
- 安装 scrapy 报错 error: Microsoft Visual C++ 14.0 is required
问题描述 使用 pip install scrapy 安装 scrapy 时出现以下错误: error: Microsoft Visual C++ 14.0 is required 错误提示中给出了一 ...
- 函数和常用模块【day06】:datetime模块(二)
本节内容 1.datetime.datetime.now 2.datetime.date.fromtimestamp 3.datetime.timedelta 4.时间替换 1.datetime.da ...
- EasyUI的onLoadSuccess方法
EasyUI加载表单的时候,对表单内行数据进行判断,可以赋颜色,也可以进行其他操作 onLoadSuccess:function(data) { for(var i=0;i<data.rows. ...
- UVa 11134 Fabled Rooks(贪心)
题目链接 题意 在n*n的棋盘上的n个指定区间上各放1个'车’ , 使他们相互不攻击(不在同行或同列),输出一种可能的方法. 分析 每行每列都必须放车,把行列分开看,若行和列同时有解,则问题有解. ...
- C#实现虚拟控件列表显示100w个控件方法
方法一: C#的FlowlayoutPanel添加一定数据量的控件后就会空白,通过虚拟列表方式可以解决这个问题. 1.创建一个包含ScrollPanel和滚动条的用户控件,定义一个List,添加控件时 ...
- DotNetBar ButtonX添加下拉面板
1. 2.在窗口上放一个控件 Control选择这个控件,即可,如果想让textBox下拉面板,需要使用textBoxDropDown,而不是textBoxX,DotNetBar的命名很奇怪.
- 使用fastreport以代码方式创建报表
Report report = new Report();// register the "Products" tablereport.RegisterData(dataSet1. ...
- # 20155337 2016-2017-2 《Java程序设计》第八周学习总结
20155337 2016-2017-2 <Java程序设计>第八周学习总结 教材学习内容总结 第14章 NIO与NIO2 NIO简介 NIO使用频道来衔接数据结点,在处理数据时,NIO可 ...