angular 接入 IdentityServer4
angular 接入 IdentityServer4
Intro
最近把活动室预约的项目做了一个升级,预约活动室需要登录才能预约,并用 IdentityServer4 做了一个统一的登录注册中心,这样以后就可以把其他的需要用户操作的应用统一到 IdentityServer 这里,这样就不需要在每个应用里都做一套用户的机制,接入 IdentityServer 就可以了。
目前活动室预约的服务器端和基于 angular 的客户端已经完成了 IdentityServer 的接入,并增加了用户的相关的一些功能,比如用户可以查看自己的预约记录并且可以取消自己未开始的预约,
还有一个小程序版的客户端暂时还未完成接入,所以小程序版目前暂时是不能够预约的
为什么要写这篇文章
目前在网上看到很多都是基于 implicit 模式接入 IdentityServer,这样实现起来很简单,但是现在 OAuth 已经不推荐这样做了,OAuth 推荐使用 code 模式来代替 implicit
implicit 模式会有一些安全风险,implicit 模式会将 accessToken 直接返回到客户端,而 code 模式只是会返回一个 code,accessToken 和 code 的分离的两步,implicit 模式很有可能会将 token 泄露出去
详细可以参考 StackOverflow 上的这个问答
除此之外,还有一个小原因,大多是直接基于 oidc-client 的 一个 npm 包来实现的,我是用了一个针对 angular 封装的一个库 angular-oauth2-oidc,如果你在用 angular ,建议你可以尝试一下,针对 angular 做了一些封装和优化,对 angular 更友好一些
准备接入吧
API 配置
预约系统的 API 和网站管理系统是在一起的,针对需要登录才能访问的 API 单独设置了的 policy 访问
services.AddAuthentication()

    .AddIdentityServerAuthentication(IdentityServerAuthenticationDefaults.AuthenticationScheme, options =>

    {

        options.Authority = Configuration["Authorization:Authority"];

        options.RequireHttpsMetadata = false;

        options.NameClaimType = "name";

        options.RoleClaimType = "role";

    })

    ;

services.AddAuthorization(options =>

{

    options.AddPolicy("ReservationApi", builder => builder

        .AddAuthenticationSchemes(IdentityServerAuthenticationDefaults.AuthenticationScheme)

        .RequireAuthenticatedUser()

        .RequireScope("ReservationApi")

    );

});
需要授权才能访问的接口设置 Authorize 并指定 Policy 为 ReservationApi
[Authorize(Policy = "ReservationApi")]

[HttpPost]

public async Task<IActionResult> MakeReservation([FromBody] ReservationViewModel model)
IdentityServer Client 配置
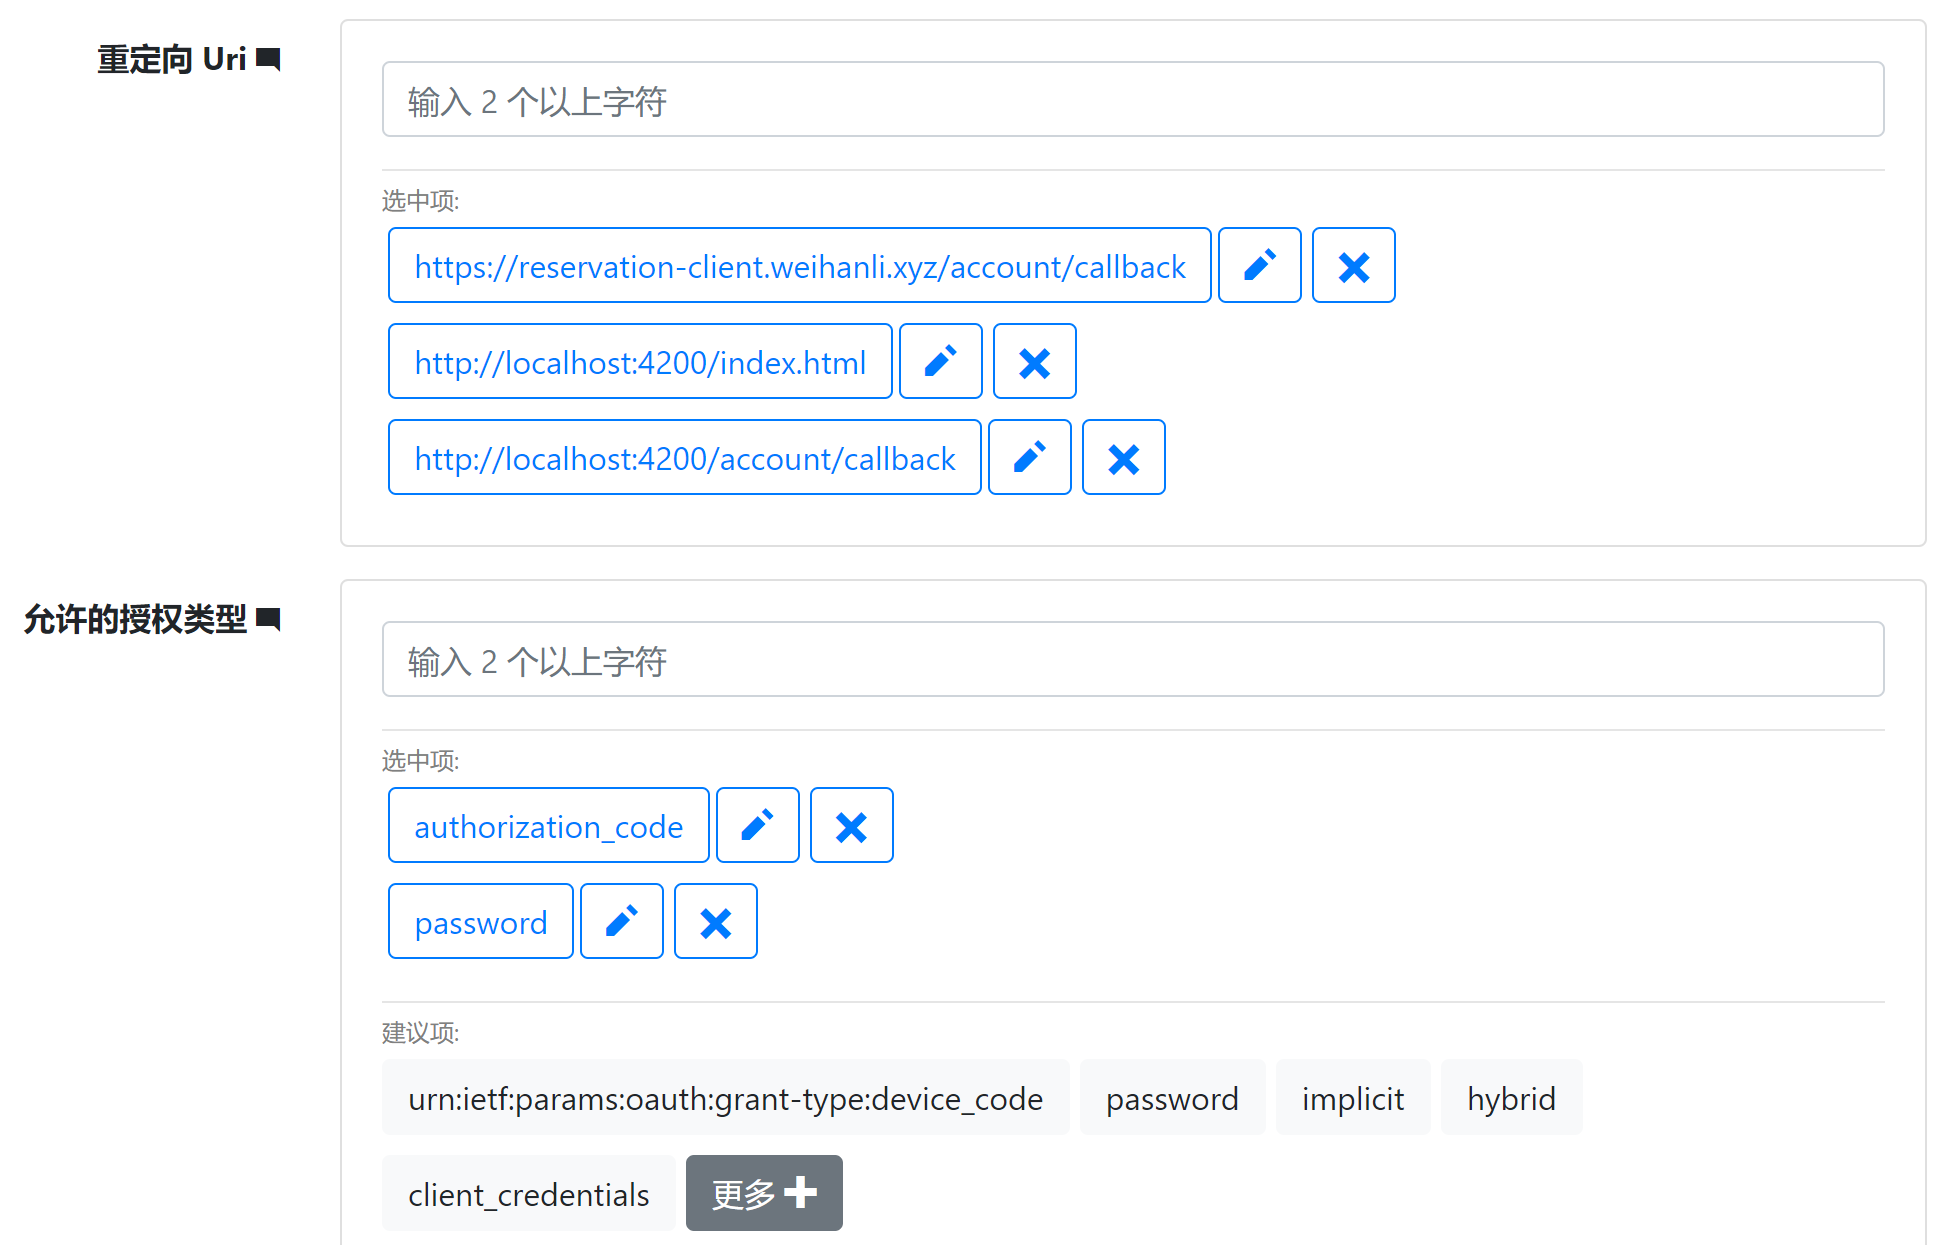
首先我们需要在 IdentityServer 这边添加一个客户端,因为我们要使用 code 模式,所以授权类型需要配置 authorization-code 模式,不使用 implicit 模式
允许的作用域(scope) 是客户端允许访问的 api 资源和用户的信息资源,openid 必选,profile 是默认的用户基本信息的集合,根据自己客户端的需要进行配置,ReservationApi 是访问 API 需要的 scope,其他的 scope 根据客户端需要进行配置

angular 客户端配置
安装 angular-oauth2-oidc npm 包,我现在使用的是 9.2.0 版本
添加 oidc 配置:
export const authCodeFlowConfig: AuthConfig = {

  issuer: 'https://id.weihanli.xyz',

  // URL of the SPA to redirect the user to after login

  redirectUri: window.location.origin + '/account/callback',

  clientId: 'reservation-angular-client',

  dummyClientSecret: 'f6f1f917-0899-ef36-63c8-84728f411e7c',

  responseType: 'code',

  scope: 'openid profile ReservationApi offline_access',

  useSilentRefresh: false,

  showDebugInformation: true,

  sessionChecksEnabled: true,

  timeoutFactor: 0.01,

  // disablePKCI: true,

  clearHashAfterLogin: false

};
在 app.module 引入 oauth 配置
  imports: [

    BrowserModule,

    AppRoutingModule,

    AppMaterialModule,

    HttpClientModule,

    FormsModule,

    ReactiveFormsModule,

    BrowserAnimationsModule,

    OAuthModule.forRoot({

      resourceServer: {

        allowedUrls: ['https://reservation.weihanli.xyz/api'],

        sendAccessToken: true

      }

    })

  ]
OAuthModule 里 resourceServer 中的 allowedUrls 是配置的资源的地址,访问的资源符合这个地址时就会自动发送 accessToken,这样就不需要自己实现一个 interceptor 来实现自动在请求头中设置 accessToken 了
在 AppComponment 的构造器中初始化 oauth 配置,并加载 ids 的发现文档
export class AppComponent {

  constructor(

        private oauth: OAuthService

    ) {

    this.oauth.configure(authConfig.authCodeFlowConfig);

    this.oauth.loadDiscoveryDocument();

    }

    // ...

}
添加一个 AuthGuard,路由守卫,需要登录才能访问的页面自动跳转到 /account/login 自动登录
AuthGuard:
import { Injectable } from '@angular/core';

import { CanActivate, Router } from '@angular/router';

import { OAuthService } from 'angular-oauth2-oidc';

@Injectable({

  providedIn: 'root'

})

export class AuthGuard implements CanActivate {

  constructor(private router: Router, private oauthService: OAuthService) {}

  canActivate() {

    if (this.oauthService.hasValidAccessToken()) {

      return true;

    } else {

      this.router.navigate(['/account/login']);

      return false;

    }

  }

}
路由配置:
import { NgModule } from '@angular/core';

import { Routes, RouterModule } from '@angular/router';

import { ReservationListComponent } from './reservation/reservation-list/reservation-list.component';

import { NoticeListComponent } from './notice/notice-list/notice-list.component';

import { NoticeDetailComponent } from './notice/notice-detail/notice-detail.component';

import { AboutComponent } from './about/about.component';

import { NewReservationComponent } from './reservation/new-reservation/new-reservation.component';

import { LoginComponent } from './account/login/login.component';

import { AuthGuard } from './shared/auth.guard';

import { AuthCallbackComponent } from './account/auth-callback/auth-callback.component';

import { MyReservationComponent } from './account/my-reservation/my-reservation.component';

const routes: Routes = [

  { path: '', component: ReservationListComponent },

  { path: 'reservations/new', component:NewReservationComponent, canActivate: [AuthGuard] },

  { path: 'reservations', component: ReservationListComponent },

  { path: 'notice', component: NoticeListComponent },

  { path: 'notice/:noticePath', component: NoticeDetailComponent },

  { path: 'about', component: AboutComponent },

  { path: 'account/login', component: LoginComponent },

  { path: 'account/callback', component: AuthCallbackComponent },

  { path: 'account/reservations', component: MyReservationComponent, canActivate: [AuthGuard] },

  { path: '**', redirectTo: '/'}

];

@NgModule({

  imports: [RouterModule.forRoot(routes)],

  exports: [RouterModule]

})

export class AppRoutingModule { }
AccountLogin 会将用户引导到 ids 进行登录,登录之后会跳转到配置的重定向 url,我配置的是 account/callback
import { Component, OnInit } from '@angular/core';

import { OAuthService } from 'angular-oauth2-oidc';

@Component({

  selector: 'app-login',

  templateUrl: './login.component.html',

  styleUrls: ['./login.component.less']

})

export class LoginComponent implements OnInit {

  constructor(private oauthService: OAuthService) {

  }

  ngOnInit(): void {

    // 登录

    this.oauthService.initLoginFlow();

  }

}
Auth-Callback
import { Component, OnInit } from '@angular/core';

import { OAuthService } from 'angular-oauth2-oidc';

import { Router } from '@angular/router';

@Component({

  selector: 'app-auth-callback',

  templateUrl: './auth-callback.component.html',

  styleUrls: ['./auth-callback.component.less']

})

export class AuthCallbackComponent implements OnInit {

  constructor(private oauthService: OAuthService, private router:Router) {

  }

  ngOnInit(): void {

    this.oauthService.loadDiscoveryDocumentAndTryLogin()

    .then(_=> {

      this.oauthService.loadUserProfile().then(x=>{

        this.router.navigate(['/reservations/new']);

      });

    });

  }

}
More
当前实现还不太完善,重定向现在始终是跳转到的新预约的页面,应当在跳转登录之前记录一下当前的地址保存在 storage 中,在 auth-callback 里登录成功之后跳转到 storage 中之前的地址
Reference
- https://sunnycoding.cn/2020/03/14/angular-spa-auth-with-ocelot-and-ids4-part3/#i-2
- https://github.com/OpenReservation/angular-client
- https://github.com/manfredsteyer/angular-oauth2-oidc/
- https://github.com/OpenReservation/ReservationServer
angular 接入 IdentityServer4的更多相关文章
- ASP.NET Core Swagger接入使用IdentityServer4 的 WebApi
写在前面 是这样的,我们现在接口使用了Ocelot做网关,Ocelot里面集成了基于IdentityServer4开发的授权中心用于对Api资源的保护.问题来了,我们的Api用了SwaggerUI做接 ...
- Angular SPA基于Ocelot API网关与IdentityServer4的身份认证与授权(一)
好吧,这个题目我也想了很久,不知道如何用最简单的几个字来概括这篇文章,原本打算取名<Angular单页面应用基于Ocelot API网关与IdentityServer4+ASP.NET Iden ...
- 每周.NET前沿技术文章摘要(2017-06-21)
汇总国外.NET社区相关文章,覆盖.NET ,ASP.NET等内容: .NET .NET Core Magic: Develop on one OS, run on another 链接:https: ...
- 每周.NET前沿技术文章摘要(2017-05-10)
汇总国内外.NET社区相关文章,覆盖.NET ,ASP.NET和Docker容器三个方面的内容: .NET Debugging .NET core with SOS everywhere 链接:htt ...
- Ocelot(四)- 认证与授权
Ocelot(四)- 认证与授权 作者:markjiang7m2 原文地址:https://www.cnblogs.com/markjiang7m2/p/10932805.html 源码地址:http ...
- .NETCore微服务探寻(二) - 认证与授权
前言 一直以来对于.NETCore微服务相关的技术栈都处于一个浅尝辄止的了解阶段,在现实工作中也对于微服务也一直没有使用的业务环境,所以一直也没有整合过一个完整的基于.NETCore技术栈的微服务项目 ...
- IdentityServer4密码模式接入现有用户数据表
具体接入identityserver请看文档,这里只简单列举部分步骤 1.创建一个web项目,引入Identityserver4的nuget包 2.新建一个类,实现IResourceOwnerPass ...
- Angular SPA基于Ocelot API网关与IdentityServer4的身份认证与授权(四)
在上一讲中,我们已经完成了一个完整的案例,在这个案例中,我们可以通过Angular单页面应用(SPA)进行登录,然后通过后端的Ocelot API网关整合IdentityServer4完成身份认证.在 ...
- Angular SPA基于Ocelot API网关与IdentityServer4的身份认证与授权(二)
上文已经介绍了Identity Service的实现过程.今天我们继续,实现一个简单的Weather API和一个基于Ocelot的API网关. 回顾 <Angular SPA基于Ocelot ...
随机推荐
- [Python基础]008.异常
异常 异常处理 捕获异常 抛出异常 自定义异常 一些常见的异常 异常处理 捕获异常 try/except 与C,java等语言用try/catch来捕获异常相似,Python使用try/except ...
- idea本地Maven仓库不能下载依赖jar包的解决方案
1.确认maven是否正正常安装,是否配置了环境变量,可以通过命令 mvn -version 看是否显示maven的版本信息. 2.检查maven的setting.xml配置文件中本地仓库位置配置是否 ...
- [Pyspark]RDD常用方法总结
aggregate(zeroValue, seqOp, combOp) 入参: zeroValue表示一组初值 Tuple seqOp表示在各个分区partition中进行 什么样的聚合操作,支持不同 ...
- Spring AMQP:RabbitTemplate SimpleMessageListenerContainer
一.RabbitTemplate介绍 RabbitTemplate:消息模板,在与Spring AMQP整合时,进行发送消息的关键类. 包括了可靠性投递消息方法.回调监听消息接口ConfirmCall ...
- jchdl - GSL实例:FullAdder
https://mp.weixin.qq.com/s/CtT08xZON0YxnheqDM2FAw 全加器是能够计算低位进位的二进制加法电路.与半加器相比,全加器不只考虑本位计算结果是否有进位,也考虑 ...
- Java实现 蓝桥杯 基础练习 闰年判断
基础练习 闰年判断 时间限制:1.0s 内存限制:256.0MB 提交此题 锦囊1 锦囊2 问题描述 给定一个年份,判断这一年是不是闰年. 当以下情况之一满足时,这一年是闰年: 年份是4的倍数而不是1 ...
- Java实现 LeetCode 516 最长回文子序列
516. 最长回文子序列 给定一个字符串s,找到其中最长的回文子序列.可以假设s的最大长度为1000. 示例 1: 输入: "bbbab" 输出: 4 一个可能的最长回文子序列为 ...
- Java实现 蓝桥杯VIP 算法提高 勾股数
算法提高 勾股数 时间限制:1.0s 内存限制:256.0MB 问题描述 勾股数是一组三个自然数,a < b < c,以这三个数为三角形的三条边能够形成一个直角三角形 输出所有a + b ...
- Java实现 LeetCode 84 柱状图中最大得矩形
84. 柱状图中最大的矩形 给定 n 个非负整数,用来表示柱状图中各个柱子的高度.每个柱子彼此相邻,且宽度为 1 . 求在该柱状图中,能够勾勒出来的矩形的最大面积. 以上是柱状图的示例,其中每个柱子的 ...
- java实现数组转置
** 数组转置** 编写程序将2行3列的数组行列置换复制给3行2列的数组(即数组的转置).已经写了如下代码,请完善之: class y{ public static void main(String[ ...