MyBatis从入门到精通(第9章):Spring集成MyBatis(下)
MyBatis从入门到精通(第9章):Spring集成MyBatis(下)
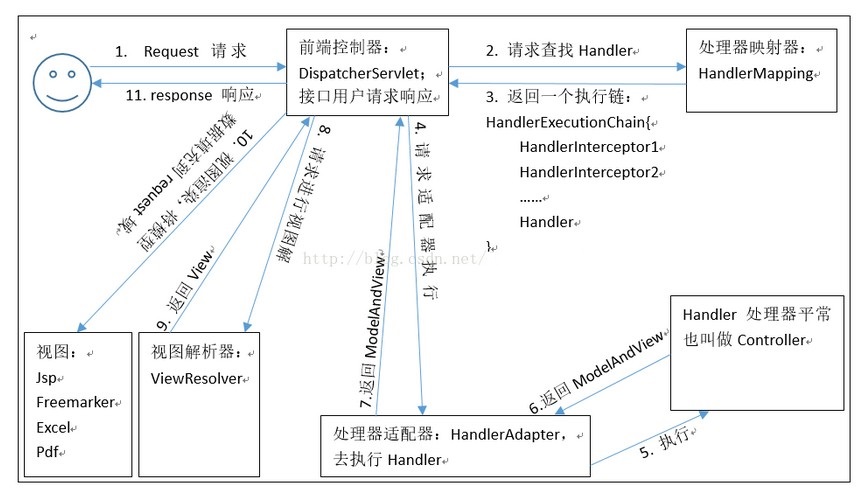
springmvc执行流程原理
- mybatis-spring 可以帮助我们将MyBatis代码无缝整合到Spring中。使用这个类库中的类,Spring将会加载必要的MyBatis工厂类和Session类。
- MyBatis Spring Adapter项目地址为: https://github.com/mybatis/spring
    <dependency>

      <groupId>org.mybatis</groupId>

      <artifactId>mybatis-spring</artifactId>

      <version>1.3.3</version>

    </dependency>
9.4.3 开发业务层(Service层)
虽然针对接口编程对小的项目来说并不重要,但是这里为了形式上的需要仍然提供了Service接口。
在 src/main/java 中新建 cn.bjut.mybatis.web.service 包,然后添加 DictService接口,代码如下。
package cn.bjut.mybatis.web.service;

import cn.bjut.mybatis.web.model.SysDict;

import java.util.List;

/**

 * @author kangmianfeng

 */

public interface DictService {

    SysDict findById(Long id);

    List<SysDict> findBySysDict(SysDict sysDict, Integer offset, Integer limit);

    boolean saveOrUpdate(SysDict sysDict);

    boolean deleteById(Long id);

}
Service层的 saveOrUpdate 方法对应DAO层的 Mapper 中的insert和updateById方法,其他3个方法和DAO层的方法一 一对应。
在 cn.bjut.mybatis.web.service 包下创建 impl包,然后新建 DictService接口的实现类 DictServiceImpl,代码如下。
package cn.bjut.mybatis.web.service.Impl;

import cn.bjut.mybatis.web.mapper.DictMapper;

import cn.bjut.mybatis.web.model.SysDict;

import cn.bjut.mybatis.web.service.DictService;

import org.apache.ibatis.session.RowBounds;

import org.springframework.beans.factory.annotation.Autowired;

import org.springframework.stereotype.Service;

import java.util.List;

/**

 * @author kangmianfeng

 */

@Service

public class DictServiceImpl implements DictService {

    @Autowired

    private DictMapper dictMapper;

    @Override

    public SysDict findById(Long id) {

        return dictMapper.selectByPrimaryKey(id);

    }

    public List<SysDict> findBySysDict(SysDict sysDict, Integer offset, Integer limit) {

        RowBounds rowBounds = RowBounds.DEFAULT;

        if(offset != null && limit != null){

            rowBounds = new RowBounds(offset, limit);

        }

        return dictMapper.selectBySysDict(sysDict, rowBounds);

    }

    @Override

    public boolean saveOrUpdate(SysDict sysDict) {

        if(sysDict.getId() == null){

            return dictMapper.insert(sysDict) == 1;

        } else {

            return dictMapper.updateById(sysDict) == 1;

        }

    }

    @Override

    public boolean deleteById(Long id) {

        if(id == null){

            throw new NullPointerException("id");

        }

        return dictMapper.deleteById(id) == 1;

    }

}
Service的实现类中需要添加 @Service注解,在9.2节集成Spring时配置过“自动扫描包”,包名是 cn.bjut.mybatis.web.service.impl ,
DictServiceImpl实现类所在的包就是符合这个包名规则的,加上注解后,Spring在初始化时就会扫描到这个类,然后由Spring管理这个类。
因为配置了自动扫描Mapper接口,所以在 Service层 可以直接通过以下代码 注入Mapper 。
@Autowired
private DictMapper dictMapper;
9.4.4 开发控制层(Controller层)
在 cn.bjut.mybatis.web.controller 包下,新建 DictController类,代码如下。
package cn.bjut.mybatis.web.controller;

import cn.bjut.mybatis.web.model.SysDict;

import cn.bjut.mybatis.web.service.DictService;

import org.springframework.beans.factory.annotation.Autowired;

import org.springframework.stereotype.Controller;

import org.springframework.ui.ModelMap;

import org.springframework.web.bind.annotation.RequestMapping;

import org.springframework.web.bind.annotation.RequestMethod;

import org.springframework.web.bind.annotation.RequestParam;

import org.springframework.web.bind.annotation.ResponseBody;

import org.springframework.web.servlet.ModelAndView;

import java.util.List;

/**

 * @author kangmianfeng

 */

@Controller

@RequestMapping("/dicts")

public class DictController {

    @Autowired

    private DictService dictService;

    /**

     * 显示字典数据列表

     *

     * @param sysDict

     * @param offset

     * @param limit

     * @return

     */

    @RequestMapping

    public ModelAndView dicts(SysDict sysDict, Integer offset, Integer limit) {

        ModelAndView mv = new ModelAndView("dicts");

        List<SysDict> dicts = dictService.findBySysDict(sysDict, offset, limit);

        mv.addObject("dicts", dicts);

        return mv;

    }

    /**

     * 新增或修改字典信息页面,使用 get 跳转到页面

     *

     * @param id

     * @return

     */

    @RequestMapping(value = "add", method = RequestMethod.GET)

    public ModelAndView add(Long id) {

        ModelAndView mv = new ModelAndView("dict_add");

        SysDict sysDict;

        if(id == null){

            //如果 id 不存在,就是新增数据,创建一个空对象即可

            sysDict = new SysDict();

        } else {

            //如果 id 存在,就是修改数据,把原有的数据查询出来

            sysDict = dictService.findById(id);

        }

        mv.addObject("model", sysDict);

        return mv;

    }

    /**

     * 新增或修改字典信息,通过表单 post 提交数据

     *

     * @param sysDict

     * @return

     */

    @RequestMapping(value = "add", method = RequestMethod.POST)

    public ModelAndView save(SysDict sysDict) {

        ModelAndView mv = new ModelAndView();

        try {

            dictService.saveOrUpdate(sysDict);

            mv.setViewName("redirect:/dicts");

        } catch (Exception e){

            mv.setViewName("dict_add");

            mv.addObject("msg", e.getMessage());

            mv.addObject("model", sysDict);

        }

        return mv;

    }

    /**

     * 通过 id 删除字典信息

     *

     * @param id

     * @return

     */

    @RequestMapping(value = "delete", method = RequestMethod.POST)

    @ResponseBody

    public ModelMap delete(@RequestParam Long id) {

        ModelMap modelMap = new ModelMap();

        try {

            boolean success = dictService.deleteById(id);

            modelMap.put("success", success);

        } catch (Exception e) {

            modelMap.put("success", false);

            modelMap.put("msg", e.getMessage());

        }

        return modelMap;

    }

}
上面这段代码中使用了两个视图,分别为dicts和dict_add。在下一节中,我们将继续编写视图层代码。
9.4.5 开发视图层(View层)
按照9.2节中的视图配置,需要在 src/main/webapp下面的WEB-INF中 创建jsp目录,然后在jsp中创建 dicts.jsp和dict_add.jsp ,
dicts.jsp代码如下。
<%@ page language="java" contentType="text/html; charset=UTF8" pageEncoding="UTF8"%>

<%@ taglib prefix="c" uri="http://java.sun.com/jsp/jstl/core" %>

<%@ taglib prefix="fmt" uri="http://java.sun.com/jsp/jstl/fmt" %>

<!DOCTYPE html PUBLIC "-//W3C//DTD HTML 4.01 Transitional//EN" "http://www.w3.org/TR/html4/loose.dtd">

<html>

<head>

    <c:set var="path" value="${pageContext.request.contextPath}"/>

    <meta http-equiv="Content-Type" content="text/html; charset=UTF8">

    <title>字典信息</title>

    <script src="${path}/static/jquery-3.1.1.min.js"></script>

</head>

<body>

<table>

    <tr>

        <th colspan="4">字典管理</th>

    </tr>

    <tr>

        <th>类别名</th>

        <th>字典名</th>

        <th>字典值</th>

        <th> 操作  [<a href="${path}/dicts/add">新增</a>]</th>

    </tr>

    <c:forEach items="${dicts}" var="dict">

        <tr id="dict-${dict.id}">

            <td>${dict.code}</td>

            <td>${dict.name}</td>

            <td>${dict.value}</td>

            <td>

                [<a href="${path}/dicts/add?id=${dict.id}">编辑</a>]

                [<a href="javascript:;" onclick="deleteById(${dict.id}, '${dict.name}')">删除</a>]

            </td>

        </tr>

    </c:forEach>

</table>

<script>

    function deleteById(id, label){

        var r = confirm('您确定要删除“' + label + '”吗?');

        if(r){

            $.ajax({

                url: '${path}/dicts/delete',

                data: {

                    id: id

                },

                dataType: 'json',

                type: 'POST',

                success: function(data){

                    if(data.success){

                        $('#dict-' + id).remove();

                    } else {

                        alert(data.msg);

                    }

                }

            })

        }

    }

</script>

</body>

</html>
dict_add.jsp代码如下。
<%@ page language="java" contentType="text/html; charset=UTF8" pageEncoding="UTF8" %>

<%@ taglib prefix="c" uri="http://java.sun.com/jsp/jstl/core" %>

<%@ taglib prefix="fmt" uri="http://java.sun.com/jsp/jstl/fmt" %>

<!DOCTYPE html PUBLIC "-//W3C//DTD HTML 4.01 Transitional//EN" "http://www.w3.org/TR/html4/loose.dtd">

<html>

<head>

    <c:set var="path" value="${pageContext.request.contextPath}"/>

    <meta http-equiv="Content-Type" content="text/html; charset=UTF8">

    <title>字典维护</title>

</head>

<body>

<form action="${path}/dicts/add" method="post">

    <input type="hidden" name="id" value="${model.id}">

    <table>

        <c:if test="${msg != null}">

            <tr>

                <th colspan="2" style="color:red;max-width:400px;">${msg}</th>

            </tr>

        </c:if>

        <tr>

            <th colspan="2">字典维护</th>

        </tr>

        <tr>

            <th>类别名</th>

            <td><input type="text" name="code" value="${model.code}"></td>

        </tr>

        <tr>

            <th>字典名</th>

            <td><input type="text" name="name" value="${model.name}"></td>

        </tr>

        <tr>

            <th>字典值</th>

            <td><input type="text" name="value" value="${model.value}"></td>

        </tr>

        <tr>

            <th colspan="2">

                <input type="submit" value="保存">

                <input type="button" onclick="backToList()" value="取消">

            </th>

        </tr>

    </table>

</form>

<script>

    function backToList(){

        location.href = '${path}/dicts';

    }

</script>

</body>

</html>
dicts.jsp 代码中使用了 jquery-3.1.1.min.js ,大家可以从地址 https://code.jquery.com/jquery-3.1.1.min.js 中下载jQuery, 然后放在 webapp/static/ 目录里面。
9.4.6 部署和运行应用
将项目部署到Tomcat下,然后启动服务。服务器启动完成后,在浏览器中输入 http://localhost:8080/mybatis-spring/dicts 并访问,
简单的字典管理操作界面便实现了。
熟练掌握基础功能开发后,结合前面几章学习的MyBatis的各种技巧后,我们就能实现各种各样的功能了。
注意:由于我们使用的是代理 Dao 的模式,Dao 具体实现类由 MyBatis 使用动态代理方式创建,所以此时mybatis 配置文件不能删。
当我们整合 spring 和 mybatis 时,mybatis 创建的 Mapper.xml 文件名必须和 Dao接口 文件名一致 。
====================
end
MyBatis从入门到精通(第9章):Spring集成MyBatis(下)的更多相关文章
- MyBatis从入门到精通(第5章):5.4 Example 介绍
jdk1.8.MyBatis3.4.6.MySQL数据库5.6.45.Eclipse Version: 2019-12 M2 (4.14.0) MyBatis从入门到精通(第5章):MyBatis代码 ...
- MyBatis从入门到精通(第9章):Spring集成MyBatis(中)
MyBatis从入门到精通(第9章):Spring集成MyBatis(中) 框架(Framework)是整个或部分系统的可重用设计,表现为一组抽象构件及构件实例间交互的方法.应该将应用自身的设计和具体 ...
- MyBatis从入门到精通(第9章):Spring集成MyBatis(上)
MyBatis从入门到精通(第9章):Spring集成MyBatis(上) Spring是一个为了解决企业级Web应用开发过程中面临的复杂性,而被创建的一个非常流行的轻量级框架. mybatis-sp ...
- MyBatis从入门到精通(第5章):MyBatis代码生成器
jdk1.8.MyBatis3.4.6.MySQL数据库5.6.45.Eclipse Version: 2019-12 M2 (4.14.0) MyBatis从入门到精通(第5章):MyBatis代码 ...
- MyBatis从入门到精通(第6章):MyBatis 高级查询->6.1.1高级结果映射之一对一映射
jdk1.8.MyBatis3.4.6.MySQL数据库5.6.45.IntelliJ IDEA 2019.2.4 本章主要包含的内容为 MyBatis 的高级结果映射,主要处理数据库一对一.一对多的 ...
- MyBatis从入门到精通(第3章):MyBatis注解方式的基本使用
MyBatis 注解方式就是将 SQL 语句直接写在DAO层的接口上. 在黑马录制的2018年双元视频课:\08 SSM整合案例[企业权限管理系统]\07.订单操作 有使用MyBatis注解进行多表 ...
- MyBatis从入门到精通(第6章):MyBatis 高级查询->6.1.2高级结果映射之一对多映射
jdk1.8.MyBatis3.4.6.MySQL数据库5.6.45.IntelliJ IDEA 2019.3.1 本章主要包含的内容为 MyBatis 的高级结果映射,主要处理数据库一对一.一对多的 ...
- MyBatis从入门到精通(第4章):MyBatis动态SQL【foreach、bind、OGNL用法】
(第4章):MyBatis动态SQL[foreach.bind.OGNL用法] 4.4 foreach 用法 SQL 语句中有时会使用 IN 关键字,例如 id in (1,2,3).可以使用 ${i ...
- MyBatis从入门到精通(第4章):MyBatis动态SQL【if、choose 和 where、set、trim】
(第4章):MyBatis动态SQL[if.choose 和 where.set.trim] MyBatis 的强大特性之一便是它的动态 SQL.MyBatis 3.4.6版本采用了功能强大的OGNL ...
随机推荐
- Golang go-gin 注册路由
代码实现 main.go package main import ( "fmt" "github.com/jihite/go-gin-example/pkg/settin ...
- 控制台连接oracle11g报ORA-12560异常
oracle11g R2 64bit oracleClient 11.2 32bit PL/SQL Developer 11.0.2 32bit 今天发现了一个奇怪的现象,如图: 后来发现机器上既有s ...
- HDU 4952 Number Transformation 多校8 机智数学
哎.这个题想了好久,状态不对啊...一个大家都出的题..当时想到肯定是可以有什么规律来暴力,不用算到10的10次方 对于某个k,x.从1到k循环,每次求一个新的x,这个x要大于等于原x,并且要是i的倍 ...
- 使用UltraISO(软碟通)制作U盘制作启动盘完整教程
背景:服务器需要安装系统,但是没有启动盘只有镜像. 前提:U盘和安装镜像准备好 步骤一:首先我们先安装软碟通,完成安装后打开软碟通,文件->打开,打开我们需要制作的iso镜像.如下图(也可下本地 ...
- LeetCode#3 - 无重复字符的最长字串(滑动窗口)
题目: 给定一个字符串,请你找出其中不含有重复字符的 最长子串 的长度. 示例: abcabcbb 输出的结果应该是3,最长的无重复的字串是'abc' 果然无论做什么都要静下心来啊!昨晚上卡了一个多小 ...
- 每天一点点之vue框架开发 - vue组件之间传值(父向子传值)
路由文件 { path: '/productListBase', name: 'productListLink', component: ProductListBase, redirect: '/pr ...
- microsoft help viewer 收藏夹功能
平时重装系统比较多,重装后,microsoft help viewer 2.0里面的收藏就丢失了,要恢复以前的收藏,可以直接在C:\Users\ZR\AppData\Local\Microsoft\H ...
- Java虚拟机之内存模型
一.java并发基础 在并发编程中存在两个关键问题①线程之间如何通信 ②线程之间如何同步. 通信 通信是指线程之间以何种机制来交换信息.在命令式编程中,线程之间的通信机制有两种:共享内存和消息传递. ...
- java中的字符串String
一.String简介d 参考:https://www.cnblogs.com/zhangyinhua/p/7689974.html String类代表字符串. java.lang.String: Ja ...
- Adaboost的python实现
不要总是掉包欧,真的丢人啊,一起码起来! '''函数的功能:单层决策树分类函数参数说明: xMat:数据矩阵 i:第i列,第几个特征 Q:阈值返回分类结果: re'''import numpy as ...