
rviz学习笔记(一)——Markers: Sending Basic Shapes (C++) 发送基础形状
一、创建一个包——进行marker练习
1、创建ROS工作空间和包
mkdir -p ~/catkin_ws/src       #创建工作空间目录

#创建ROS数据包

catkin_create_pkg using_markers roscpp visualization_msgs

#打开包根目录,进行编译

cd ~/catkin_ws

catkin_make
2、编写cpp文件,向rviz发送数据
vim ~/catkin_ws/src/using_marker/src/using_markers.cpp
贴入代码,代码中已经附加相关注释
#include <ros/ros.h>

#include <visualization_msgs/Marker.h>           //可视化

int main( int argc, char** argv )

{

  //初始化ROS,幷且创建一个ROS::Publisher 在话题visualization_marker上面

  ros::init(argc, argv, "basic_shapes");

  ros::NodeHandle n;

  ros::Rate r();

  ros::Publisher marker_pub = n.advertise<visualization_msgs::Marker>("visualization_marker", );

  // Set our initial shape type to be a cube

  // 初始化形状为立方体

  uint32_t shape = visualization_msgs::Marker::CUBE;

  while (ros::ok())

  {

    //实例化一个Marker

    visualization_msgs::Marker marker;

    // Set the frame ID and timestamp.  See the TF tutorials for information on these.

    // 设置frame ID 和 时间戳

    marker.header.frame_id = "/my_frame";

    marker.header.stamp = ros::Time::now();

    // Set the namespace and id for this marker.  This serves to create a unique ID

    // Any marker sent with the same namespace and id will overwrite the old one

    // 为这个marker设置一个独一无二的ID,一个marker接收到相同ns和id就会用新的信息代替旧的

    marker.ns = "basic_shapes";

    marker.id = ;

    // Set the marker type.  Initially this is CUBE, and cycles between that and SPHERE, ARROW, and CYLINDER

    // 设置marker类型,初始化是立方体。将进行循环

    marker.type = shape;

    // Set the marker action.  Options are ADD, DELETE, and new in ROS Indigo: 3 (DELETEALL)

    marker.action = visualization_msgs::Marker::ADD;

    // Set the pose of the marker.  This is a full 6DOF pose relative to the frame/time specified in the header

    // 设置marker的位置

    marker.pose.position.x = ;

    marker.pose.position.y = ;

    marker.pose.position.z = ;

    marker.pose.orientation.x = 0.0;

    marker.pose.orientation.y = 0.0;

    marker.pose.orientation.z = 0.0;

    marker.pose.orientation.w = 1.0;

    // Set the scale of the marker -- 1x1x1 here means 1m on a side

    // 设置marker的大小

    marker.scale.x = 1.0;

    marker.scale.y = 1.0;

    marker.scale.z = 1.0;

    // Set the color -- be sure to set alpha to something non-zero!

    // 设置marker的颜色

    marker.color.r = 0.0f;

    marker.color.g = 1.0f;

    marker.color.b = 0.0f;

    marker.color.a = 1.0;

    //取消自动删除

    marker.lifetime = ros::Duration();

    // Publish the marker

    // 必须有订阅者才会发布消息

    while (marker_pub.getNumSubscribers() < )

    {

      if (!ros::ok())

      {

        return ;

      }

      ROS_WARN_ONCE("Please create a subscriber to the marker");

      sleep();

    }

    marker_pub.publish(marker);

    // Cycle between different shapes

    // 连续改变形状

    switch (shape)

    {

    case visualization_msgs::Marker::CUBE:

      shape = visualization_msgs::Marker::SPHERE;

      break;

    case visualization_msgs::Marker::SPHERE:

      shape = visualization_msgs::Marker::ARROW;

      break;

    case visualization_msgs::Marker::ARROW:

      shape = visualization_msgs::Marker::CYLINDER;

      break;

    case visualization_msgs::Marker::CYLINDER:

      shape = visualization_msgs::Marker::CUBE;

      break;

    }

    r.sleep();

  }

}
在CMakeList.txt文件中加入
add_executable(basic_shapes src/basic_shapes.cpp)

target_link_libraries(basic_shapes ${catkin_LIBRARIES})
3、进行rviz设置
(1)打开roscore
(2)运行编写的发布器
rosrun using_marker basic_shapes
(3)重置rviz,运行rviz
rosmake rviz

rosrun rviz rviz
(4)在rviz中进行设置
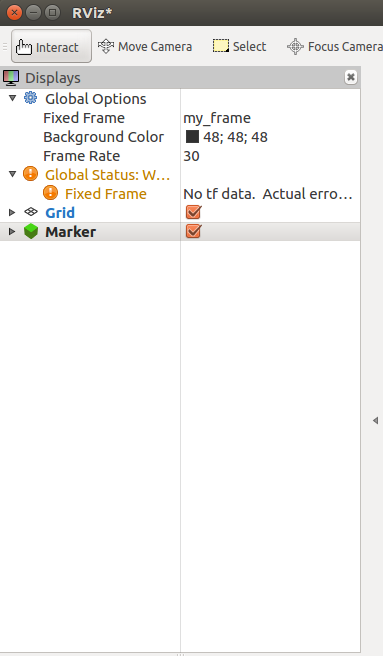
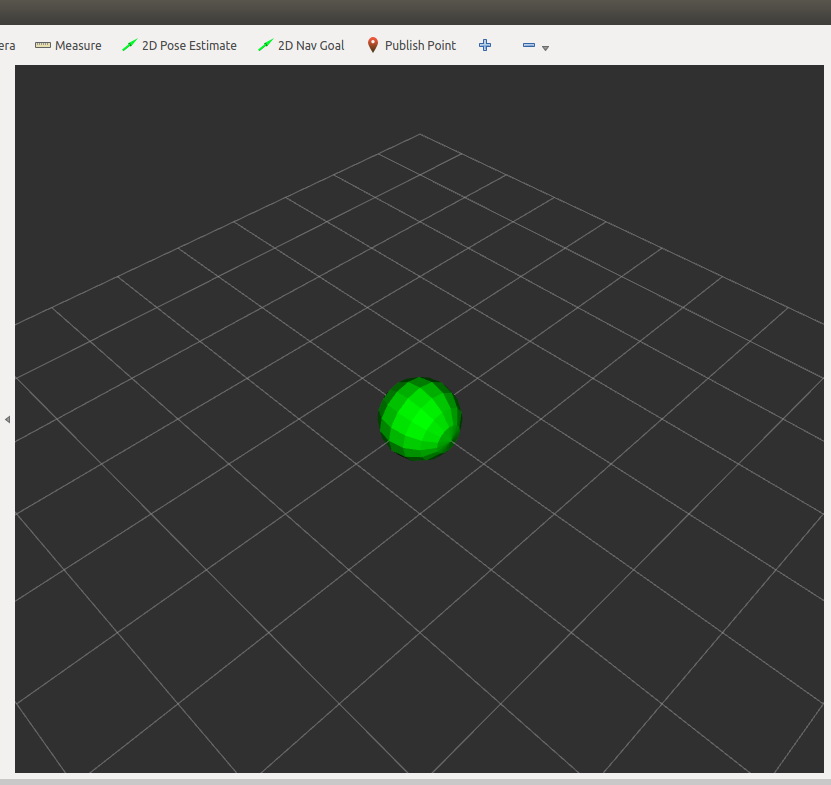
4、rviz最终效果显示:4个图形进行连续的变换
一、创建一个包——进行marker练习
1、创建ROS工作空间和包
mkdir -p ~/catkin_ws/src       #创建工作空间目录

#创建ROS数据包

catkin_create_pkg using_markers roscpp visualization_msgs

#打开包根目录,进行编译

cd ~/catkin_ws

catkin_make
2、编写cpp文件,向rviz发送数据
vim ~/catkin_ws/src/using_marker/src/using_markers.cpp
贴入代码,代码中已经附加相关注释
#include <ros/ros.h>

#include <visualization_msgs/Marker.h>           //可视化

int main( int argc, char** argv )

{

  //初始化ROS,幷且创建一个ROS::Publisher 在话题visualization_marker上面

  ros::init(argc, argv, "basic_shapes");

  ros::NodeHandle n;

  ros::Rate r(1);

  ros::Publisher marker_pub = n.advertise<visualization_msgs::Marker>("visualization_marker", 1);

  // Set our initial shape type to be a cube

  // 初始化形状为立方体

  uint32_t shape = visualization_msgs::Marker::CUBE;

  while (ros::ok())

  {

    //实例化一个Marker

    visualization_msgs::Marker marker;

    // Set the frame ID and timestamp.  See the TF tutorials for information on these.

    // 设置frame ID 和 时间戳

    marker.header.frame_id = "/my_frame";

    marker.header.stamp = ros::Time::now();

    // Set the namespace and id for this marker.  This serves to create a unique ID

    // Any marker sent with the same namespace and id will overwrite the old one

    // 为这个marker设置一个独一无二的ID,一个marker接收到相同ns和id就会用新的信息代替旧的

    marker.ns = "basic_shapes";

    marker.id = 0;

    // Set the marker type.  Initially this is CUBE, and cycles between that and SPHERE, ARROW, and CYLINDER

    // 设置marker类型,初始化是立方体。将进行循环

    marker.type = shape;

    // Set the marker action.  Options are ADD, DELETE, and new in ROS Indigo: 3 (DELETEALL)

    marker.action = visualization_msgs::Marker::ADD;

    // Set the pose of the marker.  This is a full 6DOF pose relative to the frame/time specified in the header

    // 设置marker的位置

    marker.pose.position.x = 0;

    marker.pose.position.y = 0;

    marker.pose.position.z = 0;

    marker.pose.orientation.x = 0.0;

    marker.pose.orientation.y = 0.0;

    marker.pose.orientation.z = 0.0;

    marker.pose.orientation.w = 1.0;

    // Set the scale of the marker -- 1x1x1 here means 1m on a side

    // 设置marker的大小

    marker.scale.x = 1.0;

    marker.scale.y = 1.0;

    marker.scale.z = 1.0;

    // Set the color -- be sure to set alpha to something non-zero!

    // 设置marker的颜色

    marker.color.r = 0.0f;

    marker.color.g = 1.0f;

    marker.color.b = 0.0f;

    marker.color.a = 1.0;

    //取消自动删除

    marker.lifetime = ros::Duration();

    // Publish the marker

    // 必须有订阅者才会发布消息

    while (marker_pub.getNumSubscribers() < 1)

    {

      if (!ros::ok())

      {

        return 0;

      }

      ROS_WARN_ONCE("Please create a subscriber to the marker");

      sleep(1);

    }

    marker_pub.publish(marker);

    // Cycle between different shapes

    // 连续改变形状

    switch (shape)

    {

    case visualization_msgs::Marker::CUBE:

      shape = visualization_msgs::Marker::SPHERE;

      break;

    case visualization_msgs::Marker::SPHERE:

      shape = visualization_msgs::Marker::ARROW;

      break;

    case visualization_msgs::Marker::ARROW:

      shape = visualization_msgs::Marker::CYLINDER;

      break;

    case visualization_msgs::Marker::CYLINDER:

      shape = visualization_msgs::Marker::CUBE;

      break;

    }

    r.sleep();

  }

}
在CMakeList.txt文件中加入
add_executable(basic_shapes src/basic_shapes.cpp)

target_link_libraries(basic_shapes ${catkin_LIBRARIES})
3、进行rviz设置
(1)打开roscore
(2)运行编写的发布器
rosrun using_marker basic_shapes
(3)重置rviz,运行rviz
rosmake rviz

rosrun rviz rviz
(4)在rviz中进行设置
4、rviz最终效果显示:4个图形进行连续的变换
rviz学习笔记(一)——Markers: Sending Basic Shapes (C++) 发送基础形状的更多相关文章
- 【转】Pro Android学习笔记(二):开发环境:基础概念、连接真实设备、生命周期
在Android学习笔记(二):安装环境中已经有相应的内容.看看何为新.这是在source网站上的Android架构图,和标准图没有区别,只是这张图颜色好看多了,录之.本笔记主要讲述Android开发 ...
- rviz学习笔记(二)——Markers: Points and Lines (C++) 点和线
一.在using_marker/src中编写点和线代码 vim ~/catkin_ws/src/using_marker/src/points_and_lines.cpp 编写代码,其中有注释 #in ...
- C#学习笔记12:枚举、结构、数组基础学习
枚举:public enum MyEnum { 值1, 值2, 值3 } Public enum Season { 春, 夏, 秋, 冬 } 枚举的作用:规范用户的输入,枚举可以转换为int类型,可以 ...
- Python学习笔记【第九篇】:Python面向对象基础
Python语言中一切皆对象(类.属性.方法.........) 概念 面向对象编程:Object Oriented Programming 简称OOP 面向对象程序设计 面向对象和面向过程都是解决问 ...
- JMeter学习笔记(二) 一些实际应用的基础操作
我在CSDN上面找到一位大师整理的jmeter性能测试基础,分享到这里继续学习 https://blog.csdn.net/u011541946/article/category/6893578/1
- mybatis学习笔记(六)使用generator生成mybatis基础配置代码和目录结构
原文:http://blog.csdn.net/oh_mourinho/article/details/51463413 创建maven项目 <span style="font-siz ...
- 0031 Java学习笔记-梁勇著《Java语言程序设计-基础篇 第十版》英语单词
第01章 计算机.程序和Java概述 CPU(Central Processing Unit) * 中央处理器 Control Unit * 控制单元 arithmetic/logic unit /ə ...
- 【SharePoint学习笔记】第1章 SharePoint Foundation开发基础
SharePoint Foundation开发基础 第1章 SharePoint Foundation开发基础 SharePoint能做什么 企业信息门户 应用程序工具集(文档库.工作空间.工作流.维 ...
- python学习笔记三 深浅copy,扩展数据类型(基础篇)
深浅copy以及赋值 对于字符串和数字而言,赋值.浅拷贝和深拷贝无意义,因为其永远指向同一个内存地址. import copy n1 = #n1 = 'hahahaha' #赋值n2 = n1#浅co ...
随机推荐
- 【R】函数-统计函数
- 解决PHP使用CVS导出Excel乱码问题
在使用PHP生成CVS文件后通过Excel打开发现中文全部变成了乱码,之前在我本地win08通过WPS正常的,但上传到服务器Linux在服务器上测试出现了乱码 一开始以后是Linux的问题但后来测试时 ...
- Eclipse关掉项目SVN的链接
有时候 svn 会导致 eclipse 反应很慢,可以关掉 svn项目信息展现. 1. 点击项目文件夹,右键出现项目信息 2. 选择team项 3. Disconnect.
- 模拟日历计算 poj1008
Maya Calendar Time Limit: 1000MS Memory Limit: 10000K Total Submissions: 69932 Accepted: 21524 D ...
- OAuth2 Demo PHP
OAuth2 Demo PHP 此应用程序的目的是演示OAuth2.0客户端和服务器之间的工作流.如果这是你第一次来这里,试图尝试的现场演示让OAuth2.0流更好的感觉. experimenting ...
- Cocos2d-X研究之v3.x 事件分发机制具体解释
事件分发机制 " src="http://www.cgzhw.com/wp-content/uploads/2014/07/inherent3.png" style=&q ...
- ASP入门(一)环境的搭建
突然转战ASP是因为,手头要实现一个类似管理系统的东东,正好把ASP再从头学习一下下. ASP可以做什么? ASP,它的原文是 Active Server Pages . ASP最核心的扩展内容:Ac ...
- 视频播放代码 crastr3
下载:http://down.51cto.com/data/1904974 代码(亲测): <html xmlns="http://www.w3.org/1999/xhtml" ...
- JMeter运行通过Chrome打开的website
部分website在chrome上运行正常,但在IE环境运行会存在问题.而是用 JMeter运行通过chrome打开的website时候,需要处理一下. 可以参考下面几篇文章: http://ninj ...
- linux2.6.30.4内核移植(4)——完善串口驱动
在内核里支持两个串口,也就是芯片的UART0和UART1,而UART2的驱动是针对红外接口的,而不是串口驱动,这里将其修改为串口驱动. 一.修改内核源码arch/arm/mach-s3c2440/ma ...