
(原创)boost.property_tree解析xml的帮助类以及中文解析问题的解决
boost.property_tree可以用来解析xml和json文件,我主要用它来解析xml文件,它内部封装了号称最快的xml解析器rapid_xml,其解析效率还是很好的。但是在使用过程中却发现各种不好用,归纳一下不好用的地方有这些:
- 获取不存在的节点时就抛出异常
- 获取属性值时,要排除属性和注释节点,如果没注意这一点就会抛出异常,让人摸不着头脑。
- 内存模型有点怪。
- 默认不支持中文的解析。解析中文会乱码。
ptree获取子节点
获取子节点接口原型为get_child(node_path),这个node_path从当前路径开始的全路径,父路径和子路径之间通过“.”连接,如“root.sub.child”。需要注意的是get_child获取的是第一个子节点,如果我们要获取子节点列表,则要用路径“root.sub”,这个路径可以获取child的列表。如果获取节点的路径不存在则会抛出异常,这时,如果不希望抛出异常则可以用get_xxx_optional接口,该接口返回一个optional<T>的结果出来,由外面判断是否获取到结果了。
//ptree的optional接口

auto item = root.get_child_optional("Root.Scenes");
该接口返回的是一个optional<ptree>,外面还要判断该节点是否存在,optional对象通过bool操作符来判断该对象是否是无效值,通过指针访问
符"*"来访问该对象的实际内容。建议用optional接口访问xml节点。
//ptree的optional接口

auto item = root.get_child_optional("Root.Scenes");

if(item)

    cout<<"该节点存在"<<endl;
ptree的内存模型
ptree维护了一个pair<string, ptree>的子节点列表,first指向的是该节点的TagName,second指向的才是ptree节点,因此在遍历ptree子节点时要注意迭代器的含义。
for (auto& data : root)

{

    for (auto& item : data.second) //列表元素为pair<string, ptree>,要用second继续遍历

    {

        cout<<item.first<<endl;

    }

}
需要注意的是ptree.first可能是属性("<xmlattr>")也可能是注释("<xmlcomment>"),只有非注释类型的节点才能使用获取属性值、子节点等常用接口。
ptree获取属性值
通过get<T>(attr_name)可以获取属性的值,如果想获取属性的整形值的话,可以用get<int>("Id"),返回一个整数值。有一点要注意如果ptree.first为"<xmlcomment>"时,是没有属性值的,可以通过data()来获取注释内容。如果这个ptree.first不为<xmlattr>时需要在属性名称前面加"<xmlcomment>.",即get<int>("<xmlcomment>.Id")才能正确获取属性值。可以看到获取属性值还是比较繁琐的,在后面要介绍的帮助类中可以简化属性值的获取。如果要获取节点的值则用get_value()接口,该接口用来获取节点的值,如节点:<Field>2</Field>通过get_value()就可以获取值"2"。
解析中文的问题
ptree解析的xml文件的格式是utf-8格式的,如果xml文件中含有unicode如中文字符,解析出来就是乱码。解析unicode要用wptree,该类的接口均支持宽字符并且接口和ptree保持一致。要支持中文解析仅仅wptree还不够,还需要一个unicode转换器的帮助,该转换器可以实现宽字符和窄字符的转换,宽窄的互相转换函数有很多实现,不过c++11中有更简单统一的方式实现宽窄字符的转换。
c++11中宽窄字符的转换:
std::wstring_convert<std::codecvt<wchar_t,char,std::mbstate_t>> conv

(newstd::codecvt<wchar_t,char,std::mbstate_t>("CHS"));

//宽字符转为窄字符

string str = conv.to_bytes(L"你好");

//窄字符转为宽字符

string wstr = conv.from_bytes(str);
boost.property_tree在解析含中文的xml文件时,需要先将该文件转换一下。
boost解决方法:
#include "boost/program_options/detail/utf8_codecvt_facet.hpp"

void ParseChn()

{

    std::wifstream f(fileName);

    std::locale utf8Locale(std::locale(), new boost::program_options::detail::utf8_codecvt_facet());

    f.imbue(utf8Locale); //先转换一下

    //用wptree去解析

    property_tree::wptree ptree;

    property_tree::read_xml(f, ptree);

}
这种方法有个缺点就是要引入boost的libboost_program_options库,该库有二十多M,仅仅是为了解决一个中文问题,却要搞得这么麻烦,有点得不偿失。好在c++11提供更简单的方式,用c++11可以这样:
    void Init(const wstring& fileName, wptree& ptree)

    {

        std::wifstream f(fileName);

        std::locale utf8Locale(std::locale(), new std::codecvt_utf8<wchar_t>);

        f.imbue(utf8Locale); //先转换一下

        //用wptree去解析

        property_tree::read_xml(f, ptree);

    }
用c++11就不需要再引入boost的libboost_program_options库了,很简单。
另外一种方法就是,仍然用ptree和string,只是在取出string字符串后,做一个转换为unicode的转换,就能得到中文字符串了。例如:
        auto child = item.second.get_child("Scenes.Scene");

        auto oname = child.get_optional<string>("<xmlattr>.Name");

//oname内部存了一个unicode字符串,需要将其转换为宽字符串得到中文

std::wstring_convert<std::codecvt_utf8_utf16<wchar_t>> converter;

        std::wstring wide = converter.from_bytes(*oname);

                //宽字符串转为窄字符串

                //std::string narrow = converter.to_bytes(L"foo");
property_tree的帮助类
property_tree的帮助类解决了前面提到的问题:
- 用c++11解决中文解析问题
- 简化属性的获取
- 增加一些操作接口,比如一些查找接口
- 避免抛出异常,全部返回optional<T>对象
- 隔离了底层繁琐的操作接口,提供统一、简洁的高层接口,使用更加方便。
下面来看看这个帮助类是如何实现的吧:
#include<boost/property_tree/ptree.hpp>

#include<boost/property_tree/xml_parser.hpp>

using namespace boost;

using namespace boost::property_tree;

#include <map>

#include <vector>

#include <codecvt>

#include <locale>

using namespace std;

const wstring XMLATTR = L"<xmlattr>";

const wstring XMLCOMMENT = L"<xmlcomment>";

const wstring XMLATTR_DOT = L"<xmlattr>.";

const wstring XMLCOMMENT_DOT = L"<xmlcomment>.";

class ConfigParser

{

public:

    ConfigParser() : m_conv(new code_type("CHS"))

    {

    }

    ~ConfigParser()

    {

    }

    void Init(const wstring& fileName, wptree& ptree)

    {

        std::wifstream f(fileName);

        std::locale utf8Locale(std::locale(), new std::codecvt_utf8<wchar_t>);

        f.imbue(utf8Locale); //先转换一下

        wcout.imbue(std::locale("chs")); //初始化cout为中文输出格式

        //用wptree去解析

        property_tree::read_xml(f, ptree);

    }

    // convert UTF-8 string to wstring

    std::wstring to_wstr(const std::string& str)

    {

        return m_conv.from_bytes(str);

    }

    // convert wstring to UTF-8 string

    std::string to_str(const std::wstring& str)

    {

        return m_conv.to_bytes(str);

    }

    //获取子节点列表

    auto Descendants(const wptree& root, const wstring& key)->decltype(root.get_child_optional(key))

    {

        return root.get_child_optional(key);

    }

    //根据子节点属性获取子节点列表

    template<typename T>

    vector<wptree> GetChildsByAttr(const wptree& parant, const wstring& tagName, const wstring& attrName, const T& attrVal)

    {

        vector<wptree> v;

        for (auto& child : parant)

        {

            if (child.first != tagName)

                continue;

            auto attr = Attribute<T>(child, attrName);

            if (attr&&*attr == attrVal)

                v.push_back(child.second);

        }

        return v;

    }

    //获取节点的某个属性值

    template<typename R>

    optional<R> Attribute(const wptree& node, const wstring& attrName)

    {

        return node.get_optional<R>(XMLATTR_DOT + attrName);

    }

    //获取节点的某个属性值,默认为string

    optional<wstring> Attribute(const wptree& node, const wstring& attrName)

    {

        return Attribute<wstring>(node, attrName);

    }

    //获取value_type的某个属性值

    template<typename R>

    optional<R> Attribute(const wptree::value_type& pair, const wstring& attrName)

    {

        if (pair.first == XMLATTR)

            return pair.second.get_optional<R>(attrName);

        else if (pair.first == XMLCOMMENT)

            return optional<R>();

        else

            return pair.second.get_optional<R>(XMLATTR_DOT + attrName);

    }

    //获取value_type的某个属性值,默认为string

    optional<wstring> Attribute(const wptree::value_type& pair, const wstring& attrName)

    {

        return Attribute<wstring>(pair, attrName);

    }

    //根据某个属性生成一个<string, ptree>的multimap

    template<class F = std::function<bool(wstring&)>>

    multimap<wstring, wptree> MakeMapByAttr(const wptree& root, const wstring& key, const wstring& attrName, F predict = [](wstring& str){return true; })

    {

        multimap<wstring, wptree> resultMap;

        auto list = Descendants(root, key);

        if (!list)

            return resultMap;

        for (auto& item : *list)

        {

            auto attr = Attribute(item, attrName);

            if (attr&&predict(*attr))

                resultMap.insert(std::make_pair(*attr, item.second));

        }

        return resultMap;

    }

private:

    using code_type = std::codecvt<wchar_t, char, std::mbstate_t>;

    std::wstring_convert<code_type> m_conv;

};
测试文件test.xml和测试代码:
<?xml version="1.0" encoding="UTF-8"?>

<Root Id="">

    <Scenes>

        <!--注释说明1-->

        <Scene Name="测试1">

            <!--注释说明11-->

            <DataSource>

                <!--注释说明111-->

                <Data>

                    <!--注释说明111-->

                    <Item Id="" FileName="测试文件1" />

                </Data>

                <Data>

                    <Item Id="" FileName="测试文件2" />

                    <Item Id="" FileName="测试文件3" />

                </Data>

            </DataSource>

        </Scene>

        <!--注释说明1-->

        <Scene Name="测试2">

            <DataSource>

                <Data>

                    <Item Id="" FileName="测试文件4" />

                </Data>

                <Data>

                    <Item Id="" FileName="测试文件5" />

                </Data>

            </DataSource>

        </Scene>

    </Scenes>

</Root>
void Test()

{

    wptree pt;

    ConfigParser parser;

    parser.Init(L"test1.xml", pt); //解决中文问题,要转换为unicode解析

    auto scenes = parser.Descendants(pt, L"Root.Scenes"); //返回的是optional<wptree>

    if (!scenes)

        return;

    for (auto& scene : *scenes)

    {

        auto s = parser.Attribute(scene, L"Name"); //获取Name属性,返回的是optional<wstring>

        if (s)

        {

            wcout << *s << endl;

        }

        auto dataList = parser.Descendants(scene.second, L"DataSource"); //获取第一个子节点

        if (!dataList)

            continue;

        for (auto& data : *dataList)

        {

            for (auto& item : data.second)

            {

                auto id = parser.Attribute<int>(item, L"Id");

                auto fileName = parser.Attribute(item, L"FileName");

                if (id)

                {

                    wcout << *id << L" " << *fileName << endl; //打印id和filename

                }

            }

        }

    }

}
测试结果:
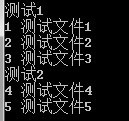
可以看到通过帮助类,无需使用原生接口就可以很方便的实现节点的访问与操作。使用者不必关注内部细节,根据统一而简洁的接口就可以操作xml文件了。
一点题外话,基于这个帮助类再结合linq to object可以轻松的实现linq to xml:
//获取子节点SubNode的属性ID的值为0x10000D的项并打印出该项的Type属性

from(node.Descendants("Root.SubNode")).where([](XNode& node)

{

    auto s = node.Attribute("ID");

    return s&&*s == "0x10000D";

}).for_each([](XNode& node)

{

    auto s = node.Attribute("Type");

    if (s)

        cout << *s << endl;

});
如果你觉得这篇文章对你有用,可以点一下推荐,谢谢。
c++11 boost技术交流群:296561497,欢迎大家来交流技术。
(原创)boost.property_tree解析xml的帮助类以及中文解析问题的解决的更多相关文章
- boost.property_tree解析xml的帮助类以及中文解析问题的解决(转)
boost.property_tree可以用来解析xml和json文件,我主要用它来解析xml文件,它内部封装了号称最快的xml解析器rapid_xml,其解析效率还是很好的.但是在使用过程中却发现各 ...
- 转载 VC轻松解析XML文件 - CMarkup类的使用方法
VC轻松解析XML文件 - CMarkup类的使用方法http://www.cctry.com/thread-3866-1-1.html VC解析XML文件的工具有很多,CMarkup, tinyXM ...
- 解析xml数据存入bean映射到数据库的 需求解决过程
解析xml数据存入bean映射到数据库的 需求解决过程2017年12月19日 15:18:57 守望dfdfdf 阅读数:419 标签: xmlbean 更多个人分类: 工作 问题编辑版权声明:本文为 ...
- 使用boost/property_tree进行XML操作
之前一直用tinyxml来进行XML文件操作,刚刚接触的一个测试项目是使用boost操作的,虽然不清楚这两者的差异,但boost使用起来还挺方便的,所以简单整理一些关于boost解析和创建XML文件的 ...
- 阶段3 1.Mybatis_03.自定义Mybatis框架_4.自定义mybatis的编码-解析XML的工具类介绍
导入xml操作的类和用到的相关包 创建util包,然后把提供好的XMLConfigBuilder.java文件复制3过来 复制过来,里面用到了很多dom4j的东西 打开pom.xml 输入depend ...
- Java解析XML文档(简单实例)——dom解析xml
一.前言 用Java解析XML文档,最常用的有两种方法:使用基于事件的XML简单API(Simple API for XML)称为SAX和基于树和节点的文档对象模型(Document Object ...
- Android之 解析XML文件(1)—— Pull解析
(以下文章基本照抄<第一行代码>) 解析XML文件有很多方法,这里主要讲Pull解析和SAX解析.这篇文章主要是讲Pull解析. 一.Pull解析参考代码 先上代码: private vo ...
- DEX文件解析--4、dex类的类型解析
一.前言 前几篇系列文章链接: DEX文件解析---1.dex文件头解析 DEX文件解析---2.Dex文件checksum(校验和)解析 DEX文件解析--3.dex文件 ...
- Android中的几种解析XML文件的类
Ø DOM解析 优点: 1.XML树在内存中完整存储,因此可以直接修改其数据和结构. 2.可以通过该解析器随时访问XML树中的任何一个节点. 3.DOM解析器的API在使用上也相对比较简单. 缺点:如 ...
随机推荐
- 转:CMake快速入门教程-实战
CMake快速入门教程:实战 收藏人:londonKu 2012-05-07 | 阅:10128 转:34 | 来源 | 分享 0. 前言一个多月 ...
- 多线程场景下如何使用 ArrayList
ArrayList 不是线程安全的,这点很多人都知道,但是线程不安全的原因及表现,怎么在多线程情况下使用ArrayList,可能不是很清楚,这里总结一下. 1. 源码分析 查看 ArrayList 的 ...
- 【已解决】mysql连接出错:ERROR 1040 (HY000): Too many connections
连接mysql,结果出错: ? 1 ERROR 1040 (HY000): Too many connections 去修改mysql的配置文件,然后添加: ? 1 2 3 4 5 6 7 8 9 1 ...
- CreateDialog 注意事项
CreateDialog创建非模态对话框时 其内部 会发送几条消息例如: WM_INITDIALOG,WM_SETFONT DS_SETFONT , DS_SHELLFONT. 所以如果在另一个Ca ...
- linux shell 脚本攻略学习4
1.cat命令详解 cat 是concatnate(拼接)的简写. 语法: cat file1 file2 file3 .... 作用:将文件内容拼接在一起进行输出 具体应用: 1).压缩空白行 加上 ...
- mysql 排序 oder by 和 使用hibernate 排序
String sql="select * from sys_invitation where to_phone = '13000000000' order by create_time de ...
- [转]MySQL DBA面试全揭秘
本文起源于有同学留言回复说想了解下MySQL DBA面试时可能涉及到的知识要点,那我们今天就来大概谈谈吧. MySQL DBA职位最近几年特别热门,不少朋友让我帮忙推荐什么的,也有很多公司找不到合 ...
- Linux增加swap空间
1.添加交换文件并设置其大小为12G,使用如下命令 # dd if=/dev/zero of=/home/swapfile bs=1024 count=12288000 12288000+0 reco ...
- sql 置顶功能的查询
sql中有置顶的需求,文章很多条,分页查询,要求置顶的在最前面: 只需要使用: order by 置顶字段 即可
- Shell脚本:向磁盘中批量写入数据
一.关于本文 工作要做的监控系统需要监控磁盘空间的使用率并报警.在测试这个功能的时候需要模拟两个场景:一是磁盘空间不断增长超过设定的阈值时,需要触发报警机制:二是磁盘空间降落到低于报警阈值的时候,不再 ...