【spring 区别】ClassXmlAplicationContext和FileSystemXmlApplicationContext的区别
今天写一个简单的spring使用例子,遇到这个问题:
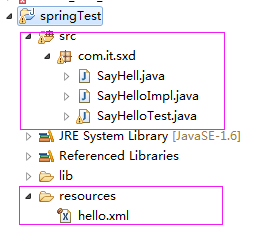
项目结构如下:
代码如下:
 package com.it.sxd;

 import java.nio.file.FileSystem;

 import org.junit.Test;

 import org.springframework.context.ApplicationContext;

 import org.springframework.context.support.ClassPathXmlApplicationContext;

 import org.springframework.context.support.FileSystemXmlApplicationContext;

 public class SayHelloTest {

     @Test

     public void testSayHello(){

         //1.读取hello。xml配置文件,实例化一个Ioc容器

         ApplicationContext context = new ClassPathXmlApplicationContext("hello.xml");

         //2.从Ioc容器中获取ID为"hello1"的bean ,此处是“面向接口编程   而不是面向实现编程”

         SayHell sayHell = context.getBean("hello1",SayHell.class);

         //3.实现功能

         sayHell.sayHello();

     }

 }
代码中使用ClassPathXmlApplicationContext获取一个Ioc的实例化对象,但是读取这个"hello.xml"文件,无论怎么修改路径,修改成"resources/hello.xml"或者"hello.xml",总之是没有办法识别,一直报如下的错误:
 org.springframework.beans.factory.BeanDefinitionStoreException: IOException parsing XML document from class path resource [resources/hello.xml]; nested exception is java.io.FileNotFoundException: class path resource [resources/hello.xml] cannot be opened because it does not exist

     at org.springframework.beans.factory.xml.XmlBeanDefinitionReader.loadBeanDefinitions(XmlBeanDefinitionReader.java:344)

     at org.springframework.beans.factory.xml.XmlBeanDefinitionReader.loadBeanDefinitions(XmlBeanDefinitionReader.java:304)

     at org.springframework.beans.factory.support.AbstractBeanDefinitionReader.loadBeanDefinitions(AbstractBeanDefinitionReader.java:181)

     at org.springframework.beans.factory.support.AbstractBeanDefinitionReader.loadBeanDefinitions(AbstractBeanDefinitionReader.java:217)

     at org.springframework.beans.factory.support.AbstractBeanDefinitionReader.loadBeanDefinitions(AbstractBeanDefinitionReader.java:188)

     at org.springframework.beans.factory.support.AbstractBeanDefinitionReader.loadBeanDefinitions(AbstractBeanDefinitionReader.java:252)

     at org.springframework.context.support.AbstractXmlApplicationContext.loadBeanDefinitions(AbstractXmlApplicationContext.java:127)

     at org.springframework.context.support.AbstractXmlApplicationContext.loadBeanDefinitions(AbstractXmlApplicationContext.java:93)

     at org.springframework.context.support.AbstractRefreshableApplicationContext.refreshBeanFactory(AbstractRefreshableApplicationContext.java:129)

     at org.springframework.context.support.AbstractApplicationContext.obtainFreshBeanFactory(AbstractApplicationContext.java:609)

     at org.springframework.context.support.AbstractApplicationContext.refresh(AbstractApplicationContext.java:510)

     at org.springframework.context.support.ClassPathXmlApplicationContext.<init>(ClassPathXmlApplicationContext.java:139)

     at org.springframework.context.support.ClassPathXmlApplicationContext.<init>(ClassPathXmlApplicationContext.java:83)

     at com.it.sxd.SayHelloTest.testSayHello(SayHelloTest.java:12)

     at sun.reflect.NativeMethodAccessorImpl.invoke0(Native Method)

     at sun.reflect.NativeMethodAccessorImpl.invoke(NativeMethodAccessorImpl.java:57)

     at sun.reflect.DelegatingMethodAccessorImpl.invoke(DelegatingMethodAccessorImpl.java:43)

     at java.lang.reflect.Method.invoke(Method.java:606)

     at org.junit.runners.model.FrameworkMethod$1.runReflectiveCall(FrameworkMethod.java:50)

     at org.junit.internal.runners.model.ReflectiveCallable.run(ReflectiveCallable.java:12)

     at org.junit.runners.model.FrameworkMethod.invokeExplosively(FrameworkMethod.java:47)

     at org.junit.internal.runners.statements.InvokeMethod.evaluate(InvokeMethod.java:17)

     at org.junit.runners.ParentRunner.runLeaf(ParentRunner.java:325)

     at org.junit.runners.BlockJUnit4ClassRunner.runChild(BlockJUnit4ClassRunner.java:78)

     at org.junit.runners.BlockJUnit4ClassRunner.runChild(BlockJUnit4ClassRunner.java:57)

     at org.junit.runners.ParentRunner$3.run(ParentRunner.java:290)

     at org.junit.runners.ParentRunner$1.schedule(ParentRunner.java:71)

     at org.junit.runners.ParentRunner.runChildren(ParentRunner.java:288)

     at org.junit.runners.ParentRunner.access$000(ParentRunner.java:58)

     at org.junit.runners.ParentRunner$2.evaluate(ParentRunner.java:268)

     at org.junit.runners.ParentRunner.run(ParentRunner.java:363)

     at org.eclipse.jdt.internal.junit4.runner.JUnit4TestReference.run(JUnit4TestReference.java:50)

     at org.eclipse.jdt.internal.junit.runner.TestExecution.run(TestExecution.java:38)

     at org.eclipse.jdt.internal.junit.runner.RemoteTestRunner.runTests(RemoteTestRunner.java:459)

     at org.eclipse.jdt.internal.junit.runner.RemoteTestRunner.runTests(RemoteTestRunner.java:675)

     at org.eclipse.jdt.internal.junit.runner.RemoteTestRunner.run(RemoteTestRunner.java:382)

     at org.eclipse.jdt.internal.junit.runner.RemoteTestRunner.main(RemoteTestRunner.java:192)

 Caused by: java.io.FileNotFoundException: class path resource [resources/hello.xml] cannot be opened because it does not exist

     at org.springframework.core.io.ClassPathResource.getInputStream(ClassPathResource.java:172)

     at org.springframework.beans.factory.xml.XmlBeanDefinitionReader.loadBeanDefinitions(XmlBeanDefinitionReader.java:330)

     ... 36 more
提示这个文件不存在,找不到。
好吧 ,我要爆炸了!!!
听说基友解读了一番,将ClassXmlAplicationContext()方法替换成FileSystemXmlApplicationContext()方法,代码如下:
 package com.it.sxd;

 import java.nio.file.FileSystem;

 import org.junit.Test;

 import org.springframework.context.ApplicationContext;

 import org.springframework.context.support.ClassPathXmlApplicationContext;

 import org.springframework.context.support.FileSystemXmlApplicationContext;

 public class SayHelloTest {

     @Test

     public void testSayHello(){

         //1.读取hello。xml配置文件,实例化一个Ioc容器

         ApplicationContext context = new FileSystemXmlApplicationContext("resources/hello.xml");

         //2.从Ioc容器中获取ID为"hello1"的bean ,此处是“面向接口编程   而不是面向实现编程”

         SayHell sayHell = context.getBean("hello1",SayHell.class);

         //3.实现功能

         sayHell.sayHello();

     }

 }
然后:

效果很好嘛~~!!!然后就好了。
下面就解读一下这两个方法的区别:
Spring容器最基本的接口就是BeanFactory. BeanFactory负责配置、创建、管理Bean,它有一个子接口ApplicationContext,也称为Spring上下文。Spring容器负责管理Bean与Bean之间的信赖关系。
BeanFactory有很多实现类,通常使用org.springframework.beans.factory.xml.XmlBeanFactory类。但对于大部分J2EE应用而言,推荐使用ApplicationContext. ApplicationContext是BeanFactory的子接口,其常用实现类是org.springframework.context.support.FileSystemXmlApplicationContext和org.springframework.context.support.ClassXmlAplicationContext。
Springr的配置信息通常采用XML配置文件来设置,因此,创建BeanFactory实例时,应该提供XML配置文件作为参数。、
下面详细介绍ApplicationContext的实际运用:
一:ClassPathXmlApplicationContext
1.没有前缀:默认为项目的classpath下相对路径
ApplicationContext appCt = new ClassPathXmlApplicationContext("app.spring.xml");
2.前缀classpath:表示的是项目的classpath下相对路径
ApplicationContext appCt = new ClassPathXmlApplicationContext("classpath:app.spring.xml");
3.使用前缀file 表示的是文件的绝对路径
ApplicationContext appCt = new ClassPathXmlApplicationContext("file:D:/app.spring.xml");
4.可以同时加载多个文件
String[] xmlCfg = new String[] { "classpath:base.spring.xml","app.spring.xml"};
ApplicationContext appCt = new ClassPathXmlApplicationContext(xmlCfg);
5.使用通配符加载所有符合要求的文件
ApplicationContext appCt = new ClassPathXmlApplicationContext("*.spring.xml");
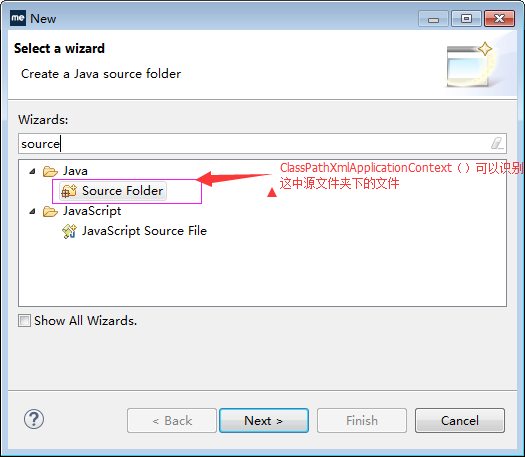
也就是说呢,这个ClassPathXmlApplicationContext()方法,只能识别源文件夹的范围下的东西。
二:FileSystemXmlApplicationContext
1.默认为项目工作路径 即项目的根目录
ApplicationContext appCt2 = new FileSystemXmlApplicationContext("src/main/resources/app.spring.xml");
2.前缀classpath:表示的是项目的classpath下相对路径
ApplicationContext appCt2 = new FileSystemXmlApplicationContext("classpath:app.spring.xml");
3.使用前缀file 表示的是文件的绝对路径
ApplicationContext appCt2 = new FileSystemXmlApplicationContext("file:D:/app.spring.xml");
ApplicationContext appCt2 = new FileSystemXmlApplicationContext("D:/app.spring.xml");
4.可以同时加载多个文件
String[] xmlCfg = new String[] { "src/main/resources/base.spring.xml","classpath:app.spring.xml"};
ApplicationContext appCt2 = new FileSystemXmlApplicationContext(xmlCfg);
5.使用通配符加载所有符合要求的文件
ApplicationContext appCt2 = new FileSystemXmlApplicationContext("classpath:*.spring.xml");
代码解释:
 import org.springframework.context.ApplicationContext;

 import org.springframework.context.support.ClassPathXmlApplicationContext;

 import org.springframework.context.support.FileSystemXmlApplicationContext;

 import aoplog.LogAfterAdvice;

 import aoplog.LogBeforeAdvice;

 /**

 * @author Michael

 *

 */

 public class TestApplicationContext {

 /**

 * @param args

 */

 public static void main(String[] args) {

 /**

 * ClassPathXmlApplicationContext

 */

 // 没有前缀:默认为项目的classpath下相对路径

 ApplicationContext appCt = new ClassPathXmlApplicationContext(

 "app.spring.xml");

 // 前缀classpath:表示的是项目的classpath下相对路径

 // ApplicationContext appCt = new ClassPathXmlApplicationContext(

 // "classpath:app.spring.xml");

 // 使用前缀file 表示的是文件的绝对路径

 // ApplicationContext appCt = new ClassPathXmlApplicationContext(

 // "file:D:/app.spring.xml");

 LogBeforeAdvice logBefore = (LogBeforeAdvice) appCt

 .getBean("logBefore");

 System.out.println("ClassPathXmlApplicationContext test:"

 + logBefore.getClass());

 // 利用通配符文件加载

 ApplicationContext appCtXx = new ClassPathXmlApplicationContext(

 "*.spring.xml");

 // 多文件加载

 String[] xmlCfg = new String[] { "classpath:base.spring.xml",

 "myapp.spring.xml" };

 ApplicationContext appCtMore = new ClassPathXmlApplicationContext(

 xmlCfg);

 /*

 * FileSystemXmlApplicationContext

 */

 // 默认为项目工作路径 即项目的根目录

 ApplicationContext appCt2 = new FileSystemXmlApplicationContext(

 "src/main/resources/app.spring.xml");

 // 前缀classpath:表示的是项目的classpath下相对路径

 // ApplicationContext appCt2 = new FileSystemXmlApplicationContext(

 // "classpath:app.spring.xml");

 // 使用前缀file 表示的是文件的绝对路径

 // ApplicationContext appCt2 = new FileSystemXmlApplicationContext(

 // "file:D:/app.spring.xml");

 LogAfterAdvice logAfter = (LogAfterAdvice) appCt2.getBean("logAfter");

 System.out.println("FileSystemXmlApplicationContext test:"

 + logAfter.getClass());

 }

 }
附录:
谈一谈什么是ClassPath以及怎么使用它:
首先:
java运行时的类路径,比如导入的类,在运行时需要将jar包放到classpath路径上。
classpath 在classpath路径上寻找指定文件,如果有多个符合的文件,以第一个为准,也就说,只要找到一个,就不在继续搜索
classpath*:会搜索所有满足条件的文件,有多少加载多少
其次:
编写的java源文件经过编译后生成class文件,需要指定目录存放这些文件。web程序默认都在web-info/classes目录下存放我们的java编译后的文件。
但是web-info目录下还有各种jar包和配置文件呢,确切说web-info根目录才是程序运行时classpath。放在根目录下的源代码,在编译之后,会将此文件copy到web-info目录。
JAVA获取classpath路径:
public URL getResource (String name);
public InputStream getResourceAsStream (String name);
这里name是资源的类路径,它是相对与“/”根路径下的位置。getResource得到的是一个URL对象来定位资源,而getResourceAsStream取得该资源输入流的引用保证程序可以从正确的位置抽取数据。
但是真正使用的不是ClassLoader的这两个方法,而是Class的 getResource和getResourceAsStream方法,因为Class对象可以从你的类得到(如YourClass.class或 YourClass.getClass()),而ClassLoader则需要再调用一次YourClass.getClassLoader()方法,不过根据JDK文档的说法,Class对象的这两个方法其实是“委托”(delegate)给装载它的ClassLoader来做的,所以只需要使用 Class对象的这两个方法就可以了。
因此,直接调用 this.getClass().getResourceAsStream(String name) ;获取流,静态化方法中则使用ClassLoader.getSystemResourceAsStream (String name) ; 。
下面是一些得到classpath和当前类的绝对路径的一些方法。你可能需要使用其中的一些方法来得到你需要的资源的绝对路径。
1.this.getClass().getResource("")
得到的是当前类class文件的URI目录。不包括自己!
如:file:/D:/workspace/jbpmtest3/bin/com/test/
2.this.getClass().getResource("/")
得到的是当前的classpath的绝对URI路径 。
如:file:/D:/workspace/jbpmtest3/bin/
3.this.getClass() .getClassLoader().getResource("")
得到的也是当前ClassPath的绝对URI路径 。
如:file:/D:/workspace/jbpmtest3/bin/
4.ClassLoader.getSystemResource("")
得到的也是当前ClassPath的绝对URI路径 。
如:file:/D:/workspace/jbpmtest3/bin/
5.Thread.currentThread().getContextClassLoader ().getResource("")
得到的也是当前ClassPath的绝对URI路径 。
如:file:/D:/workspace/jbpmtest3/bin/
6.ServletActionContext.getServletContext().getRealPath(“/”)
Web应用程序 中,得到Web应用程序的根目录的绝对路径。这样,我们只需要提供相对于Web应用程序根目录的路径,就可以构建出定位资源的绝对路径。
如:file:/D:/workspace/.metadata/.plugins/org.eclipse.wst.server.core/tmp0/wtpwebapps/WebProject
注意点:
1.尽量不要使用相对于System.getProperty("user.dir")当前用户目录的相对路径。这是一颗定时炸 弹,随时可能要你的命。
2.尽量使用URI形式的绝对路径资源。它可以很容易的转变为URI,URL,File对象。
3.尽量使用相对classpath的相对路径。不要使用绝对路径。使用上面ClassLoaderUtil类的public static URL getExtendResource(String relativePath)方法已经能够使用相对于classpath的相对路径定位所有位置的资源。
4.绝对不要使用硬编码的绝对路径。因为,我们完全可以使用ClassLoader类的getResource("")方法得到当前classpath的绝对路径。如果你一定要指定一个绝对路径,那么使用配置文件,也比硬编码要好得多!
【spring 区别】ClassXmlAplicationContext和FileSystemXmlApplicationContext的区别的更多相关文章
- Spring中ClassPathXmlApplication与FileSystemXmlApplicationContext的区别
Spring中ClassPathXmlApplication与FileSystemXmlApplicationContext的区别 一.概述 在项目中遇到加载不到Spring配置文件,简单分析后,写此 ...
- Spring中ClassPathXmlApplication与FileSystemXmlApplicationContext的区别以及ClassPathXmlApplicationContext 的具体路径
一.ClassPathXmlApplicationContext 的具体路径 String s[] = System.getProperty("java.class.path"). ...
- Spring 注释 @Autowired 和@Resource 的区别
Spring 注释 @Autowired 和@Resource 的区别 一. @Autowired和@Resource都可以用来装配bean,都可以写在字段上,或者方法上. 二. @Autowired ...
- Spring和SpringBoot比较,解惑区别
1.概述: 对于Spring和SpringBoot到底有什么区别,我听到了很多答案,刚开始迈入学习SpringBoot的我当时也是一头雾水,随着经验的积累.我慢慢理解了这两个框架到底有什么区别,我相信 ...
- Spring中BeanFactory与FactoryBean的区别
在Spring中有BeanFactory和FactoryBean这2个接口,从名字来看很相似,比较容易搞混. 一.BeanFactory BeanFactory是一个接口,它是Spring中工厂的顶层 ...
- Spring Boot @EnableAutoConfiguration和 @Configuration的区别
Spring Boot @EnableAutoConfiguration和 @Configuration的区别 在Spring Boot中,我们会使用@SpringBootApplication来开启 ...
- 【Java面试】Spring中 BeanFactory和FactoryBean的区别
一个工作了六年多的粉丝,胸有成竹的去京东面试. 然后被Spring里面的一个问题卡住,唉,我和他说,6年啦,Spring都没搞明白? 那怎么去让面试官给你通过呢? 这个问题是: Spring中Bean ...
- jQuery方法区别:click() bind() live() delegate()区别
今天看到一篇jquery 事件的文章,自己写了个小例子,虽然2种方式都可以实现,但是不太明白,找了点资料 $("#box1").delegate("p",&qu ...
- JAVA基础之——三大特征、接口和抽象类区别、重载和重写区别、==和equals区别、JAVA自动装箱和拆箱
1 java三大特征 1)封装:即class,把一类实体定义成类,该类有变量和方法. 2)继承:从已有的父类中派生出子类,子类实现父类的抽象方法. 3)多态:通过父类对象可以引用不同的子类,从而实现不 ...
随机推荐
- UVa12726 one Friend at a Time (位 广搜)
题目链接:UVa12726 是个PDF,不好复制进来. 大意:有个人要追个妹子,想加妹子QQ,但是不知道谁规定的,玩QQ的人要加好友必须先要有至少k个共同好友.共有N个人玩QQ,编号为1到N,1是男主 ...
- 深入浅出JSON
JSON定义 JSON(JavaScript Object Notation) 是一种轻量级的数据交换格式,易于阅读和编写,同时也易于机器解析和生成.它基于ECMA262语言规范(1999 ...
- cocos基础教程(3)cocos3.x版本目录结构介绍
简介 cocos2d-x-3.x版本进行了很多优化,比如:将TTF字体用Atlas缓存,节点重排序官方声称提升了10倍速度,查找.移除节点方面也提高了10%,拆分渲染层到独立的线程运行: 另外,coc ...
- FineUI第六天---表单控件
表单控件 所有表单控件都有的属性有: ShowLabel:是否显示标签(默认值:true). ShowEmptyLabel:是否显示空白的标签(默认值:false). Label:标签文本(默认值:& ...
- 第11章 使用Vsftpd服务传输文件
章节简述: 本章节先通过介绍文件传输协议来帮助读者理解FTP协议的用处,安装vsftpd服务程序并逐条分析服务文件的配置参数. 完整演示vsftpd服务匿名访问模式.本地用户模式及虚拟用户模式的配置方 ...
- 专注docker安全:Security Scanning
导读 Docker毫无疑问是近期运维同学们的热点话题,Docker安全也由此倍受重视,Docker Security Scanning 是一款Docker镜像扫描的安全工具,目前已经在Docker C ...
- POJ 1797 Heavy Transportation (Dijkstra变形)
F - Heavy Transportation Time Limit:3000MS Memory Limit:30000KB 64bit IO Format:%I64d & ...
- 如何实现SSH断开后 进程仍然在后台运行
1.nohup命令功能:不挂断地运行命令,忽略HUP信号.语法:nohup command & 实例:nohup ping www.google.com & 转自: http://bl ...
- Balanced Binary Tree
Given a binary tree, determine if it is height-balanced. For this problem, a height-balanced binary ...
- webdriver+python 对三大浏览器的支持
1.在IE浏览器上运行测试脚本,首先需要下载IEDriverServer.exe(http://code.google.com/p/selenium/downloads/list,根据浏览器的版本下载 ...