android开发学习——day8
关于UI学习的总结
EditText的练习
MainActivity.java代码
package test.example.com.ch02_button;

import android.support.v7.app.AppCompatActivity;

import android.os.Bundle;

import android.view.View;

import android.widget.TextView;

public class MainActivity extends AppCompatActivity {

    @Override

    protected void onCreate(Bundle savedInstanceState) {

        super.onCreate(savedInstanceState);

        setContentView(R.layout.activity_main);

    }

    int size=30;//字体大小,初值为30

    public void bigger(View v){

        TextView txv;

        txv= (TextView) findViewById(R.id.txv);//强制类型转换

        txv.setTextSize(++size);

    }

    public void smaller(View v){

        if(size>30){

            TextView txv= (TextView) findViewById(R.id.txv);

            txv.setTextSize(--size);

        }

    }

}
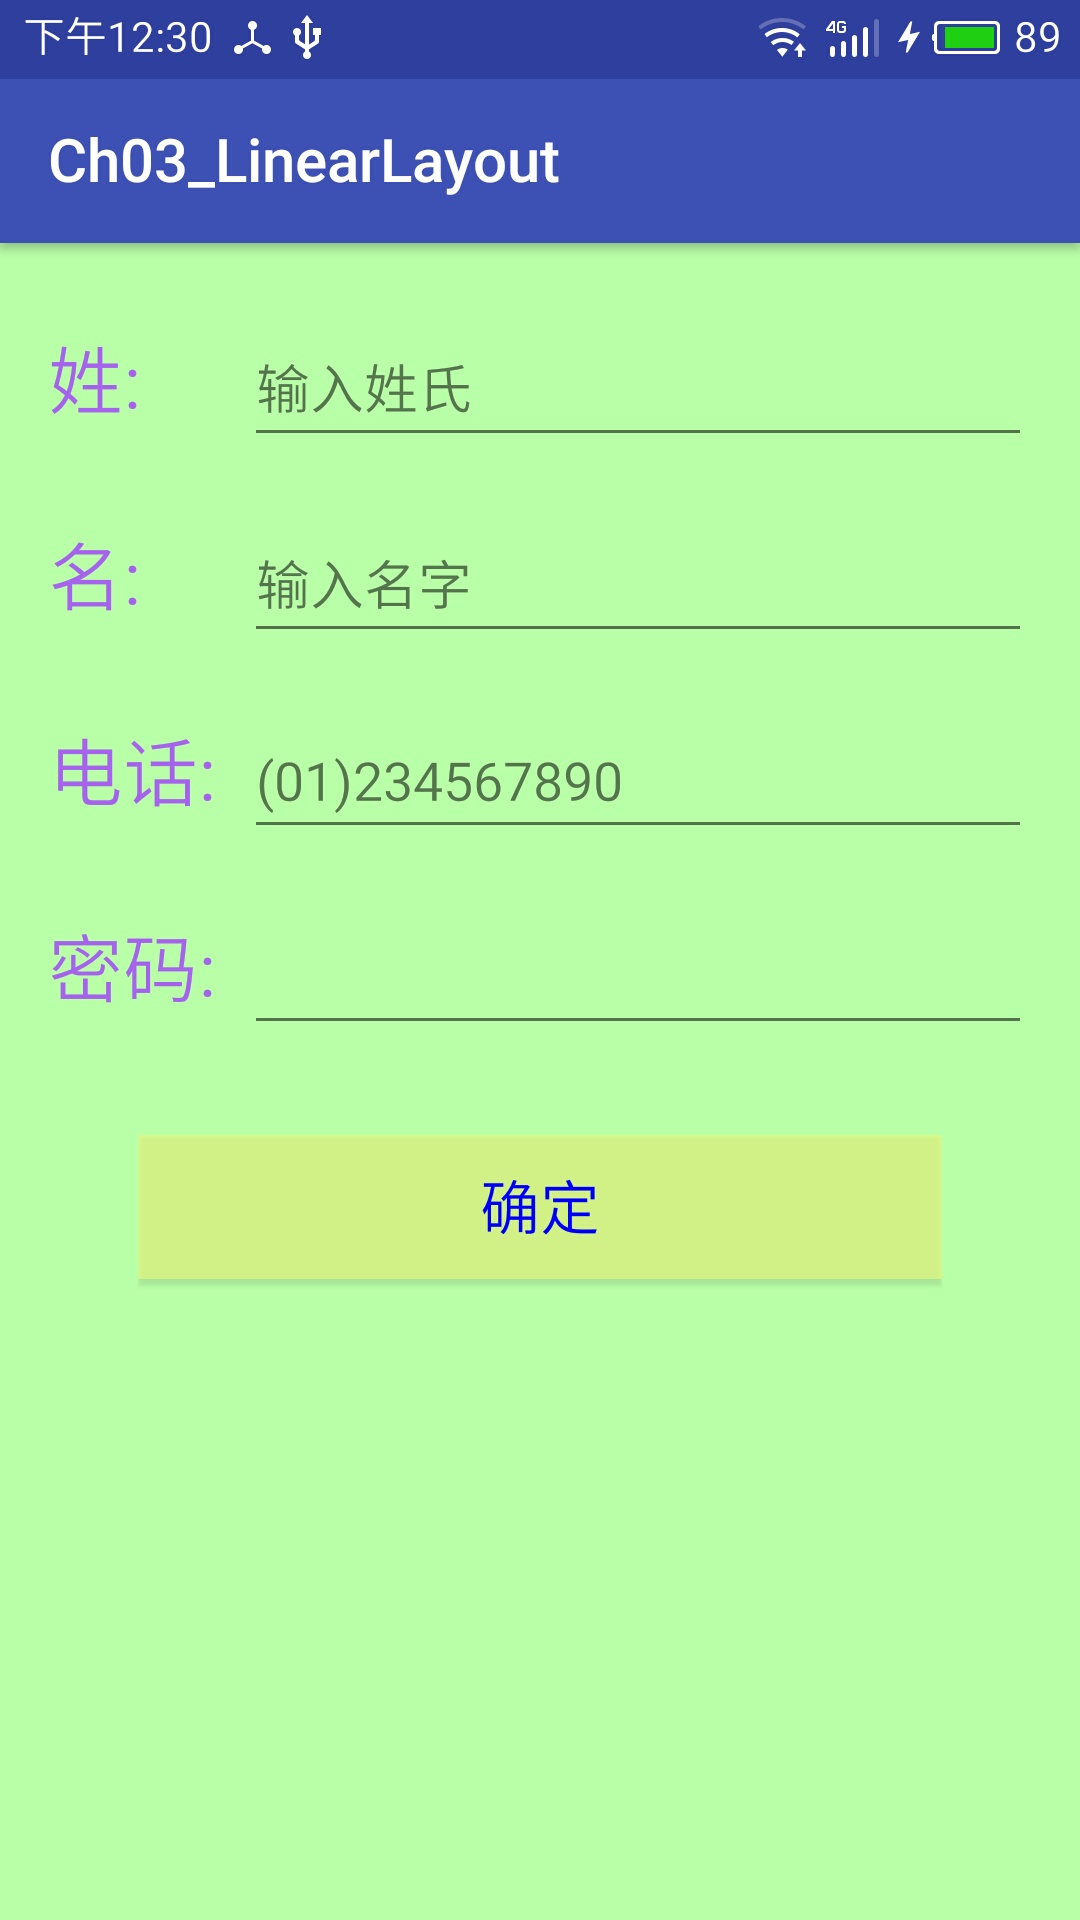
电话簿UI练习
1.利用属性设置布局
2.按比例排布控件
3.改变控件字体颜色以及背景颜色
4.插入背景图片
activity_main.xml代码
<?xml version="1.0" encoding="utf-8"?>

<LinearLayout xmlns:android="http://schemas.android.com/apk/res/android"

    xmlns:tools="http://schemas.android.com/tools"

    android:id="@+id/activity_main"

    android:orientation="vertical"

    android:layout_width="match_parent"

    android:layout_height="match_parent"

    android:background="@mipmap/ic_launcher"

    android:paddingBottom="@dimen/activity_vertical_margin"

    android:paddingLeft="@dimen/activity_horizontal_margin"

    android:paddingRight="@dimen/activity_horizontal_margin"

    android:paddingTop="@dimen/activity_vertical_margin"

    tools:context="test.example.com.ch03_linearlayout.MainActivity">

    <LinearLayout

        android:orientation="horizontal"

        android:paddingTop="10dp"

        android:paddingBottom="10dp"

        android:layout_width="match_parent"

        android:layout_height="wrap_content">

        <TextView

            android:layout_width="0dp"

            android:layout_height="wrap_content"

            android:layout_weight="1"

            android:textColor="#ffa763ee"

            android:text="@string/firstname"

            android:textSize="25dp"/>

        <EditText

            android:layout_width="0dp"

            android:layout_height="wrap_content"

            android:inputType="textPersonName"

            android:text=""

            android:ems="10"

            android:id="@+id/editText"

            android:layout_weight="4"

            android:hint="输入姓氏"

            android:ellipsize="end"

            android:singleLine="true" />

    </LinearLayout>

    <LinearLayout

        android:layout_width="match_parent"

        android:layout_height="wrap_content"

        android:paddingTop="10dp"

        android:paddingBottom="10dp"

        android:orientation="horizontal">

        <TextView

            android:layout_width="0dp"

            android:layout_height="wrap_content"

            android:layout_weight="1"

            android:textColor="#ffa763ee"

           android:text="@string/lastname"

            android:textSize="25dp"/>

        <EditText

            android:layout_width="0dp"

            android:layout_height="wrap_content"

            android:inputType="textPersonName"

            android:text=""

            android:ems="10"

            android:id="@+id/editText1"

            android:layout_weight="4"

            android:hint="输入名字"

            android:ellipsize="end"

            android:singleLine="true" />

    </LinearLayout>

    <LinearLayout

        android:layout_width="match_parent"

        android:layout_height="wrap_content"

        android:paddingTop="10dp"

        android:paddingBottom="10dp"

        android:orientation="horizontal">

        <TextView

            android:layout_width="0dp"

            android:layout_height="wrap_content"

            android:layout_weight="1"

            android:textColor="#ffa763ee"

            android:text="@string/tel"

            android:textSize="25dp"/>

        <EditText

            android:layout_width="0dp"

            android:layout_height="wrap_content"

            android:inputType="phone"

            android:text=""

            android:ems="10"

            android:id="@+id/editText2"

            android:layout_weight="4"

            android:ellipsize="end"

            android:singleLine="true"

            android:hint="(01)234567890" />

    </LinearLayout>

    <LinearLayout

        android:layout_width="match_parent"

        android:layout_height="wrap_content"

        android:paddingTop="10dp"

        android:paddingBottom="10dp"

        android:orientation="horizontal">

    <TextView

        android:text="@string/psw"

        android:layout_width="0dp"

        android:layout_height="wrap_content"

        android:layout_weight="1"

        android:textColor="#ffa763ee"

        android:id="@+id/textView"

        android:textSize="25dp"/>

        <EditText

            android:layout_width="0dp"

            android:layout_height="wrap_content"

            android:inputType="textPassword"

            android:ems="10"

            android:id="@+id/editText4"

            android:layout_weight="4"

            android:ellipsize="end"

            android:singleLine="true" />

    </LinearLayout>

<LinearLayout

    android:orientation="vertical"

    android:layout_width="match_parent"

    android:layout_height="wrap_content"

    android:paddingTop="20dp"

    android:paddingBottom="20dp"

    android:paddingRight="30dp"

    android:paddingLeft="30dp">

    <Button

        android:text="确定"

        android:layout_width="match_parent"

        android:layout_height="wrap_content"

        android:textSize="20sp"

        android:textColor="#00F"

        android:background="#80feff79"

        android:id="@+id/button"

        android:onClick="onClick" />

    <TextView

        android:layout_width="match_parent"

        android:layout_height="wrap_content"

        android:textSize="30dp"

        android:id="@+id/textView3" />

</LinearLayout>

</LinearLayout>
MainActivity.java代码
package test.example.com.ch03_linearlayout; import android.support.v7.app.AppCompatActivity;
import android.os.Bundle;
import android.view.View;
import android.widget.EditText;
import android.widget.TextView; public class MainActivity extends AppCompatActivity {
EditText firstname,lastname,tel;
TextView txv;
@Override
protected void onCreate(Bundle savedInstanceState) {
super.onCreate(savedInstanceState);
setContentView(R.layout.activity_main);
firstname=(EditText)findViewById(R.id.editText);
lastname=(EditText)findViewById(R.id.editText1);
tel=(EditText)findViewById(R.id.editText2);
txv=(TextView)findViewById(R.id.textView3);
}
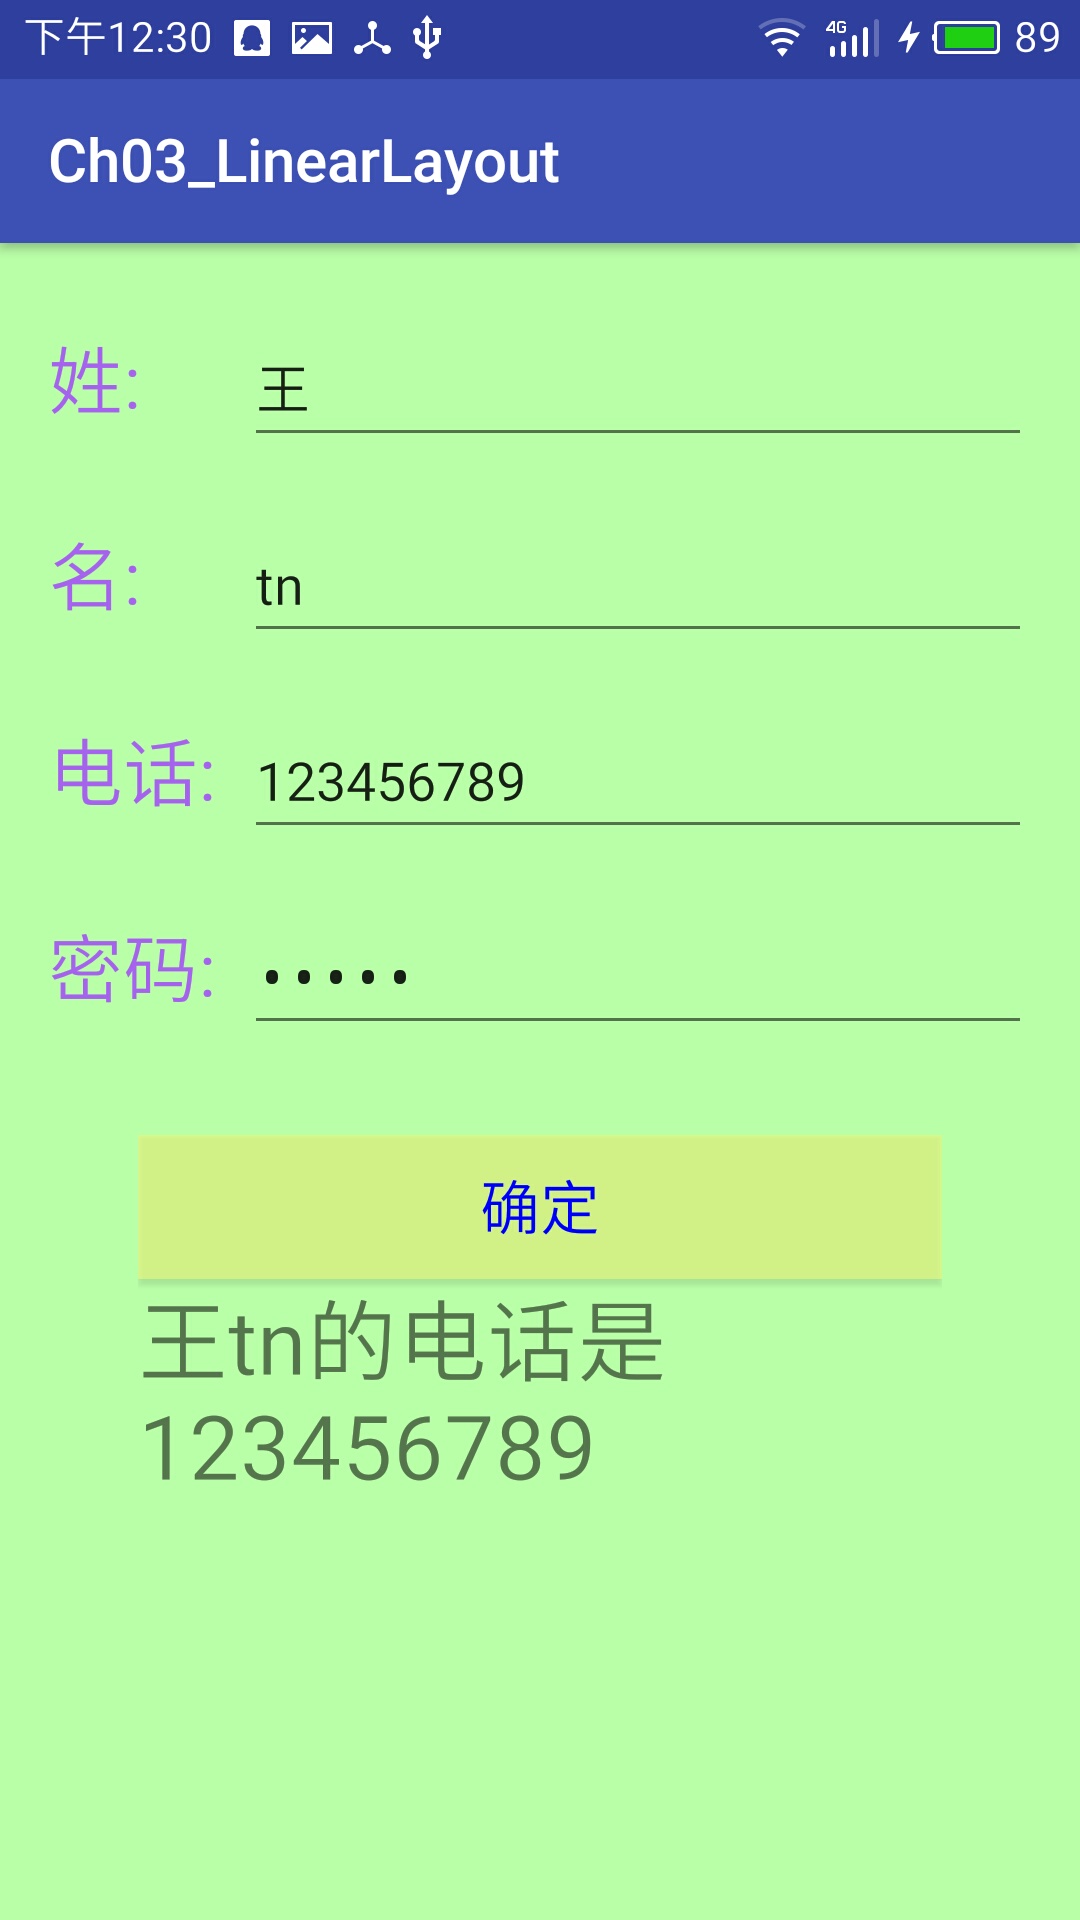
public void onClick(View v){
txv.setText(firstname.getText().toString()+lastname.getText().toString()+"的电话是"+tel.getText());
}
}
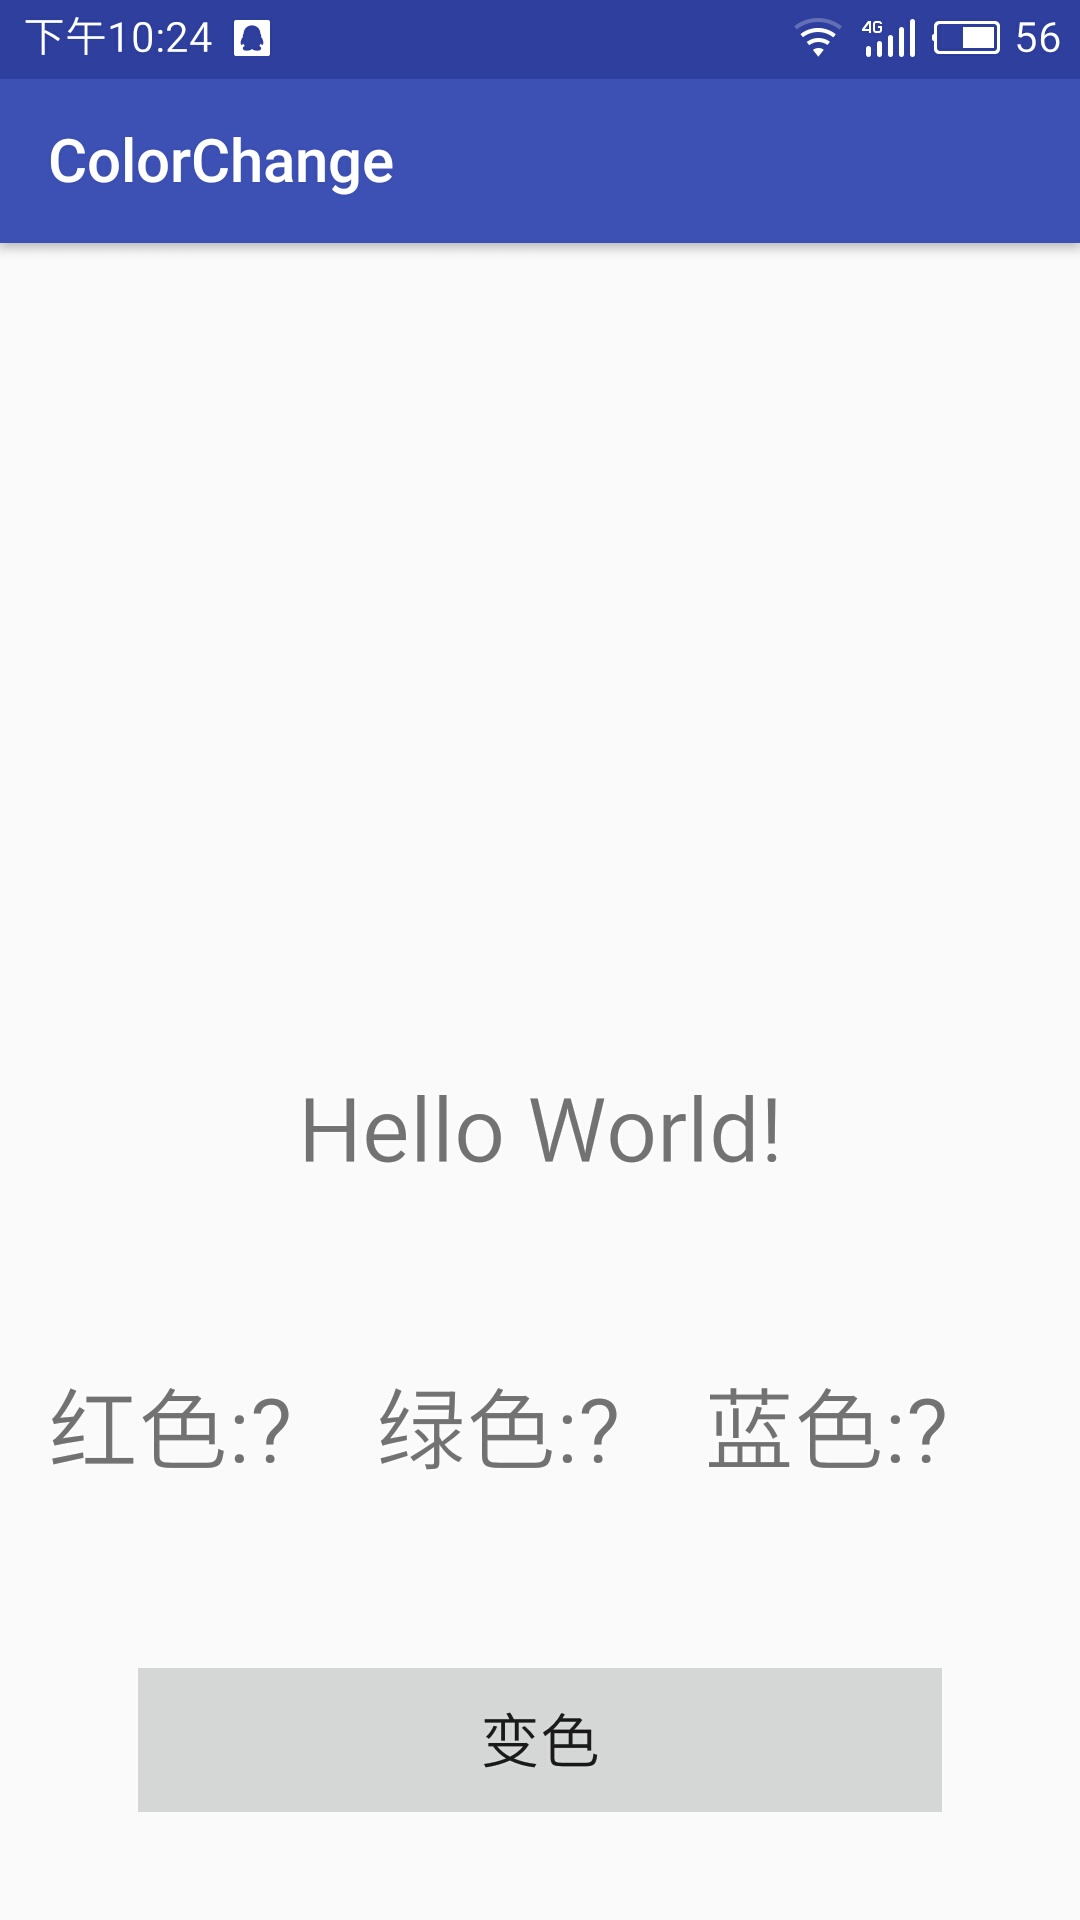
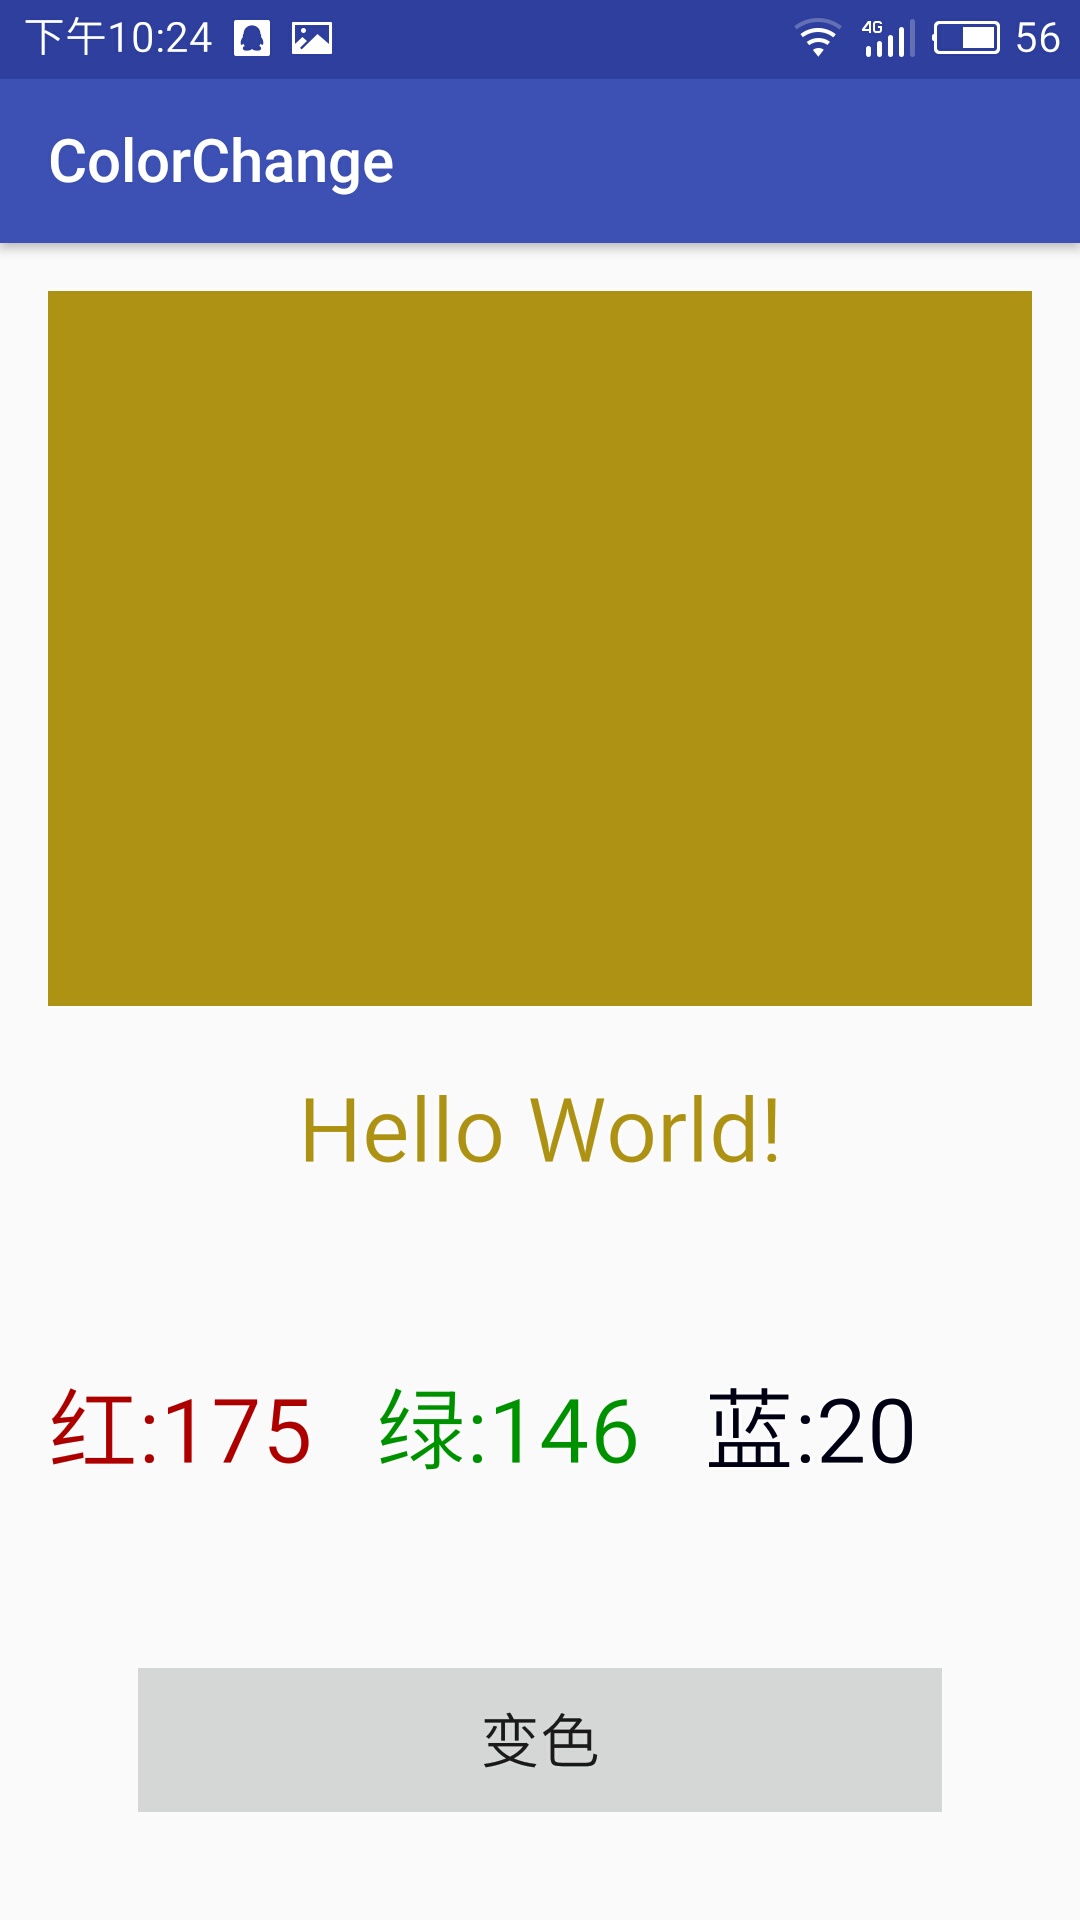
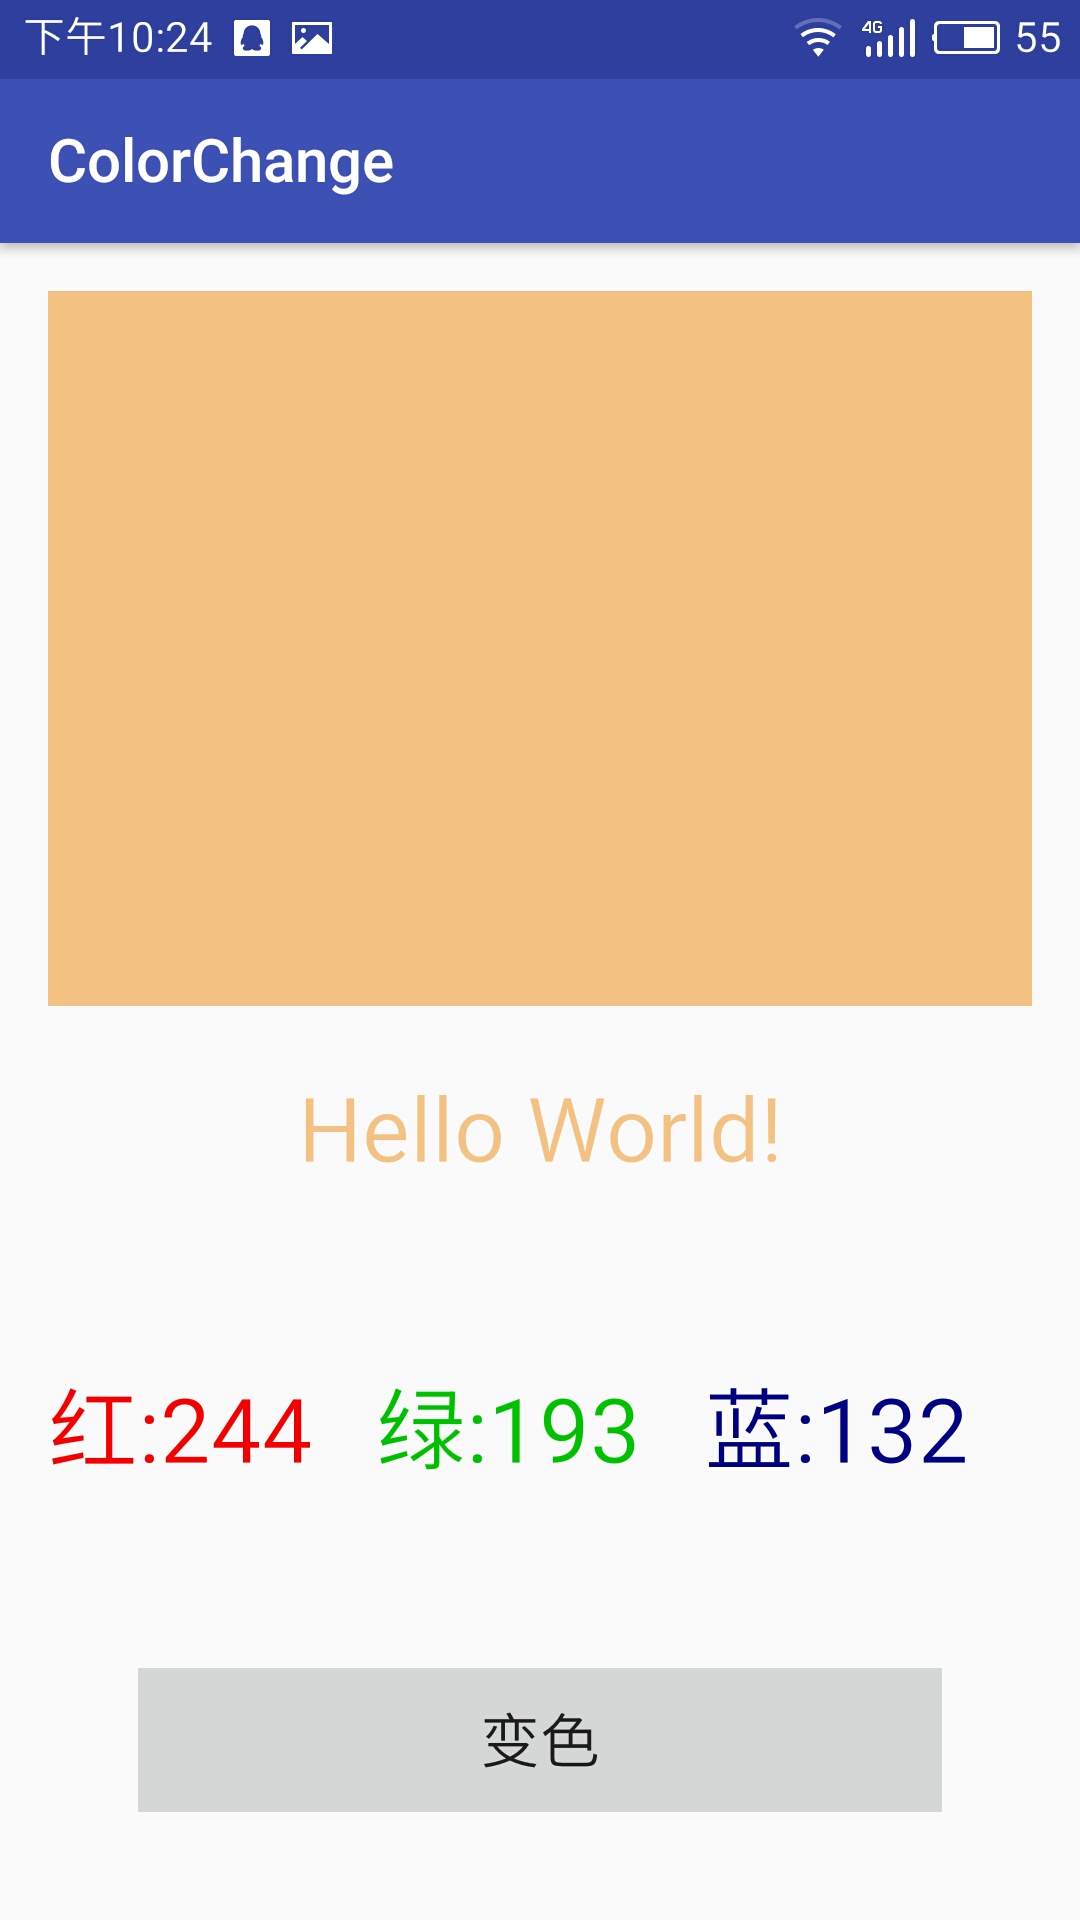
变色程序
activity_main.xml代码
<?xml version="1.0" encoding="utf-8"?>

<LinearLayout xmlns:android="http://schemas.android.com/apk/res/android"

    xmlns:tools="http://schemas.android.com/tools"

    android:id="@+id/activity_main"

    android:layout_width="match_parent"

    android:layout_height="match_parent"

    android:orientation="vertical"

    android:paddingBottom="@dimen/activity_vertical_margin"

    android:paddingLeft="@dimen/activity_horizontal_margin"

    android:paddingRight="@dimen/activity_horizontal_margin"

    android:paddingTop="@dimen/activity_vertical_margin"

    tools:context="test.example.com.chameleon_test.MainActivity">

    <LinearLayout

        android:id="@+id/colorblock"

        android:layout_weight="1"

        android:orientation="horizontal"

        android:layout_width="match_parent"

        android:layout_height="0dp"

        android:paddingTop="20dp"

        android:paddingBottom="20dp">

    </LinearLayout>

    <LinearLayout

        android:id="@+id/hello"

        android:orientation="horizontal"

        android:layout_width="match_parent"

        android:layout_height="wrap_content"

        android:paddingTop="20dp"

        android:paddingBottom="20dp">

<TextView

    android:id="@+id/hhh"

    android:textSize="30dp"

    android:text="Hello World!"

    android:gravity="center"

    android:layout_width="match_parent"

    android:layout_height="wrap_content" />

    </LinearLayout>

    <LinearLayout

        android:orientation="horizontal"

        android:layout_width="match_parent"

        android:layout_height="wrap_content"

        android:paddingTop="40dp"

        android:paddingBottom="20dp">

        <TextView

            android:id="@+id/txvR"

            android:text="@string/red"

            android:textSize="30dp"

            android:layout_width="0dp"

            android:layout_height="wrap_content"

            android:layout_weight="1"/>

        <TextView

            android:id="@+id/txvG"

            android:text="@string/green"

            android:textSize="30dp"

            android:layout_width="0dp"

            android:layout_height="wrap_content"

            android:layout_weight="1"/>

        <TextView

            android:id="@+id/txvB"

            android:text="@string/blue"

            android:textSize="30dp"

            android:layout_width="0dp"

            android:layout_height="wrap_content"

            android:layout_weight="1"/>

    </LinearLayout>

    <LinearLayout

        android:orientation="horizontal"

        android:layout_width="match_parent"

        android:layout_height="wrap_content"

        android:paddingTop="40dp"

        android:paddingBottom="20dp"

        android:paddingRight="30dp"

        android:paddingLeft="30dp">

    <Button

        android:text="@string/change"

        android:textSize="20dp"

        android:layout_width="match_parent"

        android:layout_height="wrap_content"

        android:id="@+id/button"

        android:onClick="changecolor" />

    </LinearLayout>

</LinearLayout>
MainActivity.java代码
package test.example.com.chameleon_test;

import android.graphics.Color;

import android.support.v7.app.AppCompatActivity;

import android.os.Bundle;

import android.view.View;

import android.widget.TextView;

import java.util.Random;

public class MainActivity extends AppCompatActivity {

    TextView red,green,blue,hh;

    View Colorblock;

    @Override

    protected void onCreate(Bundle savedInstanceState) {

        super.onCreate(savedInstanceState);

        setContentView(R.layout.activity_main);

        red=(TextView)findViewById(R.id.txvR);

        green=(TextView)findViewById(R.id.txvG);

        blue=(TextView)findViewById(R.id.txvB);

        hh=(TextView)findViewById(R.id.hhh);

        Colorblock=findViewById(R.id.colorblock);

    }

    public void changecolor(View v){

        Random x=new Random();

        int r=x.nextInt(256);

        red.setText("红:"+r);

        red.setTextColor(Color.rgb(r,0,0));

        int g=x.nextInt(256);

        green.setText("绿:"+g);

        green.setTextColor(Color.rgb(0,g,0));

        int b=x.nextInt(256);

        blue.setText("蓝:"+b);

        blue.setTextColor(Color.rgb(0,0,b));

        Colorblock.setBackgroundColor(Color.rgb(r,g,b));

        hh.setTextColor(Color.rgb(r,g,b));

    }

}
下划线的解决问题
EidtText和textview中内容过长的话自动换行,使用android:ellipsize与android:singleine可以解决,使只有一行。
EditText不支持marquee
用法如下:
在xml中
android:ellipsize = "end" 省略号在结尾
android:ellipsize = "start" 省略号在开头
android:ellipsize = "middle" 省略号在中间
android:ellipsize = "marquee" 跑马灯
android:singleline = "true"
android开发学习——day8的更多相关文章
- Android开发学习之路-RecyclerView滑动删除和拖动排序
Android开发学习之路-RecyclerView使用初探 Android开发学习之路-RecyclerView的Item自定义动画及DefaultItemAnimator源码分析 Android开 ...
- Android开发学习路线图
Android开发学习方法: Android是一个比较庞大的体系,从底层的Linux内核到上层的应用层,各部分的内容跨度也比较大.因此,一个好的学习方法对我们学习Android开发很重要. 在此建议, ...
- android开发学习笔记000
使用书籍:<疯狂android讲义>——李刚著,2011年7月出版 虽然现在已2014,可我挑来跳去,还是以这本书开始我的android之旅吧. “疯狂源自梦想,技术成就辉煌.” 让我这个 ...
- Android开发学习总结(一)——搭建最新版本的Android开发环境
Android开发学习总结(一)——搭建最新版本的Android开发环境(转) 最近由于工作中要负责开发一款Android的App,之前都是做JavaWeb的开发,Android开发虽然有所了解,但是 ...
- Android开发学习之LauncherActivity开发启动的列表
Android开发学习之LauncherActivity开发启动的列表 创建项目:OtherActivity 项目运行结果: 建立主Activity:OtherActivity.java [jav ...
- 最实用的Android开发学习路线分享
Android开发学习路线分享.Android发展主导移动互联发展进程,在热门行业来说,Android开发堪称火爆,但是,虽然Android有着自身种种优势,但对开发者的专业性要求也是极高,这种要求随 ...
- Android开发学习必备的java知识
Android开发学习必备的java知识本讲内容:对象.标识符.关键字.变量.常量.字面值.基本数据类型.整数.浮点数.布尔型.字符型.赋值.注释 Java作为一门语言,必然有他的语法规则.学习编程语 ...
- Android开发学习之路--基于vitamio的视频播放器(二)
终于把该忙的事情都忙得差不多了,接下来又可以开始good good study,day day up了.在Android开发学习之路–基于vitamio的视频播放器(一)中,主要讲了播放器的界面的 ...
- Android开发学习之路--Android Studio cmake编译ffmpeg
最新的android studio2.2引入了cmake可以很好地实现ndk的编写.这里使用最新的方式,对于以前的android下的ndk编译什么的可以参考之前的文章:Android开发学习之路– ...
随机推荐
- FortiGate防火墙500D下PC至外网丢包
1.现状: 如图,防火墙堆叠,500D共4个出口方向,联通.电信.FQ.运维专线 2.现象: 到网关和防火墙上.下联口不丢包,到网联通和运维专线方向丢包4%左右,电信和FQ方向不丢包 3.分析 采用从 ...
- [leetcode]40. Combination Sum II组合之和之二
Given a collection of candidate numbers (candidates) and a target number (target), find all unique c ...
- Centos7 进入单用户模式,修复系统
一.开机时进入如下界面,(按下方向键盘,阻止系统自动继续) 按e键出现下面界面 按方向键下,定位到最后,找到“ro”一行,ro的意思是read only,将“ro”替换成 rw init=/sysro ...
- angular模拟web API
现象:angular Cannot find module 'angular-in-memory-web-api'报错找不动“angular-in-memory-web-api”模块 解决:1.控制台 ...
- 将VSCode设置成中文语言环境
VSCode是一款轻量级的好用的编译软件,今天小编来将软件默认的英文语言环境变为我们熟悉的中文语言环境. 工具/原料 电脑一台 安装有VSCode 方法/步骤 首先打开VSCode软件,可 ...
- linux命令大全(1)
当用户使用linux系统时,其实在和Shell在打交道,当用户发出指令,其实先将这些指令发送给Shell, 然后由Shell将用户的指令翻译后传送给内核,再由内核来控制硬件的工作. 然后内核将硬件的工 ...
- Monotonic Array LT896
An array is monotonic if it is either monotone increasing or monotone decreasing. An array A is mono ...
- python 用文本来提供输入信息的模板,不用每次都手动粘贴了
#下面这一段用一个txt来保存input的信息来模拟input.最后提交代码时候删除这一段即可. a9999=open('1.txt','r') def input(): return a9999.r ...
- 深入理解JVM(三)垃圾收集器和内存分配策略
3.1 关于垃圾收集和内存分配 垃圾收集和内存分配主要针对的区域是Java虚拟机中的堆和方法区: 3.2 如何判断对象是否“存活”(存活判定算法) 垃圾收集器在回收对象前判断其是否“存活”的两个算法: ...
- 学习爬虫Scrapy遇到的错误
1. 这个问题是由于路径中含有中文,导致编码格式出错的问题, 查看错误方法,进入到ntpath.py文件中去,找到85行,然后,print 一下result_path,因为后面报出的错误,就是因为这段 ...