Jenkins Pipeline Job构建配置


1.创建pipeline job任务,新建任务》输入任务名称》选择“流水线”》点击【确定】

添加描述,This is my first test pipeline job

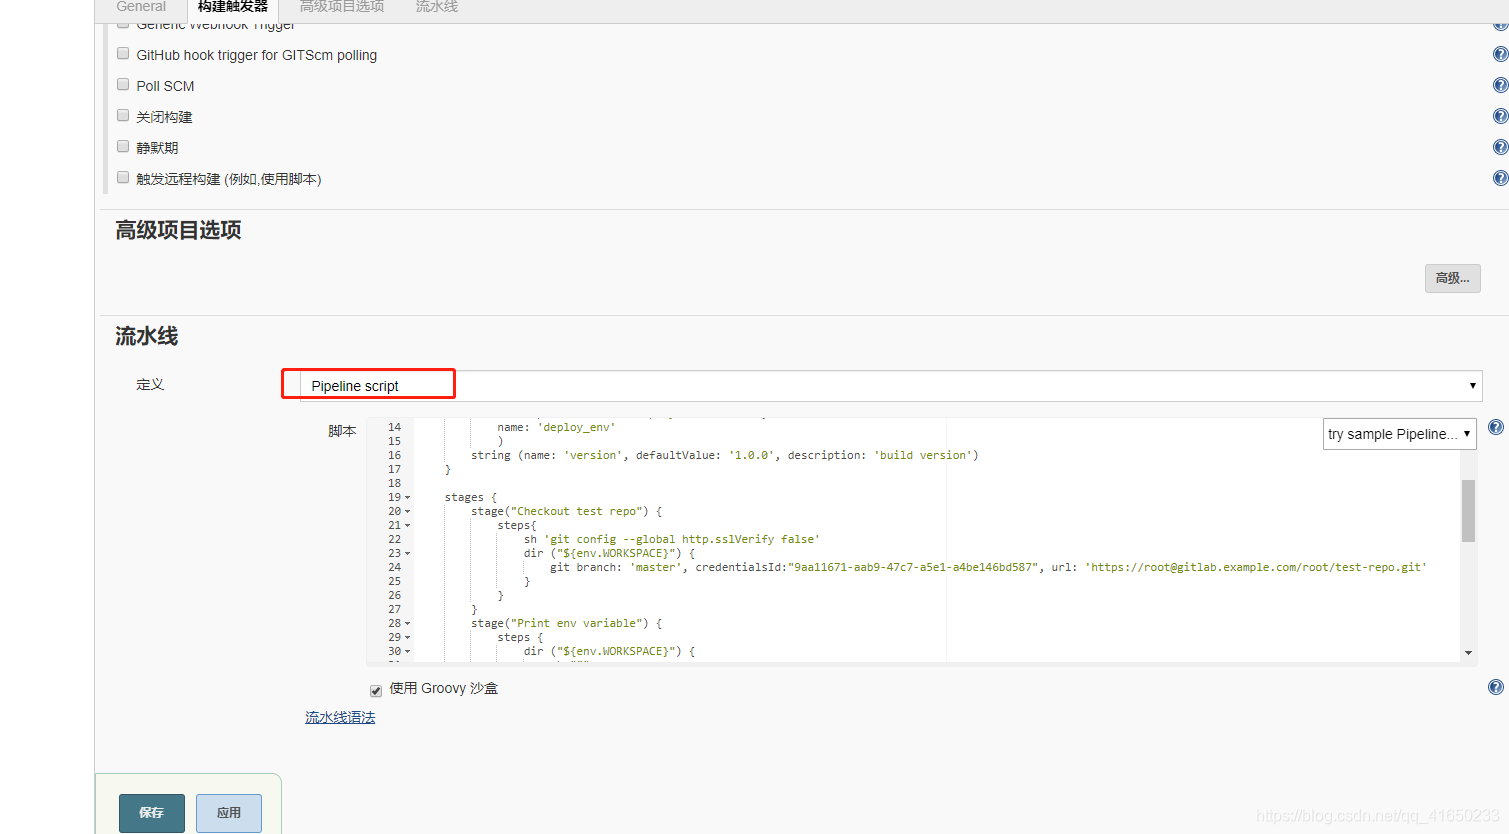
添加 pipeline脚本,点击【保存】
脚本解释
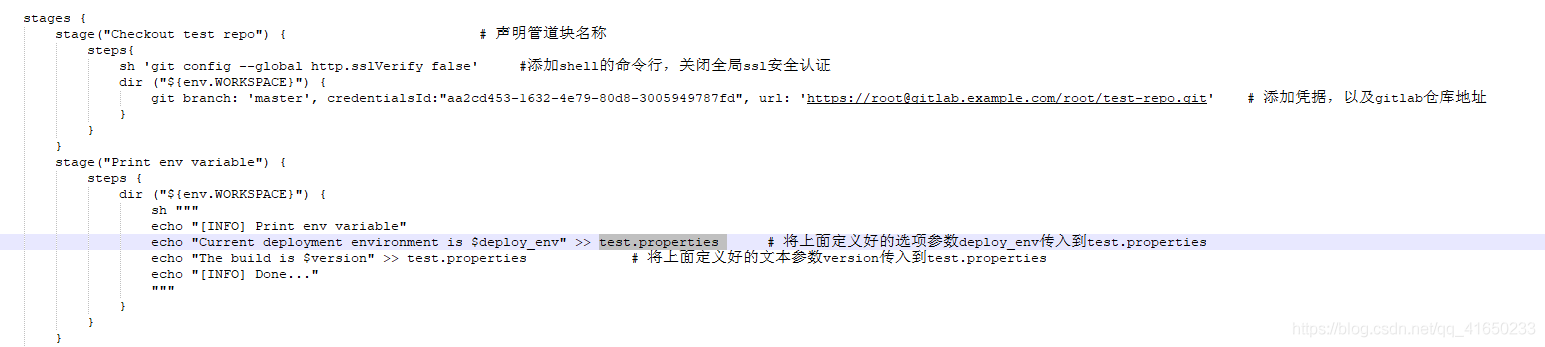
1. 声明脚本,添加环境变量

2.添加选项参数deploy_env,以及文本参数version

3.新建stage任务,将定义deploy_env、version参数,传入到test.properties 中
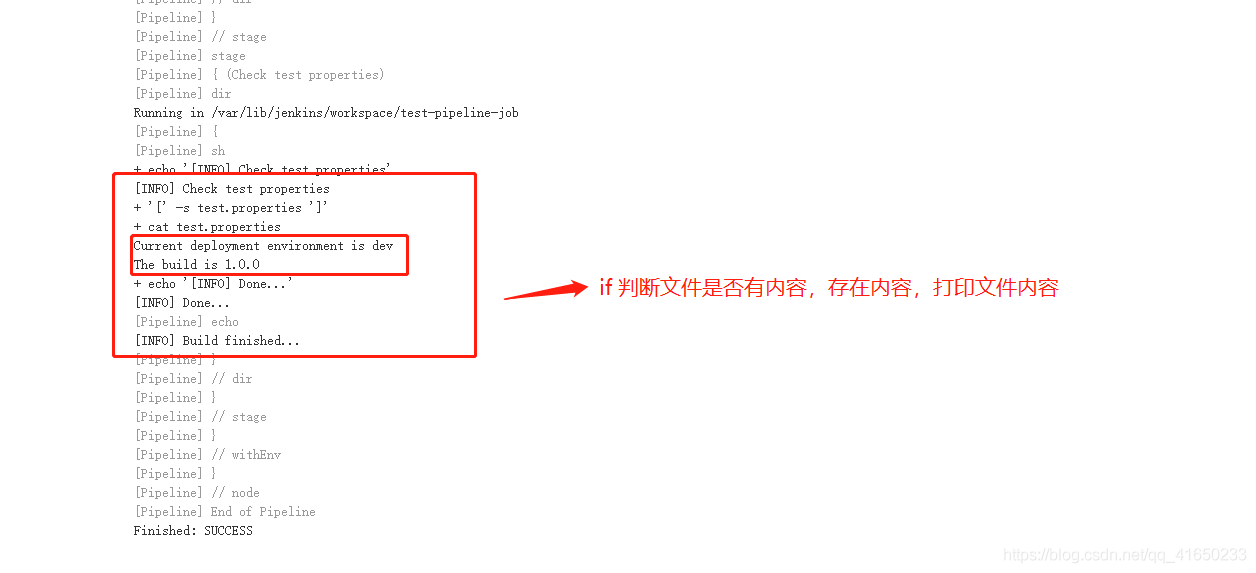
4.检查test.properties是否存在内容

5.完整脚本
#!groovy
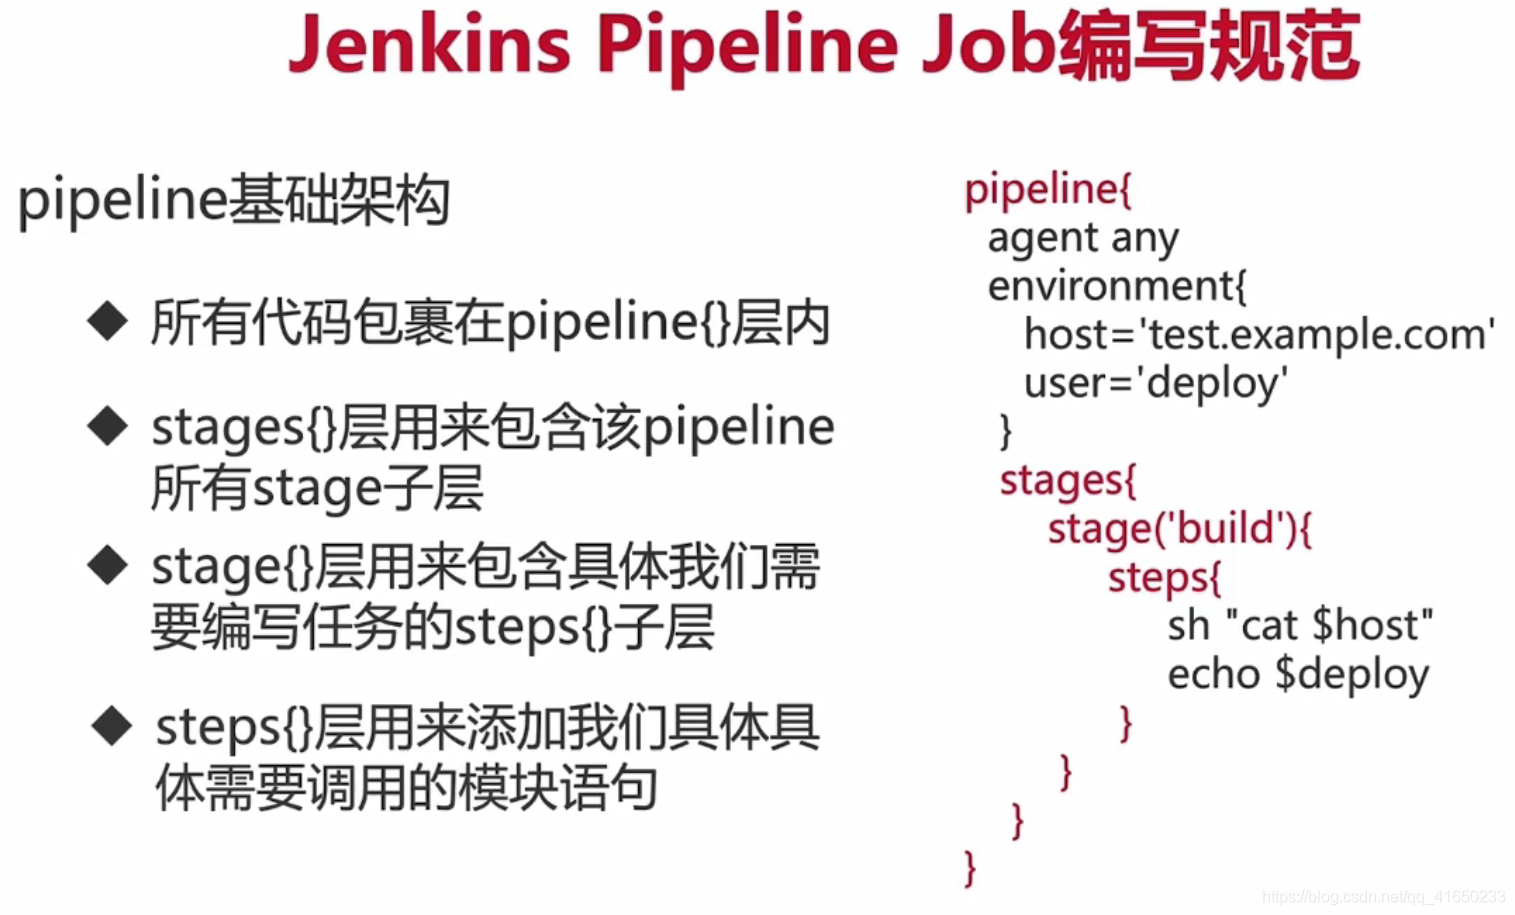
pipeline {
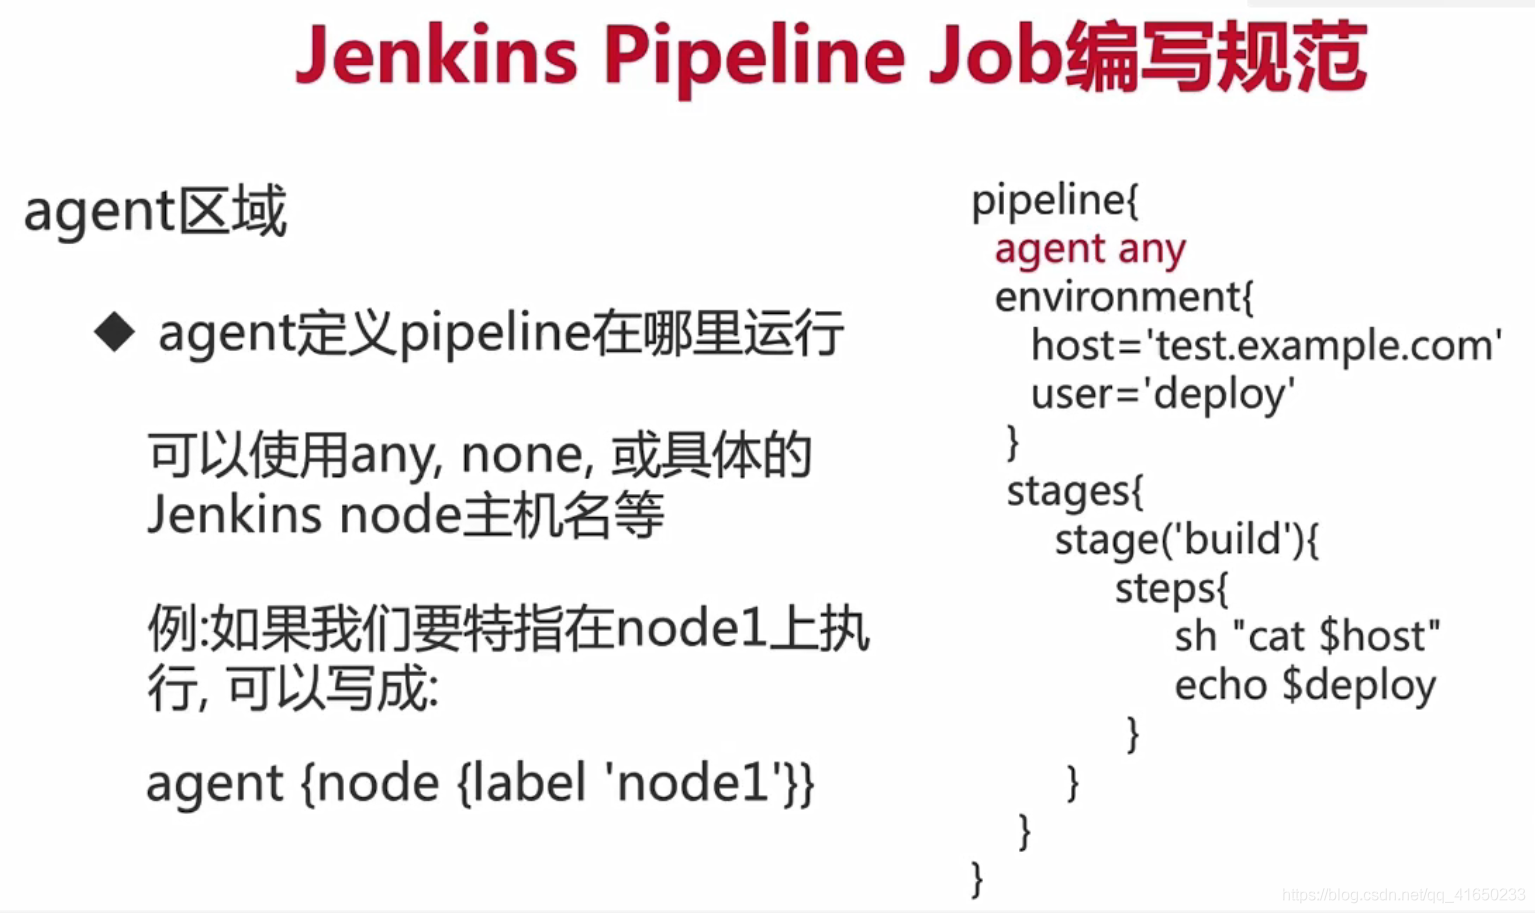
agent {node {label 'master'}}
environment {
PATH="/bin:/sbin:/usr/bin:/usr/sbin:/usr/local/bin"
}
parameters {
choice(
choices: 'dev\nprod',
description: 'choose deploy environment',
name: 'deploy_env'
)
string (name: 'version', defaultValue: '1.0.0', description: 'build version')
}
stages {
stage("Checkout test repo") {
steps{
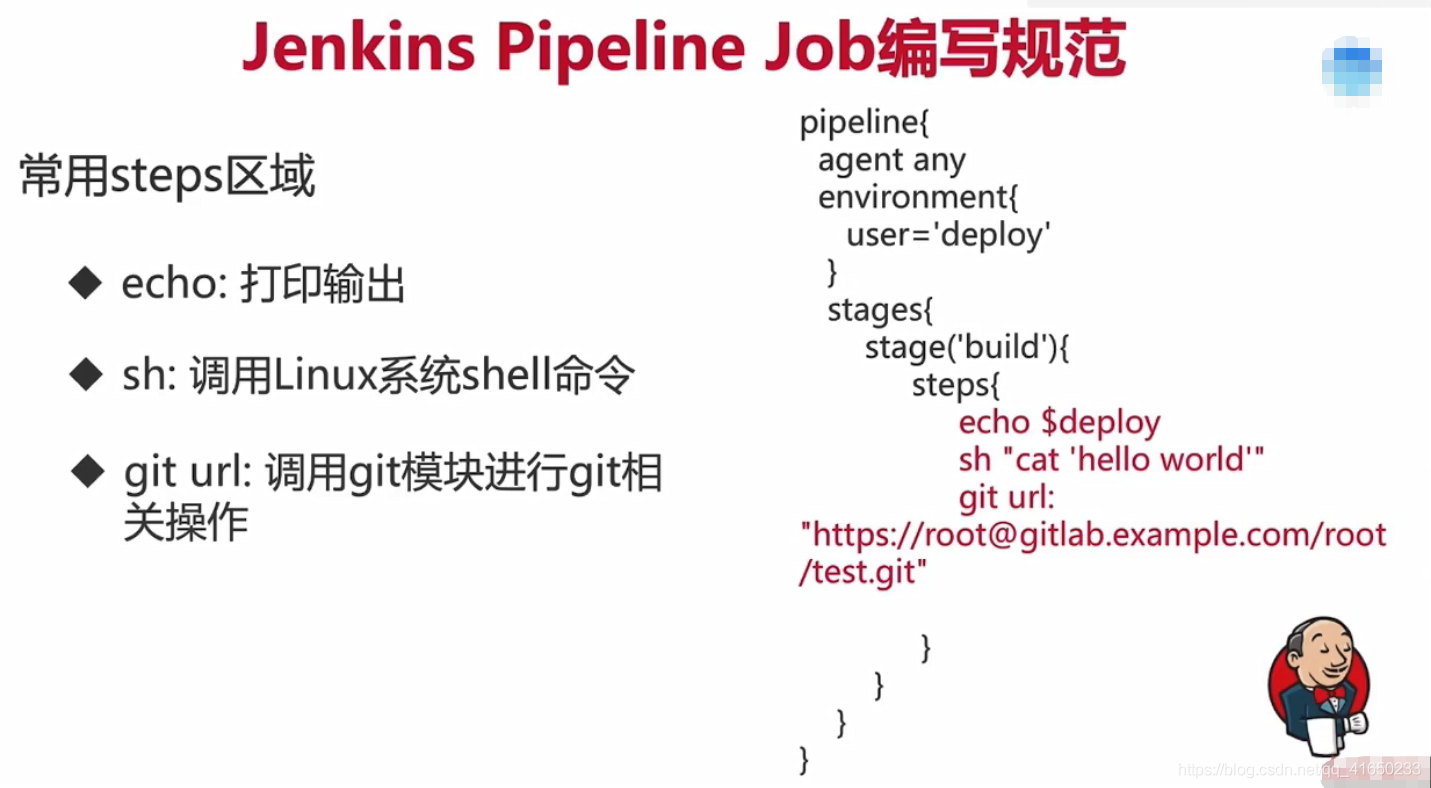
sh 'git config --global http.sslVerify false'
dir ("${env.WORKSPACE}") {
git branch: 'master', credentialsId:"9aa11671-aab9-47c7-a5e1-a4be146bd587", url: 'https://root@gitlab.example.com/root/test-repo.git'
}
}
}
stage("Print env variable") {
steps {
dir ("${env.WORKSPACE}") {
sh """
echo "[INFO] Print env variable"
echo "Current deployment environment is $deploy_env" >> test.properties
echo "The build is $version" >> test.properties
echo "[INFO] Done..."
"""
}
}
}
stage("Check test properties") {
steps{
dir ("${env.WORKSPACE}") {
sh """
echo "[INFO] Check test properties"
if [ -s test.properties ]
then
cat test.properties
echo "[INFO] Done..."
else
echo "test.properties is empty"
fi
"""
echo "[INFO] Build finished..."
}
}
}
}
}
控制台输出

Jenkins Pipeline Job构建配置的更多相关文章
- Jenkins+pipeline+参数构建+人工干预确定
Jenkins+pipeline+参数构建+人工干预 实现了以下功能 1. 可以选择环境,单选:可以选择需要发布的项目,多选 2.发布过程可视化 3. 可以人工干预是否继续发布. 初始化配置需要很久, ...
- Jenkins Pipeline+sonar构建质量平台
前提: Jenkins JDK 目录: 1.安装sonar插件:SonarQube Scanner for Jenkins 2.安装SonarQube 3.安装sonar-scanner ++++++ ...
- 使用Jenkins pipeline流水线构建docker镜像和发布
新建一个pipeline job 选择Pipeline任务,然后进入配置页面. 对于Pipeline, Definition选择 "Pipeline script from SCM" ...
- Jenkins + Pipeline 构建流水线发布
Jenkins + Pipeline 构建流水线发布 利用Jenkins的Pipeline配置发布流水线 参考: https://jenkins.io/doc/pipeline/tour/depl ...
- jenkins pipeline构建后发送邮件通知
jenkins pipeline构建后发送邮件通知 mail配置 进入系统配置 找到最下边的邮件通知 创建任务 Pipeline片段 post { always { bat "" ...
- jenkins pipeline构建后返回构建结果给gitlab
jenkins pipeline构建后返回构建结果给gitlab 使用场景 gitlab 合并请求时要求管道任务必须成功,否则无法执行合并操作,又不想使用gitlab ci 工具. 实现方法 1.Ge ...
- Jenkins自动化构建配置
写在前头 我每次修改代码一点东西,都要进行一个重新发布.重新发布的流程大概如下: 将最新代码同步上传到git上面 Maven打包 mvn clean install 将最新的jar包上传到服务器上面, ...
- jenkins git gradle android自动化构建配置
需要安装软件(jenkins所在服务器): gradle.SDK 一.gradle安装(服务器部署的gradle版本需要等于或高于开发环境的gradle版本) 1.下载地址:http://servic ...
- Jenkins操作学习 --邮箱配置及测试结果构建
前言 使用jenkins做持续集成工具,构建的整个过程中,肯定要对结果进行记录和跟踪,这里我们以qq邮箱为例,来讲解如何配置jenkins的邮箱及发送构建结果 一.明确邮箱服务器相关信息 这里我们,要 ...
随机推荐
- Python--day33--当面试时候问到如何解决黏包问题?的回答。
- 应用九:Vue之国际化(vue-i18n)
vue-i18n是一款针对Vue.js 的国际化插件,具体应用步骤如下: 一.安装插件 npm install vue-i18n --save 二.在main.js中引入插件 import VueI1 ...
- 初识Ubuntu 18.04(更换系统头像,截图,sy)
其实我认识ubuntu也有一段时间了,只是我一直沉迷Windows无法自拔,但是熟悉一下ubuntu的环境对于各项比赛以及今后的工作还是很有用处的,不过在未来的很长一段时间里,我只会以一个普通用户的身 ...
- Android 最新架构
1.Android系统架构 最新的Android系统分为五层六区(域): Linux内核层(Linux Kernel):Android系统基于Linux2.6内核,这一层为Android设备各种硬件提 ...
- slim中的请求头
请求头 每个 HTTP 请求都有请求头.这些元数据描述了 HTTP 请求,但在请求体中不可见.Slim 的 PSR 7 请求对象提供了几个检查请求头的方法. 获取所有的请求头,返回一个数组:getHe ...
- 深入ThreadLocal的底层实现机制以及对应的使用风险
学习Java中常用的开源框架,Mybatis.Hibernate中线程通过数据库连接对象Connection,对其数据进行操作,都会使用ThreadLocal类来保证Java多线程程序访问和数据库数据 ...
- DecoratorPattern(装饰器模式)-----Java/.Net
装饰器模式(Decorator Pattern)允许向一个现有的对象添加新的功能,同时又不改变其结构.这种类型的设计模式属于结构型模式,它是作为现有的类的一个包装
- 1032 挖掘机技术哪家强 (20 分)C语言
题目描述 为了用事实说明挖掘机技术到底哪家强,PAT组织了一场挖掘机技能大赛.现请你根据比赛结果统计出技术最强的那个学校. 输入描述: 输入在第1行给出不超过105的正整数N,即参赛人数.随后N行,每 ...
- 小白学 Python 爬虫(33):爬虫框架 Scrapy 入门基础(一)
人生苦短,我用 Python 前文传送门: 小白学 Python 爬虫(1):开篇 小白学 Python 爬虫(2):前置准备(一)基本类库的安装 小白学 Python 爬虫(3):前置准备(二)Li ...
- 浅谈Go类型转换之间的那些事
试着答一答这些问题 s[i]和(for _,v range)的v的区别是什么 var s string = "AB" fmt.Println(reflect.TypeOf(s[0] ...