IdentityServer4 实现OAuth2.0四种模式之密码模式
接上一篇:IdentityServer4 实现OAuth2.0四种模式之客户端模式,这一篇讲IdentityServer4 使用密码模式保护API访问。
一,IdentityServer配置
1,添加用户
要用到用户名称密码当然得添加用户,在IdentityServer项目的Config类中的新增一个方法,GetUsers。返回一个TestUser的集合。
    public static List<TestUser> GetUsers() {

            return new List<TestUser>()

            {

                new TestUser()

                {

                    //用户名

                     Username="apiUser",

                     //密码

                     Password="apiUserPassword",

                     //用户Id

                     SubjectId="0"

                }

            };

        }
添加好用户还需要要将用户注册到IdentityServer4,修改IdentityServer项目的Startup类ConfigureServices方法
 public void ConfigureServices(IServiceCollection services)

        {

            services.AddMvc();

            //添加IdentityServer

            var builder = services.AddIdentityServer()

                //身份信息授权资源

                .AddInMemoryIdentityResources(Config.GetIdentityResources())

                //API访问授权资源

                .AddInMemoryApiResources(Config.GetApis())

                //客户端

                .AddInMemoryClients(Config.GetClients())

                //添加用户

                .AddTestUsers(Config.GetUsers());

            if (Environment.IsDevelopment())

            {

                builder.AddDeveloperSigningCredential();

            }

            else

            {

                throw new Exception("need to configure key material");

            }

        }
2,添加客户端
添加一个客户端用于用户名和密码模式的访问。客户端(Client)定义里有一个AllowedGrantTypes的属性,这个属性决定了Client可以被那种模式被访问,GrantTypes.ClientCredentials为客户端凭证模式,GrantTypes.ResourceOwnerPassword为用户名密码模式。上一节添加的Client是客户端凭证模式,所以还需要添加一个Client用于支持用户名密码模式。
public static IEnumerable<Client> GetClients()

        {

            return new Client[] {

                new Client()

                {

                    //客户端Id

                     ClientId="apiClientCd",

                     //客户端密码

                     ClientSecrets={new Secret("apiSecret".Sha256()) },

                     //客户端授权类型,ClientCredentials:客户端凭证方式

                     AllowedGrantTypes=GrantTypes.ClientCredentials,

                     //允许访问的资源

                     AllowedScopes={

                        "secretapi"

                    }

                },

                new Client()

                {

                    //客户端Id

                     ClientId="apiClientPassword",

                     //客户端密码

                     ClientSecrets={new Secret("apiSecret".Sha256()) },

                     //客户端授权类型,ClientCredentials:客户端凭证方式

                     AllowedGrantTypes=GrantTypes.ResourceOwnerPassword,

                     //允许访问的资源

                     AllowedScopes={

                        "secretapi"

                    }

                }

            };

        }
二,保用密码模式访问受保护的Api
1,使用IdentityMvc项目访问受保护的Api
修改GetData控制器,使其支持密码模式访问
 public async Task<IActionResult> GetData(string type)

        {

            type = type ?? "client";

            var client = new HttpClient();

            var disco = await client.GetDiscoveryDocumentAsync("http://localhost:5000");

            if (disco.IsError)

                return new JsonResult(new { err=disco.Error});

            TokenResponse token = null;

            switch (type)

            {

                case "client":

                    token = await client.RequestClientCredentialsTokenAsync(new ClientCredentialsTokenRequest()

                    {

                        //获取Token的地址

                        Address = disco.TokenEndpoint,

                        //客户端Id

                        ClientId = "apiClientCd",

                        //客户端密码

                        ClientSecret = "apiSecret",

                        //要访问的api资源

                        Scope = "secretapi"

                    });

                    break;

                case "password":

                    token = await client.RequestPasswordTokenAsync(new PasswordTokenRequest()

                    {

                        //获取Token的地址

                        Address = disco.TokenEndpoint,

                        //客户端Id

                        ClientId = "apiClientPassword",

                        //客户端密码

                        ClientSecret = "apiSecret",

                        //要访问的api资源

                        Scope = "secretapi",

                        UserName = "apiUser",

                        Password = "apiUserPassword"

                    });

                    break;

            }

            if (token.IsError)

                return new JsonResult(new { err = token.Error });

            client.SetBearerToken(token.AccessToken);

            string data = await client.GetStringAsync("https://localhost:5001/api/identity");

            JArray json = JArray.Parse(data);

            return new JsonResult(json);

        }
运行三个项目后访问:https://localhost:5002/home/getdata?type=password
2,使用原生HTTP请求访问受保护的Api
获取access_token
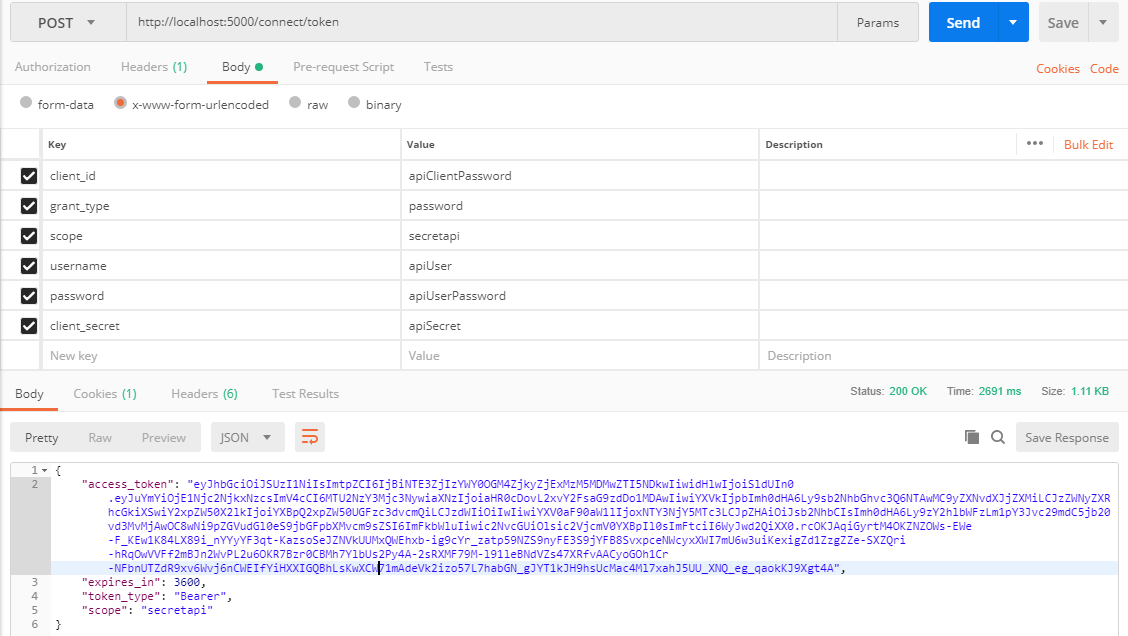
获取到Token后,访问受保护的API和通过客户端模式一样。

三,密码模式与客户端凭证模式的区别
到目前为止,昨们还没有搞清这两个模式有什么区别,如果仅仅是为了能访问这个API,那加不加用户名和密码有什么区别呢。昨们对比下这两种模式取得Token后访问api返回的数据,可以发现用户名密码模式返回的Claim的数量要多一些。Claim是什么呢,简尔言之,是请求方附带在Token中的一些信息。但客户端模式不涉及到用户信息,所以返回的Claim数量会少一些。在IdentityServer4中,TestUser有一个Claims属性,允许自已添加Claim,有一个ClaimTypes枚举列出了可以直接添加的Claim。添加一个ClaimTypes.Role试试。
IdentityServer.Config.GetUsers
    public static List<TestUser> GetUsers() {

            return new List<TestUser>()

            {

                new TestUser()

                {

                    //用户名

                     Username="apiUser",

                     //密码

                     Password="apiUserPassword",

                     //用户Id

                     SubjectId="0",

                     Claims=new List<Claim>(){

                         new Claim(ClaimTypes.Role,"admin")

                     }

                }

            };

        }
这时如果启动两个项目,采用用户密码和密码模式获取Token访问Api,返回的值依然是没有role:admin的Claim的。这时又要用到ApiResouce,ApiResouce的构造函数有一个重载支持传进一个Claim集合,用于允许该Api资源可以携带那些Claim。
IdentityServer.Config.GetApis
public static IEnumerable<ApiResource> GetApis()

        {

            return new ApiResource[] {

                //secretapi:标识名称,Secret Api:显示名称,可以自定义

                new ApiResource("secretapi","Secret Api",new List<string>(){ ClaimTypes.Role})

            };

        }
现在可以启动项目测试一下,可以发现已经可以返回role这个claim了。

Role(角色)这个Claim很有用,可以用来做简单的权限管理。
首先修改下被保护Api的,使其支持Role验证
IdentityApi.Controllers.IdentityController.GetUserClaims
 [HttpGet]

        [Route("api/identity")]

        [Microsoft.AspNetCore.Authorization.Authorize(Roles ="admin")]

        public object GetUserClaims()

        {

            return User.Claims.Select(r => new { r.Type, r.Value });

        }
然后在IdentityServer端添加一个来宾角色用户
IdentityServer.Config.GetUsers
public static List<TestUser> GetUsers() {

            return new List<TestUser>()

            {

                new TestUser()

                {

                    //用户名

                     Username="apiUser",

                     //密码

                     Password="apiUserPassword",

                     //用户Id

                     SubjectId="0",

                     Claims=new List<Claim>(){

                         new Claim(ClaimTypes.Role,"admin")

                     }

                },

                 new TestUser()

                {

                    //用户名

                     Username="apiUserGuest",

                     //密码

                     Password="apiUserPassword",

                     //用户Id

                     SubjectId="1",

                     Claims=new List<Claim>(){

                         new Claim(ClaimTypes.Role,"guest")

                     }

                }

            };

        }
再回到IdentityMvc项目,修改下获取数据的测试接口GetData,把用户名和密码参数化,方便调试
IdentityMvc.HomeContoller.GetData
 public async Task<IActionResult> GetData(string type,string userName,string password)

        {

            type = type ?? "client";

            var client = new HttpClient();

            var disco = await client.GetDiscoveryDocumentAsync("http://localhost:5000");

            if (disco.IsError)

                return new JsonResult(new { err=disco.Error});

            TokenResponse token = null;

            switch (type)

            {

                case "client":

                    token = await client.RequestClientCredentialsTokenAsync(new ClientCredentialsTokenRequest()

                    {

                        //获取Token的地址

                        Address = disco.TokenEndpoint,

                        //客户端Id

                        ClientId = "apiClientCd",

                        //客户端密码

                        ClientSecret = "apiSecret",

                        //要访问的api资源

                        Scope = "secretapi"

                    });

                    break;

                case "password":

                    token = await client.RequestPasswordTokenAsync(new PasswordTokenRequest()

                    {

                        //获取Token的地址

                        Address = disco.TokenEndpoint,

                        //客户端Id

                        ClientId = "apiClientPassword",

                        //客户端密码

                        ClientSecret = "apiSecret",

                        //要访问的api资源

                        Scope = "secretapi",

                        UserName =userName,

                        Password = password

                    });

                    break;

            }

            if (token.IsError)

                return new JsonResult(new { err = token.Error });

            client.SetBearerToken(token.AccessToken);

            string data = await client.GetStringAsync("https://localhost:5001/api/identity");

            JArray json = JArray.Parse(data);

            return new JsonResult(json);

        }
分别用apiUser和apiUserGuest访问,用apiUserGuest访问时请求被拒绝
https://localhost:5002/home/getdata?type=password&userName=apiUserGuest&password=apiUserPassword

上边是添加ClaimTypes枚举里定义好的Claim,但如果要定义的Claim不在Claim枚举里应该怎么办呢,比如我想所有用户都有一个项目编号,要添加一个名为prog的Claim。
先在ApiResouce里允许携带名为prog.Claim
IdentityServer.Config.GetApis
 public static IEnumerable<ApiResource> GetApis()

        {

            return new ApiResource[] {

                //secretapi:标识名称,Secret Api:显示名称,可以自定义

                new ApiResource("secretapi","Secret Api",new List<string>(){ ClaimTypes.Role,ClaimTypes.Name,"prog"})

            };

        }
在用户定义的Claims属性里添加prog信息
IdentityServer.Config.GetUsers
    public static List<TestUser> GetUsers() {

            return new List<TestUser>()

            {

                new TestUser()

                {

                    //用户名

                     Username="apiUser",

                     //密码

                     Password="apiUserPassword",

                     //用户Id

                     SubjectId="0",

                     Claims=new List<Claim>(){

                         new Claim(ClaimTypes.Role,"admin"),

                         new Claim("prog","正式项目"),

                     }

                },

                 new TestUser()

                {

                    //用户名

                     Username="apiUserGuest",

                     //密码

                     Password="apiUserPassword",

                     //用户Id

                     SubjectId="1",

                     Claims=new List<Claim>(){

                         new Claim(ClaimTypes.Role,"guest"),

                         new Claim("prog","测试项目"),

                     }

                }

            };

        }
使用apiUser访问
https://localhost:5002/home/getdata?type=password&userName=apiUser&password=apiUserPassword

密码模式需要知道用户的密码,那能不能用户自己从identityServer登录,不把密码给到第三方呢?,下一篇讲的隐藏模式就解决了这个问题。
IdentityServer4 实现OAuth2.0四种模式之密码模式的更多相关文章
- IdentityServer4实现Oauth2.0四种模式之隐藏模式
接上一篇:IdentityServer4实现OAuth2.0四种模式之密码模式,密码模式将用户的密码暴露给了客户端,这无疑是不安全的,隐藏模式可以解决这个问题,由用户自己在IdentityServ ...
- IdentityServer4实现OAuth2.0四种模式之授权码模式
接上一篇:IdentityServer4实现OAuth2.0四种模式之隐藏模式 授权码模式隐藏码模式最大不同是授权码模式不直接返回token,而是先返回一个授权码,然后再根据这个授权码去请求token ...
- IdentityServer4实现OAuth2.0四种模式之客户端模式
一,准备内容 IdentityServer4 是Asp.net core的一个中间件,用于添加符合OpenId Connect和OAuth2.0规范的终端到Asp.net Core应用.在这里简单介绍 ...
- OAuth2.0 四种授权模式
OAuth2.0简单笔记(四种授权模式) 金天:坚持写东西,不是一件容易的事,换句话说其实坚持本身都不是一件容易的事.如果学习有捷径,那就是不断实践,不断积累.写笔记,其实是给自己看的,是体现积累的一 ...
- Core篇——初探IdentityServer4(客户端模式,密码模式)
Core篇——初探IdentityServer4(客户端模式,密码模式) 目录 1.Oatuth2协议的客户端模式介绍2.IdentityServer4客户端模式实现3.Oatuth2协议的密码模式介 ...
- Spring Boot Security Oauth2之客户端模式及密码模式实现
Spring Boot Security Oauth2之客户端模式及密码模式实现 示例主要内容 1.多认证模式(密码模式.客户端模式) 2.token存到redis支持 3.资源保护 4.密码模式用户 ...
- 快速了解yuv4:4:4 yuv4:2:2 yuv 4:1:1 yuv 4:2:0四种YUV格式区别
四种YUV格式区别如下: 1.YUV 4:4:4抽样方式: Y: Y0 Y1 Y2 Y3 U: U0 U1 U2 U3 V: V0 V1 V2 V3 2.YUV 4:2:2抽样方式: Y : ...
- JS创建对象的四种简单方式 (工厂模式和自定义构造函数创建对象的区别)
// 对象:特指的某个事物,具有属性和方法(一组无序的属性的集合) // 特征------>属性 // 行为------>方法 // 创建对象的四种方式 1 // 1.字面量的方式,就是实 ...
- 四种webAPP横向滑动模式图解—H5页面开发
一.容器整体滑动(DEMO只演示A-B-C-B,下同) 模拟动画效果见下图(上),滑动分解见下图(下): DEMO地址:http://nirvana.sinaapp.com/demo_slider/s ...
随机推荐
- <每日 1 OJ> -LeetCode 7. 整数反转
题目描述 给定一个 32 位有符号整数,将整数中的数字进行反转. 示例 1: 输入: 123 输出: 321 示例 2: 输入: -123 输出: -321 示例 3: 输入: 120 输出: 21 ...
- BigDecimal初始化不要用double类型
在进行单价.总价相关的计算时,就会用到BigDecimal. 在初始化时,一个不小心,就可能给自己挖坑. 示例如下: public class BigDecimalInitTest { public ...
- php 对接微信接口 {"errcode":41001,"errmsg":"access_token missing hint
这里是针对所有token微信都有这种机制 1.token被多次访问无效 访问微信接口->得到token,缓存起来2小时内有效,期间2小时内每次都取缓存即可,不必每次都去微信那边兑换 问题:缓存期 ...
- 浅析String.intern()方法
1.String类型“==”比较样例代码如下:package com.luna.test;public class StringTest { public static void main(Strin ...
- log配置文件log4j.propeties(配置保存日志文件的相对路径)
log配置文件log4j.propeties(配置保存日志文件的相对路径) log4j.propeties文件: #日志的4种级别ERROR(错误).WARN(警告潜在的错误).INFO(粗粒度信息) ...
- django orm 分页(paginator)取数据出现警告manage.py:1: UnorderedObjectListWarning: Pagination may yield inconsistent results with an unordered object_list: <class 'sign.models.Guest'> QuerySet.
使用django的orm做分页(Paginator)时出现了下面的警告 In [19]: p=Paginator(guest_list,2) manage.py:1: UnorderedObjectL ...
- Python三角函数公式计算三角形的夹角
题目内容: 对于三角形,三边长分别为a, b, c,给定a和b之间的夹角C,则有:.编写程序,使得输入三角形的边a, b, c,可求得夹角C(角度值). 输入格式: 三条边a.b.c的长度值,每个值占 ...
- MySQL慢查询参数
开启mysql慢查询日志 修改/etc/mysql/my.cnf配置文件,添加: [mysqld]slow_query_log = onslow_query_log_file = /var/lib/m ...
- matlab学习笔记12_2创建结构体数组,访问标量结构体,访问非标量结构体数组的属性,访问嵌套结构体中的数据,访问非标量结构体数组中多个元素的字段
一起来学matlab-matlab学习笔记12 12_2 结构体 创建结构体数组,访问标量结构体,访问非标量结构体数组的属性,访问嵌套结构体中的数据,访问非标量结构体数组中多个元素的字段 觉得有用的话 ...
- CSS继承控制:inherit、initial和unset
CSS里有三种常用的属性值继承方式:inherit,initial和unset.我们用一个简单的例子来演示一下: <ul style="color: green;"> ...