vue tabBar导航栏设计实现4-再次抽取MainTabBar
系列导航
二、vue tabBar导航栏设计实现2-抽取tab-bar
三、vue tabBar导航栏设计实现3-进一步抽取tab-item
四、vue tabBar导航栏设计实现4-再次抽取MainTabBar
tabBar导航栏设计4-再次抽取MainTabBar
一、 本节目标效果
上一个节的例子中App.vue中代码量还是很大如何简化App.vue,再次抽取一个MainTabBar组件负责在TabBarItem里放数据

二、代码结构
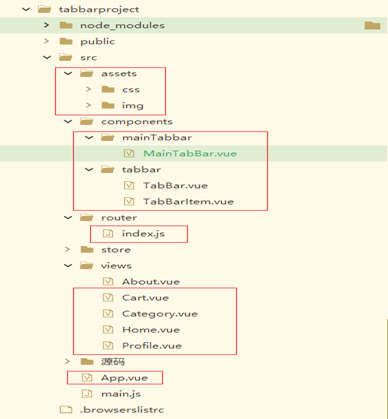
注:主要是标红的几个文件
三、代码
App.vue
<template>

	<div id="listStyle"  >

		<div id="dayCount">

			今日点击:99999 | 今日发布:2000  | 今日下载:1000

		</div>

		<List border   header="资源信息"  size="large"  >

		        <ListItem  v-for="(item, index) in resourcesList">

		            <ListItemMeta :avatar="getImgUrl(item.iconPath)" :title="item.title" :description="item.resourcesDesc" />

		            <template slot="action">

		                            <li>

		                                <Icon type="ios-star-outline" /> {{item.perfectTimes}}

		                            </li>

		                            <li>

		                                <Icon type="ios-thumbs-up-outline" />{{item.goodTimes}}

		                            </li>

		                            <li>

		                                <Icon type="ios-chatbubbles-outline" /> {{item.badTimes}}

		                            </li>

		             </template>

				</ListItem>

		        <Page  id="page" :total="pageTotal" :current="pageNum" :page-size="pageSize"   @on-change="handlePage" show-total  show-elevator  next-text="下一页"/>

		</list>

	</div>

</template>

<script>

	import {getXyResourcesInfoV} from '@/network/index.js';

	//分页的初始参数

	const paramter = {

		page: 1,

		pagesize:4,

		ispage:'Y'

	};

	export default {

		name: "MainList",

		props: {

		},

		data() {

			return {

				resourcesList: [] ,

				pageTotal: 0,

				pageNum: 1,

				pageSize: 10,

			}

		},

		created() {

			this.dataListInit();

		},

		computed: {

		},

		methods: {

			 //页面变更

			  handlePage(value) {

				  console.log('value:'+value);

			      this.pageNum = value;

				  paramter.page = value;

			      this.dataListInit()

			    },

			dataListInit() {

				getXyResourcesInfoV(paramter).then(res => {

					   //debugger

					   this.pageTotal = res.data.page.count;

					   this.pageSize = res.data.page.pagesize;

					   this.pageNum = res.data.page.page;

					   this.resourcesList = [];

						for (var i = 0; i < res.data.obj.dataList.length; i++) {

							this.resourcesList.push({

								                  resourcesId: res.data.obj.dataList[i].resourcesId,

												  title: res.data.obj.dataList[i].title,

										          resourcesDesc:res.data.obj.dataList[i].resourcesDesc,

												  perfectTimes:res.data.obj.dataList[i].perfectTimes,

												  goodTimes:res.data.obj.dataList[i].goodTimes,

												  badTimes:res.data.obj.dataList[i].badTimes,

											      iconPath:res.data.obj.dataList[i].iconPath

								                 })

						}

					})

					.catch(error => {});

			 },

			itemClick() {

				this.$router.replace(this.path)

			},

			// 动态获取头像图片

			getImgUrl(picName) {

				//默认图标

				//debugger

				if( picName == 'init' ){

					return require("@/assets/image/element/headPhoto/1.png");

				}else{

					//base64图标

					return picName;

				}

			}

		}

	}

</script>

<style lang="scss">

	#dayCount {

		height: 30px; //设置高度

		font-size: 15px; //设置字体大小

		color: #2d8cf0;

	//	position: relative;

		font-family: "PingFang SC";

		padding: 7px

	}

	#page{

		//float:right

		text-align:right

	}

</style>
TabBar.vue
<template>

  <div id="tab-bar">

	  <slot></slot>

  </div>

</template>

<script>

import {defineComponent} from 'vue'

export default defineComponent({

    //组件名称

    name:'TabBar',

    //接收父组件的数据

    props:{

    },

	components: {

	},

    setup(props,ctx){

        return{

        }

    }

})

</script>

<style lang="scss">

  #tab-bar {

    display: flex;

    background-color: #f6f6f6;

    position: fixed;

    left: 0;

    right: 0;

    bottom: 0;

    box-shadow: 0 -1px 1px rgba(100,100,100,.2);

  }

</style>
TabBarItem.vue
<template>

  <div class="tab-bar-item">

    <slot name="item-icon"></slot>

    <slot name="item-text"></slot>

  </div>

</template>

<script>

  import {defineComponent} from 'vue'

  export default defineComponent({

      //组件名称

      name:'TabBarItem',

      //接收父组件的数据

      props:{

      },

  	components: {

  	},

      setup(props,ctx){

          return{

          }

      }

  })

</script>

<style lang="scss">

  .tab-bar-item {

    flex: 1;

    text-align: center;

    height: 49px;

    font-size: 14px;

  }

  .tab-bar-item img {

    width: 24px;

    height: 24px;

    margin-top: 3px;

    vertical-align: middle;

    margin-bottom: 2px;

  }

</style>
MainTabBar.vue
<template>

  <tab-bar>

  	<tab-bar-item  path="/">

  		<template v-slot:item-icon>

  			<img :src="require('../../assets/img/tabbar/home.svg')">

  		</template>

		<template v-slot:item-icon-active>

			<img :src="require('../../assets/img/tabbar/home_active.svg')">

		</template>

  		<template v-slot:item-text>

  			 <div slot="item-text">首页</div>

  		</template>

  	</tab-bar-item>

  	<tab-bar-item path="/category">

  		<template v-slot:item-icon>

  			 <img :src="require('../../assets/img/tabbar/category.svg')">

  		</template>

		<template v-slot:item-icon-active>

			<img :src="require('../../assets/img/tabbar/category_active.svg')">

		</template>

  		<template v-slot:item-text>

  			 <div slot="item-text">分类</div>

  		</template>

  	</tab-bar-item>

  	<tab-bar-item path="/cart">

  		<template v-slot:item-icon>

  			<img :src="require('../../assets/img/tabbar/shopcart.svg')">

  		</template>

		<template v-slot:item-icon-active>

			<img :src="require('../../assets/img/tabbar/shopcart_active.svg')">

		</template>

  		<template v-slot:item-text>

  			<div slot="item-text">购物车</div>

  		</template>

  	</tab-bar-item>

  	<tab-bar-item path="/profile">

  		<template v-slot:item-icon>

  			<img :src="require('../../assets/img/tabbar/profile.svg')">

  		</template>

  		<template v-slot:item-icon-active>

  			<img :src="require('../../assets/img/tabbar/profile_active.svg')">

  		</template>

  		<template v-slot:item-text>

  			<div slot="item-text">我的</div>

  		</template>

  	</tab-bar-item>

  </tab-bar>

</template>

<script>

  import TabBar from '../tabbar/TabBar'

  import TabBarItem from '../tabbar/TabBarItem'

  export default {

    name: "MainTabBar",

    components: {

      TabBar,

      TabBarItem

    }

  }

</script>

<style scoped>

</style>
index.js
import { createRouter, createWebHistory } from 'vue-router'

import Home from '../views/Home.vue'

import Category from '../views/Category.vue'

import Cart from '../views/Cart.vue'

import Profile from '../views/Profile.vue'

const routes = [

  {

    path: '/',

    name: 'Home',

    component: Home

  } ,

  {

    path: '/category',

    component: Category

  },

  {

    path: '/cart',

    component: Cart

  },

  {

    path: '/profile',

    component: Profile

  }

]

const router = createRouter({

  history: createWebHistory(process.env.BASE_URL),

  routes

})

export default router
其他一些代码不很简单看之前的博客内容
四、代码按照步骤解释
1、 抽取MainTabBar.vue组件
MainTabBar.vue组件里调用TabBar.vue和TabBarItem.vue组件,并且将数据放到MainTabBar.vue组件里。
2、TabBarItem.vue组件里增加itemClick方法负责页面跳转 ,跳转的地址由MainTabBar.vu中的tab-bar-item 组件的path属性动态传递过来。
3、 index.js中配置路由
4、App.vue中调用MainTabBar.vue组件,注意这里一定要加一个<router-view>标签要不路径跳转没有占位符就不会有效果。
vue tabBar导航栏设计实现4-再次抽取MainTabBar的更多相关文章
- 微信小程序------导航栏样式、tabBar导航栏
一:导航栏样式设置 小程序的导航栏样式在app.json中定义. 这里设置导航,背景黑色,文字白色,文字内容测试小程序 app.json内容: { "pages":[ " ...
- 微信小程序入门四: 导航栏样式、tabBar导航栏
实例内容 导航栏样式设置 tabBar导航栏 实例一:导航栏样式设置 小程序的导航栏样式在app.json中定义. 这里设置导航,背景黑色,文字白色,文字内容测试小程序 app.json内容: { & ...
- 超详细Vue实现导航栏绑定内容锚点+滚动动画+vue-router(hash模式可用)
超详细Vue实现导航栏绑定内容锚点+滚动动画+vue-router(hash模式可用) 转载自:https://www.jianshu.com/p/2ad8c8b5bf75 亲测有效~ <tem ...
- Nuxt/Vue自定义导航栏Topbar+标签栏Tabbar组件
基于Vue.js实现自定义Topbar+Tabbar组件|仿咸鱼底部凸起导航 最近一直在倒腾Nuxt项目,由于Nuxt.js是基于Vue.js的服务端渲染框架,只要是会vue,基本能很快上手了. 一般 ...
- 使用vue给导航栏添加链接
如下面的导航栏,使用vue技术给该导航栏增加链接: js代码为: navigation:function(){ new Vue({ el: '#navUl', data: { menuData:{ ' ...
- Flutter - TabBar导航栏切换后,状态丢失
上一篇讲到了 Flutter - BottomNavigationBar底部导航栏切换后,状态丢失 里面提到了TabBar,这儿专门再写一下吧,具体怎么操作,来不让TabBar的状态丢失.毕竟大家99 ...
- 记一次Vue跨导航栏问题解决方案
简述 这篇文章是我项目中,遇到的一个issue,我将解决过程和方法记录下来. 本篇文章基于Vue.js进行的前端页面构建,由于仅涉及前端,将不做数据来源及其他部分的叙述.使用的CSS框架是 Boots ...
- Vue设置导航栏为公共模块并在登录页不显示
1.公共模块的内容可以放在App.vue中但是通常登录页面是不需要导航的,那么就需要规避登录页这时,就可以采用keep-alive结合$route.meta来实现这个功能.keep-alive 是 V ...
- vue 侧边导航栏递归显示
import axios from "axios"; import tabs1 from "../tab_content/tab1.vue"; import m ...
- 新浪微博客户端(1)-实现Tabbar导航栏效果
- (BOOL)application:(UIApplication *)application didFinishLaunchingWithOptions:(NSDictionary *)launc ...
随机推荐
- [CF1830E] Bully Sort
题目描述 On a permutation $ p $ of length $ n $ , we define a bully swap as follows: Let $ i $ be the in ...
- springMvc_快速入门
概念:是一种基于Java实现mvc模型的轻量级web框架 优点:使用简单,开发便捷 灵活性强 总体来说springMvc就是来替代servlet的一种工具 快速入门: 1.创建maven-web ...
- Oracle数据库卸载器 - 开源研究系列文章
今天无事,把网上搜到的Oracle数据库卸载器的软件更新到C#的Winform界面的操作上. 1. 程序目录: 与笔者的其它软件类似,目录如下: 2. 使用的类: 这里主要使用了一个处理函数: 3. ...
- Codeforces-470 div2 C题
C. Producing Snow time limit per test 1 second memory limit per test 256 megabytes input standard in ...
- java,类、实例化、构造方法、this关键字、方法重载
编写类的步骤: 1.定义类名 2.编写类的属性 3.编写类的方法 public 访问修饰符,表示在整个项目中都可以调用,也可以用其他词 使用class关键字来定义类,如下,定义一个Cat类 给了属性 ...
- Github 星标 8K+ 这款国人开源的 Redis 可视化管理工具,真香...
做程序员就少不了与一些工具打交道,比如:监控工具.管理工具等,有些工具是命令行界面,有些工具是可视化界面,反正都是可以能够满足日常使用的功能需求. 对于redis管理工具来说,也有不少可能的产品,比如 ...
- .NET周刊 【12月第3期 2023-12-24】
国内文章 CAP 8.0 版本发布通告 - CAP 7岁生日快乐! https://www.cnblogs.com/savorboard/p/cap-8-0.html 今天宣布CAP 8.0版本正式发 ...
- Netty 组件介绍
BootStrap Netty 中的 BootStrap 分为两种:一种是客户端的 BootStrap:一种是服务端的 ServerBootStrap. 客户端的 BootStrap 初始化客户端,该 ...
- 【scikit-learn基础】--『监督学习』之 均值聚类
聚类算法属于无监督学习,其中最常见的是均值聚类,scikit-learn中,有两种常用的均值聚类算法:一种是有名的K-means(也就是K-均值)聚类算法,这个算法几乎是学习聚类必会提到的算法:另一个 ...
- 文心一言 VS 讯飞星火 VS chatgpt (43)-- 算法导论5.4 7题
七.为使特征序列长度的下界变得更精确,请说明在 n 次硬币的公平抛掷中,不出现比Ign - 2lglgn 更长的连续正面特征序列的概率小于 1/n. 文心一言: 在 n 次硬币的公平抛掷中,每个硬币正 ...