
HTML_创建易用的Web表单
首先创建一个表单域集合fieldset
fieldset元素允许Web开发者将主题相关的表单组合在一起
<fieldset>

</fieldset>
1: <li>
2: <label for="name">名称:</label>
3: <input type="text" name="name" autofocus id="name">
4: </li>

label的for属性,用于引用与其关联的表单元素的id。从WebStorm的语法高亮也可以看出
创建滑块
1: <li>
2: <label for="priority_range">调整优先级</label>
3: <input type="range" min="0" max="100" name="priority" value="0" id="priority_range">
4: </li>
同理for属性关联input中的id属性,其中min属性指定最小值,max属性指定最大值,value指定初始值
创建数值设定框
1: <li>
2: <label for="adjust_number">调整数值</label>
3: <input type="number" name="estimated_hours" min="0" max="100" id="adjust_number" step="10">
4: </li>
type属性设置input属性类型,min设置最小值,max设定最大值,step设定步长,当然啦。我们也可以手动直接输入。直接输入的数字不受所设定的最小值和最大值限制
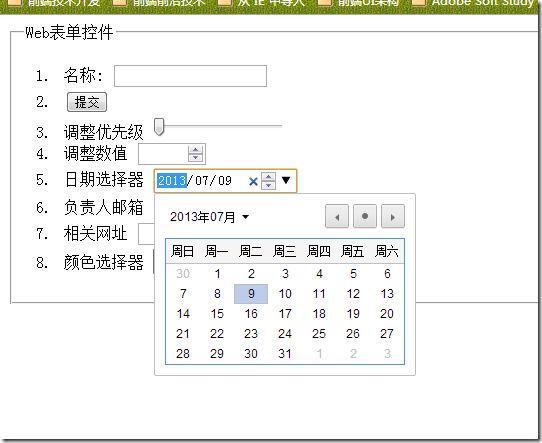
创建日期选择器
1: <li>
2: <label for="date_select">日期选择器</label>
3: <input type="date" name="start_date" id="date_select" value="2013-07-09">
4: </li>
创建电子邮件输入框
1: <li>
2: <label for="e_mail">负责人邮箱</label>
3: <input type="email" name="email" id="e_mail">
4: </li>
1: <li>
2: <label for="url">相关网址</label>
3: <input type="url" name="url" id="url">
4: </li>
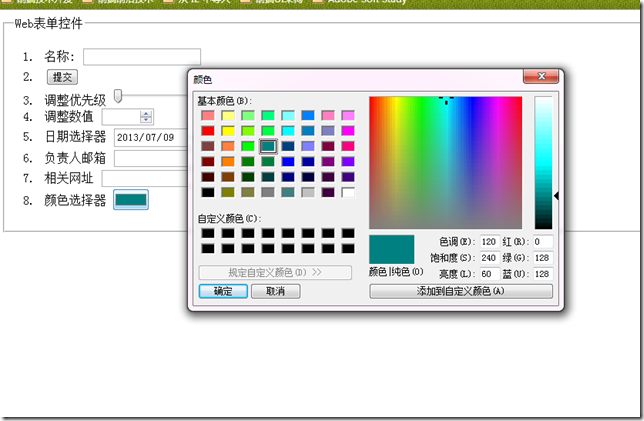
创建颜色选择器
1: <li>
2: <label for="color_select">颜色选择器</label>
3: <input type="color" name="color_selcet" id="color_select">
4: </li>
示例中的完整HTML代码如下:
1: <!DOCTYPE html>
2: <html>
3: <head>
4: <title></title>
5: <meta charset="utf-8">
6:
7: </head>
8: <body>
9: <form method="post" action="index.html">
10: <fieldset id="personal_information">
11: <legend>Web表单控件</legend>
12: <ol>
13: <li>
14: <label for="name">名称:</label>
15: <input type="text" name="name" autofocus id="name">
16: </li>
17: <li>
18: <input type="submit" value="提交">
19: </li>
20: <li>
21: <label for="priority_range">调整优先级</label>
22: <input type="range" min="0" max="100" name="priority" value="0" id="priority_range">
23: </li>
24: <li>
25: <label for="adjust_number">调整数值</label>
26: <input type="number" name="estimated_hours" min="0" max="100" id="adjust_number" step="10">
27: </li>
28: <li>
29: <label for="date_select">日期选择器</label>
30: <input type="date" name="start_date" id="date_select" value="2013-07-09">
31: </li>
32: <li>
33: <label for="e_mail">负责人邮箱</label>
34: <input type="email" name="email" id="e_mail">
35: </li>
36: <li>
37: <label for="url">相关网址</label>
38: <input type="url" name="url" id="url">
39: </li>
40: <li>
41: <label for="color_select">颜色选择器</label>
42: <input type="color" name="color_selcet" id="color_select">
43: </li>
44:
45: </ol>
46: </fieldset>
47:
48:
49:
50: </form>
51:
52: </body>
53: </html>
.csharpcode, .csharpcode pre
{
font-size: small;
color: black;
font-family: consolas, "Courier New", courier, monospace;
background-color: #ffffff;
/*white-space: pre;*/
}
.csharpcode pre { margin: 0em; }
.csharpcode .rem { color: #008000; }
.csharpcode .kwrd { color: #0000ff; }
.csharpcode .str { color: #006080; }
.csharpcode .op { color: #0000c0; }
.csharpcode .preproc { color: #cc6633; }
.csharpcode .asp { background-color: #ffff00; }
.csharpcode .html { color: #800000; }
.csharpcode .attr { color: #ff0000; }
.csharpcode .alt
{
background-color: #f4f4f4;
width: 100%;
margin: 0em;
}
.csharpcode .lnum { color: #606060; }
HTML_创建易用的Web表单的更多相关文章
- flask 利用flask_wtf扩展 创建web表单
在Flask中,为了处理web表单,我们一般使用Flask-WTF扩展,它封装了WTForms,并且它有验证表单数据的功能 创建语句格式: startTime = DateTimeField('计划开 ...
- 使用Visual Studio 2013 从头构建Web表单
在这篇文章中,我将采取VS 2013中特定的模板,也就是没有身份验证的Web表单模板,并说明如何构建这个项目从头开始.在本教程的最后,你会最终有一个模板,内容几乎是一样的使用Web表单模板没有认证(文 ...
- 读书笔记:《HTML5开发手册》Web表单
这是补充HTML5基础知识的第五篇内容,其他为: 一.HTML5-- 新的结构元素 二.HTML5-- figure.time.details.mark 三.HTML5-- details活学活用 四 ...
- 第三章:Web表单
感谢作者 –> 原文链接 本文翻译自 The Flask Mega-Tutorial Part III: Web Forms 这是Flask Mega-Tutorial系列的第三部分,我将告诉你 ...
- 怎样利用WordPress创建自己定义注冊表单插件
来源:http://www.ido321.com/1031.html 原文:Creating a Custom WordPress Registration Form Plugin 译文:创建一个定制 ...
- Flask 教程 第三章:Web表单
本文翻译自 The Flask Mega-Tutorial Part III: Web Forms 这是Flask Mega-Tutorial系列的第三部分,我将告诉你如何使用Web表单. 在第二章中 ...
- Flask开发系列之Web表单
Flask开发系列之Web表单 简单示例 from flask import Flask, request, render_template app = Flask(__name__) @app.ro ...
- Flask学习之三 web表单
本部分Miguel Grinberg教程的翻译地址:http://www.pythondoc.com/flask-mega-tutorial/webforms.html 开源中国的:http://ww ...
- ASP。NET Web表单模型,部分呈现和事件
下载EventExample.zip - 41.33 KB 下载EventandAjaxExample.zip - 41.94 KB 介绍 通过参考ASP获得Web应用程序环境及其约束的概述.NET ...
随机推荐
- Sql中的union和union all的讲解
SQL UNION 和 UNION ALL操作符 UNION 操作符用于合并两个或多个 SELECT 语句的结果集. 请注意,UNION 内部的 SELECT 语句必须拥有相同数量的列.列也必须拥有相 ...
- Pre-compile (pre-JIT) your assembly on the fly, or trigger JIT compilation ahead-of-time (转)
Introduction All .NET developers know that one of the best features of the CLR is JIT-compilation: J ...
- 数据结构之hash表
哈希表是种数据结构,它可以提供快速的插入操作和查找操作.hash定义了一种将字符组成的字符串转换为固定长度(一般是更短长度)的数值或索引值的方法,称为散列法,也叫哈希法.由于通过更短的哈希值比用原始值 ...
- BZOJ 4318: OSU! 期望DP
4318: OSU! 题目连接: http://www.lydsy.com/JudgeOnline/problem.php?id=4318 Description osu 是一款群众喜闻乐见的休闲软件 ...
- Codeforces Beta Round #4 (Div. 2 Only) C. Registration system hash
C. Registration system Time Limit: 20 Sec Memory Limit: 256 MB 题目连接 http://codeforces.com/problemset ...
- 【C语言】模拟实现库函数strcat函数
//模拟实现库函数strcat函数 #include <stdio.h> #include <string.h> #include <assert.h> char ...
- Android自己主动化測试解决方式
如今,已经有大量的Android自己主动化測试架构或工具可供我们使用,当中包含:Activity Instrumentation, MonkeyRunner, Robotium, 以及Robolect ...
- Android开发代码混淆经验(Eclipse)
为了防止自己的劳动成果被别人窃取,混淆代码能有效防止被反编译,下面来总结以下混淆代码的步骤: 2.编辑项目下的proguard-project.txt,添加不需要混淆的规则(model.泛型.反射.第 ...
- 【JavaScript】JavaScript模块化编程 - CommonJS, AMD 和 RequireJS之间的关系
通行的Javascript模块规范共有两种:CommonJS和AMD 先说说CommonJS CommonJS - 大家是不是觉得JavaScript仅仅是一个客户端的编译语言,其实JavaScr ...
- UIImage图片处理,旋转、截取、平铺、缩放等操作
来源:iOS_小松哥 链接:http://www.jianshu.com/p/9ab1205f5166 有时候我们需要处理图片,比如改变大小,旋转,截取等等,所以今天说一说图片处理相关的一些操作. 本 ...