12.Struts2自定义拦截器
拦截器是Struts2的一个重要特性。因为Struts2的大多数核心功能都是通过拦截器实现的。拦截器之所以称之为“拦截器”,是因为它可以拦截Action方法的执行,即在Acton方法执行之前或之后执行,以加强Action方法的功能。例如,一般情况下,用户在打开某个页面之前,需要先登录,否则是无法对资源进行访问的。这就是权限拦截器。
public void init():拦截器实例被创建之前被调用

public void destroy():拦截器实例被销毁之前被调用

public String intercept (ActionInvocation invocation) throws Exception
该方法在Action执行之前被调用,拦截器的附加功能在该方法中实现。
执行参数invocation的invoke()方法,就是调用Action方法在执行。

<package name="one" extends="struts-default">

<interceptors>

      <interceptor name="permission" class="interceptors.PermissionInterceptor"/>

</interceptors>

    <action name="my" class="actions.MyAction">

            <result>/message.jsp</result>

    </action>

 </package>
注册后的拦截器,便可由Action通过配置文件配置来使用了。
<package name="one" extends="struts-default">
        <interceptors>
                     <interceptor name="permission" class="interceptors.PermissionInterceptor"/>
        </interceptors>
        <action name="my" class="actions.MyAction">

                     <interceptor-ref name="permission" />

        </action>
 </package>
但,这种用法非常不好。因为这样会使该Action不能再使用Struts2自带的各种核心拦截器,而只使用这一个了。
若要使该Action既能使用自定义的拦截器,又能使用Struts2自带的拦截器,那么就需要在包中定义拦截器栈:
<interceptors>

      <interceptor name="permission"

                     class="interceptors.PermissionInterceptor"/>

      <interceptor-stack name="permissionStack">

<interceptor-ref name="defaultStack"/>

<interceptor-ref name="permission" />

      </interceptor-stack>

</interceptors>
<action name="my" class="actions.MyAction">

<interceptor-ref name=" permissionStack " />

</action>
当然,不定义permissionStack 拦截器栈直接按如下写法也可:
<action name="list" class="actions.MyAction">

<interceptor-ref name="defaultStack"/>

<interceptor-ref name="permission" />

</action>
这样,该action即可以使用defaultStack核心拦截器栈,又可以使用自定义的拦截器。
若该<package>中的所有Action均要使用该拦截器,一种方式是,每个Action均像上面那样指定要使用的拦截器栈permissionStack ;另一种方式是,指定默认的拦截器栈。即在<package>下定义:<default-interceptor-ref name=" permissionStack " />这样,每一个本包中的Action不用声明使可直接使用该拦截器栈。注意:每个包只能指定一个默认拦截器。另外,一旦为该包中的某个action显式指定了某个拦截器,则默认拦截器就不会起作用了。
只有经过登录的用户方可访问Action中的方法,否则,将返回“无权访问”提示。本例的登录,由一个JSP页面完成。即在该页面里将用户信息放入session中。也就是说,只要访问过该页面,就说明登录了。没访问过,则为未登录用户。

<%@ page language="java" import="java.util.*" pageEncoding="ISO-8859-1"%>

<%

String path = request.getContextPath();

String basePath = request.getScheme()+"://"+request.getServerName()+":"+request.getServerPort()+path+"/";

%>

<!DOCTYPE HTML PUBLIC "-//W3C//DTD HTML 4.01 Transitional//EN">

<html>

  <head>

    <base href="<%=basePath%>">

    <title>My JSP 'index.jsp' starting page</title>

    <meta http-equiv="pragma" content="no-cache">

    <meta http-equiv="cache-control" content="no-cache">

    <meta http-equiv="expires" content="0">

    <meta http-equiv="keywords" content="keyword1,keyword2,keyword3">

    <meta http-equiv="description" content="This is my page">

    <!--

    <link rel="stylesheet" type="text/css" href="styles.css">

    -->

  </head>

  <body>

    This is my JSP page. <br>

  </body>

</html>
login.jsp源码如下:
<%@page pageEncoding="utf-8"%>

<%

     session.setAttribute("user", "aynu");

 %>

登陆成功!
Step2:编写MyAction.java与PermissionInterceptor.java
package actions;

public class MyAction {

  public String execute(){

      System.out.println("执行Action方法");

      return "success";

  }

}
PermissionInterceptor.java源码如下:
package interceptors;

import com.opensymphony.xwork2.ActionContext;

import com.opensymphony.xwork2.ActionInvocation;

import com.opensymphony.xwork2.interceptor.Interceptor;

public class PermissionInterceptor implements Interceptor {

    public void destroy() { }

    public void init() {    }

    public String intercept(ActionInvocation invocation) throws Exception {

        String user=(String) ActionContext.getContext().getSession().get("user");

        //执行Action方法

        String result="success";

        if (user!=null) {

            System.out.println("Action方法执行之前的附加功能");

            result = invocation.invoke();

            System.out.println("Action方法执行之后的附加功能");

            ActionContext.getContext().getSession().put("message","欢迎访问");

        }else{

            ActionContext.getContext().getSession().put("message","无权访问");

        }

        return result;

    }

}
<?xml version="1.0" encoding="UTF-8"?>

<web-app version="2.5"

    xmlns="http://java.sun.com/xml/ns/javaee"

    xmlns:xsi="http://www.w3.org/2001/XMLSchema-instance"

    xsi:schemaLocation="http://java.sun.com/xml/ns/javaee

    http://java.sun.com/xml/ns/javaee/web-app_2_5.xsd">

        <filter>

        <filter-name>struts2</filter-name>

        <filter-class>org.apache.struts2.dispatcher.ng.filter.StrutsPrepareAndExecuteFilter</filter-class>

        </filter>

        <filter-mapping>

        <filter-name>struts2</filter-name>

        <url-pattern>/*</url-pattern>

        </filter-mapping>

  <welcome-file-list>

    <welcome-file>index.jsp</welcome-file>

  </welcome-file-list>

</web-app>
struts.xml配置如下:
<?xml version="1.0" encoding="UTF-8" ?>

<!DOCTYPE struts PUBLIC

    "-//Apache Software Foundation//DTD Struts Configuration 2.0//EN"

    "http://struts.apache.org/dtds/struts-2.0.dtd">

<struts>

     <package name="one" extends="struts-default">

     <interceptors>

       <interceptor name="permission" class="interceptors.PermissionInterceptor"/>

                   <interceptor-stack name="permissionStack">

                   <interceptor-ref name="defaultStack"/>

                   <interceptor-ref name="permission"/>

                   </interceptor-stack>

     </interceptors>

     <default-interceptor-ref name="permissionStack"/>

        <action name="my" class="actions.MyAction">

            <result>/message.jsp</result>

        </action>

    </package>

</struts>
Step4:编写message.jsp页面
<%@ page pageEncoding="utf-8" isELIgnored="false"%> <html>
<head>
<title>message page</title>
</head>
<body>
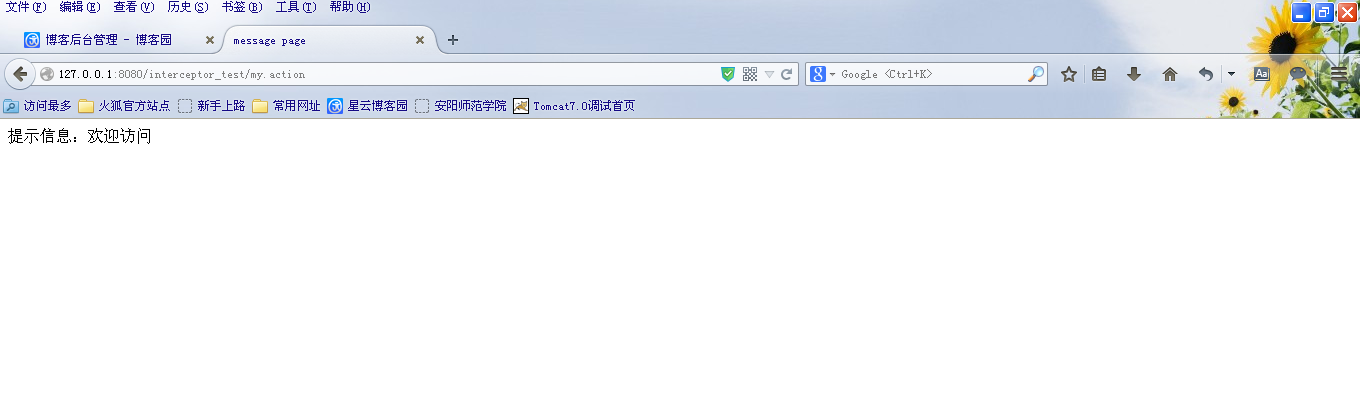
提示信息:${message}
</body>
</html>
部署发布,启动tomcat,输入地址:
http://127.0.0.1:8080/interceptor_test/my.action

http://127.0.0.1:8080/interceptor_test/login.jsp

输入地址:
http://127.0.0.1:8080/interceptor_test/my.action

12.Struts2自定义拦截器的更多相关文章
- Struts2自定义拦截器Interceptor以及拦截器登录实例
1.在Struts2自定义拦截器有三种方式: -->实现Interceptor接口 public class QLInterceptorAction implements Interceptor ...
- struts2自定义拦截器 设置session并跳转
实例功能:当用户登陆后,session超时后则返回到登陆页面重新登陆. 为了更好的实现此功能我们先将session失效时间设置的小点,这里我们设置成1分钟 修改web.xml view plainco ...
- 【Java EE 学习 35 下】【struts2】【struts2文件上传】【struts2自定义拦截器】【struts2手动验证】
一.struts2文件上传 1.上传文件的时候要求必须使得表单的enctype属性设置为multipart/form-data,把它的method属性设置为post 2.上传单个文件的时候需要在Act ...
- Struts2 自定义拦截器
自定义拦截器(权限管理),包含了对ajax和表单请求的拦截 package com.interceptor; import java.io.IOException; import java.io.Pr ...
- Struts2自定义拦截器
1. 需求 自定义拦截器实现,用户登录的访问控制. 2. 定义拦截器类 public class LoginInterceptor extends AbstractInterceptor { @Ove ...
- struts2自定义拦截器与cookie整合实现用户免重复登入
目的:测试开发时,为了减少用户登入这个繁琐的登入验证,就用struts2做了个简单的struts2拦截器,涉及到了与cookie整合,具体的看代码 结构(两部份)=struts2.xml+自定义拦截器 ...
- 5、Struts2自定义拦截器
一.拦截器相关知识 1.Struts2框架剖析 Holly版本生活案例: 影视公司(拍电影) ActionMapper 传媒公司(包装明星) ActionMapping 明星 ...
- Struts2自定义拦截器处理全局异常
今天在整理之前的项目的时候想着有的action层没有做异常处理,于是想着自定义拦截器处理一下未拦截的异常. 代码: package cn.xm.exam.action.safeHat; import ...
- Struts2自定义拦截器——完整实例代码
比如一个网上论坛过滤系统,将网友发表的不文明.不和谐的语言,通过拦截器对这些文字进行自动替代. 该项目包含: 1.自定义拦截器(MyInterceptor.java) 2.发表评论的页面(news.j ...
随机推荐
- Ajax的二次封装
function handleAjax(url,_data,method) { return ajax(url,_data,method).then(function (res) { if(res){ ...
- 项目 "Model" 受源代码管理。向源代码管理注册此项目时出错。建议不要对此项目进行任何更改。
- 安卓中的Model-View-Presenter模式介绍
转载自:http://www.jcodecraeer.com/a/anzhuokaifa/androidkaifa/2015/0425/2782.html 英文原文:Introduction to M ...
- 初识 Html5
1.1认识HTML5 HTML5并不仅仅只是做为HTML标记语言的一个最新版本,更重要的是它制定了Web应用开发的一系列标准,成为第一个将Web做为应用开发平台的HTML语言. HTML5定义了一系列 ...
- java学习之面向对象(4)
之前介绍了java面向对象三大特性之一封装,现在来说说三大特性之一继承和抽象类.这些只是我个人的认识,不足之处还请见谅. 1. 继承是面向对象的三大特征之一,那么何为继承呢? 继承是指一个对象直接使用 ...
- 资深人士剖析微软开源.NET事件:战略重心已经从PC转移到云端
本文是雷锋网对我的访谈整理的文章,源地址是 http://www.leiphone.com/news/201411/6KaGhD7PDABnvrRf.html 2014年11月13日,微软表示开源.N ...
- .NET中异常处理的最佳实践(译)
本文翻译自CodeProject上的一篇文章,原文地址. 目录 介绍 做最坏的打算 提前检查 不要信任外部数据 可信任的设备:摄像头.鼠标以及键盘 “写操作”同样可能失效 安全编程 不要抛出“new ...
- S1293和S2220KTV项目结束
1.界面原型(前台的界面搭建一下) 2.数据库 3.架构设计 4.约定的文件抽取 2015年7月20日下午 歌星点歌三界面的联动,数据动态加载 01.点击第一个LIstView,弹出第二个ListVi ...
- Chrome开发者工具不完全指南(四、性能进阶篇)
前言 Profiles面板功能的作用主要是监控网页中各种方法执行时间和内存的变化,简单来说它就是Timeline的数字化版本.它的功能选项卡不是很多(只有三个),操作起来比较前面的几块功能版本来说简单 ...
- JavaScript中的百变大咖~this
原文链接:http://www.jeffjade.com/2015/08/03/2015-08-03-javascript-this/ JavaScript作为一种脚本语言身份的存在,因此被很多人认为 ...