
tensorflow的MNIST教程
(ps:根据自己的理解,提炼了一下官方文档的内容,错误的地方希望大佬们多多指正。。。。。)
0x01:数据集的获取和表示
数据集的获取,可以通过代码自动下载。这里的数据就是各种手写数字图片和图片对应的标签(告诉我们这个数字是几,比如下面的是5,0,4,1)。
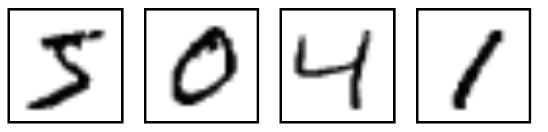
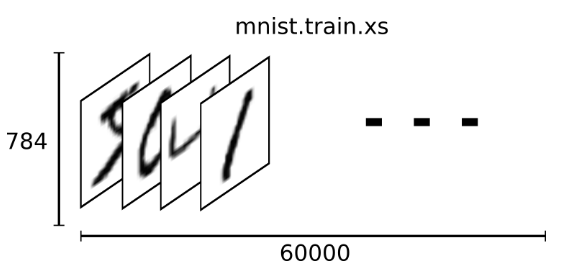
下载下来的数据集被分成两部分:60000行的训练数据集(mnist.train)和10000行的测试数据集(mnist.test),而每一个数据集都有两部分组成:一张包含手写数字的图片(xs)和一个对应的标签(ys)。训练数据集和测试数据集都包含xs和ys,比如训练数据集的图片是 mnist.train.images ,训练数据集的标签是 mnist.train.labels。根据图片像素点把图片展开为向量,再进一步操作,识别图片上的数值。那这60000个训练数据集是怎么表示的呢?在MNIST训练数据集中,mnist.train.images 是一个形状为 [60000, 784] 的张量(至于什么是张量,小伙伴们可以手都搜一下,加深一下印象),第一个维度数字用来索引图片,第二个维度数字用来索引每张图片中的像素点。在此张量里的每一个元素,都表示某张图片里的某个像素的强度值,值介于0和1之间。
0x02:代码运行
代码分为两部分,一个是用于下载数据的 input_data.py, 另一个是主程序 mnist.py,
 # Copyright 2015 Google Inc. All Rights Reserved.

 #

 # Licensed under the Apache License, Version 2.0 (the "License");

 # you may not use this file except in compliance with the License.

 # You may obtain a copy of the License at

 #

 #     http://www.apache.org/licenses/LICENSE-2.0

 #

 # Unless required by applicable law or agreed to in writing, software

 # distributed under the License is distributed on an "AS IS" BASIS,

 # WITHOUT WARRANTIES OR CONDITIONS OF ANY KIND, either express or implied.

 # See the License for the specific language governing permissions and

 # limitations under the License.

 # ==============================================================================

 """Functions for downloading and reading MNIST data."""

 from __future__ import absolute_import

 from __future__ import division

 from __future__ import print_function

 import gzip

 import os

 import tensorflow.python.platform

 import numpy

 from six.moves import urllib

 from six.moves import xrange  # pylint: disable=redefined-builtin

 import tensorflow as tf

 SOURCE_URL = 'http://yann.lecun.com/exdb/mnist/'

 def maybe_download(filename, work_directory):

   """Download the data from Yann's website, unless it's already here."""

   if not os.path.exists(work_directory):

     os.mkdir(work_directory)

   filepath = os.path.join(work_directory, filename)

   if not os.path.exists(filepath):

     filepath, _ = urllib.request.urlretrieve(SOURCE_URL + filename, filepath)

     statinfo = os.stat(filepath)

     print('Successfully downloaded', filename, statinfo.st_size, 'bytes.')

   return filepath

 def _read32(bytestream):

   dt = numpy.dtype(numpy.uint32).newbyteorder('>')

   return numpy.frombuffer(bytestream.read(4), dtype=dt)[0]

 def extract_images(filename):

   """Extract the images into a 4D uint8 numpy array [index, y, x, depth]."""

   print('Extracting', filename)

   with gzip.open(filename) as bytestream:

     magic = _read32(bytestream)

     if magic != 2051:

       raise ValueError(

           'Invalid magic number %d in MNIST image file: %s' %

           (magic, filename))

     num_images = _read32(bytestream)

     rows = _read32(bytestream)

     cols = _read32(bytestream)

     buf = bytestream.read(rows * cols * num_images)

     data = numpy.frombuffer(buf, dtype=numpy.uint8)

     data = data.reshape(num_images, rows, cols, 1)

     return data

 def dense_to_one_hot(labels_dense, num_classes=10):

   """Convert class labels from scalars to one-hot vectors."""

   num_labels = labels_dense.shape[0]

   index_offset = numpy.arange(num_labels) * num_classes

   labels_one_hot = numpy.zeros((num_labels, num_classes))

   labels_one_hot.flat[index_offset + labels_dense.ravel()] = 1

   return labels_one_hot

 def extract_labels(filename, one_hot=False):

   """Extract the labels into a 1D uint8 numpy array [index]."""

   print('Extracting', filename)

   with gzip.open(filename) as bytestream:

     magic = _read32(bytestream)

     if magic != 2049:

       raise ValueError(

           'Invalid magic number %d in MNIST label file: %s' %

           (magic, filename))

     num_items = _read32(bytestream)

     buf = bytestream.read(num_items)

     labels = numpy.frombuffer(buf, dtype=numpy.uint8)

     if one_hot:

       return dense_to_one_hot(labels)

     return labels

 class DataSet(object):

   def __init__(self, images, labels, fake_data=False, one_hot=False,

                dtype=tf.float32):

     """Construct a DataSet.

     one_hot arg is used only if fake_data is true.  `dtype` can be either

     `uint8` to leave the input as `[0, 255]`, or `float32` to rescale into

     `[0, 1]`.

     """

     dtype = tf.as_dtype(dtype).base_dtype

     if dtype not in (tf.uint8, tf.float32):

       raise TypeError('Invalid image dtype %r, expected uint8 or float32' %

                       dtype)

     if fake_data:

       self._num_examples = 10000

       self.one_hot = one_hot

     else:

       assert images.shape[0] == labels.shape[0], (

           'images.shape: %s labels.shape: %s' % (images.shape,

                                                  labels.shape))

       self._num_examples = images.shape[0]

       # Convert shape from [num examples, rows, columns, depth]

       # to [num examples, rows*columns] (assuming depth == 1)

       assert images.shape[3] == 1

       images = images.reshape(images.shape[0],

                               images.shape[1] * images.shape[2])

       if dtype == tf.float32:

         # Convert from [0, 255] -> [0.0, 1.0].

         images = images.astype(numpy.float32)

         images = numpy.multiply(images, 1.0 / 255.0)

     self._images = images

     self._labels = labels

     self._epochs_completed = 0

     self._index_in_epoch = 0

   @property

   def images(self):

     return self._images

   @property

   def labels(self):

     return self._labels

   @property

   def num_examples(self):

     return self._num_examples

   @property

   def epochs_completed(self):

     return self._epochs_completed

   def next_batch(self, batch_size, fake_data=False):

     """Return the next `batch_size` examples from this data set."""

     if fake_data:

       fake_image = [1] * 784

       if self.one_hot:

         fake_label = [1] + [0] * 9

       else:

         fake_label = 0

       return [fake_image for _ in xrange(batch_size)], [

           fake_label for _ in xrange(batch_size)]

     start = self._index_in_epoch

     self._index_in_epoch += batch_size

     if self._index_in_epoch > self._num_examples:

       # Finished epoch

       self._epochs_completed += 1

       # Shuffle the data

       perm = numpy.arange(self._num_examples)

       numpy.random.shuffle(perm)

       self._images = self._images[perm]

       self._labels = self._labels[perm]

       # Start next epoch

       start = 0

       self._index_in_epoch = batch_size

       assert batch_size <= self._num_examples

     end = self._index_in_epoch

     return self._images[start:end], self._labels[start:end]

 def read_data_sets(train_dir, fake_data=False, one_hot=False, dtype=tf.float32):

   class DataSets(object):

     pass

   data_sets = DataSets()

   if fake_data:

     def fake():

       return DataSet([], [], fake_data=True, one_hot=one_hot, dtype=dtype)

     data_sets.train = fake()

     data_sets.validation = fake()

     data_sets.test = fake()

     return data_sets

   TRAIN_IMAGES = 'train-images-idx3-ubyte.gz'

   TRAIN_LABELS = 'train-labels-idx1-ubyte.gz'

   TEST_IMAGES = 't10k-images-idx3-ubyte.gz'

   TEST_LABELS = 't10k-labels-idx1-ubyte.gz'

   VALIDATION_SIZE = 5000

   local_file = maybe_download(TRAIN_IMAGES, train_dir)

   train_images = extract_images(local_file)

   local_file = maybe_download(TRAIN_LABELS, train_dir)

   train_labels = extract_labels(local_file, one_hot=one_hot)

   local_file = maybe_download(TEST_IMAGES, train_dir)

   test_images = extract_images(local_file)

   local_file = maybe_download(TEST_LABELS, train_dir)

   test_labels = extract_labels(local_file, one_hot=one_hot)

   validation_images = train_images[:VALIDATION_SIZE]

   validation_labels = train_labels[:VALIDATION_SIZE]

   train_images = train_images[VALIDATION_SIZE:]

   train_labels = train_labels[VALIDATION_SIZE:]

   data_sets.train = DataSet(train_images, train_labels, dtype=dtype)

   data_sets.validation = DataSet(validation_images, validation_labels,

                                  dtype=dtype)

   data_sets.test = DataSet(test_images, test_labels, dtype=dtype)

   return data_sets
input.py
# 这两行用来下载数据集
import input_data
mnist = input_data.read_data_sets("MNIST_data/", one_hot=True) import tensorflow as tf # 设置变量
x = tf.placeholder("float", [None, 784]) # 占位符
w = tf.Variable(tf.zeros([784, 10])) # 权重值
b = tf.Variable(tf.zeros([10])) # 偏置值 # 创建模型,用tf.matmul(X,W)表示x乘以W
y = tf.nn.softmax(tf.matmul(x,w) + b) # 用于输入正确值,为了下面计算交叉熵
y_ = tf.placeholder("float", [None,10]) # 计算交叉熵
# 用 tf.log 计算 y 的每个元素的对数,然后把 y_ 的每一个元素和 tf.log(y_) 的对应元素相乘再用 tf.reduce_sum 计算张量的所有元素的总和
cross_entropy = -tf.reduce_sum(y_ * tf.log(y)) # 进行训练,以0.01的学习速率最小化交叉熵
train_step = tf.train.GradientDescentOptimizer(0.01).minimize(cross_entropy) # 初始化创建的变量
init = tf.initialize_all_variables() # 在一个Session里面启动模型,并初始化变量
sess = tf.Session()
sess.run(init) # 开始训练模型,训练1000次
for i in range(1000):
batch_xs, batch_ys = mnist.train.next_batch(100)
sess.run(train_step,feed_dict={x:batch_xs, y_:batch_ys}) # 用 tf.equal 来检测我们的预测是否真实标签匹配
correct_prediction = tf.equal(tf.argmax(y, 1), tf.argmax(y_, 1)) # 上一行代码会返回一组布尔2值,为了正确预测,把布尔值转换成浮点数
accuracy = tf.reduce_mean(tf.cast(correct_prediction, "float")) # 计算正确率
print(sess.run(accuracy, feed_dict={x:mnist.test.images, y_:mnist.test.labels}))
mnist.py
第一次运行主程序时会有点久,因为需要下载数据。最后,,会输出测试的准确率,大概91%左右。
0x03:图片识别过程
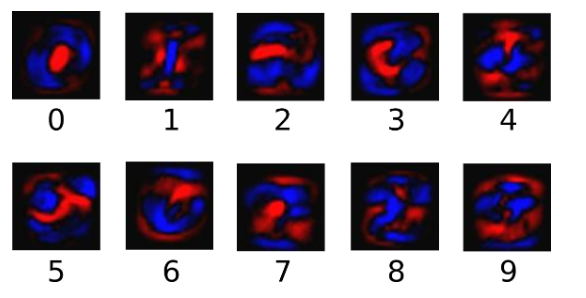
为了得到一张给定图片属于某个特定数字类的证据(evidence),我们对图片像素值进行加权求和。如果这个像素具有很强的证据说明这张图片不属于该类,那么相应的权值为负数,相反如果这个像素拥有有利的证据支持这张图片属于这个类,那么权值是正数。下面的图片显示了一个模型学习到的图片上每个像素对于特定数字类的权值。红色代表负数权值,蓝色代表正数权值。(我的理解是:将0-9抽象成10个数据类,红色的表示不属于这个数据类的“属性”,蓝色的表示属于这个数据类的“属性”,在一张图片中,如果符合蓝色“属性”的多些,则这张图片符合这个数据类的概率就高些(下面的softmax函数计算概率),个人理解,希望大佬们指正错误。。。)
我们也需要加入一个额外的偏置量(bias),因为输入往往会带有一些无关的干扰量。因此对于给定的输入图片 x 它代表的是数字 i 的证据可以表示为(这句比较重要):
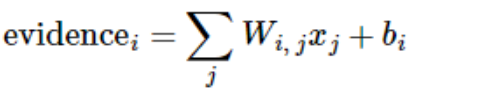
(这个公式结合下面第一个彩色图一起看比较容易理解些。)
其中  代表权重,
代表权重, 代表数字 i 类的偏置量,j 代表给定图片 x 的像素索引用于像素求和(还记得前面那个[60000, 784]的张量嘛)。然后用softmax函数可以把这些证据转换成概率 y(这句也是是关键):
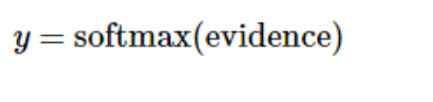
这里的softmax可以看成是一个激励(activation)函数或者链接(link)函数,把我们定义的线性函数的输出转换成我们想要的格式,也就是关于10个数字类的概率分布。因此,给定一张图片,它对于每一个数字的吻合度可以被softmax函数转换成为一个概率值。softmax函数可以定义为:

展开等式右边的子式,可以得到:
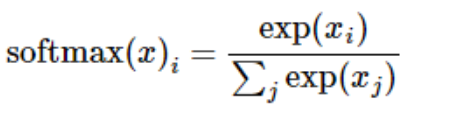
但是更多的时候把softmax模型函数定义为前一种形式:把输入值当成幂指数求值,再正则化这些结果值。这个幂运算表示,更大的证据对应更大的假设模型(hypothesis)里面的乘数权重值。反之,拥有更少的证据意味着在假设模型里面拥有更小的乘数系数。假设模型里的权值不可以是0值或者负值。Softmax然后会正则化这些权重值,使它们的总和等于1,以此构造一个有效的概率分布。(更多的关于Softmax函数的信息,可以参考Michael Nieslen的书里面的这个部分,其中有关于softmax的可交互式的可视化解释。)
对于softmax回归模型可以用下面的图解释,对于输入的xs加权求和,再分别加上一个偏置量,最后再输入到softmax函数中:

如果把它写成一个等式,我们可以得到:
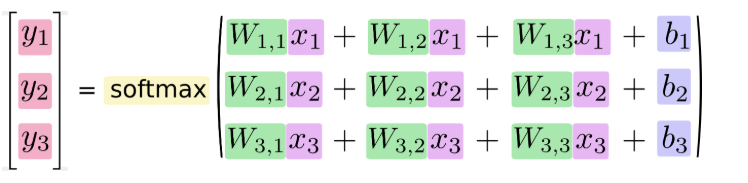
我们也可以用向量表示这个计算过程:用矩阵乘法和向量相加。这有助于提高计算效率。(也是一种更有效的思考方式)
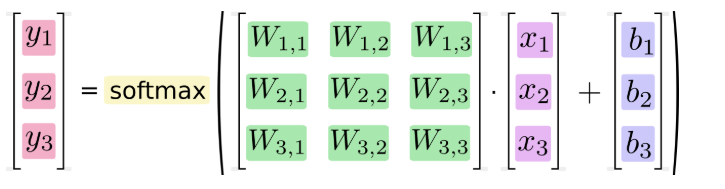
更进一步,可以写成更加紧凑的方式:

参考文章:http://www.tensorfly.cn/tfdoc/tutorials/mnist_beginners.html
********************不积跬步无以至千里********************
tensorflow的MNIST教程的更多相关文章
- Tensorflow的CNN教程解析
之前的博客我们已经对RNN模型有了个粗略的了解.作为一个时序性模型,RNN的强大不需要我在这里重复了.今天,让我们来看看除了RNN外另一个特殊的,同时也是广为人知的强大的神经网络模型,即CNN模型.今 ...
- 基于tensorflow的MNIST手写数字识别(二)--入门篇
http://www.jianshu.com/p/4195577585e6 基于tensorflow的MNIST手写字识别(一)--白话卷积神经网络模型 基于tensorflow的MNIST手写数字识 ...
- 2、TensorFlow训练MNIST
装载自:http://www.tensorfly.cn/tfdoc/tutorials/mnist_beginners.html TensorFlow训练MNIST 这个教程的目标读者是对机器学习和T ...
- tensorflow学习笔记——使用TensorFlow操作MNIST数据(1)
续集请点击我:tensorflow学习笔记——使用TensorFlow操作MNIST数据(2) 本节开始学习使用tensorflow教程,当然从最简单的MNIST开始.这怎么说呢,就好比编程入门有He ...
- Tensorflow 官方版教程中文版
2015年11月9日,Google发布人工智能系统TensorFlow并宣布开源,同日,极客学院组织在线TensorFlow中文文档翻译.一个月后,30章文档全部翻译校对完成,上线并提供电子书下载,该 ...
- Android+TensorFlow+CNN+MNIST 手写数字识别实现
Android+TensorFlow+CNN+MNIST 手写数字识别实现 SkySeraph 2018 Email:skyseraph00#163.com 更多精彩请直接访问SkySeraph个人站 ...
- Ubuntu16.04安装TensorFlow及Mnist训练
版权声明:本文为博主原创文章,欢迎转载,并请注明出处.联系方式:460356155@qq.com TensorFlow是Google开发的开源的深度学习框架,也是当前使用最广泛的深度学习框架. 一.安 ...
- 一个简单的TensorFlow可视化MNIST数据集识别程序
下面是TensorFlow可视化MNIST数据集识别程序,可视化内容是,TensorFlow计算图,表(loss, 直方图, 标准差(stddev)) # -*- coding: utf-8 -*- ...
- 使用Tensorflow操作MNIST数据
MNIST是一个非常有名的手写体数字识别数据集,在很多资料中,这个数据集都会被用作深度学习的入门样例.而TensorFlow的封装让使用MNIST数据集变得更加方便.MNIST数据集是NIST数据集的 ...
随机推荐
- 配置环境变量后不生效,显示缓存的旧jdk版本,解决方案
本人一直用jdk1.8版本; 今天安装了jdk11版本, 并配置好了jdk11的环境变量JAVA_HOME : jdk安装路径bin目录的上级目录PATH : %JAVA_HOME% ...
- JMeter基础知识系列三
JMeter测试结果字段的意义: Label:定义HTTP请求名称. Samples:表示这次测试中一共发出了多少个请求. Average:平均响应时长,当使用了Transaction Control ...
- react+dva 全局model中异步获取数据state在组件中取不到值
先上结论,不是取不到,是写法有问题. 全文分4部分,1是问题描述,2是一开始的解决想法(错误做法),3是问题产生原因的思考,4是正常解决方法.只想看结论直接跳4 1.问题描述 接触react dva一 ...
- Codeforces Round #602 (Div. 2, based on Technocup 2020 Elimination Round 3) D2. Optimal Subsequences (Hard Version) 数据结构 贪心
D2. Optimal Subsequences (Hard Version) This is the harder version of the problem. In this version, ...
- 用OC实现双向链表:构造链表、插入节点、删除节点、遍历节点
一.介绍 双向链表:每一个节点前后指针域都和它的上一个节点互相指向,尾节点的next指向空,首节点的pre指向空. 二.使用 注:跟单链表差不多,简单写常用的.循环链表无法形象化打印,后面也暂不实现了 ...
- 一文学会 TypeScript 的 82% 常用知识点(上)
前端专栏 2019-11-22 19:17:55 对于前端从业者来说,TypeScript(以下简称 TS)已经不算是新技术. Vue3 的源码基于 TS 编写, Angular 项目默认支持 TS ...
- IT兄弟连 Java语法教程 数组 数组的声明
Java语言支持两种语法格式来定义数组: type[] arrayName; type arrayName[]; 对这两种语法格式而言,通常推荐使用第一种格式,因为第一种格式不仅具有更好的语义,而且具 ...
- CentOS 7 firewalld详解,添加删除策略
一.CentOS7中firewall防火墙 修改防火墙配置文件之前,需要对之前防火墙[/etc/firewalld/zones/public.xml]做好备份 重启防火墙后,需要确认防火墙状态和防火墙 ...
- Web前端——css
css 推荐的样式编写顺序: Positioning:定位 Box model:盒子模型.大小等 Typographic:文字系列.排印等 Visual:可视化.背景等 Misc:其它混杂模式 居中 ...
- .net core下使用DbProviderFactories.GetFactory("")无法创建工厂的解决方案
前言:我们有时候会有一种需求,需要连接很多的数据库,如:mysql,sqlserver,oracle等等,需要把这些数据库里的数据抽取出来加工后,返回给客户端使用. 在.net framework中是 ...