
Spring Boot (七)MyBatis代码自动生成和辅助插件
一、简介
1.1 MyBatis Generator介绍
MyBatis Generator 是MyBatis 官方出品的一款,用来自动生成MyBatis的 mapper、dao、entity 的框架,让我们省去规律性最强的一部分最基础的代码编写。
1.2 MyBatis Generator使用
MyBatis Generator的使用方式有4种:
- 命令行生成
- Maven方式生成
- 使用Ant任务生成
- 使用Java代码生成
其中推荐使用Maven方式进行代码生成,因为集成和使用比较简单。
1.3 开发环境
MySQL:8.0.12
MyBatis Generator:1.3.7
Maven:4.0
IDEA:2018.2
二、代码自动生成配置
上面介绍了使用MyBatis Generator的几种方式,其中最推荐使用的是Maven方式,所以下面我们来看Maven方式的MyBatis代码生成,分为四步:
Step1:添加依赖
配置pom.xml文件,增加依赖和配置生成文件(“generatorConfig.xml”)路径:
<plugin>

    <groupId>org.mybatis.generator</groupId>

    <artifactId>mybatis-generator-maven-plugin</artifactId>

    <version>1.3.7</version>

    <dependencies>

        <dependency>

            <groupId>mysql</groupId>

            <artifactId>mysql-connector-java</artifactId>

            <version>8.0.12</version>

        </dependency>

        <dependency>

            <groupId>org.mybatis.generator</groupId>

            <artifactId>mybatis-generator-core</artifactId>

            <version>1.3.7</version>

        </dependency>

    </dependencies>

    <executions>

        <execution>

            <id>Generate MyBatis Artifacts</id>

            <phase>package</phase>

            <goals>

                <goal>generate</goal>

            </goals>

        </execution>

    </executions>

    <configuration>

        <!--允许移动生成的文件 -->

        <verbose>true</verbose>

        <!-- 是否覆盖 -->

        <overwrite>true</overwrite>

        <!-- 自动生成的配置 -->

        <configurationFile>generatorConfig.xml</configurationFile>

    </configuration>

</plugin>
Step2:添加配置文件
根据上面在pom里的配置,我们需要添加generatorConfig.xml在项目的根目录:
<?xml version="1.0" encoding="UTF-8"?>

<!DOCTYPE generatorConfiguration

        PUBLIC "-//mybatis.org//DTD MyBatis Generator Configuration 1.0//EN"

        "http://mybatis.org/dtd/mybatis-generator-config_1_0.dtd">

<generatorConfiguration>

    <!--加载配置文件,为下面读取数据库信息准备-->

    <properties resource="application.properties"/>

    <!--defaultModelType="flat" 大数据字段,不分表 -->

    <context id="Mysql" targetRuntime="MyBatis3Simple" defaultModelType="flat">

        <property name="autoDelimitKeywords" value="true" />

        <property name="beginningDelimiter" value="`" />

        <property name="endingDelimiter" value="`" />

        <property name="javaFileEncoding" value="utf-8" />

        <plugin type="org.mybatis.generator.plugins.SerializablePlugin" />

        <plugin type="org.mybatis.generator.plugins.ToStringPlugin" />

        <!-- 注释 -->

        <commentGenerator >

            <property name="suppressAllComments" value="true"/><!-- 是否取消注释 -->

            <property name="suppressDate" value="true" /> <!-- 是否生成注释代时间戳-->

        </commentGenerator>

        <!--数据库链接地址账号密码-->

        <jdbcConnection driverClass="${spring.datasource.driver-class-name}"

                        connectionURL="${spring.datasource.url}"

                        userId="${spring.datasource.username}"

                        password="${spring.datasource.password}">

        </jdbcConnection>

        <!-- 类型转换 -->

        <javaTypeResolver>

            <!-- 是否使用bigDecimal, false可自动转化以下类型(Long, Integer, Short, etc.) -->

            <property name="forceBigDecimals" value="false"/>

        </javaTypeResolver>

        <!--生成Model类存放位置-->

        <javaModelGenerator targetPackage="com.hello.springboot.entity" targetProject="src/main/java">

            <property name="enableSubPackages" value="true"/>

            <property name="trimStrings" value="true"/>

        </javaModelGenerator>

        <!-- 生成mapxml文件 -->

        <sqlMapGenerator targetPackage="mapper" targetProject="src/main/resources/mybatis" >

            <property name="enableSubPackages" value="false" />

        </sqlMapGenerator>

        <!-- 生成mapxml对应client,也就是接口dao -->

        <javaClientGenerator targetPackage="com.hello.springboot.dao" targetProject="src/main/java" type="XMLMAPPER" >

            <property name="enableSubPackages" value="false" />

        </javaClientGenerator>

        <table tableName="article" enableCountByExample="true" enableUpdateByExample="true" enableDeleteByExample="true" enableSelectByExample="true" selectByExampleQueryId="true">

            <generatedKey column="id" sqlStatement="Mysql" identity="true" />

        </table>

        <table tableName="user_log" enableCountByExample="true" enableUpdateByExample="true" enableDeleteByExample="true" enableSelectByExample="true" selectByExampleQueryId="true">

            <generatedKey column="id" sqlStatement="Mysql" identity="true" />

        </table>

    </context>

</generatorConfiguration>
其中数据库连接的配置,是从application.properties直接读取的。
Step3:配置全局属性文件
全局属性文件application.properties的配置,和Spring Boot增加MyBatis的配置是一样的,如果你的Spring Boot项目里面已经配置了MyBatis支持,请忽略此步骤。
# MyBatis 配置

spring.datasource.url=jdbc:mysql://172.16.10.79:3306/mytestdb?serverTimezone=UTC&useSSL=false&allowPublicKeyRetrieval=true

spring.datasource.username=root

spring.datasource.password=123456

spring.datasource.driver-class-name=com.mysql.cj.jdbc.Driver

mybatis.type-aliases-package=com.hello.springboot.mapper

mybatis.config-locations=classpath:mybatis/mybatis-config.xml

mybatis.mapper-locations=classpath:mybatis/mapper/*.xml
注意: MySQL 6以后JDBC的配置就不一样了,参照如上MySQL 8的配置。
Step4:点击Maven生成代码
如果你使用的是IDEA,点击最右侧的Maven Projects => 点击mybatis-generator => 右键mybatis-generator:generate => Run Maven Build,如下图所示:
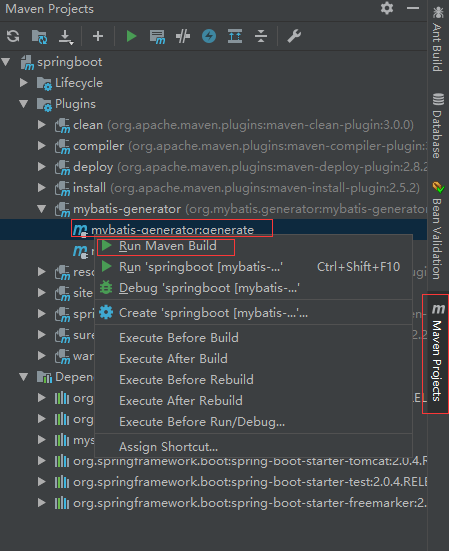
正常控制台输出“BUILD SUCCESS”说明生成已经成功了,如果出现错误,根据错误提示信息排除处理错误即可。
MyBatis Generator 示例源码:https://github.com/vipstone/springboot-example/tree/master/springboot-mybatis-xml
三、安装IDEA插件
如果你使用的是 IDEA,那么强烈建议你安装一款免费的IDEA插件“Free MyBatis plugin”,可以实现dao到mapper xml对应方法的快速映射,点击任意一个快速调整到相应的方法,提高工作效率,效果如下图所示:

点击绿色的箭头直接跳转到了mapper xml对应的方法了,如下图所示:
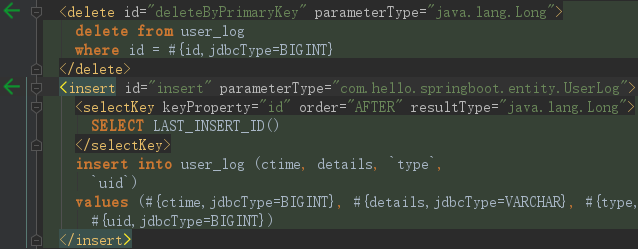
可以相互点击,进行对应的跳转。
安装步骤
- 点击菜单栏Flie => Settings
- 点击Browse repostitories..
- 输入“Free MyBatis plugin”查找插件
- 点击安装,重启IDEA
关键步骤的截图如下:

四、总结
使用了MyBatis Generator可以帮我们自动生成实体类,和5个最基础的方法,大大的提高我们的工作效率,用户只需要按需写自己独有的一些业务即可。同时增加“Free MyBatis plugin”插件,可以很方便的帮我们开发和调试代码,真是实实在在的福利。
Spring Boot (七)MyBatis代码自动生成和辅助插件的更多相关文章
- MyBatis代码自动生成(利用eclipse插件)
上一篇文章已经介绍了利用命令的方式自动生成mybatis代码,但是每次都去运行cmd命令感觉还是有点麻烦,所以找了些资料发现eclipse里面也可以安装插件自动生成代码,下面简单介绍一下,也是给自己以 ...
- (转)MyBatis框架的学习(七)——MyBatis逆向工程自动生成代码
http://blog.csdn.net/yerenyuan_pku/article/details/71909325 什么是逆向工程 MyBatis的一个主要的特点就是需要程序员自己编写sql,那么 ...
- eclipse生成mybatis的逆向工程-mybatis代码自动生成
首先,工作中一直在使用命令方式的mybatis的代码自动生成,今天把自己的笔记本直接搞一个在eclipse中生成的逆向代码生成工程,方便自己在家学习使用,在搞这个工程的过程中由于自己搞了一套环境,所i ...
- Mybatis代码自动生成(含测试)
一.建立数据库 create database shixun; use shixun; create table user( id int primary key auto_increment , u ...
- MyBatis代码自动生成(利用命令)
这几天在学习springmvc,需要用到mybatis,所以研究了一下mybatis自动代码生成,当然也可以手动敲,但是那样效率非常的慢,并且出错率也是很高的,利用MyBatis生成器自动生成实体类. ...
- MyBatis代码自动生成
MyBatis的代码自动生成的功能,由于MyBatis属于一种半自动的ORM框架,所以主要的工作就是配置Mapping映射文件,但是由于手写映射文件很容易出错,所以可利用MyBatis生成器自动生成实 ...
- Mybatis 代码自动生成[myeclipse版]
使用环境说明: OS:windows 7 64位 myeclipse: 2017 CI 1.安装 打开myeclipse--help---Install from catalog--选择eclipse ...
- Mybatis 代码自动生成(generatorConfig.xml配置)
博客推荐: Mybatis最入门---代码自动生成(generatorConfig.xml配置) MyBatis Generator generatorConfig.xml配置详解 pom.xml&l ...
- mybatis-generator-gui--一个mybatis代码自动生成界面工具
mybatis-generator-gui是什么 介绍mybatis-generator-gui之前,有必要介绍一下什么是mybatis generator(熟悉的同学可以跳过这一节).我们都知道,通 ...
随机推荐
- 使用IDEA时跳转到.class的解决办法
项目背景:jdk1.8 软件环境:IDEA 问题: 1. 两个不同的项目,在A项目中写了一个实体类.B项目中引用.在B项目中CTRL+鼠标左键点击进入,正常情况下是进入了源码文件,也就是.JAVA文件 ...
- node简介
1. Node.js是什么? 简单的说 Node.js 就是运行在服务端的 JavaScript. Node.js 是一个基于Chrome JavaScript 运行时建立的一个平台. Node.js ...
- 2019中山大学程序设计竞赛-Monitor
题目地址 题目大意:给你一个n*m的矩形,在这个矩形内告诉你p个矩形(左下角和右上角坐标),问你q个问题,每次也是给你一个矩形(左下角和右上角坐标),问你每个矩形是否可以被开始给的p个矩形完全覆盖. ...
- 压力测试工具 ab
ab 是Apache 自带的一个压力测试工具,命令行,是 ApacheBench 命令的缩写. ab的原理:ab命令会创建多个并发访问线程,模拟多个访问者同时对某一URL地址进行访问.它的测试目标是基 ...
- socket 套接字服务器端和客户端发送信息
import socket import threading host='' port=6889 def cilenThred(conn,addr): print("成功接受客户端{}的连接 ...
- python处理参数的getopt的使用
在写脚本程序的时候需要添加一些额外的参数来实现脚本的附加功能或者增强功能,通常的做法是同sys.argv[i]直接来获取参数的值,但是这个比较局限,要求参数的输入一定要按照顺序. fileName = ...
- FCC(ES6写法) Map the Debris
返回一个数组,其内容是把原数组中对应元素的平均海拔转换成其对应的轨道周期. 原数组中会包含格式化的对象内容,像这样 {name: 'name', avgAlt: avgAlt}. 思路: 直接使用公式 ...
- Java web每天学之Servlet工作原理详情解析
上篇文章中我们介绍了Servlet的实现方式以及Servlet的生命周期,我们这篇文章就来介绍一下常用对象. 点击回顾:<Java Web每天学之Servlet的工作原理解析>:<J ...
- [Swift]LeetCode169. 求众数 | Majority Element
Given an array of size n, find the majority element. The majority element is the element that appear ...
- [Swift]LeetCode174. 地下城游戏 | Dungeon Game
The demons had captured the princess (P) and imprisoned her in the bottom-right corner of a dungeon. ...