
kvm常见故障及解决
一、启动虚拟机Connection reset by peer
# virsh start vmhost1error: Failed to start domain vmhost1error: Unable to read from monitor: Connection reset by peer在虚拟机运行过程中关闭宿主服务器就有可能导致这种情况出现,由于宿主服务器中的kvm虚拟机控制器与安装在kvm中的虚拟机会话被异常重置,所以我们可以如下解决:
# virsh managedsave-remove vmhost1# virsh start vmhost1如果启动查看/var/log/libvirt/qemu/vmhost1.log下log还报如下错误:
Cannot set up guest memory 'pc.ram': Cannot allocate memory这个问题可能是分配给vmhost1分配的内存过大(甚至超过的物理主机的内存大小),或者可能是宿主机没有足够的内存分配给此虚拟机,导致无法启动!
二、重Define虚拟机时无/usr/bin/kvm
error: Failed to define domain from hostname.xmlerror: Cannot find QEMU binary /usr/bin/kvm: No such file or directory解决方法:
# ln -s /usr/libexec/qemu-kvm /usr/bin/kvm三、error: internal error process exited while connecting to monitor
# virsh start vmhost1 error: Failed to start domain vmhost1error: internal error process exited while connecting to monitor: kvm: -drive file=/dev/sp1368155439693/v1368544020461,if=none,id=drive-virtio-disk0,format=qcow2: could not open disk image /dev/sp1368155439693/v1368544020461: Invalid argument分析:镜像格式错误,用qemu-img info 检查镜像和xml配置文件中指定的type是否一致!
四、Unable to load library 'virt': libvirt.so
Unable to load library 'virt': libvirt.so: cannot open shared object file: No such file or directoryLinux下解决:      ln -s /usr/lib/libvirt.so.0   /usr/lib/libvirt.so

windows下解决:

      将libvirt-0.dll改名为virt.dll
五、error: Refusing to undefine while domain managed save image exists
# virsh undefine vmhost1error: Refusing to undefine while domain managed save image existshttp://www.redhat.com/archives/libvir-list/2011-July/msg01219.html解决方法:virsh undefine $domain --managed-save
六、启动libvirtd进程出错
# /usr/local/sbin/libvirtd -d -l --config /usr/local/etc/libvirt/libvirtd.conf (编译安装的启动方式)error:/usr/local/sbin/libvirtd: initialization failed
try to install libpcap-devel RPM and rebuild libvirt http://comments.gmane.org/gmane.comp.emulators.libvirt/58218apt-get install libpcap-dev
上面的方法好像都没有效果,但是尝试了http://wiki.libvirt.org/page/The_daemon_cannot_be_started说的,把配置文件里的
listen_tls = 0注释取消(更奇怪的问题,在我的客户端链接不对)七、启动虚拟机报错
# virsh start vmhost1error: Failed to start domain vmhost1error: internal error process exited while connecting to monitor: Could not access KVM kernel module: No such file or directoryfailed to initialize KVM: No such file or directoryNo accelerator found!上面的提示信息就是因为QEMU在初始化阶段因为无法找到kvm内核模块。
# modprobe kvm #载入指定的模块重启电脑,进入bios界面,设置advance选项里面的virtualization标签为Enabled
通过命令 lsmod | grep kvm #显示已载入的模块八、虚拟机迁移
# virsh migrate --live 1 qemu+tcp://192.168.0.121 --p2p --tunnelled --unsafe error: operation failed: Failed to connect to remote libvirt URI qemu+tcp://192.168.0.121(在URI后面加上/system,‘system’相当于root用户的访问权限)

#virsh migrate --live 2 qemu+tcp://192.168.0.121/system --p2p --tunnelled

 error: Unsafe migration: Migration may lead to data corruption if disks use cache != none(加上--unsafe参数)#virsh migrate --live 2 qemu+tcp://192.168.0.121/system --p2p --tunnelled --unsafe error: Timed out during operation: cannot acquire state change lock (启动虚拟机有时也会遇此错误),需要重启libvirtd进程
九、virsh
error: Failed to connect socket to '/var/run/libvirt/libvirt-sock': Connection refused(libvirtd 进程没有启动,libvirtd是一个监听客户端请求的进程)# virsh -c qemu:///system listerror: Failed to connect socket to '/var/run/libvirt/libvirt-sock': Permission denied

error: failed to connect to the hypervisor

(当前用户没有权限,修改/etc/libvirt/libvirtd.conf,unix_sock_rw_perms = 0777,使所有用户都有权限读写)
注意:如果查询的结果中包含有vmx,那么就可以证明服务器是支持虚拟化的
安装包
yum -y groupinstall "Virtualization" "Virtualization Client" "Virtualization Platform"
modprobe kvm
lsmod |grep kvm
ln -sv /usr/libexec/qemu-kvm /usr/bin/
service libvirtd start
chkconfig --level 2345 libvirtd on
chkconfig libvirtd --list
配置网卡桥接
virsh iface-bridge eth0 br0
安装
virt-install --connect qemu:///system --virt-type kvm --name rhel6 --ram=1024 --disk path=/var/lib/libvirt/images/rhel6.img,size=8,sparse --os-type=linux --accelerate -c /sdb1/CentOS-6.6-x86_64-bin-DVD.iso --network bridge=br0,model=virtio --vnc --vncport=5991 --vnclisten=0.0.0.0 --force
--vncport 端口可以自己改,不指定的话自动获取
--boot network,cdrom,menu=on 这个是启动顺序可以不用加
当出现下面提示的时候用vnc客户端连接即可(端口:5991)
netstat -tnlp |grep kvm
tcp 0 0 0.0.0.0:5991 0.0.0.0:* LISTEN 3006/qemu-kvm
开始安装......
创建域...... | 0 B 00:00
无法打开显示:
运行 'virt-viewer --help' 来查看可用命令行选项的完整列表
域安装仍在进行。您可以重新连接
到控制台以便完成安装进程。
注意: 如果安装完成后,ifconfig只能看到本地回环网卡,到/etc/sysconfig/network-scripts/目录下将ifcfg-eth0的ONBOOT改为yes,然后启动网卡即可。
virsh uri: 查看当前主机上hypervisor的连接路径;
virsh connect:
virsh define: 创建一个虚拟机,根据事先定义的xml格式的配置文件;创建以后不会自动启动;
virsh create: 创建,创建完成后会自动启动;
virsh undefine: 删除
virsh list --all 查看
virsh destroy rhel6 删除rhel6
virt-install --os-variant list
virsh start rhel66 开启rhel66 或 virsh create /etc/libvirt/qemu/rhel66.xml
virsh shutdown rhel66
virsh reboot rhel66
virsh console rhel66
virsh suspend rhel66 挂起
virsh resume rhel66 恢复挂起
/etc/libvirt/qemu/ 虚拟机xml配置文件目录
virsh edit rhel66 编辑xml配置文件,vi编辑的不会立即生效
解决virsh shutdown无法关闭KVM虚拟机,以下操作都在客户机,不是宿主机
yum -y install acpid
service acpid restart
chkconfig --level 2345 acpid on
chkconfig acpid --list
解决KVM中宿主机通过console无法连接客户机,以下操作都在客户机,不是宿主机
1、添加ttyS0的安全许可,允许root登录:
echo "ttyS0" >> /etc/securetty
2、在/etc/grub.conf文件中为内核添加参数:
console=ttyS0
这步要注意:
console=ttyS0一定要放在kernel这行中(大约在第16行),不能单独一行,即console=ttyS0是kernel的一个参数,不是单独的
3、在/etc/inittab中添加agetty:
S0:12345:respawn:/sbin/agetty ttyS0 115200
4、重启客户机:
reboot
kvm虚拟机的重命名
1、查看所有的kvm虚拟机
virsh list --all
Id 名称 状态
----------------------------------------------------
- rhel6 关闭
2、重命名kvm虚拟机最好是将虚拟机先关机,然后再导出其xml文件
cd /etc/libvirt/qemu
virsh dumpxml rhel6 > CentOS02.xml
3、为了让重命名后的虚拟机名字与磁盘文件名一致、我们可以先将之前的磁盘文件命名成CentOS02.img
cd /var/lib/libvirt/images
mv rhel6.1.img CentOS02.img
4、编辑CentOS02.xml文件,修改<name>标签对以及磁盘文件,这里我们将磁盘文件修改成CentOS02.img
<domain type='kvm'>
<name>CentOS02</name>
......
...省略......
......
<disk type='file' device='disk'>
<driver name='qemu' type='raw' cache='none'/>
<source file='/var/lib/libvirt/images/CentOS02.img'/>
5、使用virsh undefine命令删除之前的虚拟机,根据新的xml文件定义新的kvm虚拟机
virsh undefine rhel6 ////删除rhel6虚拟机
virsh define /etc/libvirt/qemu/CentOS02.xml //重新定义新的kvm虚拟机
6、最后我们可以再次使用virsh list --all命令查看,结果如下所示
Id 名称 状态
----------------------------------------------------
- CentOS02 关闭
经过如上方法重命名的kvm机直接启动使用即可,不会影响udev动态管理设备的文件。和之前的虚拟机相比、仅仅就是名字变了而已。
设置步骤如下:
1、以联想t420为例,开机后按F2进入bios设置;
2、选择Security选项;
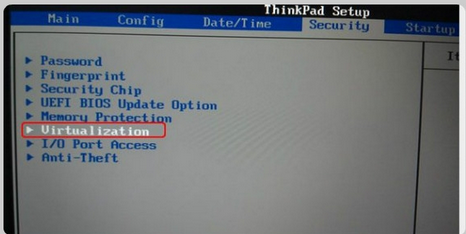
3、选择Virtualization,回车进入;
4、按+键修改俩个选项为enabled;
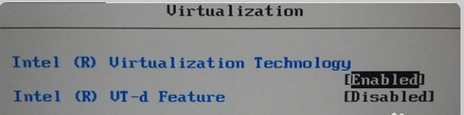
5、按F10,输入y保存退出即可。
kvm常见故障及解决的更多相关文章
- mysql主从复制常见故障解决
一.主从复制常见故障 1.从库已存在数据库,主库建立同名库导致从库同步失败.报错如下: mysql> show slave status\G*************************** ...
- 【集群实战】NFS服务常见故障排查和解决方法
NFS,全名叫Network File System,中文叫网络文件系统,是Linux.UNIX系统的分布式文件系统的一个组成部分,可实现在不同网络上共享远程文件系统. NFS由Sun公司开发,目前已 ...
- Weblogic常见故障常:JDBC Connection Pools(转)
WebLogic Server中数据库连接池是一个经常出问题的地方,总结一下出问题的原因和解决办法. 一.数据库连接泄漏 此类问题一般都是由于开发人员没有正确关闭数据库连接造成的.比如使用完Conne ...
- 理解 OpenStack + Ceph (7): Ceph 的基本操作和常见故障排除方法
本系列文章会深入研究 Ceph 以及 Ceph 和 OpenStack 的集成: (1)安装和部署 (2)Ceph RBD 接口和工具 (3)Ceph 物理和逻辑结构 (4)Ceph 的基础数据结构 ...
- [转] Linux运维常见故障排查和处理的技巧汇总
作为linux运维,多多少少会碰见这样那样的问题或故障,从中总结经验,查找问题,汇总并分析故障的原因,这是一个Linux运维工程师良好的习惯.每一次技术的突破,都经历着苦闷,伴随着快乐,可我们还是执着 ...
- Weblogic常见故障常:JDBC Connection Pools【转】
WebLogic Server中数据库连接池是一个经常出问题的地方,总结一下出问题的原因和解决办法. 一.数据库连接泄漏 此类问题一般都是由于开发人员没有正确关闭数据库连接造成的.比如使用完Conne ...
- vsftp客户连接常见故障现象
ftp客户连接常见故障现象现象0:> ftp: connect :连接被拒绝原因: 服务没启动解决: # chkconfig vsftpd on<Enter> 现象1:500 OOP ...
- Linux运维常见故障排查和处理的33个技巧汇总
作为linux运维,多多少少会碰见这样那样的问题或故障,从中总结经验,查找问题,汇总并分析故障的原因,这是一个Linux运维工程师良好的习惯.每一次技术的突破,都经历着苦闷,伴随着快乐,可我们还是执着 ...
- CentOS Grub、BASH 故障、解决方法
简介: Grub 常见的两种故障:Grub.conf 文件丢失.MBR 损坏 ( 不管恢复怎么样,还是先备份好吧 ) 一.Grub.conf 文件丢失 shell > rm -rf /boot/ ...
随机推荐
- java缓存系统
第一版 package cache; import java.util.HashMap; import java.util.Map; public class Cache1 { private Map ...
- 【一天一道LeetCode】#39. Combination Sum
一天一道LeetCode系列 (一)题目 Given a set of candidate numbers (C) and a target number (T), find all unique c ...
- 仿百度壁纸客户端(五)——实现搜索动画GestureDetector手势识别,动态更新搜索关键字
仿百度壁纸客户端(五)--实现搜索动画GestureDetector手势识别,动态更新搜索关键字 百度壁纸系列 仿百度壁纸客户端(一)--主框架搭建,自定义Tab + ViewPager + Frag ...
- Android开发中的安全
根据Android四大框架来解说安全机制 代码安全 java不同于C/C++,java是解释性语言,存在代码被反编译的隐患: 默认混淆器为proguard,最新版本为4.7: proguard还可用来 ...
- android查看源码的时候看不了
原因:未关联android中jar包源码 解决方案:导入sdk---->>resource---->>api 这样就可以在代码中查看源码了.
- android 应用模式之mvp
说到MVP就不得不提到MVC,做过J2EE的猿友们肯定知道MVC是个什么东西.MVC即 Model.View.Controller, 那MVP就Model.View.Presenter.Model用于 ...
- PS 滤镜——运动模糊
%%%%% motion blur clc; clear all; close all; Image=imread('4.jpg'); Image=double(Image); theta=pi/4 ...
- android EventBus详解(三)
post()方法调用流程 我们继续来看EventBus类,的另一个入口方法post() //已省略部分代码 public void post(Object event) { PostingThread ...
- sieve的objective-c实现
用obj-cl来实现前面的sieve代码貌似"丑"了不少,应该有更好的方式:比如不用Foundation或不用NSArray类,而改用其它更"底层"的类. 先把 ...
- leetCode(62)-Reverse Integer
题目: Reverse digits of an integer. Example1: x = 123, return 321 Example2: x = -123, return -321 clic ...