3.2、Factorization Machine实践
1、在上一篇博客中我们构建度为二的因子分解机模型,这篇博客对这个模型进行实践
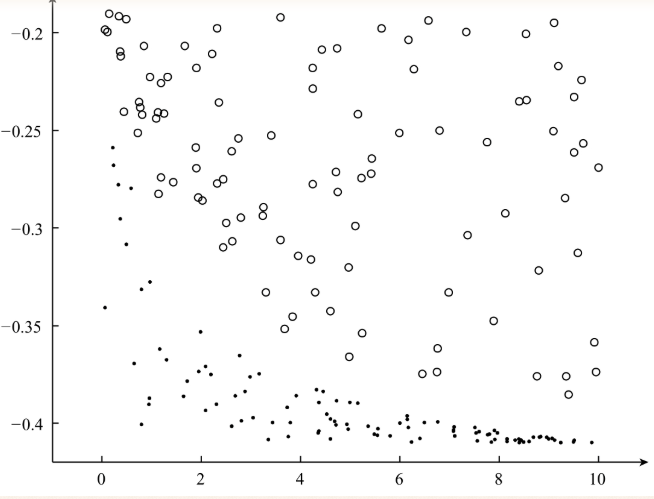
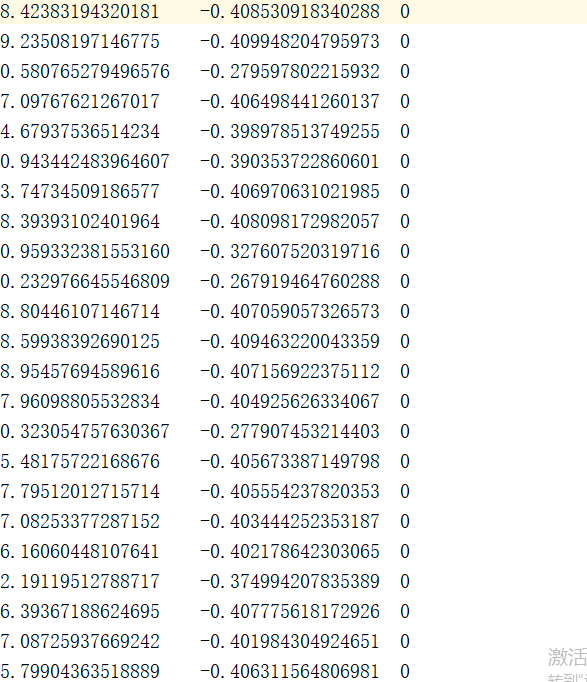
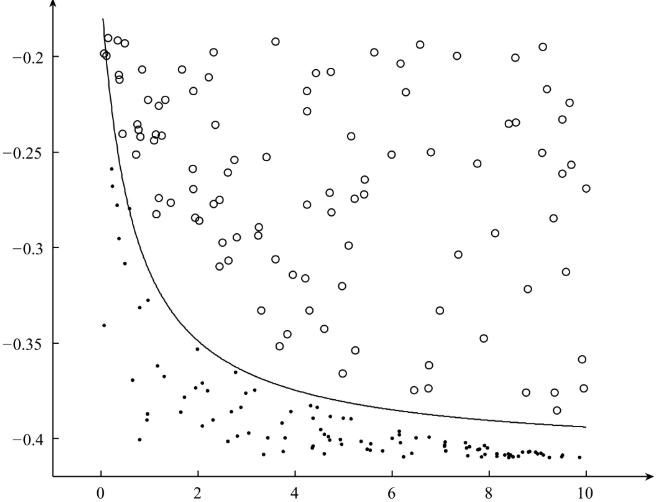
下图为准备的数据集:
完整代码为:
 # -*- coding: UTF-8 -*-

 # date:2018/6/6

 # User:WangHong

 import numpy as np

 from random import normalvariate  # 正态分布

 def loadDataSet(data):

     '''导入训练数据

     input:  data(string)训练数据

     output: dataMat(list)特征

             labelMat(list)标签

     '''

     dataMat = []

     labelMat = []

     fr = open(data)  # 打开文件

     for line in fr.readlines():

         lines = line.strip().split("\t")

         lineArr = []

         for i in range(len(lines) - 1):

             lineArr.append(float(lines[i]))

         dataMat.append(lineArr)

         labelMat.append(float(lines[-1]) * 2 - 1)  # 转换成{-1,1}

     fr.close()

     return dataMat, labelMat

 def sigmoid(inx):

     return 1.0 / (1 + np.exp(-inx))

 def initialize_v(n, k):

     '''初始化交叉项

     input:  n(int)特征的个数

             k(int)FM模型的超参数

     output: v(mat):交叉项的系数权重

     '''

     v = np.mat(np.zeros((n, k)))

     for i in range(n):

         for j in range(k):

             # 利用正态分布生成每一个权重

             v[i, j] = normalvariate(0, 0.2)

     return v

 def stocGradAscent(dataMatrix, classLabels, k, max_iter, alpha):

     '''利用随机梯度下降法训练FM模型

     input:  dataMatrix(mat)特征

             classLabels(mat)标签

             k(int)v的维数

             max_iter(int)最大迭代次数

             alpha(float)学习率

     output: w0(float),w(mat),v(mat):权重

     '''

     m, n = np.shape(dataMatrix)

     # 1、初始化参数

     w = np.zeros((n, 1))  # 其中n是特征的个数

     w0 = 0  # 偏置项

     v = initialize_v(n, k)  # 初始化V

     # 2、训练

     for it in range(max_iter):

         for x in range(m):  # 随机优化,对每一个样本而言的

             inter_1 = dataMatrix[x] * v

             inter_2 = np.multiply(dataMatrix[x], dataMatrix[x]) * \

              np.multiply(v, v)  # multiply对应元素相乘

             # 完成交叉项

             interaction = np.sum(np.multiply(inter_1, inter_1) - inter_2) / 2.

             p = w0 + dataMatrix[x] * w + interaction  # 计算预测的输出

             loss = sigmoid(classLabels[x] * p[0, 0]) - 1

             w0 = w0 - alpha * loss * classLabels[x]

             for i in range(n):

                 if dataMatrix[x, i] != 0:

                     w[i, 0] = w[i, 0] - alpha * loss * classLabels[x] * dataMatrix[x, i]

                     for j in range(k):

                         v[i, j] = v[i, j] - alpha * loss * classLabels[x] * \

                         (dataMatrix[x, i] * inter_1[0, j] -\

                           v[i, j] * dataMatrix[x, i] * dataMatrix[x, i])

         # 计算损失函数的值

         if it % 1000 == 0:

             print ("\t------- iter: ", it, " , cost: ", \

             getCost(getPrediction(np.mat(dataMatrix), w0, w, v), classLabels))

     # 3、返回最终的FM模型的参数

     return w0, w, v

 def getCost(predict, classLabels):

     '''计算预测准确性

     input:  predict(list)预测值

             classLabels(list)标签

     output: error(float)计算损失函数的值

     '''

     m = len(predict)

     error = 0.0

     for i in range(m):

         error -=  np.log(sigmoid(predict[i] * classLabels[i] ))

     return error

 def getPrediction(dataMatrix, w0, w, v):

     '''得到预测值

     input:  dataMatrix(mat)特征

             w(int)常数项权重

             w0(int)一次项权重

             v(float)交叉项权重

     output: result(list)预测的结果

     '''

     m = np.shape(dataMatrix)[0]

     result = []

     for x in range(m):

         inter_1 = dataMatrix[x] * v

         inter_2 = np.multiply(dataMatrix[x], dataMatrix[x]) * \

          np.multiply(v, v)  # multiply对应元素相乘

         # 完成交叉项

         interaction = np.sum(np.multiply(inter_1, inter_1) - inter_2) / 2.

         p = w0 + dataMatrix[x] * w + interaction  # 计算预测的输出

         pre = sigmoid(p[0, 0])

         result.append(pre)

     return result

 def getAccuracy(predict, classLabels):

     '''计算预测准确性

     input:  predict(list)预测值

             classLabels(list)标签

     output: float(error) / allItem(float)错误率

     '''

     m = len(predict)

     allItem = 0

     error = 0

     for i in range(m):

         allItem += 1

         if float(predict[i]) < 0.5 and classLabels[i] == 1.0:

             error += 1

         elif float(predict[i]) >= 0.5 and classLabels[i] == -1.0:

             error += 1

         else:

             continue

     return float(error) / allItem

 def save_model(file_name, w0, w, v):

     '''保存训练好的FM模型

     input:  file_name(string):保存的文件名

             w0(float):偏置项

             w(mat):一次项的权重

             v(mat):交叉项的权重

     '''

     f = open(file_name, "w")

     # 1、保存w0

     f.write(str(w0) + "\n")

     # 2、保存一次项的权重

     w_array = []

     m = np.shape(w)[0]

     for i in range(m):

         w_array.append(str(w[i, 0]))

     f.write("\t".join(w_array) + "\n")

     # 3、保存交叉项的权重

     m1 , n1 = np.shape(v)

     for i in range(m1):

         v_tmp = []

         for j in range(n1):

             v_tmp.append(str(v[i, j]))

         f.write("\t".join(v_tmp) + "\n")

     f.close()

 if __name__ == "__main__":

     # 1、导入训练数据

     print ("---------- 1.load data ---------")

     dataTrain, labelTrain = loadDataSet("data_1.txt")

     print( "---------- 2.learning ---------")

     # 2、利用随机梯度训练FM模型

     w0, w, v = stocGradAscent(np.mat(dataTrain), labelTrain, 3, 10000, 0.01)

     predict_result = getPrediction(np.mat(dataTrain), w0, w, v)  # 得到训练的准确性

     print( "----------training accuracy: %f" % (1 - getAccuracy(predict_result, labelTrain)))

     print ("---------- 3.save result ---------")

     # 3、保存训练好的FM模型

     save_model("weights", w0, w, v)
最终训练过程为:
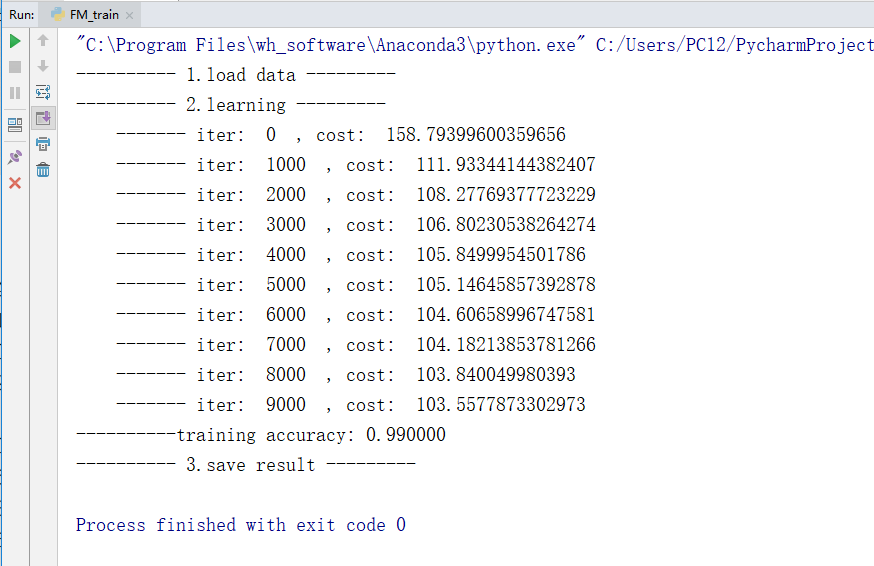
训练的过程比较慢,我用来将近有一分半
得到的权值文件为:
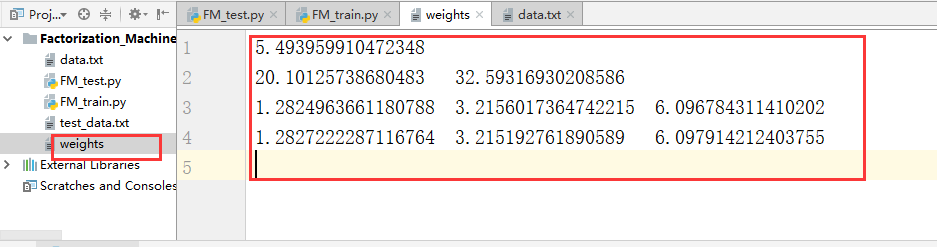
最终分隔得到的超平面为:
2、对新的数据进行预测:
预测的全部代码为:
 # -*- coding: UTF-8 -*-

 # date:2018/6/6

 # User:WangHong

 import numpy as np

 from FM_train import getPrediction

 def loadDataSet(data):

     '''导入测试数据集

     input:  data(string)测试数据

     output: dataMat(list)特征

     '''

     dataMat = []

     fr = open(data)  # 打开文件

     for line in fr.readlines():

         lines = line.strip().split("\t")

         lineArr = []

         for i in range(len(lines)):

             lineArr.append(float(lines[i]))

         dataMat.append(lineArr)

     fr.close()

     return dataMat

 def loadModel(model_file):

     '''导入FM模型

     input:  model_file(string)FM模型

     output: w0, np.mat(w).T, np.mat(v)FM模型的参数

     '''

     f = open(model_file)

     line_index = 0

     w0 = 0.0

     w = []

     v = []

     for line in f.readlines():

         lines = line.strip().split("\t")

         if line_index == 0:  # w0

             w0 = float(lines[0].strip())

         elif line_index == 1:  # w

             for x in lines:

                 w.append(float(x.strip()))

         else:

             v_tmp = []

             for x in lines:

                 v_tmp.append(float(x.strip()))

             v.append(v_tmp)

         line_index += 1

     f.close()

     return w0, np.mat(w).T, np.mat(v)

 def save_result(file_name, result):

     '''保存最终的预测结果

     input:  file_name(string)需要保存的文件名

             result(mat):对测试数据的预测结果

     '''

     f = open(file_name, "w")

     f.write("\n".join(str(x) for x in result))

     f.close()

 if __name__ == "__main__":

     # 1、导入测试数据

     dataTest = loadDataSet("test_data.txt")

     # 2、导入FM模型

     w0, w , v = loadModel("weights")

     # 3、预测

     result = getPrediction(dataTest, w0, w, v)

     # 4、保存最终的预测结果

     save_result("predict_result", result)
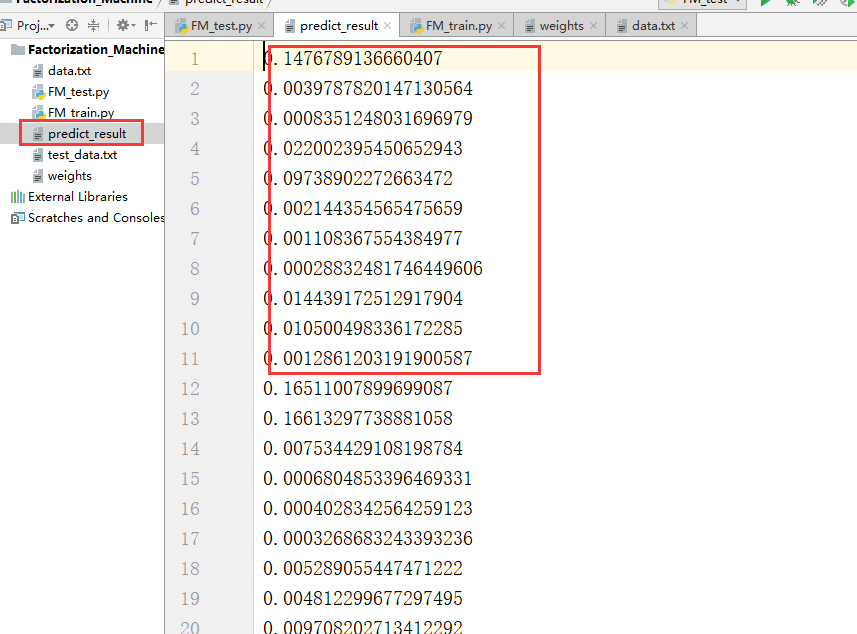
最终测试结果得到一个predict_result.txt文件
3.2、Factorization Machine实践的更多相关文章
- Factorization Machine因子分解机
隐因子分解机Factorization Machine[http://www. w2bc. com/article/113916] https://my.oschina.net/keyven/blog ...
- Factorization Machine
Factorization Machine Model 如果仅考虑两个样本间的交互, 则factorization machine的公式为: $\hat{y}(\mathbf{x}):=w_0 + \ ...
- 3.1、Factorization Machine模型
Factorization Machine模型 在Logistics Regression算法的模型中使用的是特征的线性组合,最终得到的分隔超平面属于线性模型,其只能处理线性可分的二分类问题,现实生活 ...
- Factorization Machine算法
参考: http://stackbox.cn/2018-12-factorization-machine/ https://baijiahao.baidu.com/s?id=1641085157432 ...
- AI Factorization Machine(FM)算法
FM算法 参考链接: https://www.csie.ntu.edu.tw/~b97053/paper/Rendle2010FM.pdf
- CTR预估算法之FM, FFM, DeepFM及实践
https://blog.csdn.net/john_xyz/article/details/78933253 目录目录CTR预估综述Factorization Machines(FM)算法原理代码实 ...
- 深入理解FFM原理与实践
原文:http://tech.meituan.com/deep-understanding-of-ffm-principles-and-practices.html 深入理解FFM原理与实践 del2 ...
- zz深度学习在美团配送 ETA 预估中的探索与实践
深度学习在美团配送 ETA 预估中的探索与实践 比前一版本有改进: 基泽 周越 显杰 阅读数:32952019 年 4 月 20 日 1. 背景 ETA(Estimated Time of A ...
- 个性化排序算法实践(二)——FFM算法
场感知分解机(Field-aware Factorization Machine ,简称FFM)在FM的基础上进一步改进,在模型中引入类别的概念,即field.将同一个field的特征单独进行one- ...
随机推荐
- 各种异常 及异常类和Object类 Math类
Day05 异常 Object类 equals方法,用于比较两个对象是否相同,它其实就是使用两个对象的内存地址在比较.Object类中的equals方法内部使用的就是==比较运算符. 2. 描述人这个 ...
- Redis只作为缓存,不做持久化的配置
#1.配置缓存内存限制和清理策略 #作为缓存服务器,如果不加以限制内存的话,就很有可能出现将整台服务器内存都耗光的情况,可以在redis的配置文件里面设置: #example: # 限定最多使用1.5 ...
- sql2008 安装提示重启失败
[转] https://www.cnblogs.com/chenshaogang/p/4313022.html
- CNN和GAN 比较nice的介绍
CNN是个什么鬼:https://www.zhihu.com/question/52668301 就是这样GAN : https://zhuanlan.zhihu.com/p/27199954
- NHibernate获取实体配置信息(表名,列名等等)
// 注意这里有个&符号,并不是写错了,而是约定 就是这样写的ctx.GetObject("&SessionFactory") 这是官网地址http://nhfor ...
- 重定向和请求转发后面加“return;”语句
请求转发 RequestDispatcher 重定向 Redirect 代码的执行: 无论是 request.getRequestDispatcher(path).forward(reque ...
- Perl 学习笔记-文件测试
1.文件测试操作符 针对文件和目录的测试操作符: -r/-w/-x/-o: 文件或目录, 对有效的(负责运行这个程序的)用户或组来说是可读/写/执行/拥有 的; 这些测试位会查看文件的权限位, 以此判 ...
- 关于利用word发布文章到博客
目前大部分的博客作者在写博客这件事情上都会遇到以下3个痛点:1.所有博客平台关闭了文档发布接口,用户无法使用Word,Windows Live Writer等工具来发布博客.2.发布到博客或公众号平台 ...
- 编写高质量代码改善C#程序的157个建议——建议106:为静态类添加静态构造函数
建议106:为静态类添加静态构造函数 静态类可以拥有构造方法,这就是静态构造方法.静态构造方法与实例构造方法比较有几个自己的特点: 只被执行一次,且在第一次调用类成员之前被运行时执行. 代码无法调用它 ...
- makeword()
MAKEWORD(学习之用,转载) MAKEWORD 宏 平台:SDK 这个宏创建一个被指定变量连接而成的WORD变量.返回一个WORD变量. (注:typedef unsigned short WO ...