React Native常用组件之TabBarIOS、TabBarIOS.Item组件、Navigator组件、NavigatorIOS组件、React Navigation第三方
以下内容为老版本React Native,faceBook已经有了新的导航组件,请移步其他博客参考>>【我是传送门】
参考资料:React Navigation
react-native-tab-navigator的使用传送门
TabBarIOS部分
在目前市面上的APP中,大部分都是选项与选项之间的切换,比如:微信、微博、QQ空间......, 在iOS中,我们可以通过TabItem类进行实现。那么,在React Native中,我们应该怎么实现呢?

在React Native中可以通过TabBarIOS和TabBarIOS.Item组件来实现选项卡切换效果,大家可以看到后面带有IOS,所以这个组件是不支持Android的,当然后面我们可以自定义该组件。
一、TabBarIOS常见的属性
View的所有属性都可以被继承
barTintColor color 设置tab条的背景颜色
tintColor color 设置tab条上被选中图标的颜色
translucent bool 设置Tab栏是不是半透明的效果
二、TabBarIOS.Item常见的属性
badge number
在图标的右上方显示小红色气泡,显示信息
icon Image.propTypes.source
Tab按钮自定义的图标,如果systemicon属性被定义了,那么该属性会被忽略
onPress function
当Tab按钮被选中的时候进行回调,你可以设置selected={true}来设置组件被选中
selected bool
该属性标志子页面是否可见,如果是一个空白的内容页面,那么一定是忘记了选中任何的一个页面标签Tab
selectedIcon Image.propTypes.source
设置当Tab按钮被选中的时候显示的自定义图标,如果systemIcon属性被设置了,那么该属性会被忽略。如果定义了icon属性,但是当前的selectedIcon属性没有设置,那么该图标会被设置成蓝色
style 设置样式风格,继承View的样式各种风格
systemIcon
enum('bookmarks','contacts','downloads','favorites','featured','history','more','most-recent','most-viewed','recents','search','top-rated')
系统预定义的图标,如果你使用这些图标,那么你上面设置的标题,选中的图标都会被这些系统图标所覆盖。
title string
在Tab按钮图标下面显示的标题信息,如果你设置了SystemIcon属性,那么该属性会被忽略
三、TabBarIOS.Item案例展示
代码展示:
/**

 * Sample React Native App

 * https://github.com/facebook/react-native

 * @flow

 */

import React, { Component } from 'react';

import {

  AppRegistry,

  StyleSheet,

  Text,

  View,

  Image,

  TabBarIOS

} from 'react-native';

var Car = require('./Car.json');

export default class FListViewDemo1 extends Component{

  constructor(props){

    super(props);

    this.state = {

      selectedTabBarItem:'home'

    };

  }

  render(){

    return(

      <View style={styles.container}>

        <View style={styles.headerViewStyle}>

           <Text style={{color:'white'}}>Tab选项卡切换</Text>

        </View>

        <TabBarIOS barTintColor='white'>

            <TabBarIOS.Item systemIcon="contacts"

                            badge="3"

                            // title="张三"

                            selected={this.state.selectedTabBarItem == 'home'}

                            onPress ={()=>{this.setState({selectedTabBarItem:'home'})}}

            >

              <View style={[styles.commentViewStyle,{backgroundColor:'red'}]}>

                  <Text>首页</Text>

              </View>

            </TabBarIOS.Item>

            <TabBarIOS.Item systemIcon="bookmarks"

                            // title="李四"

                            selected={this.state.selectedTabBarItem == 'second'}

                            onPress ={()=>{this.setState({selectedTabBarItem:'second'})}}

            >

                <View style={[styles.commentViewStyle,{backgroundColor:'green'}]}>

                    <Text>第二页</Text>

                </View>

            </TabBarIOS.Item>

            <TabBarIOS.Item systemIcon="contacts"

                            // title="王二"

                            selected={this.state.selectedTabBarItem == 'third'}

                            onPress ={()=>{this.setState({selectedTabBarItem:'third'})}}

            >

              <View style={[styles.commentViewStyle,{backgroundColor:'blue'}]}>

                  <Text>第三页</Text>

              </View>

            </TabBarIOS.Item>

            <TabBarIOS.Item systemIcon="contacts"

                            // title ="麻子"

                            selected={this.state.selectedTabBarItem == 'four'}

                            onPress ={()=>{this.setState({selectedTabBarItem:'four'})}}

            >

              <View style={[styles.commentViewStyle,{backgroundColor:'purple'}]}>

                  <Text>第四页</Text>

              </View>

            </TabBarIOS.Item>

        </TabBarIOS>

      </View>

    );

  }

}

const styles = StyleSheet.create({

  headerViewStyle:{

    height:64,

    backgroundColor:'black',

    justifyContent:'center',

    alignItems:'center'

  },

  commentViewStyle:{

    flex:1,

    alignItems:'center',

    justifyContent:'center'

  },

  container:{

    flex:1,

    backgroundColor:'#f5fcff'

  }

});
提示:在TabBarIOS.Item中,如果设置了systemIcon,再去设置title将不会起作用。
Navigator部分
在开发中,我们需要实现多个界面的切换,这时候就需要一个导航控制器来进行各种效果的切换。那么,在React Native中有两个组件能够实现这样的效果:Navigator和NavigatorIOS。
其中Navigator是适配Android和iOS,而NavigatorIOS则是包装了UIKit的导航功能,可以使用左划功能来返回到上一界面。

提示:报错:'Navigator is deprecated and has been removed from this package. It can now be installed ' +
'and imported from `react-native-deprecated-custom-components` instead of `react-native`. ' +
'Learn about alternative navigation solutions at http://facebook.github.io/react-native/docs/navigation.html'
这是因为版本升级到0.43以上的话,Navigator不能直接从react-native里面获取了,
解决方案:
npm install react-native-deprecated-custom-components --save
然后在引用的地方
import {Navigator} from 'react-native-deprecated-custom-components'
一、Navigator
很多时候,我们需要导航器来应对不同场景(页面)间的切换。它通过路由对象来分辨不同的场景,我们这里采用的就是 renderScene 方法,根据指定的路由来渲染。
1.1 常用的属性
initialRoute ={{ name: 'home', component: HomeScene }}
这个指定了默认的页面,也就是启动的组件页面
configureScene ={() => {
return Navigator. SceneConfigs .HorizontalSwipeJump;
}}
页面之间跳转时候的动画手势,可以看这个目录:node_modules/react-native/Libraries/CustomComponents/Navigator/NavigatorSceneConfigs.js(可以看其他跳转的时候的方向),比如:PushFromRight FloatFromRight FloatFromLeft FloatFromBottom FloatFromBottomAndroid FadeAndroid HorizontalSwipeJump HorizontalSwipeJumpFromRight VerticalUpSwipeJump VerticalDownSwipeJump等等。
renderScene
具体是方法如下:(route, navigator) =><MySceneComponent title={route.title} navigator={navigator} />
两个参数中的route包含的是initial的时候传递的name和component,而navigator是一个我们需要用的Navigator的对象;
所以当我们拿到route中的component的时候,我们就可以将navigator传递给它,正因为如此,我们的组件HomeScene才可以通过 this.props.navigator,拿到路由。
initialRouteStack [object] 参数对象数组
这是一个初始化的路由数组进行初始化。如果initalRoute属性没有设置的话,那么就必须设置initialRouteStack属性,使用该最后一项作为初始路由。 如果initalRouteStack属性没有设置的话,该会生成只包含initalRoute值的数组
navigationBar node
该为可选的参数,在页面切换中用来提供一个导航栏
navigator object
该为可选参数,可以从父类导航器中获取导航器对象
sceneStyle 样式风格
该继承了View视图的所有样式风格,用于设置每个页面容器的风格
1.2 常用的导航器方法
当获取了导航器对象的引用,我们可以进行调用以下一些方法来实现页面导航功能:
getCurrentRoutes() 该进行返回存在的路由列表信息
jumpBack() 该进行回退操作 但是该不会卸载(删除)当前的页面
jumpForward() 进行跳转到相当于当前页面的下一个页面
jumpTo(route) 根据传入的一个路由信息,跳转到一个指定的页面(该页面不会卸载删除)
push(route) 导航切换到一个新的页面中,新的页面进行压入栈。通过jumpForward()方法可以回退过去
pop() 当前页面弹出来,跳转到栈中下一个页面,并且卸载删除掉当前的页面
replace(route) 只用传入的路由的指定页面进行替换掉当前的页面
replaceAtIndex(route,index) 传入路由以及位置索引,使用该路由指定的页面跳转到指定位置的页面
replacePrevious(route) 传入路由,通过指定路由的页面替换掉前一个页面
resetTo(route) 进行导航到新的界面,并且重置整个路由栈
immediatelyResetRouteStack(routeStack) 该通过一个路由页面数组来进行重置路由栈
popToRoute(route) 进行弹出相关页面,跳转到指定路由的页面,弹出来的页面会被卸载删除
popToTop() 进行弹出页面,导航到栈中的第一个页面,弹出来的所有页面会被卸载删除
1.3 默认写法
<Navigator

    initialRoute={{ name: defaultName, component: defaultComponent }}

    configureScene={(route) => {

        return Navigator.SceneConfigs.HorizontalSwipeJumpFromRight;

    }}

    renderScene={(route, navigator) => {

        let Component = route.component;

        return <Component {...route.props} navigator={navigator} />

    }}

/>
二、Navigator.IOS
NavigatorIOS包装了UIKit的导航功能,可以使用左划功能来返回到上一界面。
2.1 常用的导航器方法
push(route)
导航器跳转到一个新的路由。
pop()
回到上一页。
popN(n)
回到N页之前。当N=1的时候,效果和 pop() 一样。
replace(route)
替换当前页的路由,并立即加载新路由的视图。
replacePrevious(route)
替换上一页的路由/视图。
replacePreviousAndPop(route)
替换上一页的路由/视图并且立刻切换回上一页。
resetTo(route)
替换最顶级的路由并且回到它。
popToRoute(route)
一直回到某个指定的路由。
popToTop()
回到最顶层的路由。
2.2 常用的属性
barTintColor string
导航条的背景颜色。
initialRoute {
component: function, // 路由到对应的版块
title: string, // 标题
passProps: object, // 传递的参数
backButtonIcon: Image.propTypes.source, // 返回按钮
backButtonTitle: string, // 返回按钮标题
leftButtonIcon:Image.propTypes.source,
leftButtonTitle: string,
onLeftButtonPress: function,
rightButtonIcon: Image.propTypes.source,
rightButtonTitle: string,
onRightButtonPress: function,
wrapperStyle: [object Object]
}
NavigatorIOS使用"路由"对象来包含要渲染的子视图、它们的属性、以及导航条配置。"push"和任何其它的导航函数的参数都是这样的路由对象。
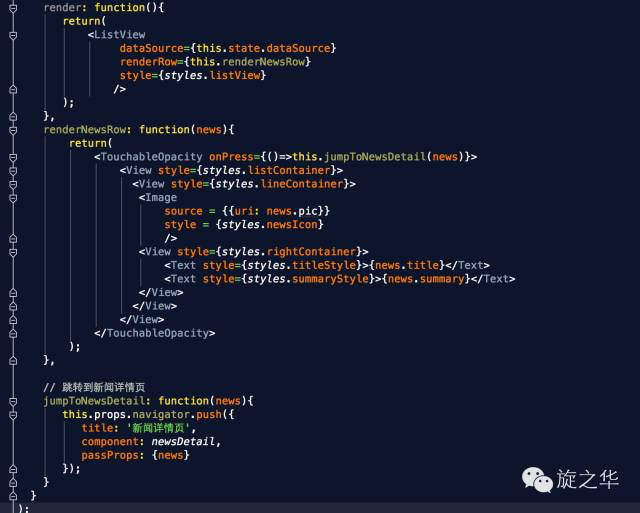
比如:下面新闻列表跳转到新闻详情页详情页:

itemWrapperStyle View#style
导航器中的组件的默认属性。一个常见的用途是设置所有页面的背景颜色。
navigationBarHidden bool
一个布尔值,决定导航栏是否隐藏。
shadowHidden bool
一个布尔值,决定是否要隐藏1像素的阴影。
tintColor string
导航栏上按钮的颜色。
titleTextColor string
导航器标题的文字颜色。
translucent bool
一个布尔值,决定是否导航条是半透明的。
三、综合小案例
3.1 部分核心代码

React Navigation部分
React Navigation 源于 React Native 社区对一个可扩展且易于使用的导航解决方案的需求,它完全使用 JavaScript 编写(因此你可以阅读并理解所有源码)。
安装
在你的 React Native 项目中安装react-navigation这个包
yarn add react-navigation

# or with npm

# npm install --save react-navigation
然后,安装 react-native-gesture-handler。 如果你使用 Expo,就什么都不需要做,他已经包含在 SDK 中 了, 否则:
yarn add react-native-gesture-handler

# or with npm

# npm install --save react-native-gesture-handler
Link 所有的原生依赖
react-native link react-native-gesture-handler
使用指南
官方文档:https://reactnavigation.org/docs/zh-Hans/getting-started.html
实例代码:
// In App.js in a new project

import React,{Component} from "react";

import {

  View,

  Text,

  Button,

  Image

} from "react-native";

import { createStackNavigator, createAppContainer } from "react-navigation";

//使用自定义组件替换标题

class LogoTitle extends Component{

  render(){

    return(

      <Image

        source={require('./img/img_02.png')}

        style={{width:30,height:30}}

      />

    );

  }

}

class ThreeScreen extends Component{

  static navigationOptions ={

    title:'ThreeScreen'

  };

  render(){

    return(

      <View style={{flex:1,alignItems:'center',justifyContent:'center'}}>

        <Text>ThressScreen</Text>

      </View>

    );

  }

}

class DetailsScreen extends Component{

  static navigationOptions=({navigation})=>{

    return{

      title:navigation.getParam('otherParam','A Nested Details Screen')

    };

  };

  render(){

    const {navigation} = this.props;

    const itemId = navigation.getParam('itemId','NO-ID');

    const otherParam = navigation.getParam('otherParam','some default value');

    return(

      <View style={{flex:1,alignItems:'center',justifyContent:'center'}}>

        <Text>DetailsScreen</Text>

        <Text>itemId:{JSON.stringify(itemId)}</Text>

        <Text>otherParam:{JSON.stringify(otherParam)}</Text>

        <Button

          title="Go to Details... again"

          onPress={()=>this.props.navigation.navigate('Three',{

              itemId:Math.floor(Math.random()*100)

            })

          }

        />

        <Button

          title="Update the title"

          onPress={()=>this.props.navigation.setParams({otherParam:'Update!'})}

        />

      </View>

    );

  }

}

class HomeScreen extends Component {

  static navigationOptions={

    headerTitle:<LogoTitle/>,

    headerRight:(

      <Button

        onPress={()=>alert('this is a button!')}

        title = "info"

        color ="#fff"

      />

    ),

  };

  render() {

    return (

       <View style={{ flex: 1, alignItems: "center", justifyContent: "center" }}>

        <Text>Home Screen</Text>

        <Button

          title="Go to Details"

          onPress={()=>{this.props.navigation.navigate('Details',{

            itemId:86,

            otherParam:'anything you want here'

          });

        }}

        />

      </View>

    );

  }

}

const AppNavigator = createStackNavigator(

  {

    Home:HomeScreen,

    Details:DetailsScreen,

    Three:ThreeScreen

  },

  {

    initialRouteName:"Home",

    defaultNavigationOptions:{

      headerStyle:{

        backgroundColor:'#fdd000'

      },

      headerTintColor:'#fff',

      headerTitleStyle:{

        fontWeight:'bold'

      }

    }

  }

);

export default createAppContainer(AppNavigator);
import React,{Component} from 'react';

import { Text, View,Button,AppRegistry,StyleSheet,Image} from 'react-native';

import Ionicons from 'react-native-vector-icons/Ionicons';

import {

  createBottomTabNavigator,

  createStackNavigator,

  createAppContainer,

} from 'react-navigation';

class FiveScreen extends Component{

  static navigationOptions={

    title:'FiveScreen',

    headerBackTitle:null

  };

  render() {

    return (

      <View style={{ flex: 1, justifyContent: 'center', alignItems: 'center' }}>

        <Text>FiveScreen!</Text>

      </View>

    );

  }

}

class FourScreen extends Component{

  static navigationOptions={

    title:'FourScreen',

    headerBackTitle:null

  };

  render() {

    return (

      <View style={{ flex: 1, justifyContent: 'center', alignItems: 'center' }}>

        <Text>FourScreen!</Text>

      </View>

    );

  }

}

class DetailsScreen extends React.Component {

  static navigationOptions={

    title:'DetailsScreen',

    headerBackTitle:null

  };

  render() {

    return (

      <View style={{ flex: 1, justifyContent: 'center', alignItems: 'center' }}>

        <Text>Details!</Text>

        <Button

          title = "Go to FourScreen"

          onPress={()=>this.props.navigation.navigate('Four')}

        />

      </View>

    );

  }

}

class HomeScreen extends React.Component {

  static navigationOptions={

    title:'HomeScreen',

    headerBackTitle:null,

    headerRight:(

      <Button

        title = "info"

        color = 'black'

        onPress = {()=>this.props.navigation.navigate('Five')}

      />

    )

  };

  render() {

    return (

      <View style={{ flex: 1, justifyContent: 'center', alignItems: 'center' }}>

        {/* other code from before here */}

        <Button

          title="Go to Details"

          onPress={() => this.props.navigation.navigate('Details')}

        />

      </View>

    );

  }

}

class SettingsScreen extends React.Component {

  static navigationOptions = {

    headerBackTitle:null,

    title:'SettingsScreen'

  };

  render() {

    return (

      <View style={{ flex: 1, justifyContent: 'center', alignItems: 'center' }}>

        {/* other code from before here */}

        <Button

          title="Go to Details"

          onPress={() => this.props.navigation.navigate('Details')}

        />

      </View>

    );

  }

}

const HomeStack = createStackNavigator(

  {

    Home: HomeScreen,

    Details: DetailsScreen,

    Four:FourScreen,

    Five:FiveScreen

  },

  {

    defaultNavigationOptions:{

      headerStyle:{

        backgroundColor:'#fdd000',

      },

      headerTintColor:'#fff',

      headerTitleColor:{

        fontWeight:'bold'

      }

    }

  }

);

const SettingsStack = createStackNavigator(

  {

    Settings:{

      screen:SettingsScreen,

    } ,

    Details: DetailsScreen,

  },

  {

    defaultNavigationOptions:{

      headerStyle:{

        backgroundColor:'#fdd000',

      },

      headerTintColor:'#fff',

      headerTitleColor:{

        fontWeight:'bold'

      }

    }

  }

);

HomeStack.navigationOptions = ({ navigation }) => {

  let tabBarVisible = true;

  if (navigation.state.index > 0) {

    tabBarVisible = false;

  }

  return {

    tabBarVisible,

  };

};

SettingsStack.navigationOptions = ({ navigation }) => {

  let tabBarVisible = true;

  if (navigation.state.index > 0) {

    tabBarVisible = false;

  }

  return {

    tabBarVisible,

  };

};

export default createAppContainer(createBottomTabNavigator(

  {

    Home: {

      screen:HomeStack,

      navigationOptions: {

          tabBarLabel: '首页', // tabBar显示的文字

          tabBarIcon: ({tintColor}) => ( // tabBar显示的图标

              // 这里使用了react-native-vector-icons, 不熟悉的请看上方连接

              <Ionicons

                  name={'ios-add'}

                  size={30}

                  color={tintColor}

              />

          )

        }

    },

    Settings: {

      screen:SettingsStack,

      navigationOptions: {

          tabBarLabel: '设置', // tabBar显示的文字

          tabBarIcon: ({tintColor}) => ( // tabBar显示的图标

              // 这里使用了react-native-vector-icons, 不熟悉的请看上方连接

              <Ionicons

                  name={'ios-close'}

                  size={30}

                  color={tintColor}

              />

          )

        }

    },

  },

  {

    tabBarOptions: {

      activeTintColor: '#fdd000',

    }

  }

));

const styles = StyleSheet.create({

   tabBarIconStyle: {

      width: 30,

      height: 30,

   },

});
React Native常用组件之TabBarIOS、TabBarIOS.Item组件、Navigator组件、NavigatorIOS组件、React Navigation第三方的更多相关文章
- React Native常用组件在Android和IOS上的不同
React Native常用组件在Android和IOS上的不同 一.Text组件在两个平台上的不同表现 1.1 height与fontSize 1.1.1只指定font,不指定height 在这种情 ...
- React Native 常用插件案例
(二).基础入门: 1.React Native For Android环境配置以及第一个实例 2.React Native开发IDE安装及配置 3.React Native应用设备运行(Runnin ...
- React Native 常用学习链接地址
Android Studio下载http://www.android-studio.org/ 第二章:Android Studio概述(一)http://ask.android-studio.org/ ...
- [RN] React Native 常用命令行
[RN] React Native 常用命令行 1.查看当前版本 react-native --version 或 react-native -v 2.创建指定版本的React Native项目 1) ...
- 《React Native 精解与实战》书籍连载「iOS 平台与 React Native 混合开发」
此文是我的出版书籍<React Native 精解与实战>连载分享,此书由机械工业出版社出版,书中详解了 React Native 框架底层原理.React Native 组件布局.组件与 ...
- React Native常用组件之ListView组件
学习iOS开发的同学应该都知道UITableView,几乎每个APP中都有它的存在,而且衍生出各种形态:那么同样,ListView就是在React Native中的tableView,而且更加简单和灵 ...
- react native 常用组件汇总
react-native-uploader //文件上传https://github.com/aroth/react-native-uploader jpush-react-native //官方版本 ...
- React Native常用组件之ListView
1. ListView常用属性 ScrollView 相关属性样式全部继承 dataSource ListViewDataSource 设置ListView的数据源 initialListSize n ...
- React Native常用组件之ScrollView
1. 两个要点 1.1 ScrollView必须有一个确定的高度才能正常工作 它实际上所做的就是将一系列不确定高度的子组件装进一个确定高度的容器(通过滚动操作) 通常有两种做法: 第一种: 直接给该S ...
随机推荐
- 性能测试:压测中TPS上不去的几种原因分析(就是思路要说清楚)
转https://www.cnblogs.com/imyalost/p/8309468.html 先来解释下什么叫TPS: TPS(Transaction Per Second):每秒事务数,指服务器 ...
- springcloud 与 dubbo 比较
作者:潜龙勿用链接:https://www.zhihu.com/question/45413135/answer/242224410来源:知乎著作权归作者所有.商业转载请联系作者获得授权,非商业转载请 ...
- python uwsgi 部署以及优化
这篇文章其实两个月之前就应该面世了,但是最近琐事.烦心事太多就一直懒得动笔,拖到现在才写 一.uwsgi.wsgi.fastcgi区别和联系 参见之前的文章 http://www.cnblogs.co ...
- sqlmap注入教程
1.SQLMAP用于Access数据库注入 (1)猜解是否能注入win: python sqlmap.py -u "http://www.stronkin.com/en/CompHonorB ...
- 《从零开始学Swift》学习笔记(Day 57)——Swift编码规范之注释规范:文件注释、文档注释、代码注释、使用地标注释
原创文章,欢迎转载.转载请注明:关东升的博客 前面说到Swift注释的语法有两种:单行注释(//)和多行注释(/*...*/).这里来介绍一下他们的使用规范. 1.文件注释 文件注释就在每一个文件开头 ...
- 禁用chrome默认打印框直接打印
在做web打印的时候 重要弹出一个对话框选择打印机等等, 比较影响操作, 经过一番谷歌终于找到了解决方案 在桌面的chrome 图标 右键 打开属性对话框 在目标 添加 --kiosk-printi ...
- 高德地图 js api 使用
使用高德地图js api 制作网页上的地图应用. 1.先申请一个 开发者用的 key . 2. 在页面中引入高德提供的地图js <script src="http://webapi. ...
- js事件委托和jQuery事件绑定on , off , one , bind , unbind , die
一. 事件委托什么是事件委托?用现实中的理解就是:有100 个学生同时在某天中午收到快递,但这100 个学生不可能同时站在学校门口等,那么都会委托门卫去收取,然后再逐个交给学生.而在jQuery 中, ...
- SpringMVC 之 RESTful 风格的增删改查
1. 视图和视图解析器 视图解析器 请求处理方法执行完成后,最终返回一个ModelAndView对象,对于返回String,View 或 ModelMap 等类型的处理方法, SpringMVC 也会 ...
- python基础之类的特性(property)
一 什么是特性propertyproperty是一种特殊的属性,访问它时会执行一段功能(函数)然后返回值. import math class Circle: def __init__(self,ra ...