vue 不完美的多标签页解决方案
背景
多标签页多用在中后台管理系统,能够让用户同时打开多个标签页,而且不会丢失之前填写的内容,操作起来会比较方便。虽然部分开源项目有多标签页的功能,但就体验来看,算不上特别好。
目标
- 可以通过router.push实现打开标签页
- 同一路由组件可以多开并且数据能够缓存下来
- 不需要处理是否缓存导致的生命周期不一致的问题
- 多标签页可以关闭,同时KeepAlive中的缓存清除
存在的问题
要实现多标签页的缓存,最简单的方法就是用RouterView配合KeepAlive。
<RouterView v-slot="{ Component }">

  <KeepAlive>

    <component :is="Component" />

  </KeepAlive>

</RouterView>
然而,这个方案存在几个问题:
- 不能重复打开同一个路由,而是原有的组件被激活
- 组件生命周期发生变化
不能重复打开路由
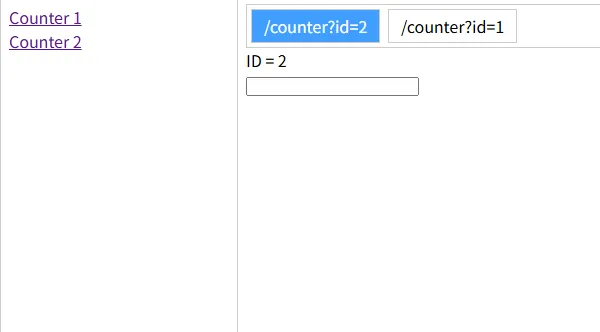
如果给路由添加参数,打开第一次没有任何问题,但如果换另一个参数打开,还会是之前的页面,因为组件被缓存下来了。
例如:
新增一个路由 counter,在页面上添加RouterLink,并使用不同的参数
<template>

  <header>

    <img alt="Vue logo" class="logo" src="@/assets/logo.svg" width="125" height="125" />

    <div class="wrapper">

      <HelloWorld msg="You did it!" />

      <nav>

        <RouterLink to="/home">Home</RouterLink>

        <RouterLink to="/about">About</RouterLink>

        <RouterLink to="/counter?id=1">Counter 1</RouterLink>

        <RouterLink to="/counter?id=2">Counter 2</RouterLink>

      </nav>

    </div>

  </header>

<RouterView v-slot="{ Component }">

  <KeepAlive>

    <component :is="Component" />

  </KeepAlive>

</RouterView>

</template>
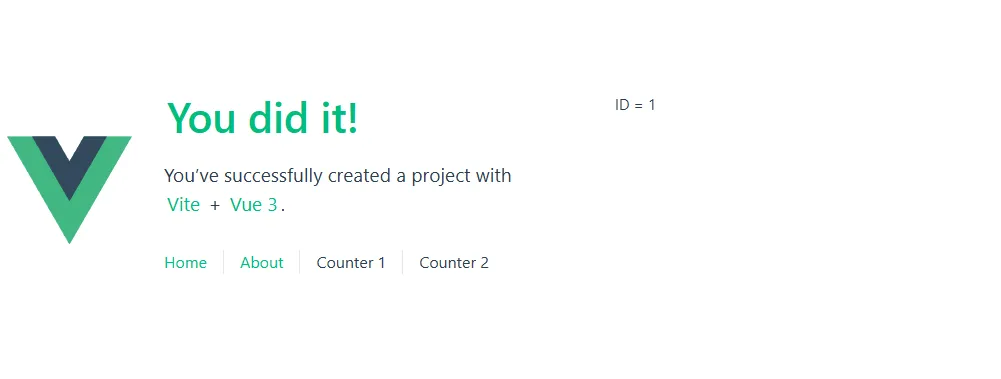
然后再Counter组件中获取id参数,分别点击Counter 1和Counter 2,会发现点击Counter 1时获取到的id是1,点击Counter 2时却没有任何变化,而且两个RouterLink同时是激活状态。
组件生命周期变化
和上一个问题有所关联,因为组件没有重新加载,在需要重新获取数据时,KeepAlive改变了组件的生命周期,添加了onActivated和onDeactivated生命周期。
添加一个组件测试生命周期:
<template>

  <div class="about">

    <h1>This is an about page</h1>

  </div>

</template>

<script setup>

import { onMounted, onUpdated, onUnmounted, onBeforeMount, onBeforeUpdate, onBeforeUnmount, onActivated, onDeactivated } from 'vue'

onMounted(() => { console.log("onMounted") })

onUpdated(() => { console.log("onUpdated") })

onUnmounted(() => { console.log("onUnmounted") })

onBeforeMount(() => { console.log("onBeforeMount") })

onBeforeUpdate(() => { console.log("onBeforeUpdate") })

onBeforeUnmount(() => { console.log("onBeforeUnmount") })

onActivated(() => { console.log("onActivated") })

onDeactivated(() => { console.log("onDeactivated") })

</script>

<style>

@media (min-width: 1024px) {

  .about {

    min-height: 100vh;

    display: flex;

    align-items: center;

  }

}

</style>
再修改App.vue
<template>

  <header>

    <img alt="Vue logo" class="logo" src="@/assets/logo.svg" width="125" height="125" />

    <div class="wrapper">

      <HelloWorld msg="You did it!" />

      <nav>

        <RouterLink to="/home">Home</RouterLink>

        <RouterLink to="/about">About</RouterLink>

        <RouterLink to="/counter?id=1">Counter 1</RouterLink>

        <RouterLink to="/counter?id=2">Counter 2</RouterLink>

      </nav>

    </div>

  </header>

  <RouterView v-slot="{ Component }">

    <!-- <KeepAlive> -->

      <component :is="Component" />

    <!-- </KeepAlive> -->

  </RouterView>

</template>

<script setup>

import { watch } from 'vue'

import { RouterLink, RouterView, useRoute } from 'vue-router'

import HelloWorld from './components/HelloWorld.vue'

const route = useRoute()

watch(route, () => {

  console.log("页面切换", route.fullPath)

})

</script>
先从Home切换到About再切换回Home再切换回About。
查看在不使用KeepAlive切换页面时候的输出,onBeforeMount -> onMounted -> onBeforeUnmount -> onUnMounted 循环
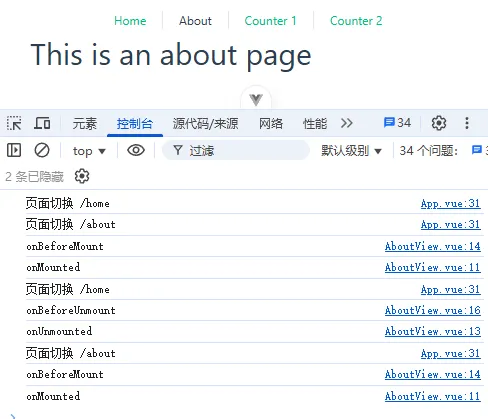
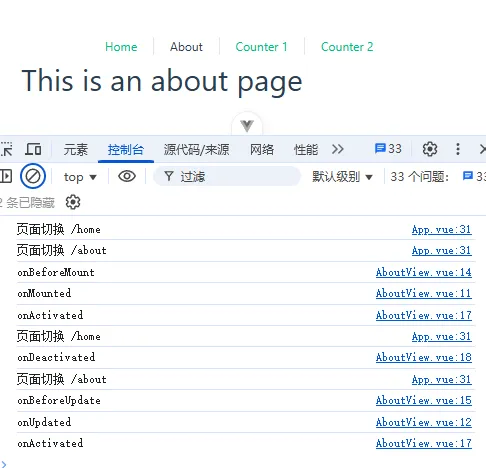
使用KeepAlive的情况,情况就复杂很多,每次切换到页面时会激活onActivated钩子,正常情况下可以通过onActivated钩子获取路由参数,重新获取数据。
问题在于:如果组件可以在缓存与不缓存中切换,在获取数据时,需要考虑是写在onMounted里还是onActivated里,写在onMounted中时如果组件会被服用,需要处理路由参数变化重新获取数据;写在onActivated里,需要考虑组件不缓存了钩子函数不会被调用的情况。
解决方案
重复打开组件 & 生命周期变化
这个问题很好解决,只需要给KeepAlive中的component加上不同的key就可以实现,key可以通过router.fullPath来计算,这样KeepAlive中就可以缓存同一个组件多次。
<RouterView v-slot="{ Component, route }">

  <KeepAlive>

    <component :is="Component" :key="route.fullPath" />

  </KeepAlive>

</RouterView>
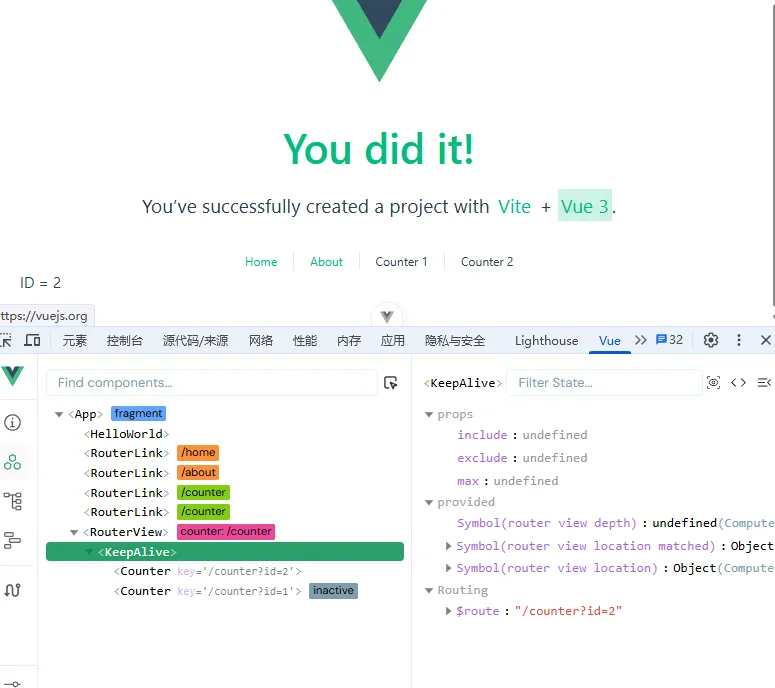
同时,修改下Counter组件,查看生命周期
<template>

    <div> ID = {{ id }}</div>

</template>

<script setup>

import { useRoute } from 'vue-router'

import { onMounted, onUpdated, onUnmounted, onBeforeMount, onBeforeUpdate, onBeforeUnmount, onActivated, onDeactivated } from 'vue'

const route = useRoute()

const id = route.query.id

onMounted(() => { console.log(route.fullPath, "onMounted") })

onUpdated(() => { console.log(route.fullPath, "onUpdated") })

onUnmounted(() => { console.log(route.fullPath, "onUnmounted") })

onBeforeMount(() => { console.log(route.fullPath, "onBeforeMount") })

onBeforeUpdate(() => { console.log(route.fullPath, "onBeforeUpdate") })

onBeforeUnmount(() => { console.log(route.fullPath, "onBeforeUnmount") })

onActivated(() => { console.log(route.fullPath, "onActivated") })

onDeactivated(() => { console.log(route.fullPath, "onDeactivated") })

</script>
会发现,虽然是同一个组件,但生命周期也独立了,也就不需要考虑路由参数变化时重新获取数据,只需要在onMounted时获取一次数据就可以了。

关闭标签页
上面的问题好像一下就解决了,但第三个目标没有实现,这也是最难的一个问题。
KeepAlive可以通过给component添加不同的key达到路由多开的效果,但是却不能用key删除,KeepAlive只能通过exclude参数使用组件名称删除缓存。
这下问题麻烦了,虽然使用不同的key多开了路由,但路由的组件名称是相同的,也就是说,就算能多开了,关闭却只能全部关闭,这种是不行的。
思索后,想到了下面的方案:
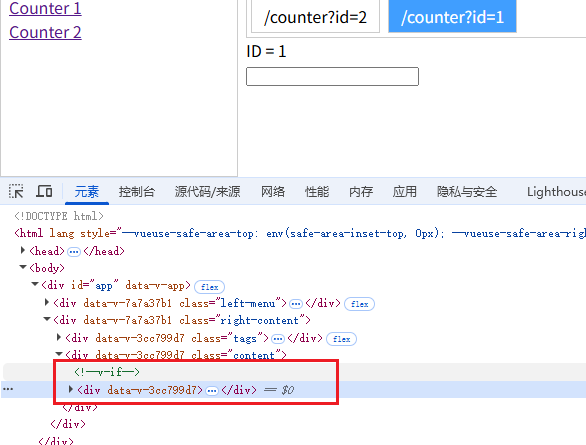
不使用KeepAlive,通过监听route,变化后就向list中添加达到打开标签页的功能,渲染list中的所有组件,然后为了让组件数据缓存下来,不能使用v-if而是使用v-show来隐藏组件。
验证方案
监听route,将访问过的路由都保存下来作为打开过的标签页,当前route作为激活的标签页
编写一个TagView组件,替代RouterView+KeepAlive,关闭的时候直接删除tagView就可以
<template>

  <div class="tags">

    <div class="tag" v-for="tagView in tagViews" :class="{ active: tagView.key === currentTagView?.key }"

     @click="router.push(tagView.route)">

      {{ tagView.title }}</div>

  </div>

  <div class="content">

    <template v-for="tagView in tagViews" :key="tagView.key">

      <Component :is="tagView.component" v-show="tagView.key === currentTagView.key" />

    </template>

  </div>

</template>

<script setup>

import { inject, ref, shallowRef, toValue, watch } from 'vue'

import { useRoute, useRouter, viewDepthKey } from 'vue-router'

const route = useRoute()

const router = useRouter()

const tagViews = ref([])

const currentTagView = ref(null)

// 参考了vue官方的RouterView, 是RouterView嵌套的深度

const routerViewDepth = inject(viewDepthKey, 0)

const routeKey = (route) => {

  return route.fullPath

}

const routeTitle = (route) => {

  // 还没有设计title,先用fullPath替代

  return route.fullPath

}

const toTagView = (route) => {

  const depth = toValue(routerViewDepth)

  return {

    title: routeTitle(route),

    key: routeKey(route),

    route: { ...route },

    component: shallowRef(route.matched[depth]?.components['default'])

  }

}

watch(route, () => {

  // 判断是否已存在,存在则不添加

  const key = routeKey(route)

  let tagView = tagViews.value.find(tagView => tagView.key === key)

  if (!tagView) {

    tagView = toTagView(route)

    tagViews.value.push(tagView)

  }

  currentTagView.value = tagView

})

</script>

<style scoped>

.tags {

  gap: 8px;

  padding: 4px;

  display: flex;

  border: 1px solid #ccc;

}

.tag {

  padding: 4px 12px;

  border: 1px solid #ccc;

}

.tag.active {

  color: #fff;

  background-color: #409EFF;

}

</style>
然后在App.vue中使用
<template>

  <div class="left-menu">

    <RouterLink to="/counter?id=1">Counter 1</RouterLink>

    <RouterLink to="/counter?id=2">Counter 2</RouterLink>

  </div>

  <div class="right-content">

    <TagView />

  </div>

</template>

<script setup>

import { watch } from 'vue'

import TagView from './components/TagView.vue'

import { RouterLink, useRoute } from 'vue-router'

const route = useRoute()

watch(route, () => {

  console.log("页面切换", route.fullPath)

})

</script>

<style scoped>

.left-menu {

  display: flex;

  padding: 8px;

  width: 220px;

  border: 1px solid #ccc;

  flex-direction: column;

}

.right-content {

  flex: 1;

  padding: 8px;

}

</style>
样式随便写的,明白意思就好。
可以自由切换标签页,并且填写的内容依然保留。
优点:编写起来很简单
缺点:之前的组件一直保留,打开的页面多了可能会卡
总结:也算一种可行的方案,但要注意页面不能太多
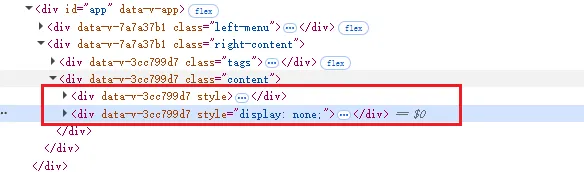
之前的组件只是display: none了
可能是优化
上面其实解决了最大的问题,但是还可以优化一下,可以利用KeepAlive卸载dom并缓存。
基于上面的方案,在Component外面再套一层KeepAlive,然后将v-show改成v-if。
<template>

  <div class="tags">

    <div class="tag" v-for="tagView in tagViews" :class="{ active: tagView.key === currentTagView?.key }"

      @click="router.push(tagView.route)">

      {{ tagView.title }}</div>

  </div>

  <div class="content">

    <template v-for="tagView in tagViews" :key="tagView.key">

      <KeepAlive>

        <Component :is="tagView.component" v-if="tagView.key === currentTagView.key" />

      </KeepAlive>

    </template>

  </div>

</template>
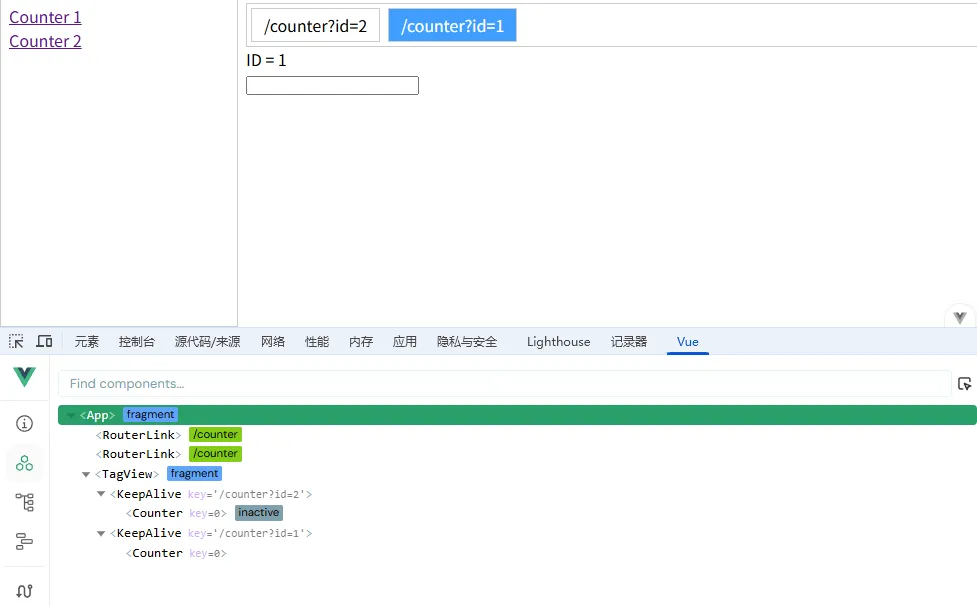
这样就解决了打开页面太多可能会导致的性能问题,但是在DevTool中就会看到很多个KeepAlive了,这也是一种取舍吧。
总结
上面的解决方案并不完美,要么容易影响性能,要么可能会影响开发(多个KeepAlive在DevTool里),要完美的话估计只能自己实现一个KeepAlive了。
vue 不完美的多标签页解决方案的更多相关文章
- 《vue.js实战》练习---标签页组件
html: <!DOCTYPE html> <html lang="en"> <head> <meta charset="UTF ...
- 【vue】vue中实现标签页
前言 tab标签页实现很多, 纯css实现, js实现等, 外加一些特殊动画. vue中实现标签页实现 keep-alive标签和is特性 vue-router中嵌套路由 is特性实现(推荐) 优点: ...
- vue 标签页以及标签页赋值
背景: 使用vue增加了标签页,点击不同标签页传给后端的值不一样,用来做区分,如图: vue代码如下: 使用 form.PageA form.PageB ,后端接收到的值 first.second ...
- vue单页面条件下添加类似浏览器的标签页切换功能
在用vue开发的时候,单页面应用程序,而又有标签页这种需求,各种方式实现不了, 从这个 到这个,然后再返回上面那个 因为每个标签页的route不一样,导致组件重新渲染的问题,怎么都不知道如何实现... ...
- Vue自定义标签页,并且在其中渲染Echarts图表
目录 一.需求说明 二.标签页功能实现 一.需求说明 1.点击标签按钮切换不同的echarts图表,考虑用Ant Design Vue,但是其样式无法自定义 2.div的整体布局样式使用tailwin ...
- 【解决方案】chrome打开新标签页自动打开chrome://newtab并且跳转到谷歌香港
简述天,昨天开始遇到这个问题,还没有留心,结果今天多次使用chrome的时候,就发现有些不对了..打开chrome的新标签页,结果出现了自动跳转的问题我自动跳转的是下面这个网页:https://www ...
- vue中实现后台管理路由标签页
<template> <section> <div class="navTabList el-tabs__nav-scroll" id="t ...
- Element-UI标签页el-tabs组件的拖动排序实现
ElementUI的标签页组件支持动态添加删除,如下图: 但是这个组件不支持标签之间的拖动排序.那么我们自己怎样实现这个功能呢? 有一个叫vuedraggable的组件(https://github. ...
- Web编程基础--HTML、CSS、JavaScript 学习之课程作业“仿360极速浏览器新标签页”
Web编程基础--HTML.CSS.JavaScript 学习之课程作业"仿360极速浏览器新标签页" 背景: 作为一个中专网站建设出身,之前总是做静态的HTML+CSS+DIV没 ...
- Android之ActionBar、Tabs、Fragment、ViewPager实现标签页切换并缓存页面
感觉 Android 到处都是坑,每个地方都要把人折腾半天. 今天来简单说说 Android之ActionBar.Tabs.Fragment.ViewPager 实现标签页切换并缓存页面 关于他们的介 ...
随机推荐
- requirejs的简单使用,requirejs报错Uncaught Error: Mismatched anonymous define() module: …
requirejs的简单使用 define()方法的3个参数: 参数1为模块名称(不填则以当前js的文件名定义一个匿名模块), 参数2为依赖项数组(可不填), 参数3为模块的实现 引入jQuery: ...
- Marmoset Toolbag 4.02 八猴渲染器破解版 免费下载
猴安装包下载链接 https://pan.baidu.com/s/1Mgy3Mrlrb3Tvtc8w7Zn1nA?pwd=6666 提取码:6666 Marmoset Toolbag是由Monkey公 ...
- CentOS 7怎么开放端口
转自:https://www.jb51.net/os/Ubuntu/617627.html 以开放8080端口为例,其他类似 centos7已经开始使用firewall作为防火墙,而不是iptable ...
- 代码随想录第八天| Leecode 344. 反转字符串、Leecode 541 反转字符串 II
Leecode 344 反转字符串 题目链接:https://leetcode.cn/problems/reverse-string/description/ 题目描述 编写一个函数,其作用是将输入的 ...
- 爬虫入门(urllib与requests)
urllib与requests 一.urllib的学习 学习目标 了解urllib的基本使用 1.urllib介绍 除了requests模块可以发送请求之外, urllib模块也可以实现请求的发送,只 ...
- odoo14里面给所有模型添加方法
给所有的model都添加一个方法, 即所有的model都能调用[类似于create.write.unlink.read]. 方式一: from odoo import api, fields, mod ...
- Manim实现图像变形特效
在数学教学和科普领域,变形效果往往能起到事半功倍的作用,让抽象的数学概念变得生动形象. 这篇文章将通过三个典型场景,来看看如何超越默认效果的限制,制作出更专业的变形动画. 1. 几何体的形态跃迁 传统 ...
- centos7系统安装后的基础优化2
1.更改网卡信息 1 2 3 4 5 6 7 8 9 10 11 12 13 14 15 16 17 18 19 20 21 22 23 24 25 26 27 28 29 30 31 32 33 3 ...
- Spring扩展接口-FactoryBean
.markdown-body { line-height: 1.75; font-weight: 400; font-size: 16px; overflow-x: hidden; color: rg ...
- 【语义分割专栏】3:Segnet原理篇
目录 前言 背景介绍 Segnet核心剖析 池化索引(pooling Indices) 其他细节 编码器解码器的对称结构 Segnet模型代码 结语 参考资料 前言 本篇文章收录于语义分割专栏,如果对 ...