
百度编辑器 ueditor .net开发
ueditor1.4.3 下载地址:http://pan.baidu.com/s/1bnCQVtd
<!--editor-->
<script type="text/javascript" charset="utf-8" src="/ueditor/ueditor.config.js"></script>
<script type="text/javascript" charset="utf-8" src="/ueditor/ueditor.all.js"> </script>
<link href="/ueditor/themes/iframe.css" rel="stylesheet" />
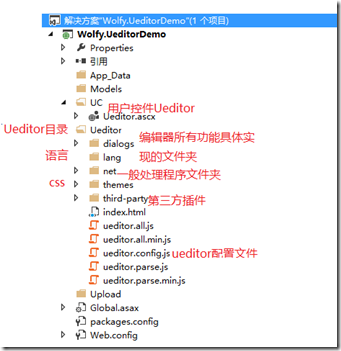
一,修改配置文件ueditor.config.js,配置Ueditor路径
    /**

     * 编辑器资源文件根路径。它所表示的含义是:以编辑器实例化页面为当前路径,指向编辑器资源文件(即dialog等文件夹)的路径。

     * 鉴于很多同学在使用编辑器的时候出现的种种路径问题,此处强烈建议大家使用"相对于网站根目录的相对路径"进行配置。

     * "相对于网站根目录的相对路径"也就是以斜杠开头的形如"/myProject/ueditor/"这样的路径。

     * 如果站点中有多个不在同一层级的页面需要实例化编辑器,且引用了同一UEditor的时候,此处的URL可能不适用于每个页面的编辑器。

     * 因此,UEditor提供了针对不同页面的编辑器可单独配置的根路径,具体来说,在需要实例化编辑器的页面最顶部写上如下代码即可。当然,需要令此处的URL等于对应的配置。

     * window.UEDITOR_HOME_URL = "/xxxx/xxxx/";

     */

    window.UEDITOR_HOME_URL = "/Ueditor/";

    var URL = window.UEDITOR_HOME_URL || getUEBasePath();

    //测试用 如果不知道路径是什么可以通过alert来测试

    //alert("URL:" + URL);

    //alert("window.UEDITOR_HOME_URL:" + window.UEDITOR_HOME_URL);

    //alert("getUEBasePath():" + getUEBasePath());

    /**

     * 配置项主体。注意,此处所有涉及到路径的配置别遗漏URL变量。
二:上传配置
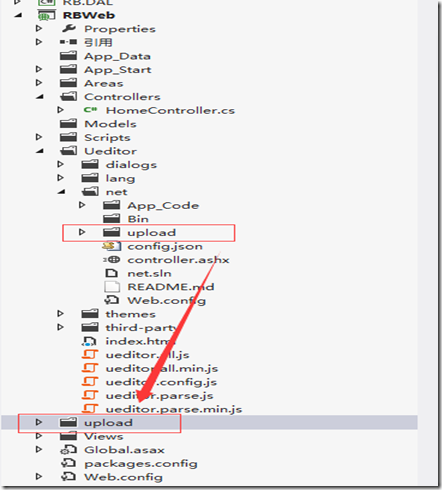
在根目录创建一个upload文件夹,把Ueditor/net/upload/下面的图片改为根目录的upload里,
Ueditor/net/config.json里面改成
"imageUrlPrefix": "", /* 图片访问路径前缀 */

    "imagePathFormat": "/upload/image/{yyyy}{mm}{dd}/{time}{rand:6}", /* 上传保存路径,可以自定义保存路径和文件名格式 */
案例:
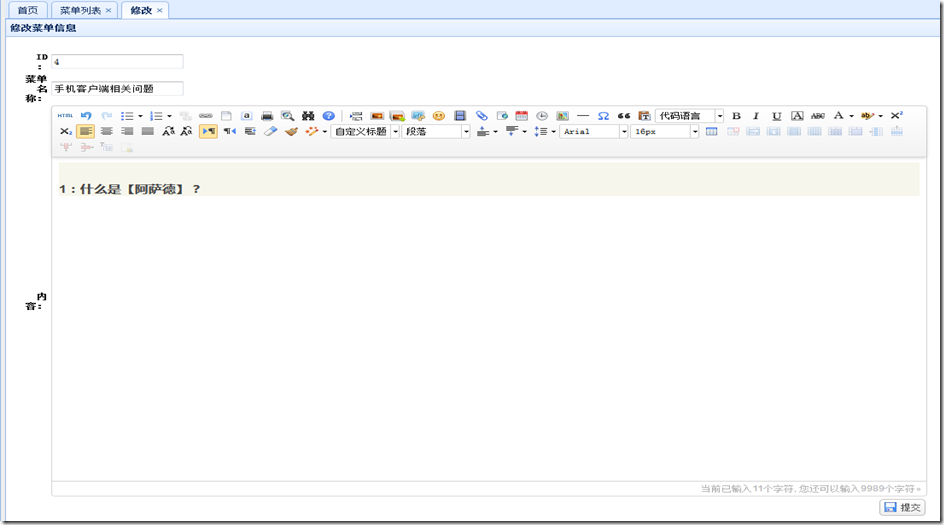
//-----------修改按钮-------------

            function editFun() {

                var rows = _datagrid.datagrid('getSelections');

                //alert(rows[0]);

                //console.info(rows[0].ID)

                //选择多行

                if (rows.length != 1 && rows.length != 0) {

                    var names = [];

                    for (var i = 0; i < rows.length; i++) {

                        names.push(rows[i].UserName);

                    }

                    $.messager.show({

                        title: '提示',

                        msg: '只能选择一条记录编辑!<br>您选择了' + names.length + '条记录!'

                    });

                } else if (rows.length == 0) {

                    $.messager.alert('提示', '请选择要修改的记录!', 'error')

                }

                    //选择1行

                else if (rows.length == 1) {

                    //-----修改按钮-----start

                    console.info($('#main-center'))

                    $('#main-center').tabs('add', {

                        title: '修改',

                        href: '/Backstage/MenuItem/getMenuItemContent?id=' + rows[0].ID,

                        closable: true

                    });

                    //-----修改按钮-----start

                }

            }
getMenuItemContent.cshtml
getMenuItemContent.cshtml

@{

    Layout = null;

}

<!DOCTYPE html>

@model RBW.Model.RB_MenuItem

<html>

<body>

    <script type="text/javascript">

        ////-----1.实例化编辑器-----start

        //建议使用工厂方法getEditor创建和引用编辑器实例,如果在某个闭包下引用该编辑器,直接调用UE.getEditor('editor')就能拿到相关的实例

        var editor = new baidu.editor.ui.Editor({

            //点击编辑框的时候 值不会消失

            autoClearinitialContent: false,

            textarea: 'Content',

        });

        editor.render("editor");

        ////-----1.实例化编辑器-----end

        //-----给ueditor赋值-----start

        @*$.ajax({

                        type: "POST",

                        url: "/Backstage/MenuItem/getMenuItemContent",

                        data: { ID: rows[0].ID },

                        success: function (msg) {

                            //给前台赋值

                            editor.ready(function () {

                                var content = msg;

                                editor.setContent(content);

                            });

                        }

                    });*@

        //-----给ueditor赋值-----end

        //-----2.panel修改弹窗-----start

        $("#EditAndRegDialog").panel({

            fit: true,

            border: true,

            closable: false,

            modal: true,

            closed: false,

            buttons: [{

                text: '修改',

                iconCls: 'icon-ok',

                handler: function () {

                    //***先验证(根据自己的需求)

                    if ($("#EditForm").form('validate') == true) {

                        //ajax提交

                        $.post("/Backstage/MenuItem/MenuItemEdit", $("#EditForm").form().serialize(),

                             function (msg) {

                                 //console.info(msg);

                                 if (msg != null) {

                                     $("#EditAndRegDialog").dialog("close");

                                     //刷新当前页reload

                                     _datagrid.datagrid('reload', {

                                         //UserName: '',

                                     });

                                     $.messager.show({

                                         title: '提示',

                                         msg: "修改成功!"

                                     });

                                 } else {

                                     $.messager.show({

                                         title: '提示',

                                         msg: msg

                                     });

                                 }

                             }, 'json');

                    }

                }

            }]

        });

        $("#EditForm input[name='ID']").attr('readonly', 'readonly');

        //

        //$("#EditForm input[name='MenuName']").attr('readonly', 'readonly');

        //$("#EditForm input[name='editTime']").attr('readonly', 'readonly');

        //var d = new Date();

        //LoginInputForm = $('#EditForm').form("load", {

        // ID: rows[0].ID,

        //MenuName: rows[0].MenuName,

        //editor: rows[0].Content,

        //sRole: rows[0].Roel,

        //editTime: d.format('yyyy-MM-dd'),

        //});

        //-----2.panel修改弹窗-----end

        //-----3.提交-----start

        $('#btn').bind('click', function () {

            //***先验证(根据自己的需求)

            if ($("#EditForm").form('validate') == true) {

                //ajax提交

                $.post("/Backstage/MenuItem/MenuItemEdit", $("#EditForm").form().serialize(),

                     function (msg) {

                         console.info(msg);

                         if (msg != null) {

                             //$("#EditAndRegDialog").dialog("close");

                             //刷新当前页reload

                             //_datagrid.datagrid('reload', {

                             //    //UserName: '',

                             //});

                             $.messager.show({

                                 title: '提示',

                                 msg: "修改成功!"

                             });

                         } else {

                             $.messager.show({

                                 title: '提示',

                                 msg: msg

                             });

                         }

                     }, 'json');

            }

        });

        //-----3.提交-----end

    </script>

    <div>

        @*修改菜单信息--start*@

        <div id="EditAndRegDialog" class="easyui-panel" title="修改菜单信息">

            <form id="EditForm" method="post"  style="width: 1024px; height: 768px;" >

                <table style="margin-top: 20px; padding-left: 20px">

                    <tr>

                        <th style="width:200px;word-break : break-all; " align="right">ID:</th>

                        <td style=""width:50%">

                            <!--直接使用验证规则class="easyui-validatebox"-->

                            <input name="ID" value="@Model.ID"/>

                        </td>

                    </tr>

                    <tr>

                        <th align="right">菜单名称:</th>

                        <td>

                            <!--直接使用验证规则class="easyui-validatebox"-->

                            <input name="MenuName" class="easyui-validatebox" data-options="required:true"  value="@Model.MenuName"/>

                        </td>

                    </tr>

                    <tr>

                        <th align="right">内容:</th>

                        <td>

                            <!--把角色写完后加上去           validType:'length[8,12]'-->

                            <textarea name="editor" id="editor" style="width: 1024px; height: 500px;">@Model.Content</textarea>

                            @*@Html.TextAreaFor(model => model.Content, new { id = "editor" })*@

                        </td>

                    </tr>

                    <tr>

                    <th align="right"></th>

                    <td align="right">

                        <a  id="btn" href="#" class="easyui-linkbutton" data-options="iconCls:'icon-save'">提交</a>

                    </td>

                </tr>

                </table>

            </form>

        </div>

        @*修改菜单信息--end*@

    </div>

</body>

</html>
action控制器
        /// <summary>

        /// 修改 单独的 页面 赋值

        /// </summary>

        /// <returns></returns>

        public ActionResult getMenuItemContent()

        {

            int iD = int.Parse(Request["ID"]);

            JsonResponesReturnObject json = BLL.RB_MenuItemService.Service.GetMenuItemContent(iD);

            string xjson = Common.Response.Return(json);

            //linq

            JObject jObj = JObject.Parse(xjson);

            RB_MenuItem rb = new RB_MenuItem();

            rb.Content = jObj["rows"]["Content"].ToString();

            rb.ID = int.Parse(Request["ID"]);

            rb.MenuName = jObj["rows"]["MenuName"].ToString();

            //return Content(ageToken.ToString());

            return View(rb);

        }

        /// <summary>

        /// 修改

        /// </summary>

        /// <returns></returns>

        //[HttpPost]

        [ValidateInput(false)]

        public ActionResult MenuItemEdit()

        {

            int iD = int.Parse(Request["ID"]);

            //菜单名称

            string menuName = Request["MenuName"].ToString();

            //内容

            string content = Request["editor"].ToString();

            RB_MenuItem model = new RB_MenuItem();

            model.ID = iD;

            model.MenuName = menuName;

            model.Content = content;

            model.CreateTime = DateTime.Now;

            JsonResponesReturnObject json = BLL.RB_MenuItemService.Service.EditMenuItem(model);

            string xjson = Common.Response.Return(json);

            return Content(xjson);

        }
问题:
1.“将截断字符串或二进制数据。”
把数据库字段设置为text
2.从客户端(editorValue=”……”)中检测到有潜在危险的 Request.Form 值
这个需要在web.config中设置,有两个地方,第一个地方添加requestValidationMode="2.0",第二个地方添加validateRequest="false",最后的结果类似下面的代码:
<?xml version="1.0"?>
<configuration>
<system.web>
<compilation debug="true" targetFramework="4.0"/>
<httpRuntime requestValidationMode="2.0" />
<pages validateRequest="false" />
</system.web>
</configuration>
Action头上添加 [ValidateInput(false)] 的标识
ValidateInput(false)]
public ActionResult Index(XDocument xml){
}
3.百度编辑器UEditor自适应宽度
今天在开发后台的时候,遇到了一个问题,因为后台是响应式的,需要实时应对不同大小屏幕的不同分辨率,所有需要编辑器支持自适应宽度,但是查找百度编辑器的论坛发现貌似这个问题问的很多,貌似大家都不太知道怎么才能让编辑器自适应宽度,搜索了很久,终于找到了解决的答案,说来很可笑,竟然是那么的简单
找到 ueditor.config.js 文件,大约在118行左右:initialFrameWidth:1000 //初始化编辑器宽度,默认1000 ,对,就是这行代码,只需要把 ,initialFrameWidth:1000 替换成 ,initialFrameWidth: ’100%’ 即可搞定问题
百度编辑器 ueditor .net开发的更多相关文章
- [转载]百度编辑器-Ueditor使用
前段时间发表过一篇关于“KindEditor在JSP中使用”的博文.这几天在沈阳东软进行JavaWeb方面的实习工作,在一个CMS系统的后台和博客板块中又要用到文本编辑器,突然发现了这个——百度编辑器 ...
- 百度编辑器ueditor 在vs2008中的使用方法
个人觉得百度编辑器ueditor还是不错的,虽然出生的时间比较短,但某些方面相比其它富文本编辑器更优秀,免费.可定制等等. 由于在官方下载的ueditor包是在vs2012下开发的,可以在vs2010 ...
- drupal7 安装百度编辑器Ueditor及后续使用
参考文章:drupal7安装百度编辑器ueditor 一.下载 1.需要下载安装的模块: 1.1.wysiwyg 1.2.ueditor 1.3Libraries 下载后安装在\sites\all\m ...
- 关于百度编辑器UEditor的一点说明
大家在使用的时候要特别注意editor_config.js中的“URL”这个参数 我的理解:1.这个参数是editor整个结构的总路径 2.首先要把这个路径配置好了.才能正常的显示, ...
- 百度编辑器ueditor插入表格没有边框颜色的解决方法
附:从word excel 中 复制的表格提交后无边框,参考这个同学的,写的很详细: http://blog.csdn.net/lovelyelfpop/article/details/51678 ...
- 百度编辑器ueditor插入表格没有边框,没有颜色的解决方法 2015-01-06 09:24 98人阅读 评论(0) 收藏
百度富文本编辑器..很强大.. - - ,不过有些BUG..真的很无解.. 最近用这个,发现上传的表格全部没有表框.. 解决办法如下: 转载的.. 百度编辑器ueditor插入一个表格后,在编辑过程中 ...
- 百度编辑器ueditor 异步加载时,初始化没办法赋值bug解决方法
百度编辑器ueditor 异步加载时,初始化没办法赋值bug解决方法 金刚 前端 ueditor 初始化 因项目中使用了百度编辑器——ueditor.整体来说性能还不错. 发现问题 我在做一个编辑页面 ...
- 工具,如何去掉百度编辑器 ueditor 元素路径、字数统计等
去掉如下截图: 在百度编辑器 ueditor 根目录下: ueditor.config.js 文件中 搜索并将参数elementPathEnabled设置成false即可 常用功能开关如下: ,ele ...
- [moka同学笔记]百度编辑器Ueditor自动换行,添加<p>的问题(摘录)
原文:http://www.cnblogs.com/kissdodog/p/5419919.html 百度编辑器Ueditor其实蛮好用的,后来使用了一段时间发现,每次打开后又保存,发现都会往内容的 ...
随机推荐
- spark.SecurityManager: SecurityManager: authentication disabled
- std::thread join和detach区别
thread detach, join 线程有两种状态,joinable或者detachable,pthread默认创建的线程是joinable的,也可以指定atrribute创建成一个detacha ...
- 在Eclipse中编写servlet时出现"The import javax.servlet cannot be resolved" 问题解决办法
在Eclipse中,project->properties,选择Java Build Path->Libraries->Add External JARs,找到你计算机中tomcat ...
- JavaScript中call、apply、bind、slice的使用
1.参考资料 http://www.cnblogs.com/coco1s/p/4833199.html 2.归结如下 apply . call .bind 三者都是用来改变函数的this对象的指向 ...
- Python序列的切片操作与技巧
切片操作 对于具有序列结构的数据来说,切片操作的方法是:consequence[start_index: end_index: step]. start_index: 表示是第一个元素对象,正索引位置 ...
- C# Attribute 特性 学习
一.特性的概述 公共语言运行库允许您添加类似关键字的描述性声明(称为特性 (Attribute))来批注编程元素,如类型.字段.方法和属性 (Property).属性与 Microsoft .NET ...
- 如何做一名好的web安全工程师?
在网络安全行业里面,web安全方向的人相对来说算是占大头,因为web安全初学阶段不像系统底层安全那么枯燥,而且成功hack目标网站的成就感相对也是比较强的. web安全工程师这个职位在甲方和乙方公司都 ...
- Kali实现局域网ARP欺骗和ARP攻击
原文地址: http://netsecurity.51cto.com/art/201303/386031.htm http://xiao106347.blog.163.com/blog/static/ ...
- css 伪类::after ::beftor 的使用方式
注释:对于 IE8 及更早版本中的 :before,必须声明 . ::before和::after这两个主要用来给元素的前面或后面插入内容,这两个常用"content"配合使用,见 ...
- /run/systemd/private: No such file or directory
今天执行consul脚本的时候报错 /run/systemd/private: No such file or directory reboot -f 重启电脑private文件就出现了.