Netty(6)源码-服务端与客户端创建
原生的NIO类图使用有诸多不便,Netty向用户屏蔽了细节,在与用户交界处做了封装。
一、服务端创建时序图
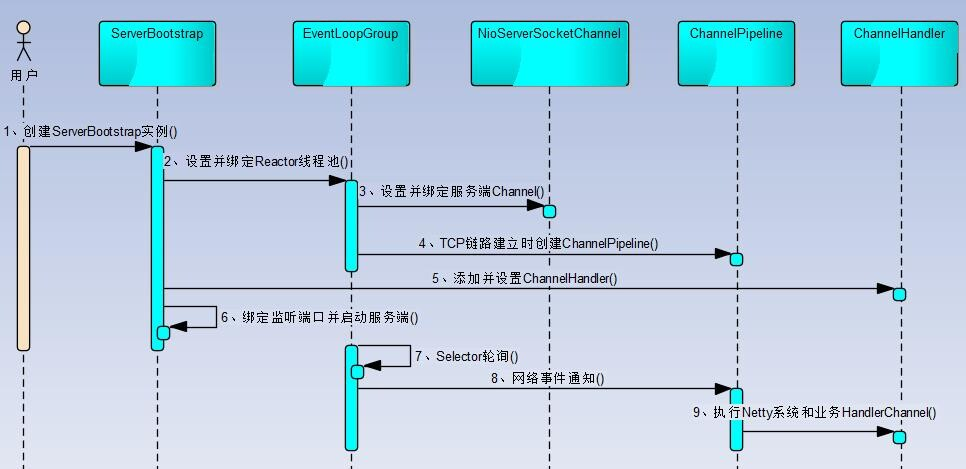
步骤一:创建ServerBootstrap实例
ServerBootstrap是Netty服务端的启动辅助类,它提供了一些列的方法用于设置参数,由于参数太多,使用builder模式。
步骤二:设置并且绑定好Reactor线程池
Netty中的Reactor线程池是EventLoopGroup,它实际上就是EventLoop数组。EventLoop的职责是处理所有注册到本线程多路复用器Selector上的Channel。Selector的轮询操作由绑定的EventLoop线程run方法驱动,在一个循环体内循环执行。值得说明的是,EventLoop的职责不仅仅是处理网络I/O事件,用户自定义的Task和定时任务Task也统一由EventLoop负责处理,这样线程模型就实现了统一。从调度层面看,也不存在从EvenetLoop线程中再启动其他类型的线程用于异步执行另外的任务,这样就避免了多线程的并发操作和锁竞争,提升了I/O线程的处理和调度性能。
步骤三:设置并绑定服务端Channel
服务端需要创建ServerSocketChannel,对原生NIO类库进行了封装,对应是NioServerSocketChannel
对用户而言,不需要关心服务端Channel的底层实现细节和工作原理,只需要指定具体是哪种服务端
Netty的ServerBootstrap提供了channel方法用于指定服务端Channel的类型。Netty通过工厂反射创建NioServerSocketChannel对象。
public B channel(Class<? extends C> channelClass) {

        if (channelClass == null) {

            throw new NullPointerException("channelClass");

        }

        return channelFactory(new ReflectiveChannelFactory<C>(channelClass));

    }
步骤四:链路建立的时候创建并且初始化ChannelPipeline。
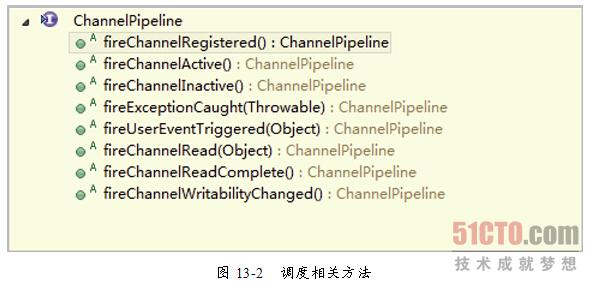
它本质上是一个负载处理网络事件的职责链,负载管理和执行ChannelHanler。网络事件以事件流的形式在ChannelPipeline中流转,由ChannelPipeline根据ChannelHandler的执行策略调度ChannelHandler的执行。典型的网络事件如下:
(1)链路注册;
(2)链路激活;
(3)链路断开;
(4)接收到请求消息;
(5)请求消息接收并处理完毕;
(6)发送应答消息;
(7)链路发生异常;
(8)发生用户自定义事件。
步骤五:初始化ChannelPipeline完成之后,添加并设置ChannelHandler。
ChannelHandler是Netty提供给用户定制和扩展的关键接口。利用ChannelHandler用户可以完成大多数的功能定制,例如消息编解码、心跳、安全认证、TSL/SSL认证、流量控制和流量整形等。Netty同时也提供了大量的系统ChannelHandler供用户使用,比较实用的系统ChannelHandler总结如下:
(1)系统编解码框架——ByteToMessageCodec;
(2)通用基于长度的半包解码器——LengthFieldBasedFrameDecoder;
(3)码流日志打印Handler——LoggingHandler;
(4)SSL安全认证Handler——SslHandler;
(5)链路空闲检测Handler——IdleStateHandler;
(6)流量整形Handler——ChannelTrafficShapingHandler;
(7)Base64编解码——Base64Decoder和Base64Encoder。
.childHandler(new ChannelInitializer<SocketChannel>() {

            @Override

            public void initChannel(SocketChannel ch)

                throws Exception {

                ch.pipeline().addLast(

                    new EchoServerHandler());

            }

            });
步骤6:绑定并启动监听端口。
在绑定监听端口之前系统会做一系列的初始化和检测工作,完成之后,会启动监听端口,并将ServerSocketChannel注册到Selector上监听客户端连接,相关代码如下。
   public ChannelFuture bind(SocketAddress localAddress) {

        validate();

        if (localAddress == null) {

            throw new NullPointerException("localAddress");

        }

        return doBind(localAddress);

    }
步骤7:Selector轮询。
由Reactor线程NioEventLoop负责调度和执行Selector轮询操作,选择准备就绪的Channel集合,相关代码如下
private void select(boolean oldWakenUp) throws IOException {

        Selector selector = this.selector;

        try {

                //此处代码省略...

                int selectedKeys = selector.select(timeoutMillis);

                selectCnt ++;

                //此处代码省略...
步骤8:当轮询到准备就绪的Channel之后,就由Reactor线程NioEventLoop执行ChannelPipeline的相应方法,最终调度并执行ChannelHandler
步骤9:执行Netty系统ChannelHandler和用户添加定制的ChannelHandler。
ChannelPipeline根据网络事件的类型,调度并执行ChannelHandler,相关代码如下。
    public ChannelHandlerContext fireChannelRead(final Object msg) {

        invokeChannelRead(findContextInbound(), msg);

        return this;

    }
二、Netty服务端创建源码分析
1. 创建线程组:
通常会创建两个EventLoopGroup,也可以只创建一个并共享。
        EventLoopGroup bossGroup = new NioEventLoopGroup();

        EventLoopGroup workerGroup = new NioEventLoopGroup();
NioEventLoopGroup实际就是Reactor线程池,负责调度和执行具体的任务:
client接入
网络读写事件处理
用户自定义任务
定时任务
通过ServerBootstrap的group方法将2个EventLoopGroup实例传入:
    public ServerBootstrap group(EventLoopGroup parentGroup, EventLoopGroup childGroup) {

        //1. 调用父类的group方法传入parentGroup

        super.group(parentGroup);

        //2. 设置childGroup

        if (childGroup == null) {

            throw new NullPointerException("childGroup");

        }

        if (this.childGroup != null) {

            throw new IllegalStateException("childGroup set already");

        }

        this.childGroup = childGroup;

        return this;

    }
如果只传一个参数,则2个线程池会被重用。
    public ServerBootstrap group(EventLoopGroup group) {

        return group(group, group);

    }
2. 设置服务端Channel用于端口监听和客户端链路接入:
根据传入的channel class创建对应的服务端Channel,调用的是ReflectiveChannelFactory
public class ReflectiveChannelFactory<T extends Channel> implements ChannelFactory<T> {

    private final Class<? extends T> clazz;

    public ReflectiveChannelFactory(Class<? extends T> clazz) {

        if (clazz == null) {

            throw new NullPointerException("clazz");

        }

        this.clazz = clazz;

    }

    @Override

    public T newChannel() {

        try {

            return clazz.newInstance();

        } catch (Throwable t) {

            throw new ChannelException("Unable to create Channel from class " + clazz, t);

        }

    }

    @Override

    public String toString() {

        return StringUtil.simpleClassName(clazz) + ".class";

    }

}
3. 下面要设定服务端TCP参数:
Netty使用一个LinkedHashMap来保存
private final Map<ChannelOption<?>, Object> options = new LinkedHashMap<ChannelOption<?>, Object>();
主要参数是TCP的backlog参数,底层C对应的接口为:
int listen(int fd, int backlog);
backlog指定了内核为此套接字接口排队的最大连接个数,内核要为套接字维护2个队列:未连接队列和已连接队列,根据TCP三路握手的三个分节分隔这2个队列。
服务器处于listen状态时,收到客户端syn分节(connect)时在未完成队列中创建一个新的条目,然后用三路握手的第二个分节即服务器的syn响应客户端,此条目在第三个分节到达前(客户端对服务器syn的ack)一直保留在未完成队列中,如果三路握手完成,该条目将从未完成连接队列搬到已完成队列尾部。
当进程调用accept时,从已完成队列中的头部取出一个条目给进程,当已完成队列为空时进程将进入睡眠,直到有条目在已完成队列中才唤醒。backlog则用来规定2个队列总和的最大值,大多数实现值为5,但是在高并发场景中显然不够,比如Lighttpd中此值达到128*8。需要设置此值更大原因是未完成连接队列可能因为客户端syn的到达以及等待握手第三个分节的到达延时而增大。Netty默认是100,用户可以调整。
4. 下面可以为启动辅助类和其父类分别指定Handler。
本质区别就是:
- ServerBootstrap中的Handler是NioServerSocketChannel使用的,所有连接该监听端口的客户端都会执行它;
- 父类AbstractBootstrap中的Handler是个工厂类,它为每个新接入的客户端都创建一个新的Handler;
5. 服务端启动的最后一步,就是绑定本地端口,启动服务:
    private ChannelFuture doBind(final SocketAddress localAddress) {

        final ChannelFuture regFuture = initAndRegister();

        final Channel channel = regFuture.channel();

        if (regFuture.cause() != null) {

            return regFuture;

        }

        if (regFuture.isDone()) {

            // At this point we know that the registration was complete and successful.

            ChannelPromise promise = channel.newPromise();

            doBind0(regFuture, channel, localAddress, promise);

            return promise;

        } else {

            // Registration future is almost always fulfilled already, but just in case it's not.

            final PendingRegistrationPromise promise = new PendingRegistrationPromise(channel);

            regFuture.addListener(new ChannelFutureListener() {

                @Override

                public void operationComplete(ChannelFuture future) throws Exception {

                    Throwable cause = future.cause();

                    if (cause != null) {

                        // Registration on the EventLoop failed so fail the ChannelPromise directly to not cause an

                        // IllegalStateException once we try to access the EventLoop of the Channel.

                        promise.setFailure(cause);

                    } else {

                        // Registration was successful, so set the correct executor to use.

                        // See https://github.com/netty/netty/issues/2586

                        promise.registered();

                        doBind0(regFuture, channel, localAddress, promise);

                    }

                }

            });

            return promise;

        }

    }
看红色标注的initAndRegister方法:
调用 channelFactory.newChannel()常见NioServerSocketChannel
然后调用init(channel)方法,由具体子类实现,这里实现的子类是ServerBootrap.
    final ChannelFuture initAndRegister() {

        Channel channel = null;

        try {

            channel = channelFactory.newChannel();

            init(channel);

        } catch (Throwable t) {

            if (channel != null) {

                // channel can be null if newChannel crashed (eg SocketException("too many open files"))

                channel.unsafe().closeForcibly();

            }

            // as the Channel is not registered yet we need to force the usage of the GlobalEventExecutor

            return new DefaultChannelPromise(channel, GlobalEventExecutor.INSTANCE).setFailure(t);

        }

        ChannelFuture regFuture = config().group().register(channel);

        if (regFuture.cause() != null) {

            if (channel.isRegistered()) {

                channel.close();

            } else {

                channel.unsafe().closeForcibly();

            }

        }

        // If we are here and the promise is not failed, it's one of the following cases:

        // 1) If we attempted registration from the event loop, the registration has been completed at this point.

        //    i.e. It's safe to attempt bind() or connect() now because the channel has been registered.

        // 2) If we attempted registration from the other thread, the registration request has been successfully

        //    added to the event loop's task queue for later execution.

        //    i.e. It's safe to attempt bind() or connect() now:

        //         because bind() or connect() will be executed *after* the scheduled registration task is executed

        //         because register(), bind(), and connect() are all bound to the same thread.

        return regFuture;

    }
下面关注init方法,主要完成了以下功能:
(1). 设置Socket参数和NioServerSocketChannel的附加属性,代码如下:
        final Map<ChannelOption<?>, Object> options = options0();

        synchronized (options) {

            channel.config().setOptions(options);

        }

        final Map<AttributeKey<?>, Object> attrs = attrs0();

        synchronized (attrs) {

            for (Entry<AttributeKey<?>, Object> e: attrs.entrySet()) {

                @SuppressWarnings("unchecked")

                AttributeKey<Object> key = (AttributeKey<Object>) e.getKey();

                channel.attr(key).set(e.getValue());

            }

        }
(2).将AbstractBootstrap的Handler添加到NioServerSocketChannel的ChannelPipeline中,将用于服务端注册的Handler ServerBootstrapAcceptor添加到ChannelPipeline中,代码如下:
p.addLast(new ChannelInitializer<Channel>() {

            @Override

            public void initChannel(Channel ch) throws Exception {

                final ChannelPipeline pipeline = ch.pipeline();

                ChannelHandler handler = config.handler();

                if (handler != null) {

                    pipeline.addLast(handler);

                }

                // We add this handler via the EventLoop as the user may have used a ChannelInitializer as handler.

                // In this case the initChannel(...) method will only be called after this method returns. Because

                // of this we need to ensure we add our handler in a delayed fashion so all the users handler are

                // placed in front of the ServerBootstrapAcceptor.

                ch.eventLoop().execute(new Runnable() {

                    @Override

                    public void run() {

                        pipeline.addLast(new ServerBootstrapAcceptor(

                                currentChildGroup, currentChildHandler, currentChildOptions, currentChildAttrs));

                    }

                });

            }

        });
到此处,Netty服务端监听的相关资源已经初始化完毕,就剩下最后一步-
6. 注册NioServerSocketChannel到Reactor线程的多路复用器上,然后轮询客户端连接事件。
在分析注册代码之前,我们先通过下图看看目前NioServerSocketChannel的ChannelPipeline的组成:

通过Debug最终发现在AbstractChannel类中的register方法上:
public final void register(EventLoop eventLoop, final ChannelPromise promise) {

            if (eventLoop == null) {

                throw new NullPointerException("eventLoop");

            }

            if (isRegistered()) {

                promise.setFailure(new IllegalStateException("registered to an event loop already"));

                return;

            }

            if (!isCompatible(eventLoop)) {

                promise.setFailure(

                        new IllegalStateException("incompatible event loop type: " + eventLoop.getClass().getName()));

                return;

            }

            AbstractChannel.this.eventLoop = eventLoop;

            if (eventLoop.inEventLoop()) {

                register0(promise);

            } else {

                try {

                    eventLoop.execute(new Runnable() {

                        @Override

                        public void run() {

                            register0(promise);

                        }

                    });

                } catch (Throwable t) {

                    logger.warn(

                            "Force-closing a channel whose registration task was not accepted by an event loop: {}",

                            AbstractChannel.this, t);

                    closeForcibly();

                    closeFuture.setClosed();

                    safeSetFailure(promise, t);

                }

            }

        }
首先判断是否是NioEventLoop自身发起的操作,如果是,则不存在并发操作,直接执行Channel注册;如果由其它线程发起,则封装成一个Task放入消息队列中异步执行。此处,由于是由ServerBootstrap所在线程执行的注册操作,所以会将其封装成Task投递到NioEventLoop中执行:
        private void register0(ChannelPromise promise) {

            try {

                // check if the channel is still open as it could be closed in the mean time when the register

                // call was outside of the eventLoop

                if (!promise.setUncancellable() || !ensureOpen(promise)) {

                    return;

                }

                boolean firstRegistration = neverRegistered;

                doRegister();

                neverRegistered = false;

                registered = true;

                // Ensure we call handlerAdded(...) before we actually notify the promise. This is needed as the

                // user may already fire events through the pipeline in the ChannelFutureListener.

                pipeline.invokeHandlerAddedIfNeeded();

                safeSetSuccess(promise);

                pipeline.fireChannelRegistered();

                // Only fire a channelActive if the channel has never been registered. This prevents firing

                // multiple channel actives if the channel is deregistered and re-registered.

                if (isActive()) {

                    if (firstRegistration) {

                        pipeline.fireChannelActive();

                    } else if (config().isAutoRead()) {

                        // This channel was registered before and autoRead() is set. This means we need to begin read

                        // again so that we process inbound data.

                        //

                        // See https://github.com/netty/netty/issues/4805

                        beginRead();

                    }

                }

            } catch (Throwable t) {

                // Close the channel directly to avoid FD leak.

                closeForcibly();

                closeFuture.setClosed();

                safeSetFailure(promise, t);

            }

        }
将NioServerSocketChannel注册到NioEventLoop的Selector上,代码如下:
    protected void doRegister() throws Exception {

        boolean selected = false;

        for (;;) {

            try {

                selectionKey = javaChannel().register(eventLoop().selector, 0, this);

                return;

            } catch (CancelledKeyException e) {

                if (!selected) {

                    // Force the Selector to select now as the "canceled" SelectionKey may still be

                    // cached and not removed because no Select.select(..) operation was called yet.

                    eventLoop().selectNow();

                    selected = true;

                } else {

                    // We forced a select operation on the selector before but the SelectionKey is still cached

                    // for whatever reason. JDK bug ?

                    throw e;

                }

            }

        }

    }
大伙儿可能会很诧异,应该注册OP_ACCEPT(16)到多路复用器上,怎么注册0呢?0表示只注册,不监听任何网络操作。这样做的原因如下:
- 注册方法是多态的,它既可以被NioServerSocketChannel用来监听客户端的连接接入,也可以用来注册SocketChannel,用来监听网络读或者写操作;
- 通过SelectionKey的interestOps(int ops)方法可以方便的修改监听操作位。所以,此处注册需要获取SelectionKey并给AbstractNioChannel的成员变量selectionKey赋值。
注册成功之后,触发ChannelRegistered事件,方法如下:
                doRegister();

                neverRegistered = false;

                registered = true;

                // Ensure we call handlerAdded(...) before we actually notify the promise. This is needed as the

                // user may already fire events through the pipeline in the ChannelFutureListener.

                pipeline.invokeHandlerAddedIfNeeded();

                safeSetSuccess(promise);

                pipeline.fireChannelRegistered();
Netty的HeadHandler不需要处理ChannelRegistered事件,所以,直接调用下一个Handler,当ChannelRegistered事件传递到TailHandler后结束,TailHandler也不关心ChannelRegistered事件。
ChannelRegistered事件传递完成后,判断ServerSocketChannel监听是否成功,如果成功,需要出发NioServerSocketChannel的ChannelActive事件,判断方法即isActive().
          pipeline.fireChannelRegistered();

                // Only fire a channelActive if the channel has never been registered. This prevents firing

                // multiple channel actives if the channel is deregistered and re-registered.

                if (isActive()) {

                    if (firstRegistration) {

                        pipeline.fireChannelActive();

                    } else if (config().isAutoRead()) {

                        // This channel was registered before and autoRead() is set. This means we need to begin read

                        // again so that we process inbound data.

                        //

                        // See https://github.com/netty/netty/issues/4805

                        beginRead();

                    }

                }
其中isActive()是一个多态方法,如果是服务端则,判断监听是否启动;如果是客户端,判断TCP连接是否完成。ChannelActive事件在ChannelPipeline()传递,完成之后根据配置决定是否自动触发Channel的读操作。
读方法最终到:
        public final void beginRead() {

            assertEventLoop();

            if (!isActive()) {

                return;

            }

            try {

                doBeginRead();

            } catch (final Exception e) {

                invokeLater(new Runnable() {

                    @Override

                    public void run() {

                        pipeline.fireExceptionCaught(e);

                    }

                });

                close(voidPromise());

            }

        }
由于不同类型的Channel对读的准备工作不同,因此doBeginRead也是个多态方法。
对于NIO通信,无论是客户端,还是服务端,都要设置网络监听操作位为自己感兴趣的,对于NioServerSocketChannel感兴趣的是OP_ACCEPT(16),于是修改操作位:
 @Override

    protected void doBeginRead() throws Exception {

        // Channel.read() or ChannelHandlerContext.read() was called

        final SelectionKey selectionKey = this.selectionKey;

        if (!selectionKey.isValid()) {

            return;

        }

        readPending = true;

        final int interestOps = selectionKey.interestOps();

        if ((interestOps & readInterestOp) == 0) {

            selectionKey.interestOps(interestOps | readInterestOp);

        }

    }
某些情况下,当前监听的操作类型和Channel关心的网络事件是一致的,不需要重复注册,所以增加了&的判断。JDK SelectionKey有4种操作类型,分别为:
(1) OP_READ = 1 <<0;
(2) OP_WRTE = 1 <<2;
(3) OP_CONNECT = 1 <<3;
(4) OP_ACCEPT = 1 <<4;
此时,服务器监听启动部分源码已经分析结束。
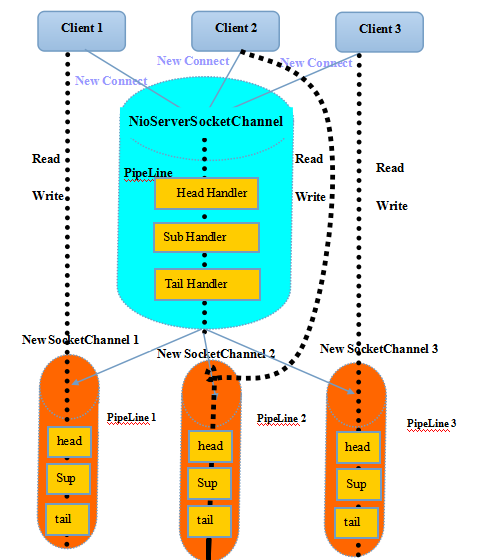
三、客户端接入源码分析
负责处理网络读写、连接和客户端请求介入的Reactor线程就是NioEventLoop,下面分析如何处理新的客户端接入。
当多路复用器检测到新的Channel时候,默认执行processSelectedKeysOptimized方法.
    private void processSelectedKeys() {

        if (selectedKeys != null) {

            processSelectedKeysOptimized(selectedKeys.flip());

        } else {

            processSelectedKeysPlain(selector.selectedKeys());

        }

    }
由于Channel的Attachment是NioServerSocketChannel,所以执行processSelectedKey方法。
            if (a instanceof AbstractNioChannel) {

                processSelectedKey(k, (AbstractNioChannel) a);

            } else {

                @SuppressWarnings("unchecked")

                NioTask<SelectableChannel> task = (NioTask<SelectableChannel>) a;

                processSelectedKey(k, task);

            }
继续点入该方法debug,由于监听的是连接操作,会执行unsafe.read()方法。由于不同的Channel执行不同的操作,所以NioUnsafe被设计为接口。
debug发现使用的是:
其read()方法如下所示:
 @Override

        public void read() {

            assert eventLoop().inEventLoop();

            final ChannelConfig config = config();

            final ChannelPipeline pipeline = pipeline();

            final RecvByteBufAllocator.Handle allocHandle = unsafe().recvBufAllocHandle();

            allocHandle.reset(config);

            boolean closed = false;

            Throwable exception = null;

            try {

                try {

                    do {

                        int localRead = doReadMessages(readBuf);

                        if (localRead == 0) {

                            break;

                        }

                       //代码省略...

    }
对doReadMessages方法进行分析,发现它实际就是接受新的客户端连接并且创建NioSocketChannel:
    protected int doReadMessages(List<Object> buf) throws Exception {

        SocketChannel ch = javaChannel().accept();

        try {

            if (ch != null) {

                buf.add(new NioSocketChannel(this, ch));

                return 1;

            }

        } catch (Throwable t) {

            logger.warn("Failed to create a new channel from an accepted socket.", t);

            try {

                ch.close();

            } catch (Throwable t2) {

                logger.warn("Failed to close a socket.", t2);

            }

        }

        return 0;

    }
接收到新的连接之后,触发ChannelPipeLine的ChannelRead方法,代码如下:
                int size = readBuf.size();

                for (int i = 0; i < size; i ++) {

                    readPending = false;

                    pipeline.fireChannelRead(readBuf.get(i));

                }
于是触发pipeLine调用链,事件在ChannelPipeline中传递,执行ServerBootstrapAcceptor中的channelRead方法,代码如下:
        public void channelRead(ChannelHandlerContext ctx, Object msg) {

            final Channel child = (Channel) msg;

            child.pipeline().addLast(childHandler); //(1)

            for (Entry<ChannelOption<?>, Object> e: childOptions) {

                try {

                    if (!child.config().setOption((ChannelOption<Object>) e.getKey(), e.getValue())) {

                        logger.warn("Unknown channel option: " + e);

                    }

                } catch (Throwable t) {

                    logger.warn("Failed to set a channel option: " + child, t);

                }

            }

        //(2)

            for (Entry<AttributeKey<?>, Object> e: childAttrs) {

                child.attr((AttributeKey<Object>) e.getKey()).set(e.getValue());

            }

        //(3)

            try {

                childGroup.register(child).addListener(new ChannelFutureListener() {

                    @Override

                    public void operationComplete(ChannelFuture future) throws Exception {

                        if (!future.isSuccess()) {

                            forceClose(child, future.cause());

                        }

                    }

                });

            } catch (Throwable t) {

                forceClose(child, t);

            }

        }
上面方法主要分为3个步骤:
(1) 加入childHandler到客户端SocketChannel的ChannelPipeline中
(2) 设置SocketChannel的TCP参数
(3) 注册SocketChannel到多路复用器
注意这里register注册也是注册操作位为0.
执行完注册后,紧接着会触发ChannelReadComplete事件。
Netty的Header和Tailer本身不关于这个事件,因此ChannelReadComplete是直接透传, 执行完ChannelReadComplete后,接着执行PipeLine的read()方法,最终到HeadHandler的read()方法。read()方法在前面说过,会修改操作位,此时这里debug发现把操作位修改OP_READ。
此时,客户端连接处理完成,可以进行网络读写等I/O操作。
四、Netty客户端创建流程
1、用户线程创建Bootstrap
Bootstrap b = new Bootstrap();
Bootstrap是Socket客户端创建工具类,通过API设置创建客户端相关的参数,异步发起客户端连接。
2、创建处理客户端连接、IO读写的Reactor线程组NioEventLoopGroup
EventLoopGroup group = new NioEventLoopGroup();
3、通过Bootstrap的ChannelFactory和用户指定的Channel类型创建用于客户端连接的NioSocketChannel
b.group(group).channel(NioSocketChannel.class).option(ChannelOption.TCP_NODELAY, true)
此处的NioSocketChannel类似于Java NIO提供的SocketChannel。
4、创建默认的channel Handler pipeline
b.group(group).channel(NioSocketChannel.class).option(ChannelOption.TCP_NODELAY, true)

 .handler(new ChannelInitializer<SocketChannel>()

  {

       @Override

       public void initChannel(SocketChannel ch) throws Exception

       {

         ch.pipeline().addLast(new HelloClientHandler());

        }

  });
用于调度和执行网络事件。
5、异步发起TCP连接
 // 发起异步连接操作

 ChannelFuture f = b.connect(host, port).sync();
SocketChannel执行connect()操作后有以下三种结果:
- 连接成功,然会true;
- 暂时没有连接上,服务器端没有返回ACK应答,连接结果不确定,返回false。此种结果下,需要将NioSocketChannel中的selectionKey设置为OP_CONNECT,监听连接结果;
- 接连失败,直接抛出I/O异常
6、注册对应的网络监听状态位到多路复用器
7、由多路复用器在I/O中轮询个Channel,处理连接结果
8、如果连接成功,设置Future结果,发送连接成功事件,触发ChannelPipeline执行
9、由ChannelPipeline调度执行系统和用户的ChannelHandler,执行业务逻辑
五、客户端创建源码分析
Netty客户端创建流程非常繁琐,这里只针对关键步骤进行分析。
5.1 客户端连接辅助类Bootstrap
1. 设置I/O线程组:只需要一个线程组EventLoopGroup
2. TCP参数设置:
    public <T> B option(ChannelOption<T> option, T value) {

        if (option == null) {

            throw new NullPointerException("option");

        }

        if (value == null) {

            synchronized (options) {

                options.remove(option);

            }

        } else {

            synchronized (options) {

                options.put(option, value);

            }

        }

        return (B) this;

    }
主要TCP参数如下:
- (1) SO_TIMEOUT: 控制读取操作将阻塞多少毫秒,如果返回值为0,计时器就被禁止了,该线程将被无限期阻塞。
- (2) SO_SNDBUF: 套接字使用的发送缓冲区大小
- (3) SO_RCVBUF: 套接字使用的接收缓冲区大小
- (4) SO_REUSEADDR : 是否允许重用端口
- (5) CONNECT_TIMEOUT_MILLIS: 客户端连接超时时间,原生NIO不提供该功能,Netty使用的是自定义连接超时定时器检测和超时控制
- (6) TCP_NODELAY : 是否使用Nagle算法
3. channel接口
同样使用反射创建NioSocketChannel
4. 设置Handler接口
Bootstrap为了简化Handler的编排,提供了ChannelInitializer,当TCP链路注册成功后,调用initChannel接口:
    public final void channelRegistered(ChannelHandlerContext ctx) throws Exception {

        // Normally this method will never be called as handlerAdded(...) should call initChannel(...) and remove

        // the handler.

        if (initChannel(ctx)) {

            // we called initChannel(...) so we need to call now pipeline.fireChannelRegistered() to ensure we not

            // miss an event.

            ctx.pipeline().fireChannelRegistered();

        } else {

            // Called initChannel(...) before which is the expected behavior, so just forward the event.

            ctx.fireChannelRegistered();

        }

    }
其中InitChannel为抽象接口,即下面红色标注的代码,用户便是在这个方法中设置ChannelHandler:
    private boolean initChannel(ChannelHandlerContext ctx) throws Exception {

        if (initMap.putIfAbsent(ctx, Boolean.TRUE) == null) { // Guard against re-entrance.

            try {

                initChannel((C) ctx.channel());

            } catch (Throwable cause) {

                // Explicitly call exceptionCaught(...) as we removed the handler before calling initChannel(...).

                // We do so to prevent multiple calls to initChannel(...).

                exceptionCaught(ctx, cause);

            } finally {

                remove(ctx);

            }

            return true;

        }

        return false;

    }
5.2 客户端连接操作
1. 首先要创建和初始化NioSocketChannel
    private ChannelFuture doResolveAndConnect(final SocketAddress remoteAddress, final SocketAddress localAddress) {

        final ChannelFuture regFuture = initAndRegister();

        final Channel channel = regFuture.channel();
      //.....
创建之后,初始化,然后在注册:
final ChannelFuture initAndRegister() {

        Channel channel = null;

        try {

            channel = channelFactory.newChannel();

            init(channel);

        } catch (Throwable t) {

            if (channel != null) {

                // channel can be null if newChannel crashed (eg SocketException("too many open files"))

                channel.unsafe().closeForcibly();

            }

            // as the Channel is not registered yet we need to force the usage of the GlobalEventExecutor

            return new DefaultChannelPromise(channel, GlobalEventExecutor.INSTANCE).setFailure(t);

        }

        ChannelFuture regFuture = config().group().register(channel);

        if (regFuture.cause() != null) {

            if (channel.isRegistered()) {

                channel.close();

            } else {

                channel.unsafe().closeForcibly();

            }

        }

        // If we are here and the promise is not failed, it's one of the following cases:

        // 1) If we attempted registration from the event loop, the registration has been completed at this point.

        //    i.e. It's safe to attempt bind() or connect() now because the channel has been registered.

        // 2) If we attempted registration from the other thread, the registration request has been successfully

        //    added to the event loop's task queue for later execution.

        //    i.e. It's safe to attempt bind() or connect() now:

        //         because bind() or connect() will be executed *after* the scheduled registration task is executed

        //         because register(), bind(), and connect() are all bound to the same thread.

        return regFuture;

    }
2. 创建完成后,连接操作会异步执行,最终调用到HeadContext的connect方法.
        public void connect(

                ChannelHandlerContext ctx,

                SocketAddress remoteAddress, SocketAddress localAddress,

                ChannelPromise promise) throws Exception {

            unsafe.connect(remoteAddress, localAddress, promise);

        }

的connect操作如下:
 if (doConnect(remoteAddress, localAddress)) {

                    fulfillConnectPromise(promise, wasActive);

                } else {

//...
3. doConnect三种可能结果
- 连接成功,然会true;
- 暂时没有连接上,服务器端没有返回ACK应答,连接结果不确定,返回false。此种结果下,需要将NioSocketChannel中的selectionKey设置为OP_CONNECT,监听连接结果;
- 接连失败,直接抛出I/O异常
异步返回之后,需要判断连接结果,如果成功,则触发ChannelActive事件。最终会将NioSocketChannel中的selectionKey设置为SelectionKey.OP_READ,用于监听网络读操作。
5.3 异步连接结果通知
NioEventLoop的Selector轮询客户端连接Channel,当服务端返回应答后,进行判断。依旧是NioEventLoop中的processSelectedKey方法:
 if ((readyOps & SelectionKey.OP_CONNECT) != 0) {

                // remove OP_CONNECT as otherwise Selector.select(..) will always return without blocking

                // See https://github.com/netty/netty/issues/924

                int ops = k.interestOps();

                ops &= ~SelectionKey.OP_CONNECT;

                k.interestOps(ops);

                unsafe.finishConnect();

            }
下面分析finishConnect方法:
        @Override

        public final void finishConnect() {

            // Note this method is invoked by the event loop only if the connection attempt was

            // neither cancelled nor timed out.

            assert eventLoop().inEventLoop();

            try {

                boolean wasActive = isActive();

                doFinishConnect(); //判断SocketChannel的连接结果,true表示成功

                fulfillConnectPromise(connectPromise, wasActive); //触发链路激活

            } catch (Throwable t) {

                fulfillConnectPromise(connectPromise, annotateConnectException(t, requestedRemoteAddress));

            } finally {

                // Check for null as the connectTimeoutFuture is only created if a connectTimeoutMillis > 0 is used

                // See https://github.com/netty/netty/issues/1770

                if (connectTimeoutFuture != null) {

                    connectTimeoutFuture.cancel(false);

                }

                connectPromise = null;

            }

        }
fulfillConnectPromise方法则触发链路激活事件,并由ChannelPipeline进行传播:
        private void fulfillConnectPromise(ChannelPromise promise, boolean wasActive) {

            if (promise == null) {

                // Closed via cancellation and the promise has been notified already.

                return;

            }

            // Get the state as trySuccess() may trigger an ChannelFutureListener that will close the Channel.

            // We still need to ensure we call fireChannelActive() in this case.

            boolean active = isActive();

            // trySuccess() will return false if a user cancelled the connection attempt.

            boolean promiseSet = promise.trySuccess();

            // Regardless if the connection attempt was cancelled, channelActive() event should be triggered,

            // because what happened is what happened.

            if (!wasActive && active) {

                pipeline().fireChannelActive();

            }

            // If a user cancelled the connection attempt, close the channel, which is followed by channelInactive().

            if (!promiseSet) {

                close(voidPromise());

            }

        }
跟之前类似,将网络监听修改为读操作。
5.4 客户端连接超时机制
由Netty自己实现的客户端超时机制,在AbstractNioChannel的connect方法中:
 public final void connect(

                final SocketAddress remoteAddress, final SocketAddress localAddress, final ChannelPromise promise) {

            if (!promise.setUncancellable() || !ensureOpen(promise)) {

                return;

            }

            try {

                if (connectPromise != null) {

                    // Already a connect in process.

                    throw new ConnectionPendingException();

                }

                boolean wasActive = isActive();

                if (doConnect(remoteAddress, localAddress)) {

                    fulfillConnectPromise(promise, wasActive);

                } else {

                    connectPromise = promise;

                    requestedRemoteAddress = remoteAddress;

                    // Schedule connect timeout.

                    int connectTimeoutMillis = config().getConnectTimeoutMillis();

                    if (connectTimeoutMillis > 0) {

                        connectTimeoutFuture = eventLoop().schedule(new Runnable() {

                            @Override

                            public void run() {

                                ChannelPromise connectPromise = AbstractNioChannel.this.connectPromise;

                                ConnectTimeoutException cause =

                                        new ConnectTimeoutException("connection timed out: " + remoteAddress);

                                if (connectPromise != null && connectPromise.tryFailure(cause)) {

                                    close(voidPromise());

                                }

                            }

                        }, connectTimeoutMillis, TimeUnit.MILLISECONDS);

                    }

                    promise.addListener(new ChannelFutureListener() {

                        @Override

                        public void operationComplete(ChannelFuture future) throws Exception {

                            if (future.isCancelled()) {

                                if (connectTimeoutFuture != null) {

                                    connectTimeoutFuture.cancel(false);

                                }

                                connectPromise = null;

                                close(voidPromise());

                            }

                        }

                    });

                }

            } catch (Throwable t) {

                promise.tryFailure(annotateConnectException(t, remoteAddress));

                closeIfClosed();

            }

        }
一旦超时定时器执行,则说明客户端超时,构造异常,将异常结果设置到connectPromise中,同时关闭客户端句柄。
如果在超时之前获取结果,则直接删除定时器,防止其被触发。
Netty(6)源码-服务端与客户端创建的更多相关文章
- 口袋微博android源码服务端和客户端
刚刚在源码天堂看到了一个不错的安卓SNS应用源码,而且也比较完整的,它基本具备了新浪微博的所有功能,包括查看最新的微博.微博评论.好友资料.回复评论以及发私信等,除此之外,还提供了许多独有的特色功能: ...
- Netty源码 服务端的启动
最近一直在看netty,看完之后就想做点笔记.可是实在是太忙了,挤了还要几个晚上终于挤出来了 上图是服务端的实例代码.大致的流程先梳理一遍. 首先会执行 用于创建两个线程组,boosGroup用于接受 ...
- Netty服务端与客户端(源码一)
首先,整理NIO进行服务端开发的步骤: (1)创建ServerSocketChannel,配置它为非阻塞模式. (2)绑定监听,配置TCP参数,backlog的大小. (3)创建一个独立的I/O线程, ...
- Fresco 源码分析(二) Fresco客户端与服务端交互(3) 前后台打通
4.2.1.2.4 PipelineDraweeControllerBuilder.obtainController()源码分析 续 上节中我们提到两个核心的步骤 obtainDataSourceSu ...
- Netty 4源码解析:服务端启动
Netty 4源码解析:服务端启动 1.基础知识 1.1 Netty 4示例 因为Netty 5还处于测试版,所以选择了目前比较稳定的Netty 4作为学习对象.而且5.0的变化也不像4.0这么大,好 ...
- 【转】TCP/UDP简易通信框架源码,支持轻松管理多个TCP服务端(客户端)、UDP客户端
[转]TCP/UDP简易通信框架源码,支持轻松管理多个TCP服务端(客户端).UDP客户端 目录 说明 TCP/UDP通信主要结构 管理多个Socket的解决方案 框架中TCP部分的使用 框架中UDP ...
- Netty 学习(一):服务端启动 & 客户端启动
Netty 学习(一):服务端启动 & 客户端启动 作者: Grey 原文地址: 博客园:Netty 学习(一):服务端启动 & 客户端启动 CSDN:Netty 学习(一):服务端启 ...
- Netty 学习(二):服务端与客户端通信
Netty 学习(二):服务端与客户端通信 作者: Grey 原文地址: 博客园:Netty 学习(二):服务端与客户端通信 CSDN:Netty 学习(二):服务端与客户端通信 说明 Netty 中 ...
- 常量,字段,构造方法 调试 ms 源代码 一个C#二维码图片识别的Demo 近期ASP.NET问题汇总及对应的解决办法 c# chart控件柱状图,改变柱子宽度 使用C#创建Windows服务 C#服务端判断客户端socket是否已断开的方法 线程 线程池 Task .NET 单元测试的利剑——模拟框架Moq
常量,字段,构造方法 常量 1.什么是常量 常量是值从不变化的符号,在编译之前值就必须确定.编译后,常量值会保存到程序集元数据中.所以,常量必须是编译器识别的基元类型的常量,如:Boolean ...
随机推荐
- Linux内核编译和运行
内核获取网站:https://www.kernel.org/pub/linux/kernel/ 步骤如下: 1.打开终端,更改用户权限为root.具体做法是在终端输入sudo su,然后按提示输入 ...
- .net实现依赖注入
.net实现依赖注入 1. 问题的提出 开发中,尤其是大型项目的开发中,为了降低模块间.类间的耦合关系,比较提倡基于接口开发,但在实现中也必须面临最终是“谁”提供实体类的问题.Martin Fowle ...
- Redis .NET开源组件Beetle.Redis
Redis .NET开源组件Beetle.Redis Beetle.Redis是一款开源的Redis Client for .net组件,它提供非常简便的操作方式可以让开发人员轻松地访问Redis,同 ...
- 使用MMS(MongoDB Monitoring Service)监控MongoDB
使用MMS(MongoDB Monitoring Service)监控MongoDB 一.MongoDB简介: MongoDB是一个基于分布式文件存储的数据库.由C++语言编写.旨在为WEB应用提供可 ...
- [原]关于在 iOS 中支持 DLNA
目前国内的视频播放器中,支持 DLNA 播放比较好的是:腾讯视频. 刚才反编了一下他们的代码,发现使用了一个开源库, 地址:https://github.com/FuruyamaTakeshi/DLN ...
- 上传组件uploadify的使用
上传组件uploadify的使用 大概一年前,我还在用Asp.NET开发一些行业管理系统的时候,就曾经使用这个组件作为文件的上传操作,在随笔<Web开发中的文件上传组件uploadify的使用& ...
- WPF之TreeList的实现方法1
WPF之TreeList的实现方法(一) 做项目的时候根据需求,WPF现有的控件不能完全满足我们的需求, 很多时候我们需要对现有的控件做一下加工. 最简单的我们可能会把Tree转换成List形式有的叫 ...
- boost xpressive 例子
1.效果图: 我有一个wordpress博客,每次在csdn上写完博客,都需要复制到wordpress中,还需要手动修改<pre>和图片地址,比较麻烦,所以做了这个工具. 功能: 1.把C ...
- 在C中判断变量存储类型(字符常量/数组/动态变量)
在C中判断变量存储类型(字符常量/数组/动态变量) 在chinaunix论坛上有人问到关于变量存府类型的问题,我觉得可以写个测试代码加深大家对内存使用和布局的理解.下面我把原问题及处理办法贴出来,限供 ...
- 验证视图状态 MAC 失败,解决方法
错误信息 今天调试一个带cookie表单提交的页面时,浏览器中报错提示:验证视图状态 MAC 失败.如果此应用程序由网络场或群集承载,请确保 <machineKey> 配置指定了相同的 v ...