Geometry and Appearances【转】
https://github.com/AnalyticalGraphicsInc/cesium/wiki/Geometry-and-Appearances
Geometry and Appearances
Part I is now on the Cesium website.
Part II: Creating Custom Geometry and Appearances
This is now out-of-date. There will be a new version as part of #1683.
Cesium supports many common geometries and appearances out of the box. However, we may need to visualize a new type of geometry or apply custom shading to existing geometries.
Since geometries and appearances are decoupled, we can add new geometries that are compatible with many appearances and vice-versa. Doing so requires some knowledge of computer graphics and geometry. In this tutorial, we create a simple new Geometry and Appearance.
To follow along, download the latest full version of Cesium, or fork the Cesium repo. See the Contributor's Guide for details. If you develop new geometries or appearances that would be useful to the Cesium community, please consider contributing them.
Geometry
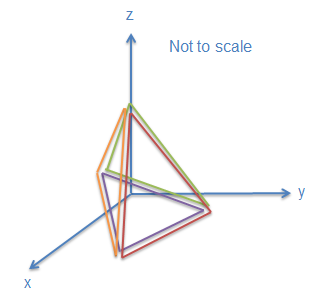
Geometry is a geometry representation that supports indexed or non-indexed triangles, lines, or points. Let's start by making a simple geometry for a tetrahedron, which is a solid composed of four equilateral triangles forming a pyramid. To begin, create the file TetrahedronGeometry.js in the Cesium Source/Core/ directory and add the following code:
/*global define*/

define([

        './Cartesian3',

        './ComponentDatatype',

        './PrimitiveType',

        './BoundingSphere',

        './GeometryAttribute',

        './GeometryAttributes',

        './GeometryPipeline',

        './VertexFormat',

        './Geometry'

    ], function(

        Cartesian3,

        ComponentDatatype,

        PrimitiveType,

        BoundingSphere,

        GeometryAttribute,

        GeometryAttributes,

        GeometryPipeline,

        VertexFormat,

        Geometry) {

    "use strict";

    var TetrahedronGeometry = function() {

        var negativeRootTwoOverThree = -Math.sqrt(2.0) / 3.0;

        var negativeOneThird = -1.0 / 3.0;

        var rootSixOverThree = Math.sqrt(6.0) / 3.0;

        var positions = new Float64Array(4 * 3);

        // position 0

        positions[0] = 0.0;

        positions[1] = 0.0;

        positions[2] = 1.0;

        // position 1

        positions[3] = 0.0;

        positions[4] = (2.0 * Math.sqrt(2.0)) / 3.0;

        positions[5] = negativeOneThird;

        // position 2

        positions[6] = -rootSixOverThree;

        positions[7] = negativeRootTwoOverThree;

        positions[8] = negativeOneThird;

        // position 3

        positions[9] = rootSixOverThree;

        positions[10] = negativeRootTwoOverThree;

        positions[11] = negativeOneThird;

        var attributes = new GeometryAttributes({

            position : new GeometryAttribute({

                componentDatatype : ComponentDatatype.DOUBLE,

                componentsPerAttribute : 3,

                values : positions

            })

        });

        var indices = new Uint16Array(4 * 3);

        // back triangle

        indices[0] = 0;

        indices[1] = 1;

        indices[2] = 2;

        // left triangle

        indices[3] = 0;

        indices[4] = 2;

        indices[5] = 3;

        // right triangle

        indices[6] = 0;

        indices[7] = 3;

        indices[8] = 1;

        // bottom triangle

        indices[9] = 2;

        indices[10] = 1;

        indices[11] = 3;

        this.attributes = attributes;

        this.indices = indices;

        this.primitiveType = PrimitiveType.TRIANGLES;

        this.boundingSphere = undefined;

    };

    return TetrahedronGeometry;

});
The tetrahedron is made up of four vertices, whose positions lie on the unit sphere. For precision, we always store positions in a Float64Array.

Each of the tetrahedron's four triangles is defined by three indices. Using indices - as opposed to defining three vertices per triangle - allows us to reuse vertices to save memory. For our tetrahedron, each vertex is indexed three times since each vertex has three incident triangles. Indices are stored in a Uint16Array, but can also be stored in a Uint32Array if more than 64K vertices are used.
Tip: Use IndexDatatype.createTypedArray to allocate the right typed array for indices.

As shown with the blue arrow on the back triangle, the outward-facing side of the triangle is defined by ordering indices in counter-clockwise order. If we wrapped four fingers of our righthand around the back triangle in the orders the indices are defined, 0 - 1 - 2, our thumb points in the direction that is considered outward facing. In Cesium, this counter-clockwise winding order is required.
Our tetrahedron assigns to four public properties, which are required to meet the Geometryinterface.
this.attributes = attributes;

this.indices = indices;

this.primitiveType = Cesium.PrimitiveType.TRIANGLES;

this.boundingSphere = undefined;
attributes- AGeometryAttributesobject where each property is aGeometryAttribute. Each attribute defines one characteristic of the vertices in the geometry, and data is stored in a typed array. Examples of attributes include positions, normals, and colors.indices(optional) - Index data that indexes intoattributes. Using indices allows us to reuse vertices without duplicating them (and avoiding duplication is virtually always a win). For example, our tetrahedron has 4 vertices and each vertex is part of 3 different triangles. Using indices allows us to reuse the same vertex for each triangle instead of creating a copy.primitiveType- The primitive that composes the geometry. Most often this isTRIANGLESorLINES, which provide the most flexibility. This determines how the indices (or vertices) are interpreted. For example, whenTRIANGLESis used, every three vertices is interpreted as a triangle.boundingSphere(optional) - A sphere that encloses the geometry. This is used to improve drawing performance via culling.
Bounding Spheres
We can improve the performance of drawing our tetrahedron by computing the bounding sphere.
this.boundingSphere = BoundingSphere.fromVertices(positions);
BoundingSphere has functions to compute a tight bounding sphere like fromVertices, but in many cases we can use our knowledge of the geometry to quickly create a tighter bounding sphere. Since we know the tetrahedron's vertices lie on the unit sphere, we can just use the unit sphere as the bounding sphere:
this.boundingSphere = new BoundingSphere(new Cartesian3(0.0, 0.0, 0.0), 1.0);
Visualizing the Tetrahedron with a Primitive
Our tetrahedron is centered in its local coordinate system and inscribed in the unit sphere. To visualize it, we need to compute a modelMatrix to position and scale it. In addition, since it only has position attributes, we'll use an appearance with flat shading so normals are not required. First, build the code and run the HTTP server for testing (.\Tools\apache-ant-1.8.2\bin\ant combine runServer). Navigate to http://localhost:8080/Apps/Sandcastle/index.html, your local version of Cesium Sandcastle. Paste the following code in the Sandcastle Hello World demo:
var widget = new Cesium.CesiumWidget('cesiumContainer');

var scene = widget.scene;

var ellipsoid = widget.centralBody.ellipsoid;

var modelMatrix = Cesium.Matrix4.multiplyByUniformScale(

    Cesium.Matrix4.multiplyByTranslation(

        Cesium.Transforms.eastNorthUpToFixedFrame(ellipsoid.cartographicToCartesian(

            Cesium.Cartographic.fromDegrees(-100.0, 40.0))),

        new Cesium.Cartesian3(0.0, 0.0, 200000.0)),

    500000.0);

var instance = new Cesium.GeometryInstance({

    geometry : new Cesium.TetrahedronGeometry(),

    modelMatrix : modelMatrix,

    attributes : {

        color : Cesium.ColorGeometryInstanceAttribute.fromColor(Cesium.Color.WHITE)

    }

});

scene.primitives.add(new Cesium.Primitive({

    geometryInstances : instance,

    appearance : new Cesium.PerInstanceColorAppearance({

        flat : true,

        translucent : false

    })

}));
Here's our tetrahedron, scaled and positioned, without shading:

Without shading, it is hard to see the surfaces. To view a wireframe, we could change the primitiveType to LINES and change the indices to represent a line segment per unique triangle edge. However, GeometryPipeline is a collection of functions that transform geometries. The function GeometryPipeline.toWireframe transforms a geometry to use the LINES primitive type. Replace the instance with this:
var instance = new Cesium.GeometryInstance({

  geometry : Cesium.GeometryPipeline.toWireframe(new Cesium.TetrahedronGeometry()),

  modelMatrix : modelMatrix,

  attributes : {

    color : Cesium.ColorGeometryInstanceAttribute.fromColor(Cesium.Color.WHITE)

  }

});

Tip: Use GeometryPipeline.toWireframe for debugging to visualize a geometry's primitives.
Adding Normals for Shading
To use an appearance with shading, the geometry must have a normal attribute. The normal to a triangle is a unit vector that is perpendicular to the triangle.

In our case, we need to compute the normals for each vertex to determine the shading of the geometry. The normal to a vertex is a vector in the direction of the sum of the normals for each triangle the vertex composes and with a magnitude of 1. Below shows how we can add the normals of

Normal vectors can be computed after the geometry is created using GeometryPipeline.computeNormal. Lets take a look at how the generated normals effect shading. In TetrahedronGeometry,js, replace the last few lines of the constructor (after we set the values of the indices) with the following:
        var boundingSphere = new BoundingSphere(new Cartesian3(0.0, 0.0, 0.0), 1.0);

        var geometry = GeometryPipeline.computeNormal(new Geometry({

            attributes: attributes,

            indices: indices,

            primitiveType: PrimitiveType.TRIANGLES,

            boundingSphere: boundingSphere

        }));

        this.attributes = geometry.attributes;

        this.indices = geometry.indices;

        this.primitiveType = geometry.primitiveType;

        this.boundingSphere = geometry.boundingSphere;
Build Cesium then reload the sandcastle example to see the results:

This is not what we would expect shading to look like. To better understand what's happening, we can visualize the normal vectors with createTangentSpaceDebugPrimitive. Add the following code to the end of the Sandcastle example:
scene.primitives.add(Cesium.createTangentSpaceDebugPrimitive({

    geometry: tetrahedron,

    modelMatrix: modelMatrix,

    length: 0.2

}));

As you can see, the normal vectors aren't very "normal" to any of the triangles of the tetrahedron. Using single vertices works best when angle between adjacent triangles is close to 180 degrees (like the triangles in a sphere), and thus the normals for the adjacent triangles are pointing in the same general direction. To get better shading, we must duplicate each vertex so that adjacent triangles no longer share vertices.

In TetrahedronGeometry.js, replace the positions and indices with the following:
var positions = new Float64Array(4 * 3 * 3);

// back triangle

positions[0] = 0.0;

positions[1] = 0.0;

positions[2] = 1.0;

positions[3] = 0.0;

positions[4] = (2.0 * Math.sqrt(2.0)) / 3.0;

positions[5] = negativeOneThird;

positions[6] = -rootSixOverThree;

positions[7] = negativeRootTwoOverThree;

positions[8] = negativeOneThird;

// left triangle

positions[9] = 0.0;

positions[10] = 0.0;

positions[11] = 1.0;

positions[12] = -rootSixOverThree;

positions[13] = negativeRootTwoOverThree;

positions[14] = negativeOneThird;

positions[15] = rootSixOverThree;

positions[16] = negativeRootTwoOverThree;

positions[17] = negativeOneThird;

// right triangle

positions[18] = 0.0;

positions[19] = 0.0;

positions[20] = 1.0;

positions[21] = rootSixOverThree;

positions[22] = negativeRootTwoOverThree;

positions[23] = negativeOneThird;

positions[24] = 0.0;

positions[25] = (2.0 * Math.sqrt(2.0)) / 3.0;

positions[26] = negativeOneThird;

// bottom triangle

positions[27] = -rootSixOverThree;

positions[28] = negativeRootTwoOverThree;

positions[29] = negativeOneThird;

positions[30] = 0.0;

positions[31] = (2.0 * Math.sqrt(2.0)) / 3.0;

positions[32] = negativeOneThird;

positions[33] = rootSixOverThree;

positions[34] = negativeRootTwoOverThree;

positions[35] = negativeOneThird;

var indices = new Uint16Array(4 * 3);

// back triangle

indices[0] = 0;

indices[1] = 1;

indices[2] = 2;

// left triangle

indices[3] = 3;

indices[4] = 4;

indices[5] = 5;

// right triangle

indices[6] = 6;

indices[7] = 7;

indices[8] = 8;

// bottom triangle

indices[9] = 9;

indices[10] = 10;

indices[11] = 11;
We can still use GeometryPipeline.computeNormal to find the normal vectors. To see the results, build Cesium and reload the sandcastle example.

Now that we've duplicated the positions, the normal vector for each position is perpendicular to the triangle that vertices composes. This corrects the shading.
Using a Web Worker
Using a web workers for a geometry allows the computation to happen asynchronously, which keeps the UI responsive. The computation for our tetrahedron is pretty trivial, but many geometry computations can be complicated so all built-in Cesium geometries use a web worker.
The first step is to add createTetrahedronGeometry.js to the Source/Workers/ directory. This will contain a function to instruct the web worker what do to when it is triggered. In this case, we want to create the geometry in the worker. Copy and paste the following code into the createTetrahedronGeometry.js file:
/*global define*/

define([

        '../Core/TetrahedronGeometry',

        '../Scene/PrimitivePipeline',

        './createTaskProcessorWorker'

    ], function(

        TetrahedronGeometry,

        PrimitivePipeline,

        createTaskProcessorWorker) {

    "use strict";

    function createTetrahedronGeometry(parameters, transferableObjects) {

        var geometry = TetrahedronGeometry.createGeometry();

        PrimitivePipeline.transferGeometry(geometry, transferableObjects);

        return {

            geometry : geometry,

            index : parameters.index

        };

    }

    return createTaskProcessorWorker(createTetrahedronGeometry);

});
Now we're going to modify TetrahedronGeometry.js. We don't want the computation of positions and indices to happen until TetrahedronGeometry.computeGeometry is called. Change the current TetrahedronGeometry constructor to:
TetrahedronGeometry.createGeometry = function() {

...

};
This function is going to return a Geometry. Replace the last four lines of the function (this.attributes = attributes;....) with
return new Geometry({

    attributes : attributes,

    indices : indices,

    primitiveType : PrimitiveType.TRIANGLES,

    boundingSphere : new BoundingSphere(new Cartesian3(0.0, 0.0, 0.0), 1.0)

});
The next step is to introduce a new constructor. Add the following code:
var TetrahedronGeometry = function() {

    this._workerName = 'createTetrahedronGeometry';

};
With these changes, we can generate the tetrahedron asynchronously using the same syntax we were using before. We also have the option to generate it synchronously by calling TetrahedronGeometry.createGeometry from the code.
Geometry and Appearances【转】的更多相关文章
- Cesium中级教程7 - Geometry and Appearances 几何图形和外观
Cesium中文网:http://cesiumcn.org/ | 国内快速访问:http://cesium.coinidea.com/ 本教程将向您介绍提供使用Primitive API的几何图形和外 ...
- Cesium学习笔记(六):几何和外观(Geometry and Appearances)【转】
https://blog.csdn.net/UmGsoil/article/details/74912638 我们先直接来看一个例子 var viewer = new Cesium.Viewer('c ...
- Cesium官方教程8-- 几何体和外观效果
原文地址:https://cesiumjs.org/tutorials/Geometry-and-Appearances/ 几何体和外观效果(Geometry and Appearances) 这篇教 ...
- Cesium中级教程4 - 空间数据可视化(二)
Cesium中文网:http://cesiumcn.org/ | 国内快速访问:http://cesium.coinidea.com/ Viewer中的Entity功能 让我们看看Viewer为操作e ...
- CSharpGL(14)用geometry shader渲染模型的法线(normal)
+BIT祝威+悄悄在此留下版了个权的信息说: CSharpGL(14)用geometry shader渲染模型的法线(normal) +BIT祝威+悄悄在此留下版了个权的信息说: 2016-08-13 ...
- the operation was attempted on an empty geometry Arcgis Project异常
处理gis数据,投影变换时出现异常: the operation was attempted on an empty geometry 解决思路: arcgis的repair geometry方法:删 ...
- Topology and Geometry in OpenCascade-Adapters
Topology and Geometry in OpenCascade-Adapters eryar@163.com 摘要Abstract:本文简要介绍了适配器模式(adapter pattern) ...
- HDU1086You can Solve a Geometry Problem too(判断线段相交)
You can Solve a Geometry Problem too Time Limit: 2000/1000 MS (Java/Others) Memory Limit: 65536/3 ...
- <<Differential Geometry of Curves and Surfaces>>笔记
<Differential Geometry of Curves and Surfaces> by Manfredo P. do Carmo real line Rinterval I== ...
随机推荐
- (五)react-native开发系列之Android原生交互
react-native可以做web与原生的交互,这是使用react-native开发项目的主要目的之一,也是主要优势,用rn而不用原生交互则毫无价值,这篇文章用来记录在项目中rn的原生交互使用过程. ...
- Python标准库-datatime和time
Python标准库-datatime和time 作者:尹正杰 版权声明:原创作品,谢绝转载!否则将追究法律责任. 一.标准库datatime 1>.datatime模块 #!/usr/bin/e ...
- XSL-FO知识点【一】
XSL-FO 用于格式化供输出的 XML 数据. 什么是 XSL-FO? XSL-FO 是用于格式化 XML 数据的语言 XSL-FO 指可扩展样式表语言格式化对象(Extensible Styles ...
- Python sorted 函数用法
1.背景 在python中,通常需要使用排序函数.而对字典针对一个键值进行排序会经常使用到.记录sorted 函数的键值排序用法. 2.代码 data 一个list,list 中的元素由字典组成 ...
- 复习巩固:oracle如何实现去重和分页
一:oracle实现去重: user数据表: 分两步:1.查询重复数据 2.删除重复数据 1.查询重复数据:在oracle中实现查询重复数据,可以借助于rowid这个伪列.oracle中每个表物理上 ...
- 用js刷剑指offer(第一个只出现一次的字符)
题目描述 在一个字符串(0<=字符串长度<=10000,全部由字母组成)中找到第一个只出现一次的字符,并返回它的位置, 如果没有则返回 -1(需要区分大小写). 牛客网链接 js代码 fu ...
- S3cmd
一:安装方法 #wget http://nchc.dl.sourceforge.net/project/s3tools/s3cmd/1.0.0/s3cmd-1.0.0.tar.gz #tar -zxf ...
- LeetCode - 82、删除排序链表中的重复元素 II
给定一个排序链表,删除所有含有重复数字的节点,只保留原始链表中 没有重复出现 的数字. 示例 1: 输入: 1->2->3->3->4->4->5 输出: 1 ...
- AngularJs中Uncaught Error: [$injector:modulerr] http://errors.angularjs.org/1.3.15/
我在使用angularjs的时候报出来这个错误: Uncaught Error: [$injector:modulerr] http://errors.angularjs.org/1.3.15/ 当时 ...
- SQL中 count(*)和count(1)的对比,区别
执行效果: 1. count(1) and count(*) 当表的数据量大些时,对表作分析之后,使用count(1)还要比使用count(*)用时多了! 从执行计划来看,count(1)和coun ...