
SpringBoot内置tomcat启动原理
前言
不得不说SpringBoot的开发者是在为大众程序猿谋福利,把大家都惯成了懒汉,xml不配置了,连tomcat也懒的配置了,典型的一键启动系统,那么tomcat在springboot是怎么启动的呢?
内置tomcat
开发阶段对我们来说使用内置的tomcat是非常够用了,当然也可以使用jetty。
<dependency>

   <groupId>org.springframework.boot</groupId>

   <artifactId>spring-boot-starter-web</artifactId>

   <version>2.1.6.RELEASE</version>

</dependency>
@SpringBootApplication

public class MySpringbootTomcatStarter{

    public static void main(String[] args) {

        Long time=System.currentTimeMillis();

        SpringApplication.run(MySpringbootTomcatStarter.class);

        System.out.println("===应用启动耗时:"+(System.currentTimeMillis()-time)+"===");

    }

}
这里是main函数入口,两句代码最耀眼,分别是SpringBootApplication注解和SpringApplication.run()方法。
发布生产
发布的时候,目前大多数的做法还是排除内置的tomcat,打瓦包(war)然后部署在生产的tomcat中,好吧,那打包的时候应该怎么处理?
<dependency>

    <groupId>org.springframework.boot</groupId>

    <artifactId>spring-boot-starter-web</artifactId>

    <!-- 移除嵌入式tomcat插件 -->

    <exclusions>

        <exclusion>

            <groupId>org.springframework.boot</groupId>

            <artifactId>spring-boot-starter-tomcat</artifactId>

        </exclusion>

    </exclusions>

</dependency>

<!--添加servlet-api依赖--->

<dependency>

    <groupId>javax.servlet</groupId>

    <artifactId>javax.servlet-api</artifactId>

    <version>3.1.0</version>

    <scope>provided</scope>

</dependency>
更新main函数,主要是继承SpringBootServletInitializer,并重写configure()方法。
@SpringBootApplication

public class MySpringbootTomcatStarter extends SpringBootServletInitializer {

    public static void main(String[] args) {

        Long time=System.currentTimeMillis();

        SpringApplication.run(MySpringbootTomcatStarter.class);

        System.out.println("===应用启动耗时:"+(System.currentTimeMillis()-time)+"===");

    }

    @Override

    protected SpringApplicationBuilder configure(SpringApplicationBuilder builder) {

        return builder.sources(this.getClass());

    }

}
从main函数说起
public static ConfigurableApplicationContext run(Class<?> primarySource, String... args) {

    return run(new Class[]{primarySource}, args);

}

--这里run方法返回的是ConfigurableApplicationContext

public static ConfigurableApplicationContext run(Class<?>[] primarySources, String[] args) {

	return (new SpringApplication(primarySources)).run(args);

}
public ConfigurableApplicationContext run(String... args) {

	ConfigurableApplicationContext context = null;

	Collection<SpringBootExceptionReporter> exceptionReporters = new ArrayList();

	this.configureHeadlessProperty();

	SpringApplicationRunListeners listeners = this.getRunListeners(args);

	listeners.starting();

	Collection exceptionReporters;

	try {

		ApplicationArguments applicationArguments = new DefaultApplicationArguments(args);

		ConfigurableEnvironment environment = this.prepareEnvironment(listeners, applicationArguments);

		this.configureIgnoreBeanInfo(environment);

		//打印banner,这里你可以自己涂鸦一下,换成自己项目的logo

		Banner printedBanner = this.printBanner(environment);

		//创建应用上下文

		context = this.createApplicationContext();

		exceptionReporters = this.getSpringFactoriesInstances(SpringBootExceptionReporter.class, new Class[]{ConfigurableApplicationContext.class}, context);

		//预处理上下文

		this.prepareContext(context, environment, listeners, applicationArguments, printedBanner);

		//刷新上下文

		this.refreshContext(context);

		//再刷新上下文

		this.afterRefresh(context, applicationArguments);

		listeners.started(context);

		this.callRunners(context, applicationArguments);

	} catch (Throwable var10) {

	}

	try {

		listeners.running(context);

		return context;

	} catch (Throwable var9) {

	}

}
既然我们想知道tomcat在SpringBoot中是怎么启动的,那么run方法中,重点关注创建应用上下文(createApplicationContext)和刷新上下文(refreshContext)。
创建上下文
//创建上下文

protected ConfigurableApplicationContext createApplicationContext() {

	Class<?> contextClass = this.applicationContextClass;

	if (contextClass == null) {

		try {

			switch(this.webApplicationType) {

				case SERVLET:

                    //创建AnnotationConfigServletWebServerApplicationContext

				    contextClass = Class.forName("org.springframework.boot.web.servlet.context.AnnotationConfigServletWebServerApplicationContext");

					break;

				case REACTIVE:

					contextClass = Class.forName("org.springframework.boot.web.reactive.context.AnnotationConfigReactiveWebServerApplicationContext");

					break;

				default:

					contextClass = Class.forName("org.springframework.context.annotation.AnnotationConfigApplicationContext");

			}

		} catch (ClassNotFoundException var3) {

			throw new IllegalStateException("Unable create a default ApplicationContext, please specify an ApplicationContextClass", var3);

		}

	}

	return (ConfigurableApplicationContext)BeanUtils.instantiateClass(contextClass);

}
这里会创建AnnotationConfigServletWebServerApplicationContext类。
而AnnotationConfigServletWebServerApplicationContext类继承了ServletWebServerApplicationContext,而这个类是最终集成了AbstractApplicationContext。
刷新上下文
//SpringApplication.java

//刷新上下文

private void refreshContext(ConfigurableApplicationContext context) {

	this.refresh(context);

	if (this.registerShutdownHook) {

		try {

			context.registerShutdownHook();

		} catch (AccessControlException var3) {

		}

	}

}

//这里直接调用最终父类AbstractApplicationContext.refresh()方法

protected void refresh(ApplicationContext applicationContext) {

	((AbstractApplicationContext)applicationContext).refresh();

}
//AbstractApplicationContext.java

public void refresh() throws BeansException, IllegalStateException {

	synchronized(this.startupShutdownMonitor) {

		this.prepareRefresh();

		ConfigurableListableBeanFactory beanFactory = this.obtainFreshBeanFactory();

		this.prepareBeanFactory(beanFactory);

		try {

			this.postProcessBeanFactory(beanFactory);

			this.invokeBeanFactoryPostProcessors(beanFactory);

			this.registerBeanPostProcessors(beanFactory);

			this.initMessageSource();

			this.initApplicationEventMulticaster();

			//调用各个子类的onRefresh()方法,也就说这里要回到子类:ServletWebServerApplicationContext,调用该类的onRefresh()方法

			this.onRefresh();

			this.registerListeners();

			this.finishBeanFactoryInitialization(beanFactory);

			this.finishRefresh();

		} catch (BeansException var9) {

			this.destroyBeans();

			this.cancelRefresh(var9);

			throw var9;

		} finally {

			this.resetCommonCaches();

		}

	}

}
//ServletWebServerApplicationContext.java

//在这个方法里看到了熟悉的面孔,this.createWebServer,神秘的面纱就要揭开了。

protected void onRefresh() {

	super.onRefresh();

	try {

		this.createWebServer();

	} catch (Throwable var2) {

	}

}

//ServletWebServerApplicationContext.java

//这里是创建webServer,但是还没有启动tomcat,这里是通过ServletWebServerFactory创建,那么接着看下ServletWebServerFactory

private void createWebServer() {

	WebServer webServer = this.webServer;

	ServletContext servletContext = this.getServletContext();

	if (webServer == null && servletContext == null) {

		ServletWebServerFactory factory = this.getWebServerFactory();

		this.webServer = factory.getWebServer(new ServletContextInitializer[]{this.getSelfInitializer()});

	} else if (servletContext != null) {

		try {

			this.getSelfInitializer().onStartup(servletContext);

		} catch (ServletException var4) {

		}

	}

	this.initPropertySources();

}

//接口

public interface ServletWebServerFactory {

    WebServer getWebServer(ServletContextInitializer... initializers);

}

//实现

AbstractServletWebServerFactory

JettyServletWebServerFactory

TomcatServletWebServerFactory

UndertowServletWebServerFactory
这里ServletWebServerFactory接口有4个实现类
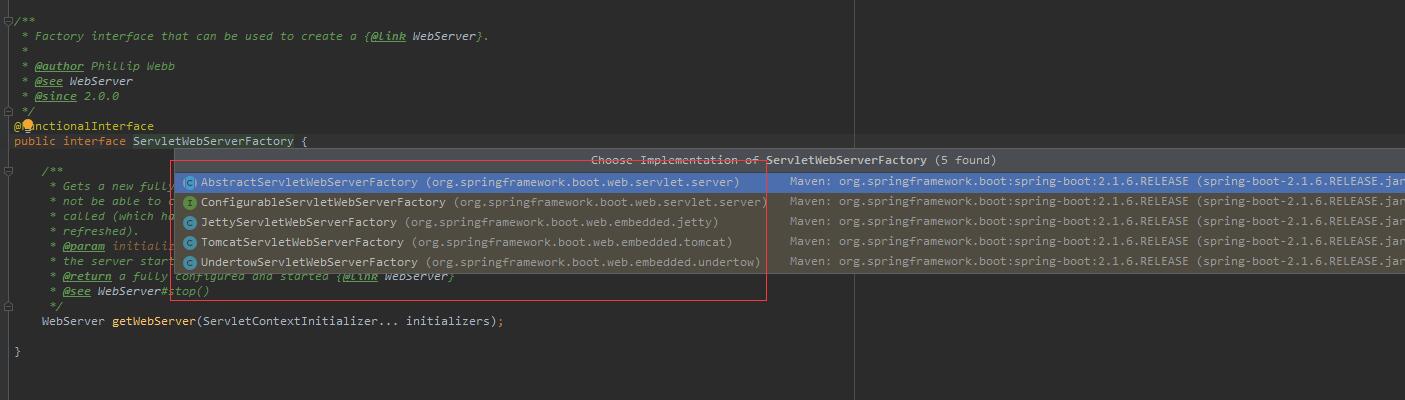
而其中我们常用的有两个:TomcatServletWebServerFactory和JettyServletWebServerFactory。
//TomcatServletWebServerFactory.java

//这里我们使用的tomcat,所以我们查看TomcatServletWebServerFactory。到这里总算是看到了tomcat的踪迹。

@Override

public WebServer getWebServer(ServletContextInitializer... initializers) {

	Tomcat tomcat = new Tomcat();

	File baseDir = (this.baseDirectory != null) ? this.baseDirectory : createTempDir("tomcat");

	tomcat.setBaseDir(baseDir.getAbsolutePath());

    //创建Connector对象

	Connector connector = new Connector(this.protocol);

	tomcat.getService().addConnector(connector);

	customizeConnector(connector);

	tomcat.setConnector(connector);

	tomcat.getHost().setAutoDeploy(false);

	configureEngine(tomcat.getEngine());

	for (Connector additionalConnector : this.additionalTomcatConnectors) {

		tomcat.getService().addConnector(additionalConnector);

	}

	prepareContext(tomcat.getHost(), initializers);

	return getTomcatWebServer(tomcat);

}

protected TomcatWebServer getTomcatWebServer(Tomcat tomcat) {

	return new TomcatWebServer(tomcat, getPort() >= 0);

}

//Tomcat.java

//返回Engine容器,看到这里,如果熟悉tomcat源码的话,对engine不会感到陌生。

public Engine getEngine() {

    Service service = getServer().findServices()[0];

    if (service.getContainer() != null) {

        return service.getContainer();

    }

    Engine engine = new StandardEngine();

    engine.setName( "Tomcat" );

    engine.setDefaultHost(hostname);

    engine.setRealm(createDefaultRealm());

    service.setContainer(engine);

    return engine;

}

//Engine是最高级别容器,Host是Engine的子容器,Context是Host的子容器,Wrapper是Context的子容器
getWebServer这个方法创建了Tomcat对象,并且做了两件重要的事情:把Connector对象添加到tomcat中,configureEngine(tomcat.getEngine());
getWebServer方法返回的是TomcatWebServer。
//TomcatWebServer.java

//这里调用构造函数实例化TomcatWebServer

public TomcatWebServer(Tomcat tomcat, boolean autoStart) {

	Assert.notNull(tomcat, "Tomcat Server must not be null");

	this.tomcat = tomcat;

	this.autoStart = autoStart;

	initialize();

}

private void initialize() throws WebServerException {

    //在控制台会看到这句日志

	logger.info("Tomcat initialized with port(s): " + getPortsDescription(false));

	synchronized (this.monitor) {

		try {

			addInstanceIdToEngineName();

			Context context = findContext();

			context.addLifecycleListener((event) -> {

				if (context.equals(event.getSource()) && Lifecycle.START_EVENT.equals(event.getType())) {

					removeServiceConnectors();

				}

			});

			//===启动tomcat服务===

			this.tomcat.start();

			rethrowDeferredStartupExceptions();

			try {

				ContextBindings.bindClassLoader(context, context.getNamingToken(), getClass().getClassLoader());

			}

			catch (NamingException ex) {

			}

            //开启阻塞非守护进程

			startDaemonAwaitThread();

		}

		catch (Exception ex) {

			stopSilently();

			destroySilently();

			throw new WebServerException("Unable to start embedded Tomcat", ex);

		}

	}

}
//Tomcat.java

public void start() throws LifecycleException {

	getServer();

	server.start();

}

//这里server.start又会回到TomcatWebServer的

public void stop() throws LifecycleException {

	getServer();

	server.stop();

}
//TomcatWebServer.java

//启动tomcat服务

@Override

public void start() throws WebServerException {

	synchronized (this.monitor) {

		if (this.started) {

			return;

		}

		try {

			addPreviouslyRemovedConnectors();

			Connector connector = this.tomcat.getConnector();

			if (connector != null && this.autoStart) {

				performDeferredLoadOnStartup();

			}

			checkThatConnectorsHaveStarted();

			this.started = true;

			//在控制台打印这句日志,如果在yml设置了上下文,这里会打印

			logger.info("Tomcat started on port(s): " + getPortsDescription(true) + " with context path '"

					+ getContextPath() + "'");

		}

		catch (ConnectorStartFailedException ex) {

			stopSilently();

			throw ex;

		}

		catch (Exception ex) {

			throw new WebServerException("Unable to start embedded Tomcat server", ex);

		}

		finally {

			Context context = findContext();

			ContextBindings.unbindClassLoader(context, context.getNamingToken(), getClass().getClassLoader());

		}

	}

}

//关闭tomcat服务

@Override

public void stop() throws WebServerException {

	synchronized (this.monitor) {

		boolean wasStarted = this.started;

		try {

			this.started = false;

			try {

				stopTomcat();

				this.tomcat.destroy();

			}

			catch (LifecycleException ex) {

			}

		}

		catch (Exception ex) {

			throw new WebServerException("Unable to stop embedded Tomcat", ex);

		}

		finally {

			if (wasStarted) {

				containerCounter.decrementAndGet();

			}

		}

	}

}
附:tomcat顶层结构图
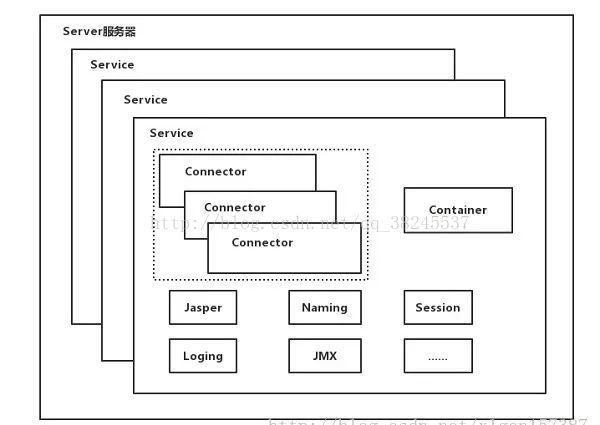
tomcat最顶层容器是Server,代表着整个服务器,一个Server包含多个Service。从上图可以看除Service主要包括多个Connector和一个Container。Connector用来处理连接相关的事情,并提供Socket到Request和Response相关转化。Container用于封装和管理Servlet,以及处理具体的Request请求。那么上文提到的Engine>Host>Context>Wrapper容器又是怎么回事呢? 我们来看下图:
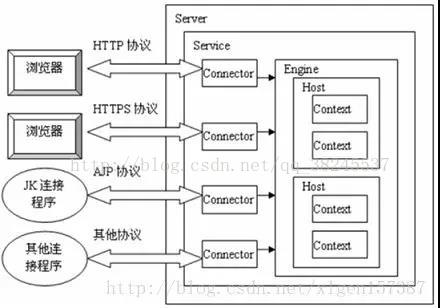
综上所述,一个tomcat只包含一个Server,一个Server可以包含多个Service,一个Service只有一个Container,但有多个Connector,这样一个服务可以处理多个连接。
多个Connector和一个Container就形成了一个Service,有了Service就可以对外提供服务了,但是Service要提供服务又必须提供一个宿主环境,那就非Server莫属了,所以整个tomcat的声明周期都由Server控制。
总结
SpringBoot的启动主要是通过实例化SpringApplication来启动的,启动过程主要做了以下几件事情:配置属性、获取监听器,发布应用开始启动事件初、始化输入参数、配置环境,输出banner、创建上下文、预处理上下文、刷新上下文、再刷新上下文、发布应用已经启动事件、发布应用启动完成事件。在SpringBoot中启动tomcat的工作在刷新上下这一步。而tomcat的启动主要是实例化两个组件:Connector、Container,一个tomcat实例就是一个Server,一个Server包含多个Service,也就是多个应用程序,每个Service包含多个Connector和一个Container,而一个Container下又包含多个子容器。
SpringBoot内置tomcat启动原理的更多相关文章
- springboot学习笔记:6.内置tomcat启动和外部tomcat部署总结
springboot的web项目的启动主要分为: 一.使用内置tomcat启动 启动方式: 1.IDEA中main函数启动 2.mvn springboot-run 命令 3.java -jar XX ...
- Spring Boot 添加jersey-mvc-freemarker依赖后内置tomcat启动不了解决方案
我在我的Spring Boot 项目的pom.xml中添加了jersey-mvc-freemarker依赖后,内置tomcat启动不了. 报错信息如下: org.springframework.con ...
- Spring Boot:内置tomcat启动和外部tomcat部署总结
springboot的web项目的启动主要分为: 一.使用内置tomcat启动 启动方式: 1.IDEA中main函数启动 2.mvn springboot-run 命令 3.java -jar XX ...
- springboot内置tomcat验证授权回调页面域名
springboot内置tomcat验证公众号授权回调页面域名 解决方法: 网上下载一个tomcat,在server.xml文件中修改端口为springboot内置tomcat的端口号,复制验证文件到 ...
- 去除springboot内置tomcat
/** * @author zx * @title: ServletInitializer * @projectName activiti * @description: 解决内置tomcat * @ ...
- springboot不使用内置tomcat启动,用jetty或undertow
Spring Boot启动程序通常使用Tomcat作为默认的嵌入式服务器.如果需要更改 - 您可以排除Tomcat依赖项并改为包含Jetty或Undertow: jetty配置: <depend ...
- 1.springboot内置tomcat的connection相关
最近在研究tomcat的连接超时问题,环境:jdk1.8 + springboot 2.1.1.RELEASE,以下仅为个人理解,如果异议,欢迎指正. springboot的tomcat的几个配置参数 ...
- Springboot 内置tomcat 基本配置收集整理
配置一: server:# tomcat 配置 tomcat: # 接收队列长度 accept-count: 1000 # 最小空闲线程数 min-spare-threads ...
- eclipse内置tomcat启动方法
tomcat:run -Dmaven.tomcat.port=
随机推荐
- DAX 第二篇:计算上下文
计算上下文是计算公式的环境,任何DAX表达式都是在上下文中求值的.行上下文和筛选上下文是DAX中仅有的上下文类型,把这两种上下文称为计算上下文.计算上下文用于限定公式计算的环境,当上下文变化时,相同的 ...
- Shiro authentication for Apache Zeppelin
Overview Apache Shiro is a powerful and easy-to-use Java security framework that performs authentica ...
- 个人永久性免费-Excel催化剂功能第103波-批量打开多文件或多链接
有时简单的东西,却带来许多的便利,为了让大家可以记住并容易找寻到此功能,也将这么简单的功能归为一波,反正已经100+波了,也无需为了凑功能文章而故意罗列一些小功能带忽悠性地让人觉得很强大. 使用场景 ...
- 题解 P3126 【[USACO15OPEN]回文的路径Palindromic Paths】
P3126 [USACO15OPEN]回文的路径Palindromic Paths 看到这题题解不多,蒟蒻便想更加通俗易懂地分享一点自己的心得,欢迎大佬批评指正^_^ 像这种棋盘形的两边同时做的dp还 ...
- 求1到n的质数个数和O(n)
也许更好的阅读体验 \(\mathcal{AIM}\) 我们知道: 对于一个合数\(x\) 有\(x=p^{a_1}_1*p^{a_2}_2*...*p^{a_n}_n\) 现在给出一个\(n\) 求 ...
- [leetcode] #213 House Robber II Medium (medium)
原题链接 比子母题House Robber多了一个条件:偷了0以后,第n-1间房子不能偷. 转换思路为求偷盗[0,n-1)之间,以及[1,n)之间的最大值. 用两个DP,分别保存偷不偷第0间房的情况. ...
- 浅入深出Vue:代码整洁之去重
在开始本篇的主题之前,让我们把上次遗留下来的问题都清理一下: 将其他组件中 axios 请求的地方封装起来. 这里就不把代码放在开头了,相关代码都放在文末,有兴趣了解的童鞋可以先往下翻. 好了, 我们 ...
- Centos7 安装Homestead环境2
历史命令, -- :: cd /etc/yum.repos.d/ -- :: wget http://download.virtualbox.org/virtualbox/rpm/rhel/virtu ...
- Linux文件系统损坏导致无法正常启动与fsck修复工具
今天在打开自己的虚拟机学习的时候,发现在文件系统检查过程中出现以下的报错: /dev/mapper/VolGroup-lv_root:UNEXPECTED INCONSISTENCY;RUN fsck ...
- 【iOS】更换证书遇到的问题
今天给一个项目换证书的时候遇到了这个问题: Code Sign error: Provisioning profile does not match bundle identifier: The pr ...