SpringBoot整合系列-整合Swagger2
原创作品,可以转载,但是请标注出处地址:https://www.cnblogs.com/V1haoge/p/9959844.html
SpringBoot整合Swagger2
步骤
第一步:添加必要的依赖
<dependency>

    <groupId>io.springfox</groupId>

    <artifactId>springfox-swagger2</artifactId>

    <version>2.7.0</version>

</dependency>

<dependency>

    <groupId>io.springfox</groupId>

    <artifactId>springfox-swagger-ui</artifactId>

    <version>2.7.0</version>

</dependency>
第二步:添加必要的配置
一般无配置项,必要时可以添加自定义配置项,在配置类中读取
第三步:添加配置类(重点)
// swagger2的配置内容仅仅就是需要创建一个Docket实例

@Configuration

@EnableSwagger2 //启用swagger2

public class Swagger2Config {

    @Bean

    public Docket createRestApi() {

        return new Docket(DocumentationType.SWAGGER_2)

                .pathMapping("/")

                .apiInfo(apiInfo())

                .select()

                .apis(RequestHandlerSelectors.basePackage("com.example.springbootdemo"))

                .paths(PathSelectors.any())

                .build();

    }

    private ApiInfo apiInfo() {

        return new ApiInfoBuilder()

                .title("springboordemo")

                .description("Springboot整合Demo")

                .version("0.0.1")

                .build(); // 这部分信息其实可以自定义到配置文件中读取

    }

}
通过@Configuration注解,让Spring-boot来加载该类配置。再通过@EnableSwagger2注解来启用Swagger2Config。
再通过createRestApi方法创建Docket的Bean之后,
apiInfo方法用来创建该Api的基本信息(这些基本信息会展现在文档页面中)。
select() 函数返回一个 ApiSelectorBuilder 实例用来控制哪些接口暴露给Swagger2来展现。
一般采用指定扫描的包路径来定义
Swagger会扫描该包下所有Controller定义的API,并产生文档内容(除了被@ApiIgnore指定的请求)
第四步:在Controller和Bean上添加Swagger注解
@RestController

@RequestMapping("/user")

@Log4j2

@Api(description = "用户接口")

public class UserApi {

    @Autowired

    private UserService service;

    @ApiOperation(value = "添加用户", notes = "根据给定的用户信息添加一个新用户",response = ResponseEntity.class,httpMethod = "PATCH")

    @RequestMapping(value = "/addUser",method = RequestMethod.PATCH)

    public ResponseEntity<User> addUser(final User user) {

        log.info("执行添加用户操作");

        return service.addUser(user);

    }

    @ApiOperation(value = "更新用户状态", notes = "根据给定的用户ID修改用户状态",response = ResponseEntity.class,httpMethod = "POST")

    @RequestMapping(value = "/updateUser", method = RequestMethod.POST)

    public ResponseEntity<User> updateUser(final UseState useState, int useId) {

        log.info("执行修改用户状态操作");

        return service.updateUser(User.builder().useState(useState).useId(useId).build());

    }

    @ApiOperation(value = "更新用户手机号", notes = "根据给定的用户ID修改用户手机号",response = ResponseEntity.class,httpMethod = "POST")

    @RequestMapping(value = "/updateUsePhoneNum", method = RequestMethod.POST)

    public ResponseEntity<User> updateUsePhoneNum(final String usePhoneNum, int useId) {

        log.info("执行修改用户手机号操作");

        return service.updateUsePhoneNum(User.builder().usePhoneNum(usePhoneNum).useId(useId).build());

    }

    @ApiOperation(value = "删除用户", notes = "根据给定的用户ID删除一个用户",response = ResponseEntity.class,httpMethod = "DELETE")

    @RequestMapping(value = "/deleteUser", method = RequestMethod.DELETE)

    public ResponseEntity<User> deleteUser(final int useId) {

        log.info("执行删除用户操作");

        return service.deleteUser(useId);

    }

    @ApiOperation(value = "查询用户", notes = "根据给定的用户ID获取一个用户",response = ResponseEntity.class,httpMethod = "GET")

    @RequestMapping(value = "getUser", method = RequestMethod.GET)

    public ResponseEntity<User> getUser(final int useId) {

        log.info("执行查询单个用户操作");

        return service.getUser(useId);

    }

    @ApiOperation(value = "查询用户", notes = "根据给定的用户信息查询用户",response = ResponseEntity.class,httpMethod = "POST")

    @RequestMapping(value = "getUsers", method = RequestMethod.POST)

    public ResponseEntity<List<User>> getUsers(final User user) {

        log.info("根据条件查询用户");

        return service.getUsers(user);

    }

}
@ApiModel(value = "用户模型")

public class User {

    @ApiModelProperty("用户ID")

    private int useId;

    @ApiModelProperty("用户姓名")

    private String useName;

    @ApiModelProperty("用户性别")

    private UseSex useSex;

    @ApiModelProperty("用户年龄")

    private int useAge;

    @ApiModelProperty("用户身份证号")

    private String useIdNo;

    @ApiModelProperty("用户手机号")

    private String usePhoneNum;

    @ApiModelProperty("用户邮箱")

    private String useEmail;

    @ApiModelProperty("创建时间")

    private LocalDateTime createTime;

    @ApiModelProperty("修改时间")

    private LocalDateTime modifyTime;

    @ApiModelProperty("用户状态")

    private UseState useState;

}
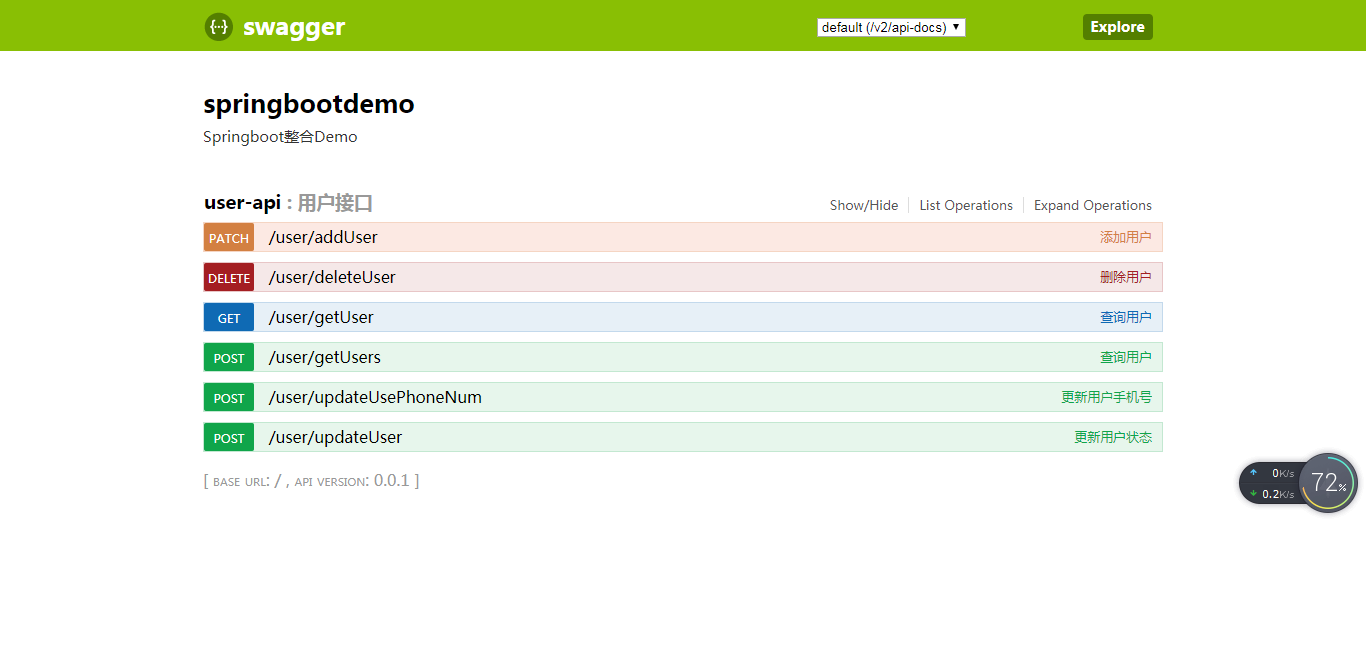
第五步:启动应用,浏览器请求
http://localhost:8080/swagger-ui.html
可得到如下界面:
SpringBoot整合系列-整合Swagger2的更多相关文章
- SpringBoot整合系列-整合MyBatis
原创作品,可以转载,但是请标注出处地址:https://www.cnblogs.com/V1haoge/p/9971036.html SpringBoot整合Mybatis 步骤 第一步:添加必要的j ...
- SpringBoot整合系列--整合MyBatis-plus
原创作品,可以转载,但是请标注出处地址:https://www.cnblogs.com/V1haoge/p/10125279.html SpringBoot整合MyBatis-plus 步骤 第一步: ...
- SpringBoot整合系列-整合SpringMVC
原创作品,可以转载,但是请标注出处地址:https://www.cnblogs.com/V1haoge/p/9984607.html SpringBoot整合Spring MVC 步骤 第一步:添加必 ...
- SpringBoot整合系列-整合JPA
原创作品,可以转载,但是请标注出处地址:https://www.cnblogs.com/V1haoge/p/9959865.html SpringBoot整合JPA进行数据库开发 步骤 第一步:添加必 ...
- SpringBoot整合系列-整合H2
原创作品,可以转载,但是请标注出处地址:https://www.cnblogs.com/V1haoge/p/9959855.html SpringBoot整合H2内存数据库 一般我们在测试的时候习惯于 ...
- SpringBoot整合系列-PageHelper分页插件
原创作品,可以转载,但是请标注出处地址:https://www.cnblogs.com/V1haoge/p/9971043.html SpringBoot整合MyBatis分页插件PageHelper ...
- SpringBoot系列-整合Mybatis(注解方式)
目录 一.常用注解说明 二.实战 三.测试 四.注意事项 上一篇文章<SpringBoot系列-整合Mybatis(XML配置方式)>介绍了XML配置方式整合的过程,本文介绍下Spring ...
- springboot + mybatis + mycat整合
1.mycat服务 搭建mycat服务并启动,windows安装参照. 系列文章: [Mycat 简介] [Mycat 配置文件server.xml] [Mycat 配置文件schema.xml] [ ...
- SpringBoot与Swagger整合
1 SpringBoot与Swagger整合https://blog.csdn.net/jamieblue1/article/details/99847744 2 Swagger详解(SpringBo ...
随机推荐
- Spark内部执行机制
Spark内部执行机制 1.1 内部执行流程 如下图1为分布式集群上spark应用程序的一般执行框架.主要由sparkcontext(spark上下文).cluster manager(资源管理器)和 ...
- linux系统资源监控
top命令 1.平均负载(load average): 正在耗费CPU进程与正在等待io的进程之和,三个值分别是一分钟,五分钟,十五分钟的平均负载,负载值只要小于CPU颗粒数属于正常情况 任务进程(T ...
- 如何把if-else代码重构成高质量代码
原文:https://blog.csdn.net/qq_35440678/article/details/77939999 本文提纲: 为什么我们写的代码都是if-else? 这样的代码有什么缺点? ...
- Java之hashCode的作用和equals方法的重构规则
这个是博主对hashcode的初步理解,以后加深了会再来更新: 1.hashcode是什么? hashcode是对象的散列码,不同的对象几乎不一样,说几乎是因为还是可以一样的. 特点:每一个对象都有h ...
- golang ntp协议客户端
NTP(Network Time Protocol,网络时间协议)是由RFC 1305定义的时间同步协议,用来在分布式时间服务器和客户端之间进行时间同步.NTP基于UDP报文进行传输,使用的UDP端口 ...
- 机器学习(九)隐马尔可夫模型HMM
1.隐马尔可夫HMM模型 一个隐马尔可夫模型可以表示为\[\lambda=\{A,B,\pi\}\]具体就不说了,比较基本. 2.HMM模型的三个基本问题 1.概率计算问题:给定\(\lambda\) ...
- MORE XOR
MORE XOR #include<bits/stdc++.h> using namespace std; ; int a[maxn]; ][maxn]; int main() { ios ...
- protobuf是什么?
ProtoBuf (Google Protocol Buffer)是由google公司用于数据交换的序列结构化数据格式,具有跨平台.跨语言.可扩展特性,类型于常用的XML及JSON,但具有更小的传 ...
- 删除API
Delete API 删除API允许根据ID从指定索引中删除一个类型化的JSON文档. DELETE /twitter/_doc/1 返回结果如下: { "_index": &qu ...
- C语言面试题分类->回调
本文主要讲解如果实现回调,特别是在封装接口的时候,回调显得特别重要,我们首先假设有两个程序员在写代码,A程序员写底层驱动接口,B程序员写上层应用程序,然而此时底层驱动接口A有一个数据d需要传输给B,此 ...